Contributing to Docs
Overview
Docs contributions take many forms. However, they all follow the same workflow. Below, you'll find all you need to get your local development environment set up and - before you know it - you'll be helping make our product clearer for users.
Thanks for considering an improvement to our docs! Please know that the information below is directed towards employees at Hasura. But, you can fork the repo and open a PR to help us improve our documentation ❤️
If at any point you have questions, create an issue and we'll be happy to help 🙌
Mise-en-place
Like Uncle Tony said:
“Mise-en-place is the religion of all good line cooks...”
Docs believes the same is true for engineers and all contributors to documentation.
As such, there's a few steps needed to get your 'station' in order and to ready your local development environment for the fast-paced world of documentation.
We use Yarn as our package-manager- / project-manager-of-choice. Please make sure you follow their installation instructions if not already on your system.
Like to automate things? So do we. This snippet runs through the prerequisites for Hasurians and fires up the docs
development server. Simply navigate to the directory you want the ddn-docs repo to live, open your terminal, copy /
paste, hit enter, and save literally seconds:
git clone https://github.com/hasura/ddn-docs.git
cd ddn-docs
yarn install
yarn start
Alternatively, take it step-by-step:
Step 1: Clone the repository
git clone https://github.com/hasura/ddn-docs.git
Step 2: Install docs dependencies
cd ddn-docs && yarn install
We also highly recommend testing locally at this point. Start the development server by running the following command:
yarn start
Otherwise, congrats! You're ready to start slinging docs 🤙
Workflow
Step 1: Create a new branch
If it's been a while since you've pulled from main, make sure it's up-to-date before creating a new branch for this
contribution. You can simply run git pull while on the trunk to update your local repository to the current state of
the remote on GitHub. Then, utilize the command below the next paragraph to create your branch.
If this is a fresh clone, there shouldn't be any need to pull changes down from GitHub. You can create a new branch
and simultaneously switch to it using the command below. We follow a convention that includes your name + docs + a
kebab-cased description of what the branch will focus on. For example: rob/docs/add-more-bourdain-references.
git checkout -b <your-name>/docs/<short-update-description>
Once this command is run, you should be on your new branch!
Step 2: Start the development server
You'll want to start the development server so you can see all your changes live. Especially the first time, the development server will take some time to spin up. However, Docusaurus caches content...so this gets better with repetition.
yarn start
Step 3: Make your local changes
We have a comprehensive-yet-continually-evolving style guide. We ask that you reference it as you begin formatting your docs contribution.
If you don't want to go piece-by-piece in the style guide, find a page of documentation you think works well and use it as a template.
Docusaurus utilizes a file-based routing system. You can see more about working with Docusaurus here.
Most files you'll be authoring will be .mdx. It's like markdown on steroids and allows utilization of jsx
components. For more information about the syntax of markdown,
check out these docs.
Step 4: Stage your local changes
After your changes have been made, you'll need to stage them using Git. The following command will add all modifications you've made to Git's staging area:
git add .
Step 5: Create a commit
With your changes staged, you'll need to create a commit with a commit message. Prefix the message with docs: and a
imperative verb followed by a description of the changes present in the commit:
git commit -m “docs: update / fix / add <feature>”
The size of commits isn't of massive importance for docs contributions. If you're here for a quick fix, chances are there will only be one commit. Alternatively, if you're working on a large contribution documenting a new feature and need to modify / add / delete multiple files, it helps to have more atomic commits reflective of each set of actions.
Step 6: Test your local changes
We don't have unit tests for docs. However, Docusaurus will (generally) let you know when it's not happy with something
you did. As such, our testing process consists of doing a build and serving from the build folder to make sure
everything functions correctly. To start your build, from the /docs directory, run:
yarn build
After a bit, you should see output similar to this:
# Lots of other output above this...
[SUCCESS] Generated static files in build.
[INFO] Use `npm run serve` command to test your build locally.
✨  Done in 35.84s.
If you don't see an output similar to the above (especially one that's missing SUCCESS), something went wrong. There
should be errors logged in the terminal; check the common errors section at the bottom of this page
for more info.
Once you achieve a successful build, serve the build folder using the following command:
yarn serve
All you're doing here is checking to ensure your pages render as expected. Go through any changes you made and ensure
there's no missing images, broken links, or malformations in your code snippets (especially gql!).
Step 7: Push your commit(s)
With everything rendering as expected, it's time to push this contribution online! Run the following to push your changes up to GitHub:
git push origin <name-of-your-branch>
Step 8: Compare and pull request
Head to the hasura/ddn-docs repo and you should see a Compare & pull request button - click it to create you PR 🤙
Follow the instructions in the PR template.
Once you open your PR, hasura-bot will assign a docs reviewer, and prompt you with some steps you need to complete for us to review your PR. You'll also get a handy preview link (which will need some time to build) at the end of the comment.
Common errors
We all make mistakes! Here's the most common ones we encounter. This is not an exhaustive list, but if you find lots of errors getting thrown, chances are the issue is one of the items below. These are rank-ordered according to what we encounter most often.
Broken markdown links
With Docusaurus's file-based routing system, markdown links commonly break due to one of two circumstances:
-
Filename changes
The url path for a particular page is dependent upon its filename. If you change the name of a file, any link referencing it will break. The error thrown to the Console will alert you to which page contains the error and to which file is being referenced. If there are multiple broken links, it will list out each.
-
File location changes
If you change the name of a file or folder (e.g.,
modelling/index.mdxtomodeling/index.mdx), any links referencing this route will break. Often, simply resolving these paths isn't enough...Docusaurus will still be looking for these files. If this is the case, kill the server (CTRL+c) and start it up again by runningyarn start.
Regardless of which of the above circumstances caused this error, you'll see output similar to this within the server console:
Error: Docs markdown link couldn't be resolved: (/styles/index.mdx) in ~/hasura/graphql-engine-mono/docs/wiki/contributions.mdx for version current
    at Array.forEach (<anonymous>)
client (webpack 5.70.0) compiled with 1 error
Broken image links
Assets are stored in static/img/<feature-folder>. Just like the file-based routing Docusaurus uses to render pages,
file paths are important for images as well. However, instead of any output to the Console, the page will simply crash
and present a message indicating which image's path cannot be resolved.
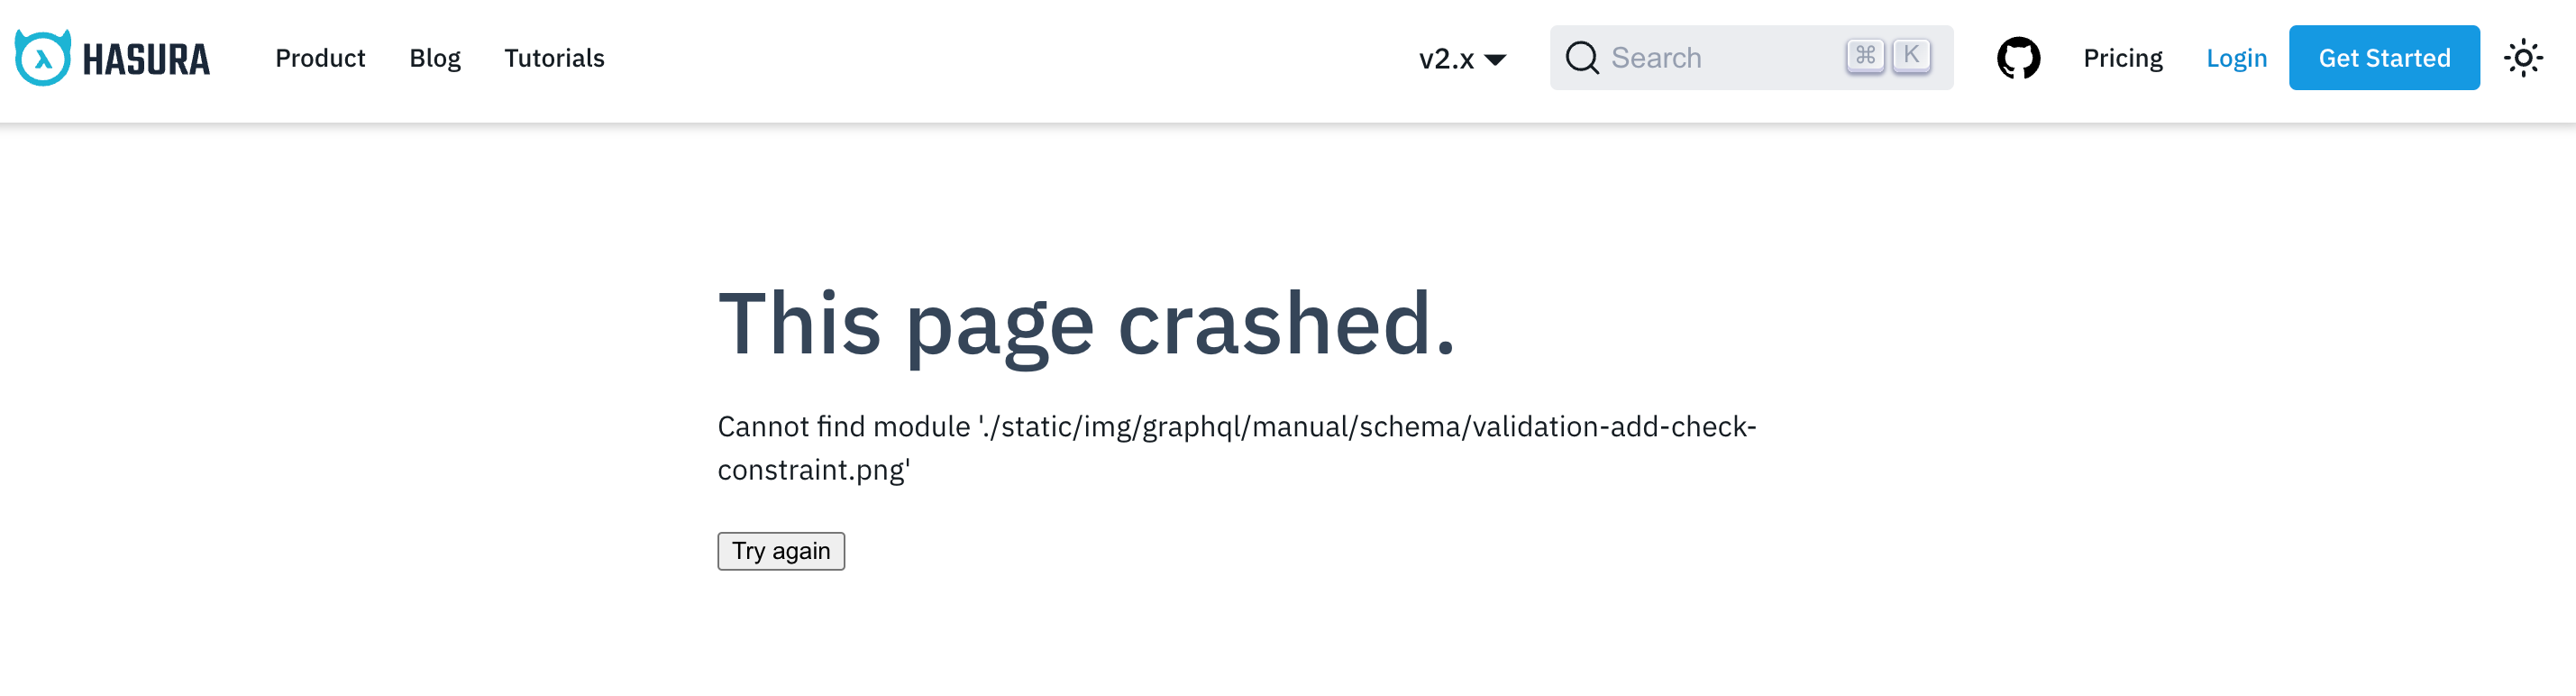
Use the erroneous image path to identify the error, facepalm, and then fix your typo.
We use the PNG image format. When you create a PR, our automated CI processes take care of image optimization automatically 🚀
Improperly imported components
This is a sneaky one. If you forget to import a component - such as the <Thumbnail /> component used for images -
there won't be any errors thrown by the server. However, if you check your browser's developer tools, you'll notice the
quite prominent error. Thus, when something just isn't appearing...check the browser's Console.
Simply import the missing component at the top of the page and viola 🤌
Formatting code blocks
Perhaps the biggest pitfall we've encountered with Docusaurus is how delicate .mdx files can be with regard to
placement of code blocks and other text. If you've included a code block using common markdown syntax, and things aren't
rendering as you think they should, try giving the block a bit of breathing room with a single empty line above and
below it.
Codespaces
For Hasurians, we've recently introduced a new way to contribute to the docs: Codespaces. This is a new feature from GitHub that allows you to spin up a fully-configured docs dev environment in the cloud. This means you can get started contributing to the docs without having to install any dependencies on your local machine.
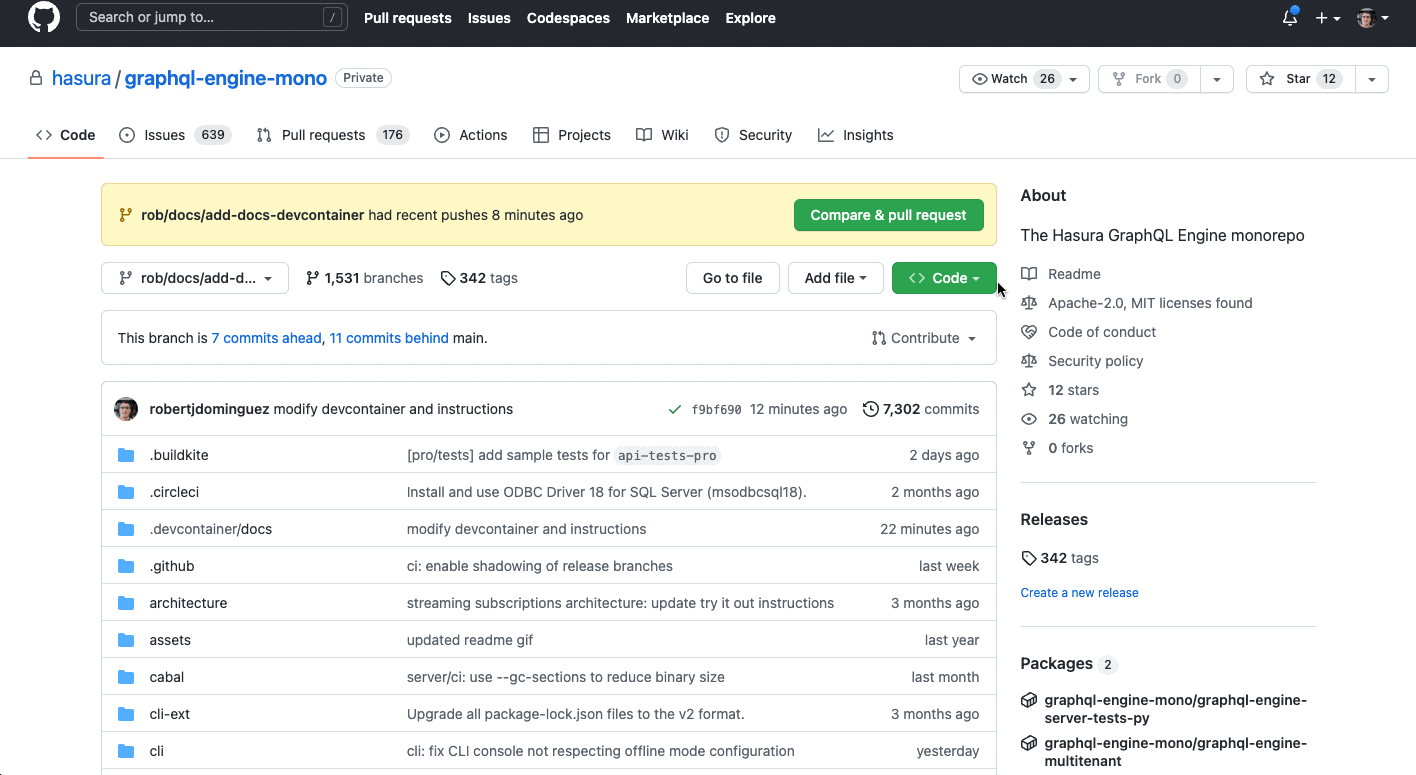
Step 1: Create a Codespace
Head to the hasura/graphql-engine-mono repo and click the Code button. You should see a Open with Codespaces
button. Click it and choose ... and then + New with options... as in the example below:
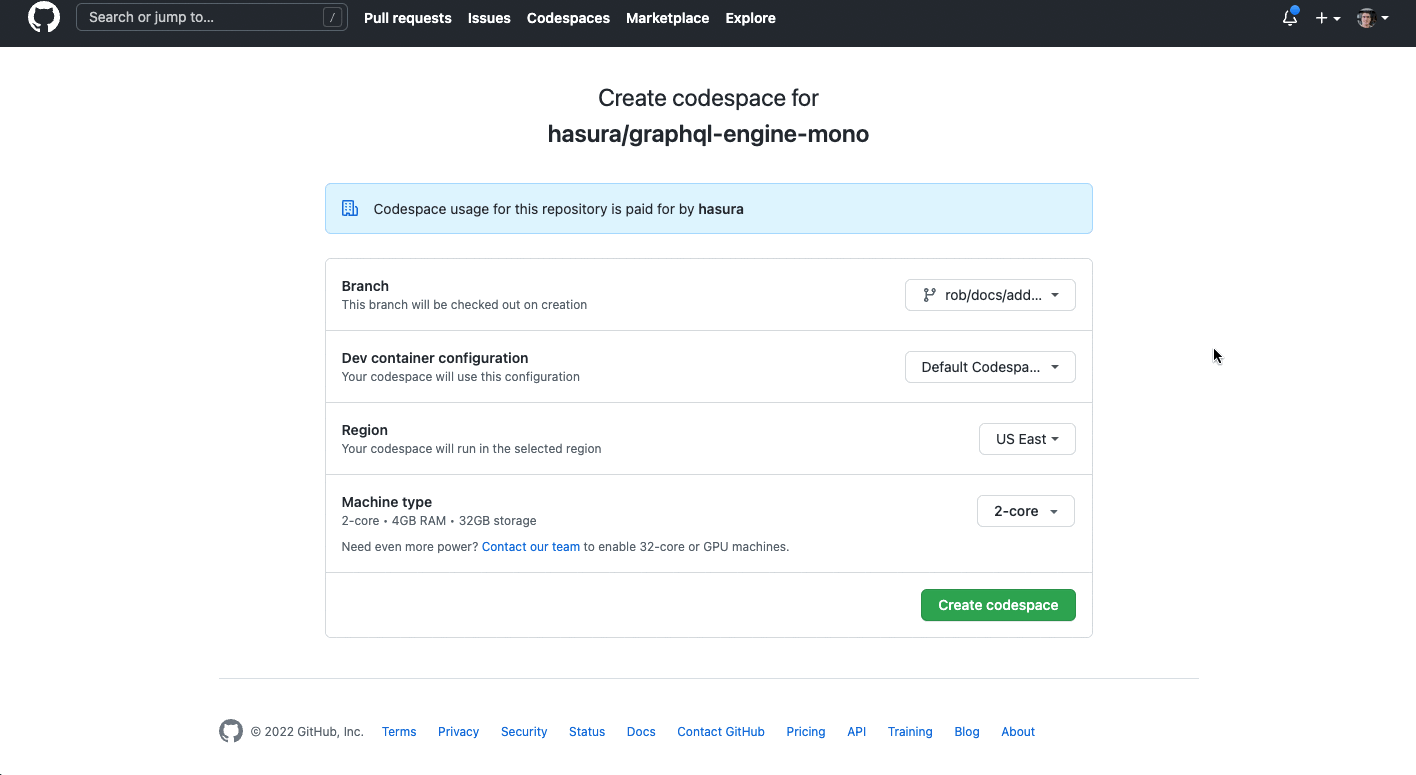
Step 2: Configure your Codespace
You'll be presented with a few options. Select the docs devcontainer, the region nearest to you, and a machine type
before clicking Create codespace:
The Codespace will spin up and you'll be presented with a fully-configured dev environment. We automatically open you to
the CODESPACES.md file where you can follow the instructions to get started quickly.
