Send an Email when a User Signs Up
Introduction
Using Event Triggers allows you to call a webhook with a contextual payload whenever a specific event occurs in your database. In this recipe, we'll create an Event Trigger that will fire whenever a new user signs up. We'll then send a welcome email to that user.
DOCS E-COMMERCE SAMPLE APP
This quickstart/recipe is dependent upon the docs e-commerce sample app. If you haven't already deployed the sample app, you can do so with one click below. If you've already deployed the sample app, simply use your existing project.
Prerequisites
Before getting started, ensure that you have the following in place:
- The docs e-commerce sample app deployed to Hasura Cloud.
If you plan on using a webhook endpoint hosted on your own machine, ensure that you have a tunneling service such as ngrok set up so that your Cloud Project can communicate with your local machine.
Our model
Event Triggers are designed to run when specific operations occur on a table, such as insertions, updates, and deletions. When architecting your own Event Trigger, you need to consider the following:
- Which table's changes will initiate the Event Trigger?
- Which operation(s) on that table will initiate the Event Trigger?
- What should my webhook do with the data it receives?
Step 1: Create the Event Trigger
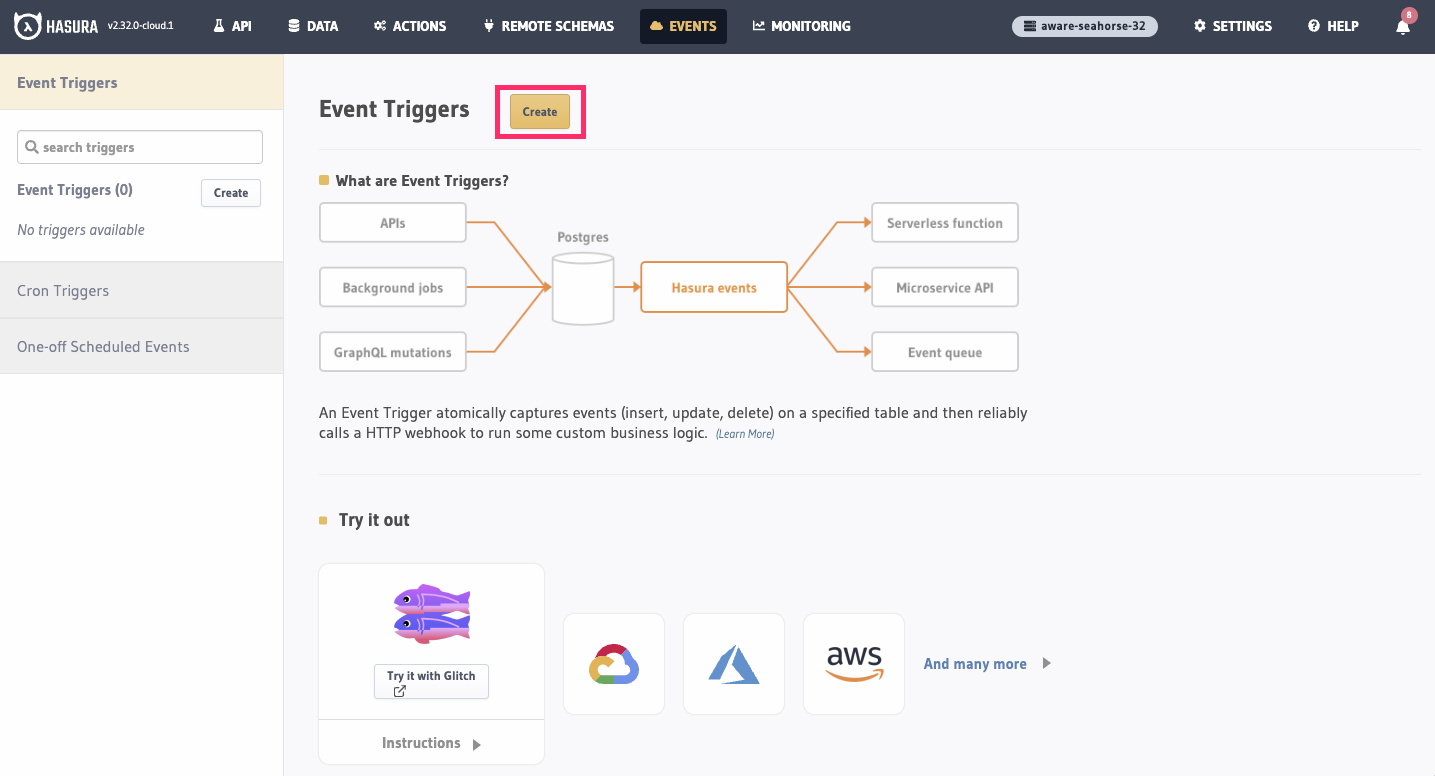
Head to the Events tab of the Hasura Console and click Create:

Step 2: Configure the Event Trigger
First, provide a name for your trigger, e.g., new_user_welcome. Choose the public schema and the users table.
Then, select the insert operation.
Finally, enter a webhook URL that will be called when the event is triggered. This webhook will be responsible for parsing the body of the request and sending the email to the new user; it can be hosted anywhere, and written in any language you like.
The route on our webhook we'll use is /new-user. Below, we'll see what this looks like with a service like
ngrok, but the format will follow this template:
https://<your-webhook-url>/new-user
Since our project is running on Hasura Cloud, and our handler will run on our local machine, we'll use ngrok to expose the webhook endpoint to the internet. This will allow us to expose a public URL that will forward requests to our local machine and the server we'll configure below.
You'll need to modify your webhook URL to use the public URL provided by ngrok.
After installing ngrok and authenticating, you can do this by running:
ngrok http 4000
Then, copy the Forwarding value for use in our webhook 🎉
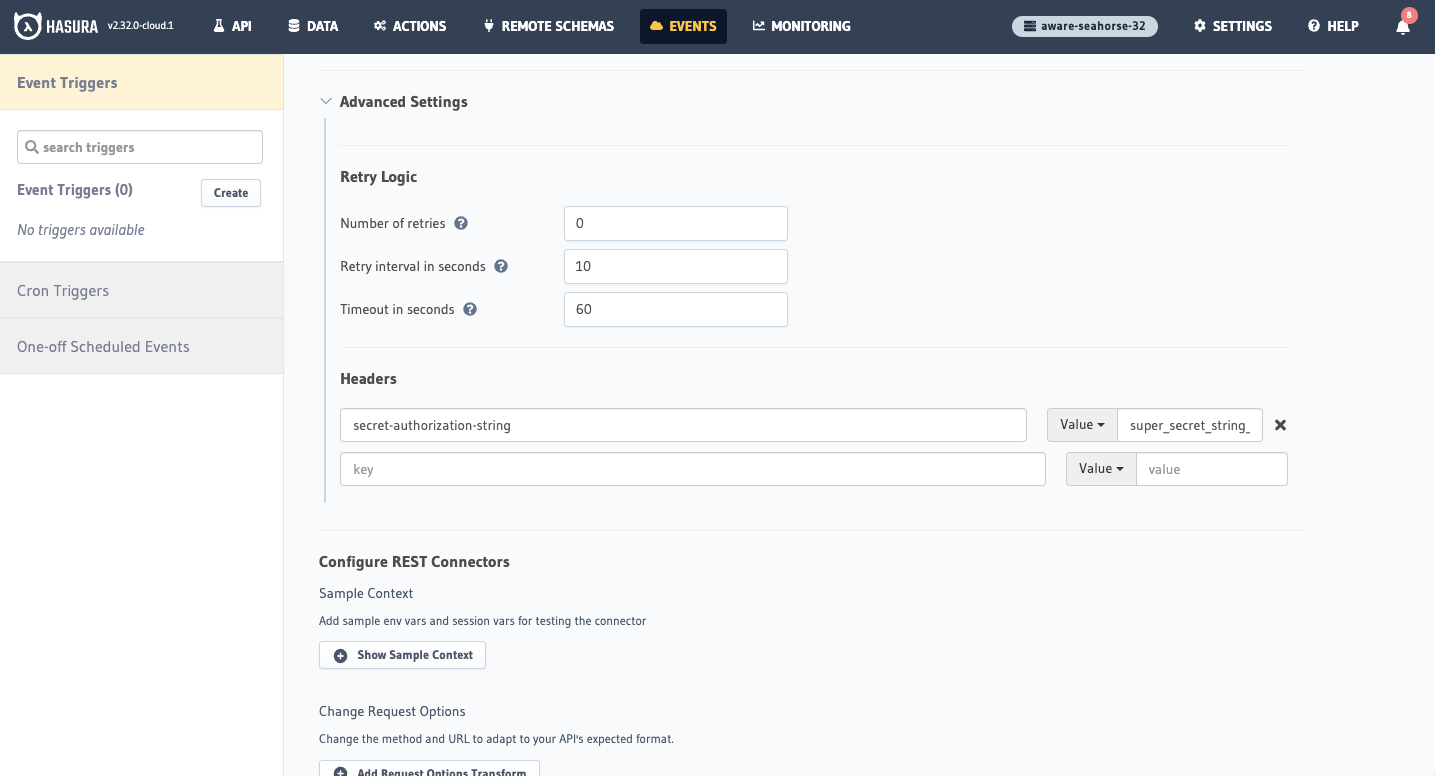
Under Advanced Settings, we can configure the headers that will be sent with the request. We'll add an
authentication header to prevent abuse of the endpoint and ensure that only Hasura can trigger the event. Set the
Key as secret-authorization-string and the Value as super_secret_string_123:

Before exiting, open the Add Request Options Transform section and check POST. Then, click Create Event Trigger.
Step 3: Create a webhook to handle the request
Whenever new data is inserted into our users table, the Event Trigger fires. Hasura will send a request to the webhook
URL you provided. In this example, we're simply going to send a POST request. Our webhook will parse the request,
ensure the header is correct, and then send a welcome email.
Event Triggers sent by Hasura to your webhook as a request include a payload with event
data nested inside the body object of the request. This event object can then be parsed and values extracted from it
to be used in your webhook.
Below, we've written an example of webhook. As we established earlier, this runs on port 4000. If you're attempting to
run this locally, follow the instructions below. If you're running this in a hosted environment, use this code as a
guide to write your own webhook.
- JavaScript
- Python
Init a new project with npm init and install the following dependencies:
npm install express body-parser nodemailer
Then, create a new file called index.js and add the following code:
const express = require('express');
const bodyParser = require('body-parser');
const nodemailer = require('nodemailer');

const app = express();
app.use(bodyParser.json());
app.use(bodyParser.urlencoded({ extended: true }));

// Create a Nodemailer transporter using Ethereal email service
// Ideally, this configuration would be stored somewhere else
nodemailer.createTestAccount((err, account) => {
  if (err) {
    console.error('Failed to create a testing account. ' + err.message);
    return process.exit(1);
  }

  // If all goes as planned, here's the console telling us we're 👍
  console.log('Credentials obtained, listening on the webhook...');

  // Create a transporter object for nodemailer
  const transporter = nodemailer.createTransport({
    host: 'smtp.ethereal.email',
    port: 587,
    secure: false,
    auth: {
      user: account.user,
      pass: account.pass,
    },
  });

  // Our route for the webhook
  app.post('/new-user', async (req, res) => {
    // confirm the auth header is correct — ideally, you'd keep the secret in an environment variable
    const authHeader = req.headers['secret-authorization-string'];
    if (authHeader !== 'super_secret_string_123') {
      return res.status(401).json({
        message: 'Unauthorized',
      });
    }

    // Get the user's name and email from the request body
    const name = req.body.event.data.new.name;
    const email = req.body.event.data.new.email;

    // Create the notification email
    const message = {
      from: 'SuperStore.com <[email protected]>',
      to: `${name} <${email}>`,
      subject: `Welcome, ${name.split(' ')[0]}!`,
      text: `Hi ${name.split(' ')[0]},\n\nWe're glad to have you as a member!`,
    };

    // Send the message using the Nodemailer transporter
    const info = await transporter.sendMail(message);

    // Log the message info
    console.log(`\nWelcome email sent to ${name}: ${nodemailer.getTestMessageUrl(info)}`);

    // Return a JSON response to the client
    res.json({
      message: 'Welcome email sent!',
    });
  });

  // Start the server
  app.listen(4000, () => {
    console.log('Server started on port 4000');
  });
});
You can run the server by running node index.js in your terminal.
Make sure you have the necessary dependencies installed. You can use pip to install them:
pip install Flask secure-smtplib
Then, create a new file called index.py and add the following code:
from flask import Flask, request, jsonify
import smtplib
from smtplib import SMTPException
from email.mime.multipart import MIMEMultipart
from email.mime.text import MIMEText

app = Flask(__name__)

# Create an SMTP server connection
def create_smtp_server():
    try:
        server = smtplib.SMTP(host='smtp.ethereal.email', port=587)
        server.starttls()
        server.login('[email protected]', 'samplePassword123')
        return server
    except SMTPException as e:
        print(f"An error occurred while creating the SMTP server: {e}\n\n🔔We'll print the message to the terminal:\n\n")
        return None

@app.route('/new-user', methods=['POST'])
def create_new_user():
    # Confirm the authentication header is correct
    auth_header = request.headers.get('secret-authorization-string')
    if auth_header != 'super_secret_string_123':
        return jsonify({'message': 'Unauthorized'}), 401

    # Get the user's name and email from the request body
    data = request.get_json()
    name = data['event']['data']['new']['name']
    email = data['event']['data']['new']['email']

    # Create the notification email
    # Create a message
    msg = MIMEMultipart()
    msg['From'] = '[email protected]'
    msg['To'] = f"{name} <{email}>"
    msg['Subject'] = f"Welcome, {name.split(' ')[0]}!"
    message_body = f"Hi {name.split(' ')[0]},\n\nWe're glad to have you as a member!"
    msg.attach(MIMEText(message_body, 'plain'))

    server = create_smtp_server()
    if server is not None:
        # Send the email if server is running
        server.sendmail('[email protected]', email, msg.as_string())
        server.quit()
    else:
        # or just print the message to the terminal
        print(f"From: {msg['From']}\nTo: {msg['To']}\nSubject: {msg['Subject']}\n{message_body}")

    return jsonify({'message': 'Welcome email sent!'})

if __name__ == '__main__':
    app.run(port=4000)
You can run the server by running python index.py in your terminal.
If you see the message Webhook server is running on port 4000, you're good to go!
Step 4: Test the setup
With your server running, Hasura should be able to hit the endpoint. We can test this by inserting a new row into our
users table. Let's do this with the following mutation from the API tab of the Console:
mutation InsertUser {
  insert_users_one(object: { name: "<YOUR_NAME>", email: "YOUR_EMAIL" }) {
    id
  }
}
We'll then see our server send the welcome email 🎉
Feel free to customize the webhook implementation based on your specific requirements. Remember to handle error scenarios, implement necessary validations, and add appropriate security measures to your webhook endpoint.