Update a Product Description to Improve SEO using AI
Introduction
Event Triggers allow you to react to changes in your database automatically and asynchronously by calling a webhook.
In this guide, we'll show how to use Event Triggers to react to a product insert operation created by sending a
request to the OpenAI ChatGPT API with a request to improve the product's description for SEO purposes.
In this recipe, we'll be overwriting the description field of the product with the improved description returned by
the ChatGPT API. In reality, you would likely not want to overwrite the field but instead, store the improved version in
another column in the database for human review.
DOCS E-COMMERCE SAMPLE APP
This quickstart/recipe is dependent upon the docs e-commerce sample app. If you haven't already deployed the sample app, you can do so with one click below. If you've already deployed the sample app, simply use your existing project.

Prerequisites
Before getting started, ensure that you have the docs e-commerce sample app deployed to Hasura Cloud.
If you plan on using a webhook endpoint hosted on your own machine, ensure that you have a tunneling service such as ngrok set up so that your Cloud Project can communicate with your local machine.
Our model
When designing a system such as this, there are at least three components to consider:
- Which table's changes will initiate the Event Trigger?
- Which operation(s) on that table will initiate the Event Trigger?
- What should my webhook do with the data it receives?
In this example, we'll be using the products table and the insert operation to trigger the Event Trigger. The
webhook will call the OpenAI ChatGPT API with a custom prompt and the description data to get an improved version of the
description. Finally, the webhook will update the product table with the improved description.
Step 1: Create the Event Trigger
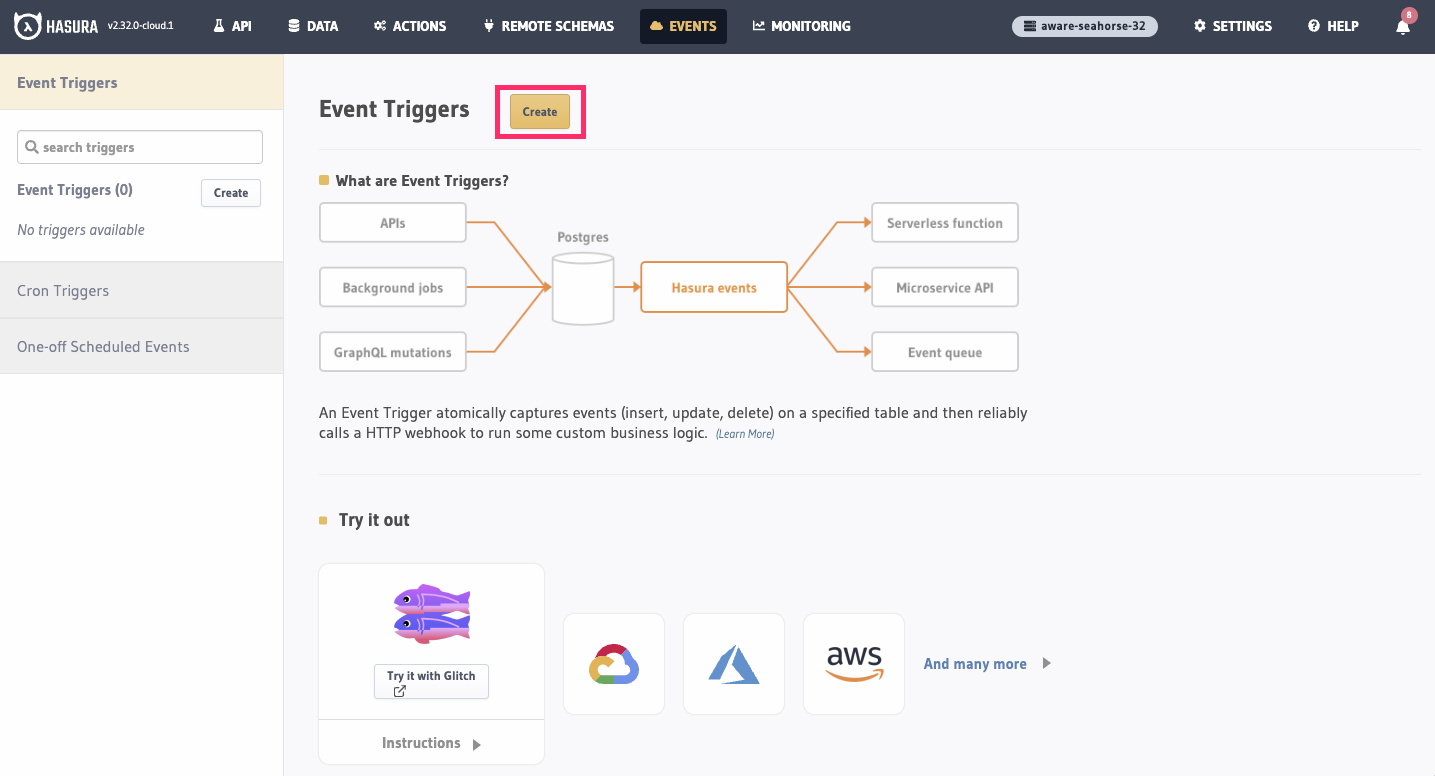
Go to your Hasura Console and click the Events tab. You should automatically be on the Event Triggers item in the
sidebar.
Click Create.
Step 2: Configure the Event Trigger
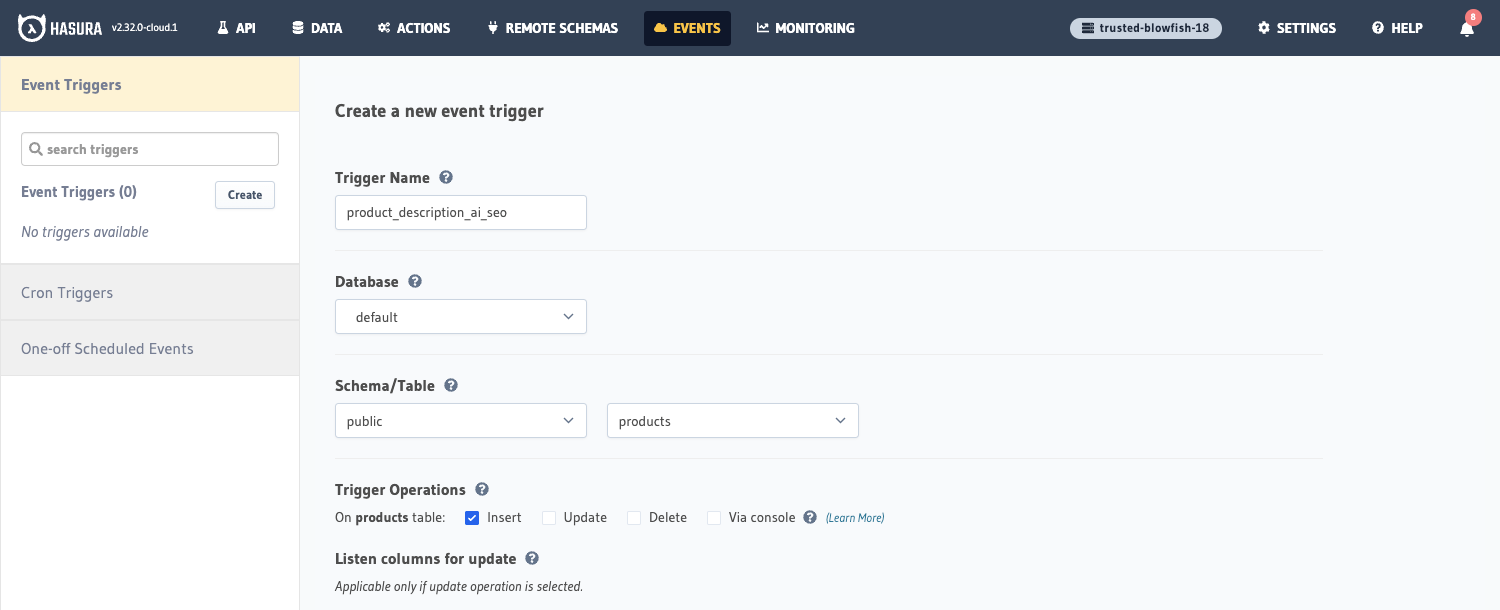
First, provide a name for your trigger, for example: product_description_ai_seo.
Select the database, schema, table, and table operation that you want to trigger the event. In this example, we'll use
the default database, the public schema, the products table and set the trigger to fire on the Insert operation.
Enter a webhook URL that will be called when a new product is inserted into this table. This URL will point to the logic we're going to implement later:
https://<your-webhook-url>/product-description-ai-seo
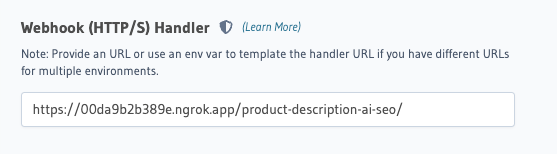
You'll need to use a tunneling service such as ngrok to expose a webhook endpoint running on your local machine to the internet and Hasura Cloud. This will give you a public URL that will forward requests to your local machine and the server which we'll configure below.
You'll need to modify your webhook URL to use the public URL provided by ngrok.
After installing ngrok and authenticating, you can do this by running:
ngrok http 4000
Then, copy the Forwarding value for use in our webhook 🎉
Under Advanced Settings, we can configure the headers that will be sent with the request. We'll add an
authentication header to prevent abuse of the endpoint and ensure that only Hasura can trigger the event. Set the
Key as secret-authorization-string and the Value as super_secret_string_123.
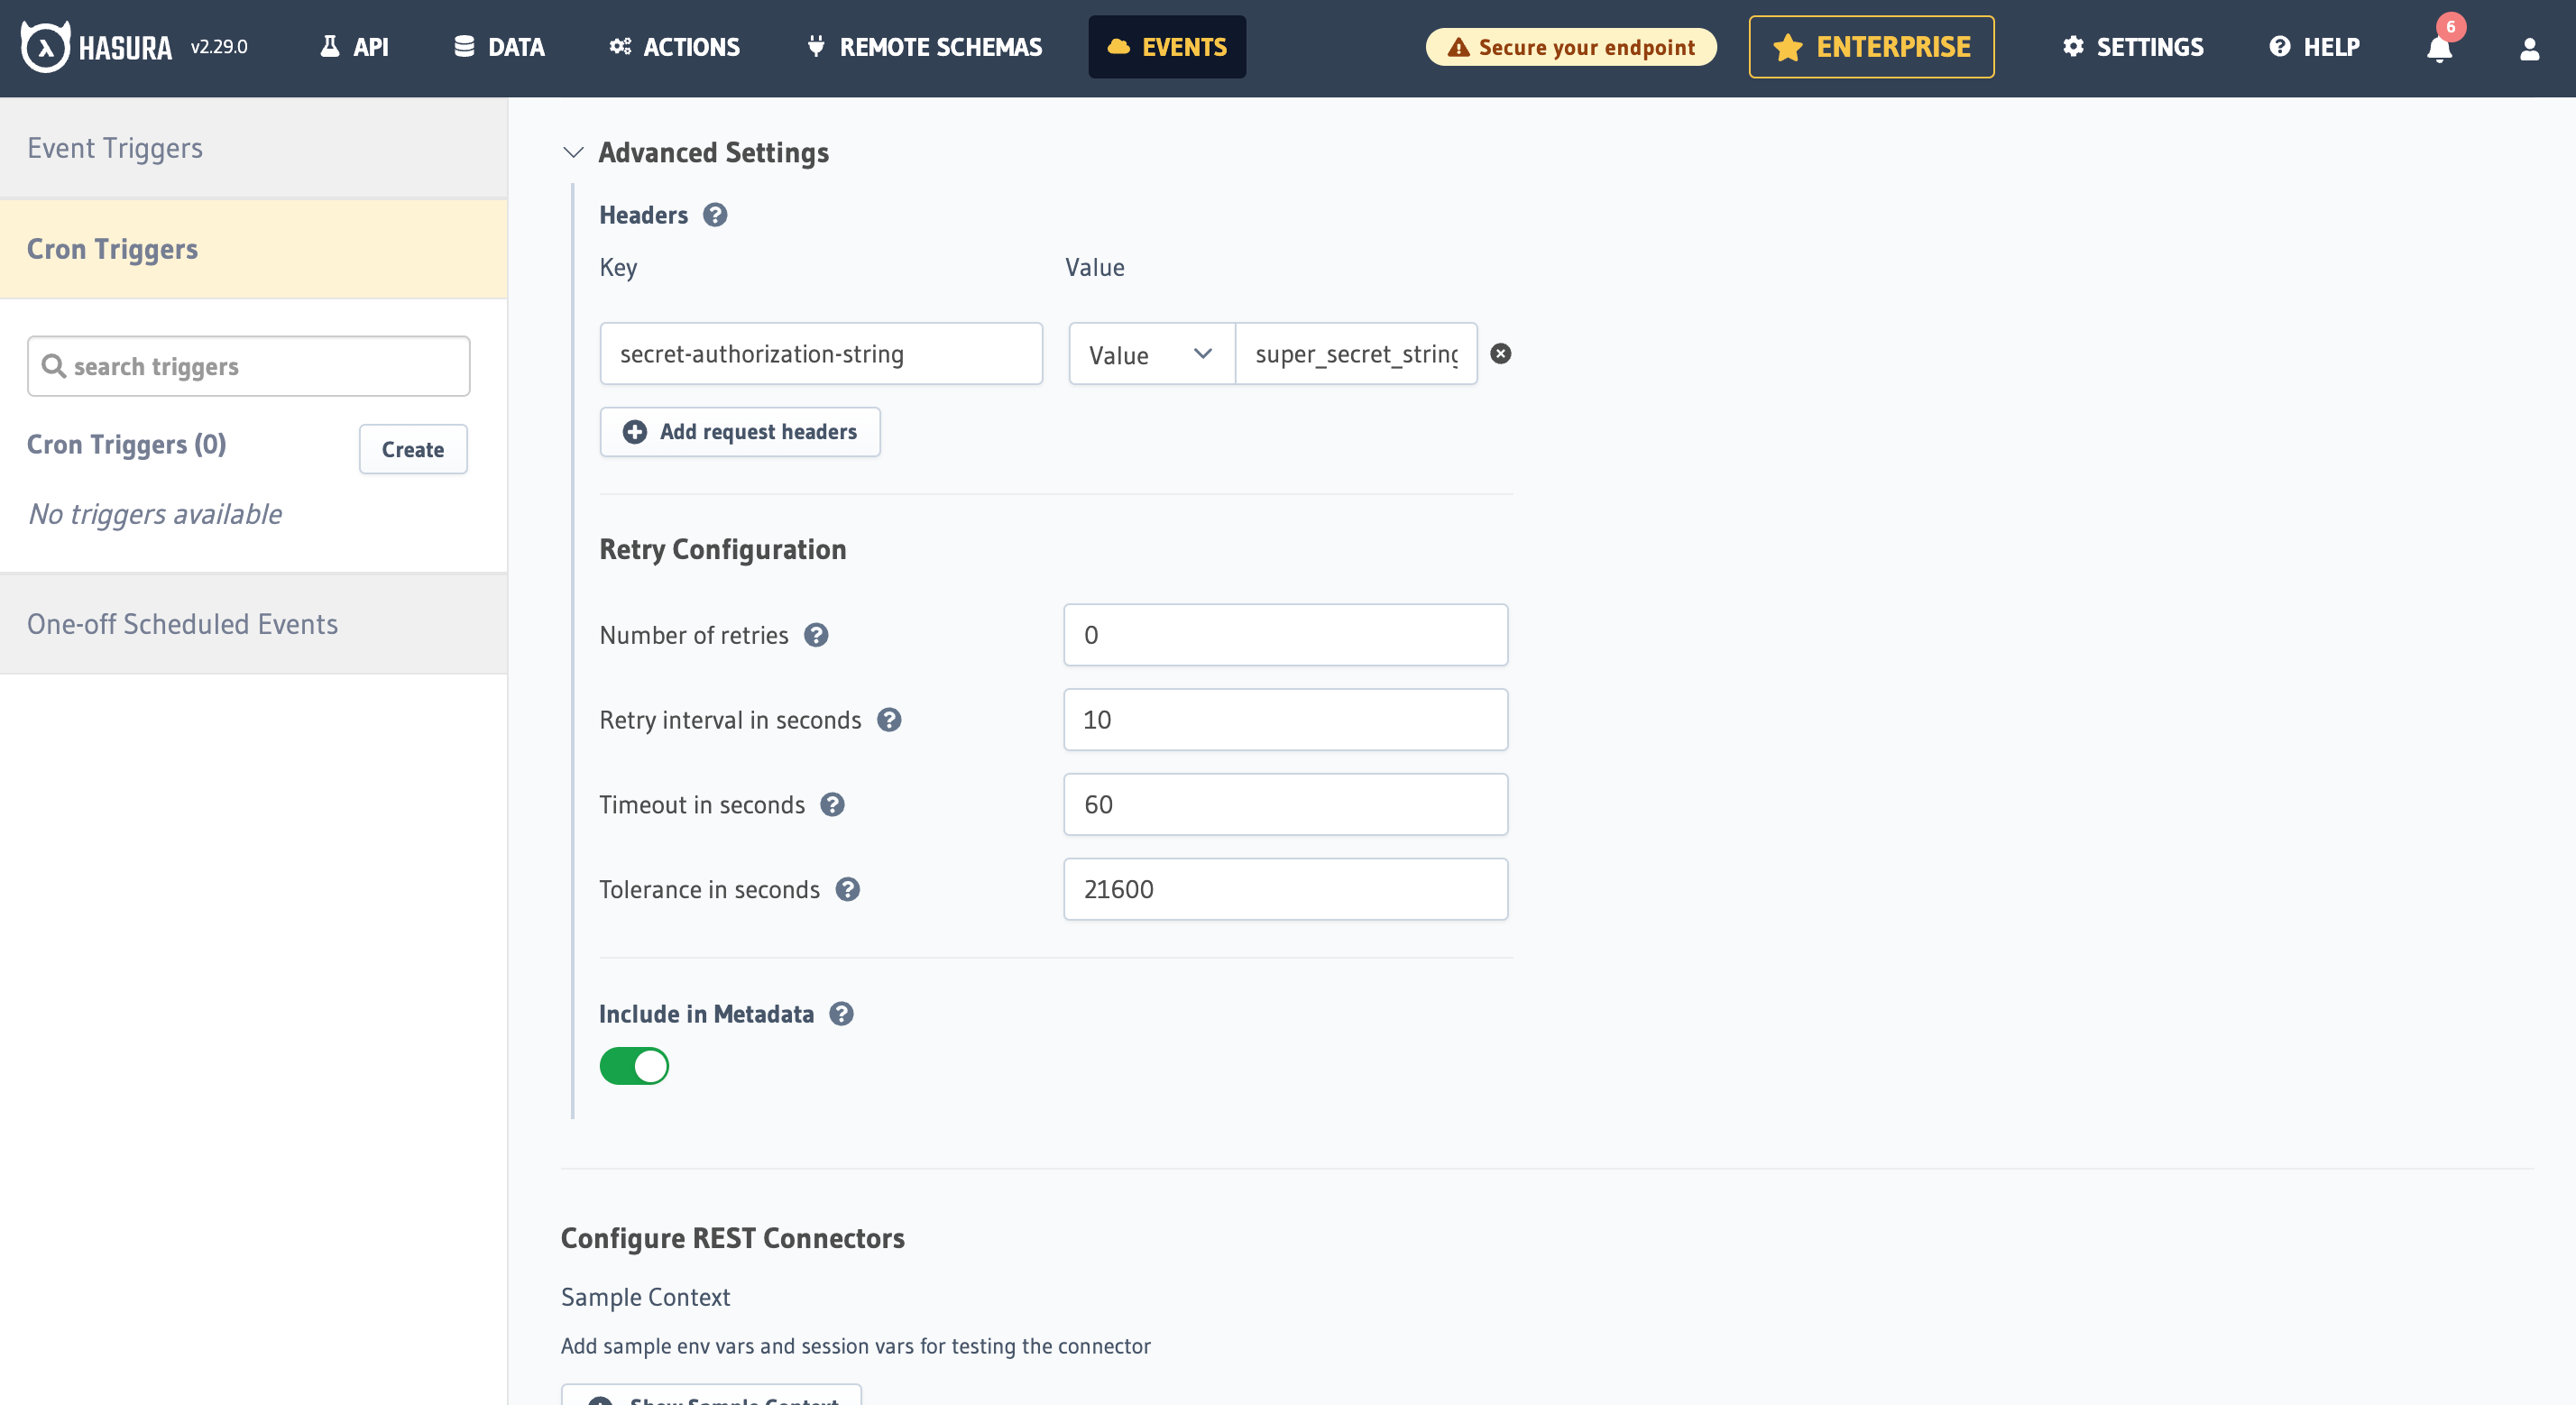
For simplicity in this example we've used a string literal for the value of the authorization header. In production, you should always use an environment variable to store secrets. This prevents your secrets from being exposed in your codebase and will also allow you to change the value without having to update the Event Trigger.
Leave Auto-cleanup Event Logs and
Configure REST Connectors as they are. In production these settings are useful
and are covered in their respective places in docs.
Finally, click the "Create Event Trigger" button to create the trigger.
Step 3: Implement the Webhook
Your webhook can be a simple HTTP server that performs the desired tasks. It could be written in any programming language or framework you prefer. The webhook needs to do three main things when triggered:
- Parse the request body to get the
idanddescriptiondata from theproducttableinsertoperation that Hasura sends. - Call the OpenAI ChatGPT API with a custom prompt and the description data to get an improved version of the description.
- Update the
producttable with the improved description.
- JavaScript
- Python
Here's an example implementation using Node.js and Express:
Let's create a script to do it:
In a new directory run the following to create a new package.json file:
npm init -y
Install the dependencies for the server:
npm install openai express
Create an index.js file in the root of the folder and paste in the code below:
const express = require('express');
const OpenAI = require('openai');

// Constants for server and external service configurations
const PORT = 4000;
const OPEN_AI_KEY = 'YOUR-OPENAI-KEY';
const HASURA_GRAPHQL_ENDPOINT = 'YOUR-HASURA-GRAPHQL-ENDPOINT';
const HASURA_ADMIN_SECRET = 'YOUR-HASURA-ADMIN-SECRET';

// Set up the express server instance
const app = express();

// Middleware to parse incoming JSON and URL-encoded bodies
app.use(express.json()); // to support JSON-encoded bodies
app.use(express.urlencoded({ extended: true }));

// Initialize OpenAI client with the provided API key
const openai = new OpenAI({
  apiKey: OPEN_AI_KEY,
});

/**
 * Function to improve the original product description for SEO using OpenAI.
 * @param {string} originalDescription - The original product description.
 * @return {string} The improved description for SEO.
 */
async function improveDescription(originalDescription) {
  const completion = await openai.chat.completions.create({
    messages: [
      {
        role: 'user',
        content: `You are an SEO expert who works on an e-commerce website. Your task is to take the following product description and improve it for SEO purposes, making it more likely to rank highly in search engines and lead to increased visitor traffic and purchases. Only respond with the improved description and nothing else. If there is nothing to improve then respond with the original content. The product description to improve for SEO is as follows: ${originalDescription}`,
      },
    ],
    model: 'gpt-3.5-turbo',
  });

  return completion.choices[0].message.content;
}

/**
 * Function to update the product description in Hasura.
 * @param {string} productId - The unique ID of the product.
 * @param {string} improvedDescription - The improved product description.
 * @return {string} The product ID of the updated product.
 */
async function updateProductDescription(productId, improvedDescription) {
  // Send a POST request to Hasura's GraphQL endpoint to update the product description
  const response = await fetch(HASURA_GRAPHQL_ENDPOINT, {
    method: 'POST',
    headers: {
      'Content-Type': 'application/json',
      'x-hasura-admin-secret': HASURA_ADMIN_SECRET,
    },
    body: JSON.stringify({
      query: `
          mutation UpdateProduct($id: uuid!, $description: String) {
            update_products_by_pk(pk_columns: {id: $id}, _set: {description: $description}) {
              id
              description
            }
          }
          `,
      variables: {
        id: productId,
        description: improvedDescription,
      },
    }),
  });

  const { data } = await response.json();
  return data.update_products_by_pk.id;
}

// API endpoint to improve and update product descriptions using AI
app.post('/product-description-ai-seo', async (req, res, next) => {
  try {
    // Check for the custom authorization header for security
    const authHeader = req.headers['secret-authorization-string'];
    if (authHeader !== 'super_secret_string_123') {
      console.log('Unauthorized');
      return res.status(401).json({ message: 'Unauthorized' });
    }

    // Extract description and id from the incoming request
    const { description, id } = req.body?.event?.data?.new;

    console.log(`Description: ${description}\n`);

    // Ensure both description and id are present
    if (!description || !id) {
      console.log('Bad request: no description or id\n');
      return res.status(400).json({ message: 'Bad request' });
    }

    // Get the improved description from OpenAI
    const improvedDescription = await improveDescription(description);
    console.log(`Improved description: ${improvedDescription}\n`);

    // Update the product description in Hasura
    await updateProductDescription(id, improvedDescription);

    // Return a success response
    console.log('Success\n');
    return res.status(200).json({ message: 'Success' });
  } catch (error) {
    // Handle any errors
    next(error); // Forward error to centralized error handling
  }
});

// Centralized error handling
app.use((err, req, res, next) => {
  console.error(err.stack);
  res.status(500).json({ message: 'Internal server error' });
});

// Start the server on the specified port
app.listen(PORT, () => {
  console.log(`Server started on port ${PORT}\n`);
});
Here's an example implementation using Python and Flask:
Let's create a script to do it:
Make sure you have the necessary dependencies installed. You can use pip to install them:
pip install Flask[async] openai requests
Create an index.py file in the root of the folder and paste in the code below:
from flask import Flask, request, jsonify
import openai
import requests

# Set up flask server instance
app = Flask(__name__)

# Constants for server and external service configurations
PORT = 4000;
OPEN_AI_KEY = 'YOUR-OPENAI-KEY';
HASURA_GRAPHQL_ENDPOINT = 'YOUR-HASURA-GRAPHQL-ENDPOINT';
HASURA_ADMIN_SECRET = 'YOUR-HASURA-ADMIN-SECRET';

openai.api_key = OPEN_AI_KEY

async def improve_description(original_description):
  """
  Function to improve the original product description for SEO using OpenAI.

  Args:
      original_description (str): The original product description.

  Returns:
      str: The improved product description for SEO.
  """
  try:
      completion = openai.ChatCompletion.create(
          model="gpt-3.5-turbo",
          messages=[
      {"role": "user", "content": f"You are an SEO expert who works on an e-commerce website. Your task is to take the following product description and improve it for SEO purposes, making it more likely to rank highly in search engines and lead to increased visitor traffic and purchases. Only respond with the improved description and nothing else. If there is nothing to improve then respond with the original content. The product description to improve for SEO is as follows: {original_description}."},
  ])
      return completion["choices"][0]["message"]["content"]
  except Exception as e:
      print(f"An error occurred while generating description: {e}")
      return None

# Function to update the product description in Hasura.
async def update_product_description(product_id, improved_description):
  """
  Function to update the product description in Hasura.

  Args:
      product_id (str): The unique ID of the product.
      improved_description (str): The improved product description.

  Returns:
      str: The ID of the updated product or None if an error occurred.
  """
  headers = {
    "Content-Type": "application/json",
    "x-hasura-admin-secret": HASURA_ADMIN_SECRET,
  }

  #Ideally store your querys in another file where you can re-use them
  body = {
      "query": """
          mutation UpdateProduct($id: uuid!, $description: String) {
              update_products_by_pk(pk_columns: {id: $id}, _set: {description: $description}) {
              id
              description
              }
          }
      """,
      "variables": {
          "id": product_id,
          "description": improved_description
      }
  }

  try:
      # Send a POST request to Hasura's GraphQL endpoint to update the product description
      response = requests.post(HASURA_GRAPHQL_ENDPOINT,json=body, headers=headers)

      response.raise_for_status()

      return response.json()["data"]["update_products_by_pk"]["id"]

  except Exception as e:
      print(f"An error occurred while updating description: {e}")
      return None

@app.route("/product-description-ai-seo", methods=["POST"])
async def improve_product_description_ai_seo():
   # Check secret header permission
  auth_header = request.headers.get('secret-authorization-string')
  if auth_header != 'super_secret_string_123':
      print('Unauthorized')
      return jsonify({'message': 'Unauthorized'}), 401

  try:
      # Extract description and id from the incoming request
      data_new = request.get_json()["event"]["data"]["new"]
      description = data_new["description"]
      product_id = data_new["id"]
  except Exception as e:
      print("Bad request: no description or id\n")
      return jsonify({'message': 'Bad request'}), 400

  print(f"description: {description}")

  # Get the improved description from OpenAI
  improved_description = await improve_description(description)
  if improve_description == None:
      return jsonify({'message': 'An error occurred'}), 500

  print(f"Improved description: {improved_description}")

  # Update the product description in Hasura
  updated_product_id = await update_product_description(product_id,improved_description)
  if updated_product_id == None:
      return jsonify({'message': 'An error occurred'}), 500
  # Return a success response
  print('Success\n')
  return jsonify({'message': 'Success'}), 200

# Error handling
@app.errorhandler(Exception)
def handle_error(error):
  print(error)
  response = jsonify({"error_message": "An error occurred"})
  response.status_code = 500
  return response

# Start the server on the specified port
if __name__ == "__main__":
  app.run(debug=True, port=PORT)
You can run the server by running python index.py in your terminal.
Step 4: Test your Setup
Now that your Event Trigger and webhook are set up, you can test it by simulating a new product being added.
Run your server with node index.js and go to the Hasura Console and click the Data tab. From there, in the left
navigation, click the public schema of the default database. Then, click the products table.
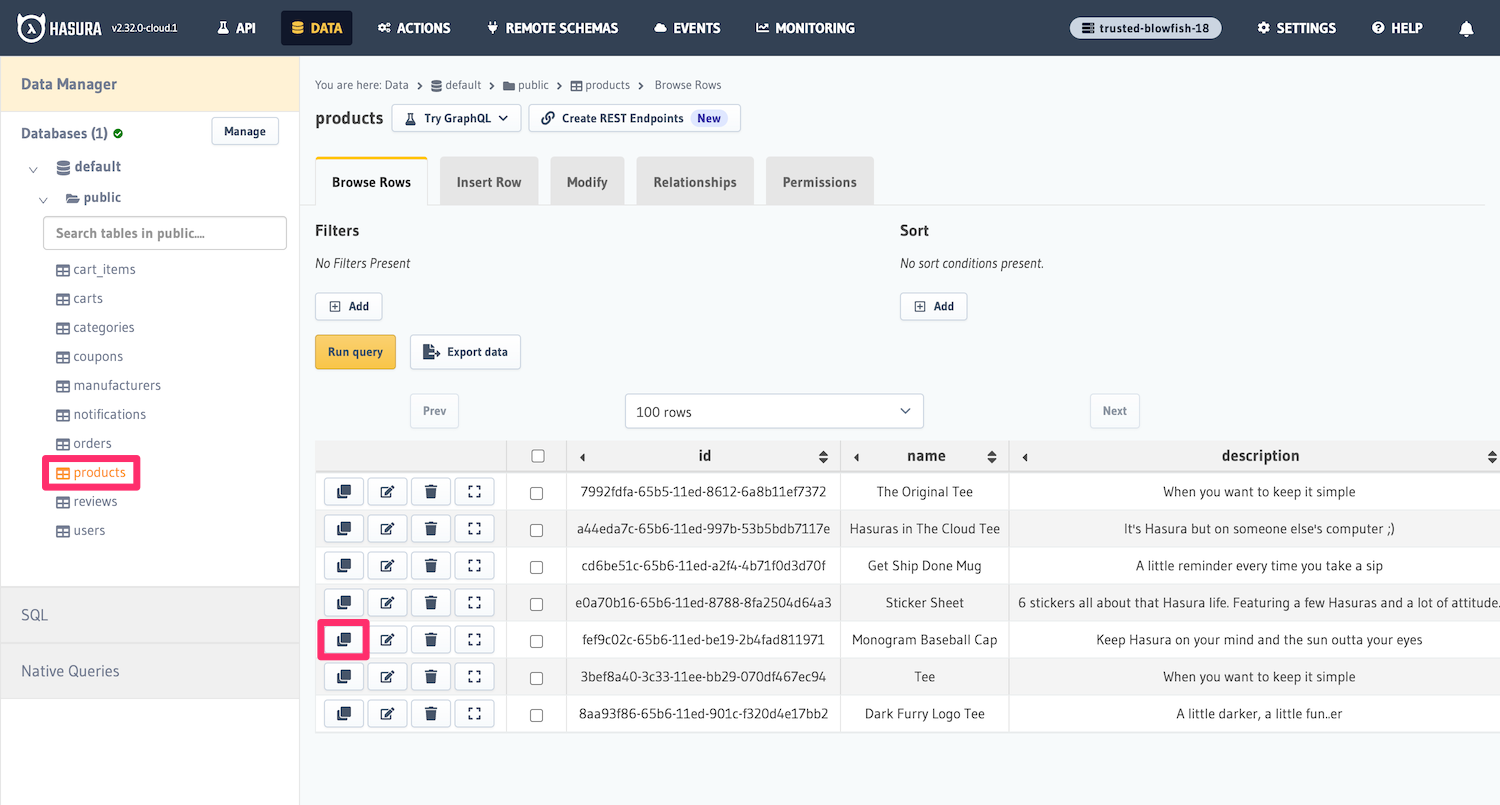
For this example let's create a new product by cloning an existing one so that we don't have to worry about getting the correct ids for the foreign key relationships.
Click the clone button on the row for the "Monogram Baseball Cap" product.
You will be presented with a form to enter the details of the new product. For id, created_at and updated_at click
the "default" radio button so that those fields take on their default values in the new row.
For the name field, enter a new name for the product, for example: "Monogram Baseball Cap 2". Then you can use this
dummy description, which has awful SEO and is ripe for improvement:
Baseball Cap  This is a cap. It's a hat you can wear. It's made of some material. You can wear it on your head. It has
some design on it. It might fit you. It has a thing on the back to make it fit better. It's good for sunny days or any
days. You can wear it with clothes. It's a good cap. Buy this cap. It's a nice cap. Good cap for sale. Best cap online.
Buy cap now.  Note: This hat is a hat. Clean it sometimes. Don't lose it. It's a good hat. Buy hat
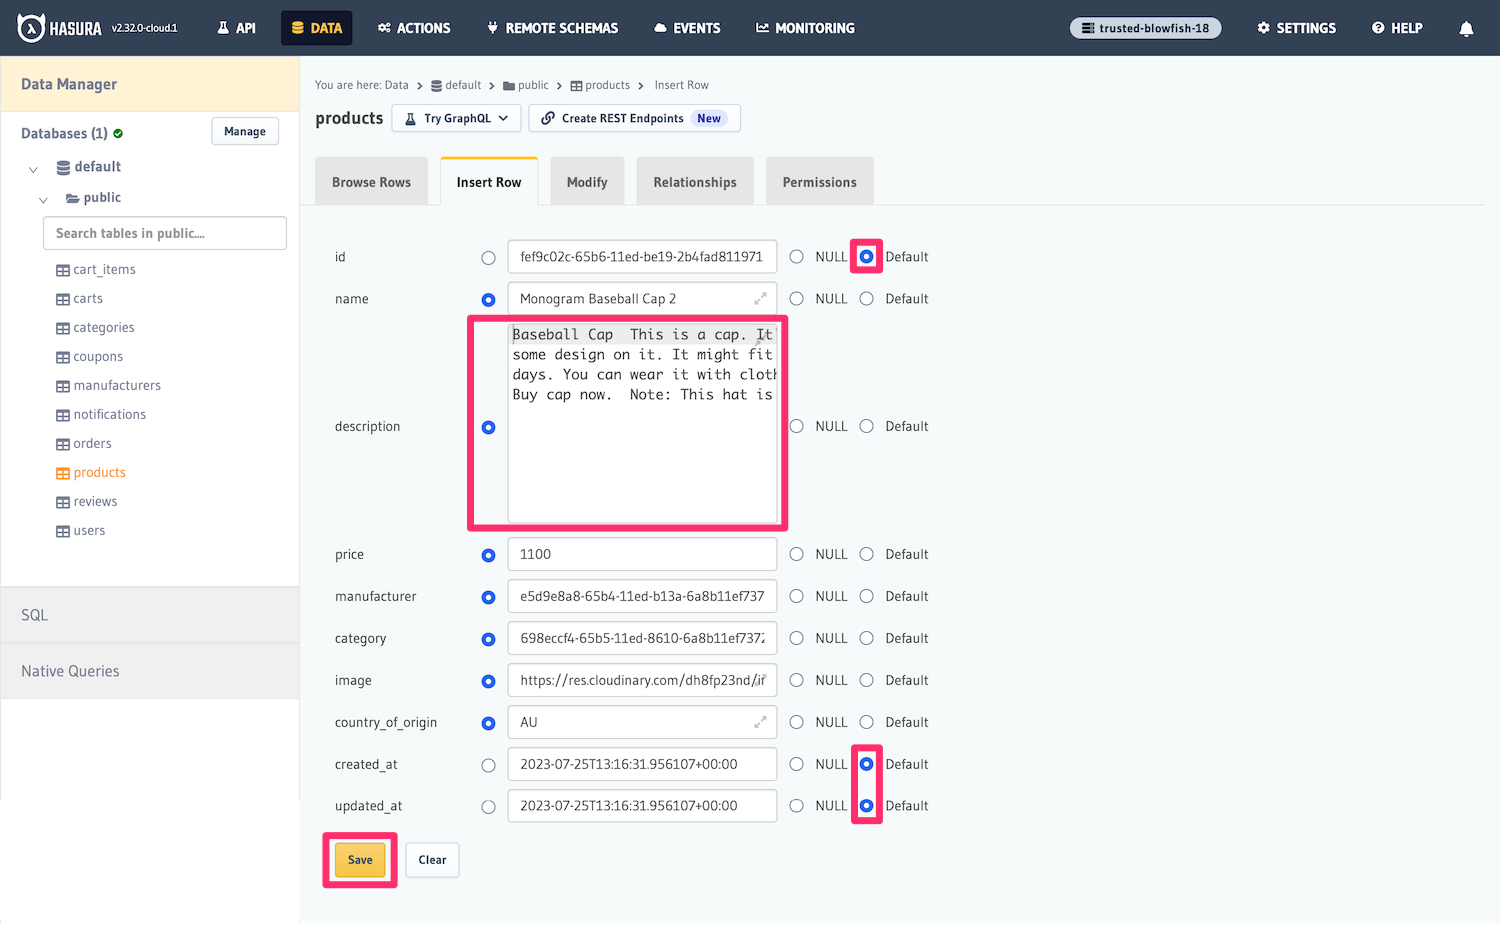
Click "Save" and then switch to your terminal to see the logs of the script. You should see the following:
Click here to see an example of the console log of the webhook.
Server started on port 4000

Description: Baseball Cap  This is a cap. It's a hat you can wear. It's made of some material. You can wear it on your
head. It has some design on it. It might fit you. It has a thing on the back to make it fit better. It's good for
sunny days or any days. You can wear it with clothes. It's a good cap. Buy this cap. It's a nice cap. Good cap for
sale. Best cap online. Buy cap now.  Note: This hat is a hat. Clean it sometimes. Don't lose it. It's a good hat. Buy
hat.

Improved description: Shop our Baseball Cap, the perfect addition to your wardrobe. Made from high-quality materials,
this cap offers both style and comfort. Its unique design adds a trendy touch to any outfit. With an adjustable strap
on the back, you can ensure a perfect fit every time you wear it. Whether it's a sunny day or any other day, this cap
is a must-have accessory. Pair it with any outfit for a stylish look. Don't miss out on this opportunity to own a
top-notch cap. Add it to your cart now and enjoy the benefits of owning a high-quality cap. Keep this hat clean and
secure to ensure its longevity. Invest in this exceptional hat today.

Success
You can confirm that everything worked by clicking back to the products table in the Hasura Console and viewing the
new saved description of the product.
Conclusion
In this guide, we've shown how to use Hasura Event Triggers to automate a useful task of increasing the SEO score of a piece of text, which is common for an e-commerce application, by using a powerful API. This can be a useful strategy drive conversion and revenue in e-commerce applications and the idea can be adapted for a wide range of other tasks.