JWT Mode
Introduction
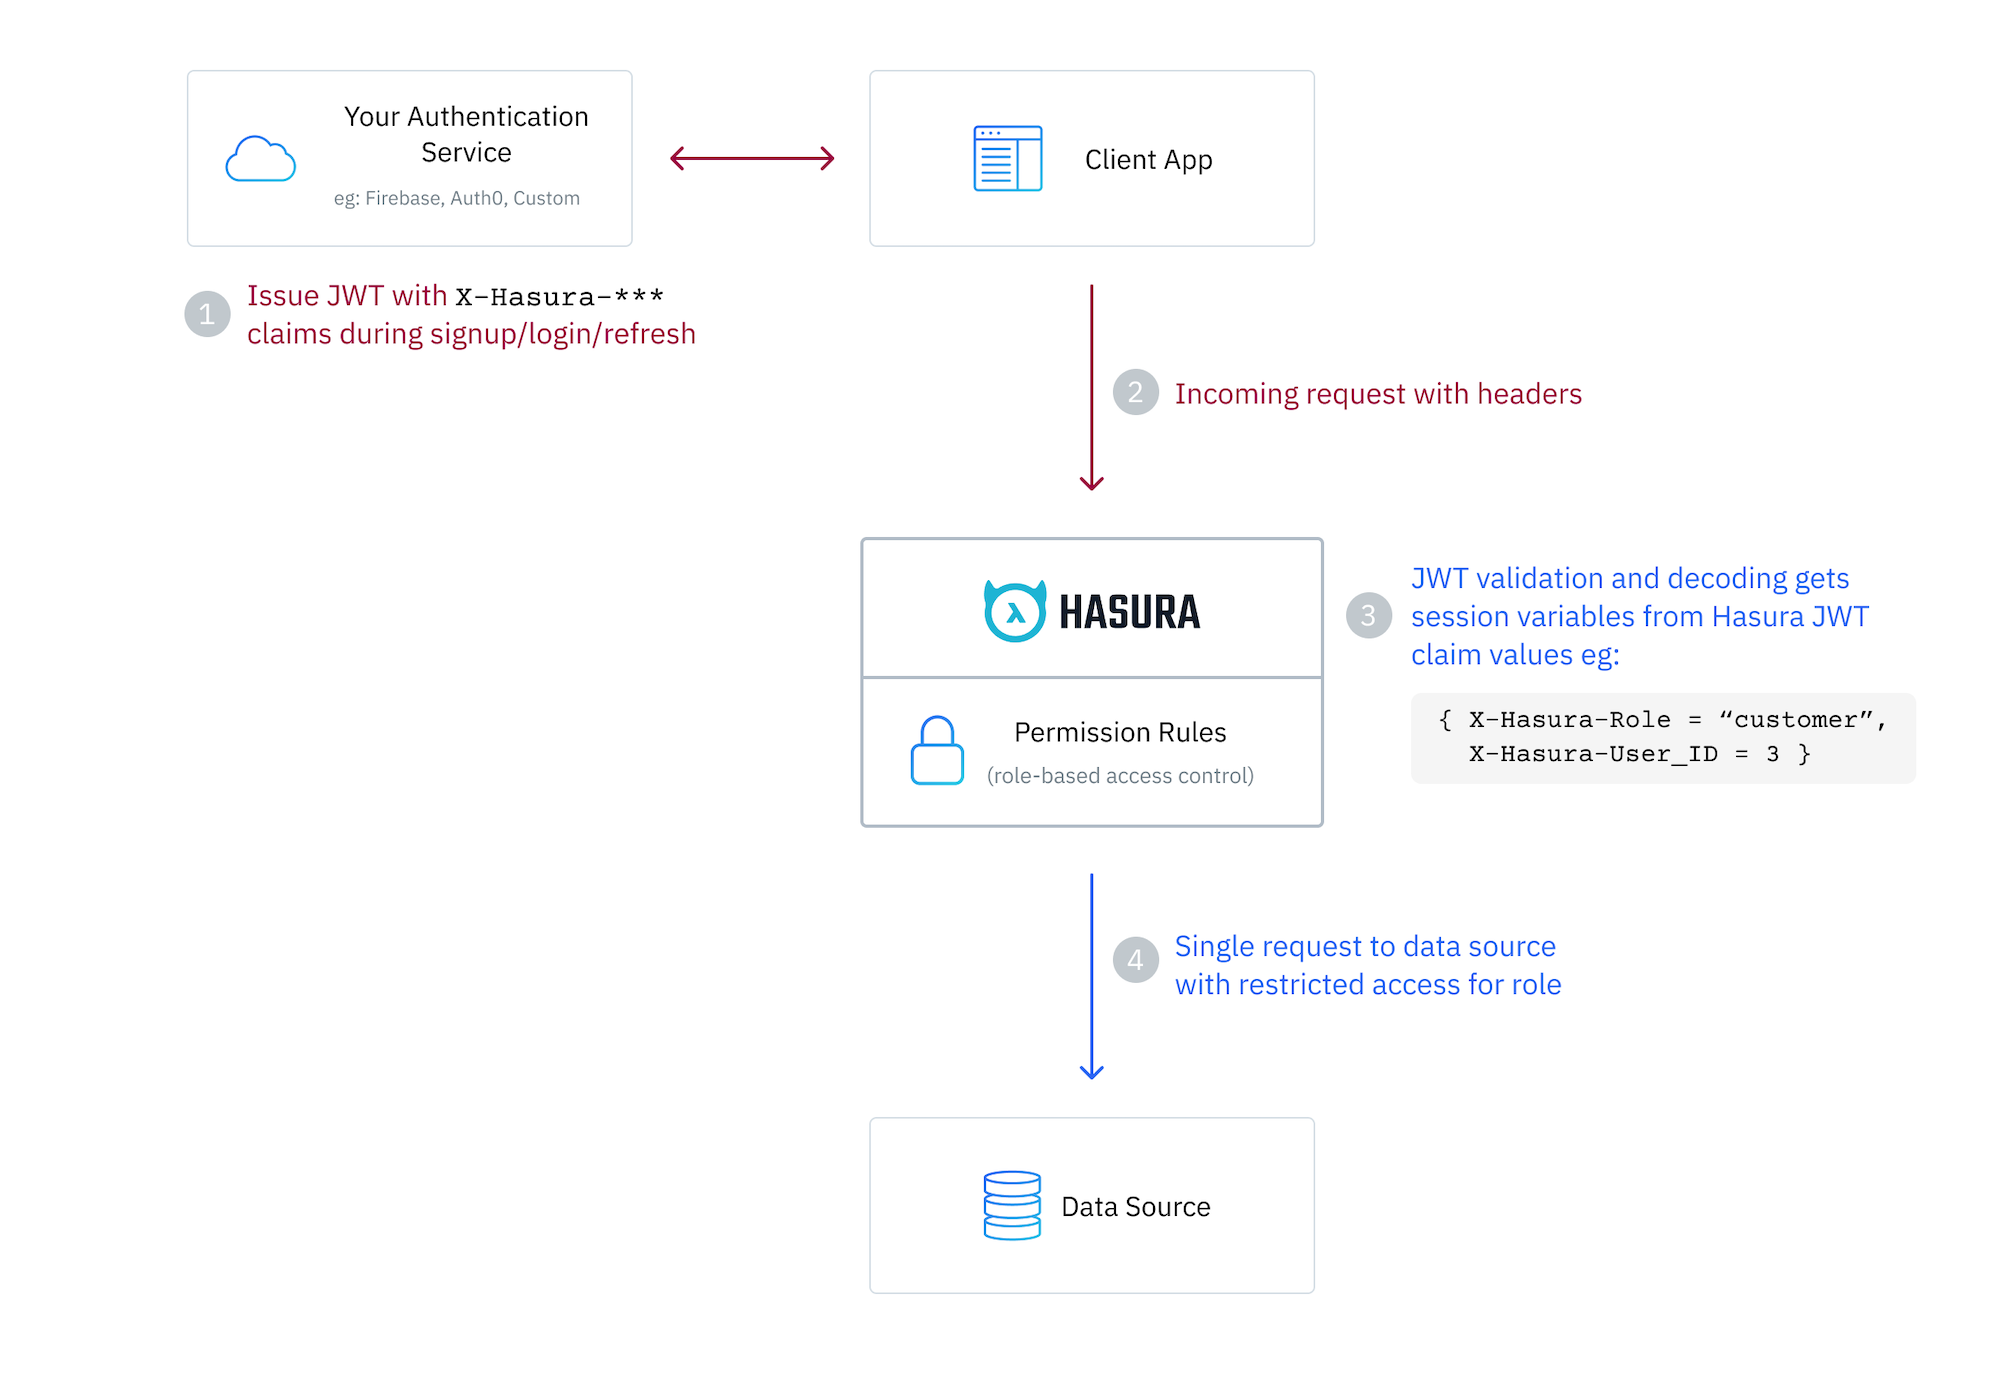
JWT mode requires that the client making the query sends a valid JSON Web Token to the Hasura Engine endpoint. This JWT is provided by an auth service such as Auth0, AWS Cognito, Firebase, Clerk, or your own custom solution.
Hasura then verifies and decodes the JWT to extract x-hasura-* session variable claim values from a defined namespace
in the token.
The x-hasura-default-role and x-hasura-allowed-roles session variables are required, and you will also most likely
utilize the user id and any other information which you need to determine access to your data.
The token can be passed in the header of the request in a dedicated key, or using the Authorization header with the
Bearer prefix, or as a cookie. All these options are defined in the AuthConfig object in your metadata.
Session variable requirements
Session variables passed via JWT or webhook can contain any information you want, but must at least contain an
x-hasura-default-role property and x-hasura-allowed-roles array.
An x-hasura-role value can optionally be sent as a plain header in the request to indicate the role which should be
used. If this is not provided, the engine will use the x-hasura-default-role value in the JWT.
To clarify, the x-hasura-role header is optional and can be used to override the default role in the JWT allowing the
same verified JWT to be used for different roles.
Only keys prefixed with x-hasura- will be accessible by the engine.
Session variable keys are case-insensitive. Values are case-sensitive.
Enabling JWT authentication
You can enable your Hasura DDN instance to use JWTs in just a few steps.
Step 1. Update your AuthConfig
Hasura utilizes an AuthConfig object that allows you to define the
configuration for your authentication service. In a standard setup the auth-config.hml file can be found in your
globals directory.
You can use Hasura's VS Code extension to
scaffold out your AuthConfig object by typing AuthConfig and selecting this object from the list of available
options. As you navigate through the skeleton, you can type CTRL+SPACEBAR at any point to reveal options for the
different key-value pairs.
Below, we're showing using the BearerAuthorization header location format using a fixed secret key from an environment
variable. However, Hasura DDN supports other methods for
where the engine can locate the JWT and
how it is verified.
kind: AuthConfig
version: v4
definition:
  mode:
    jwt:
      claimsConfig:
        namespace:
          claimsFormat: Json
          location: /claims.jwt.hasura.io
      tokenLocation:
        type: BearerAuthorization
      key:
        fixed:
          algorithm: HS256
          key:
            valueFromEnv: AUTH_SECRET
Read more about other setup options here.
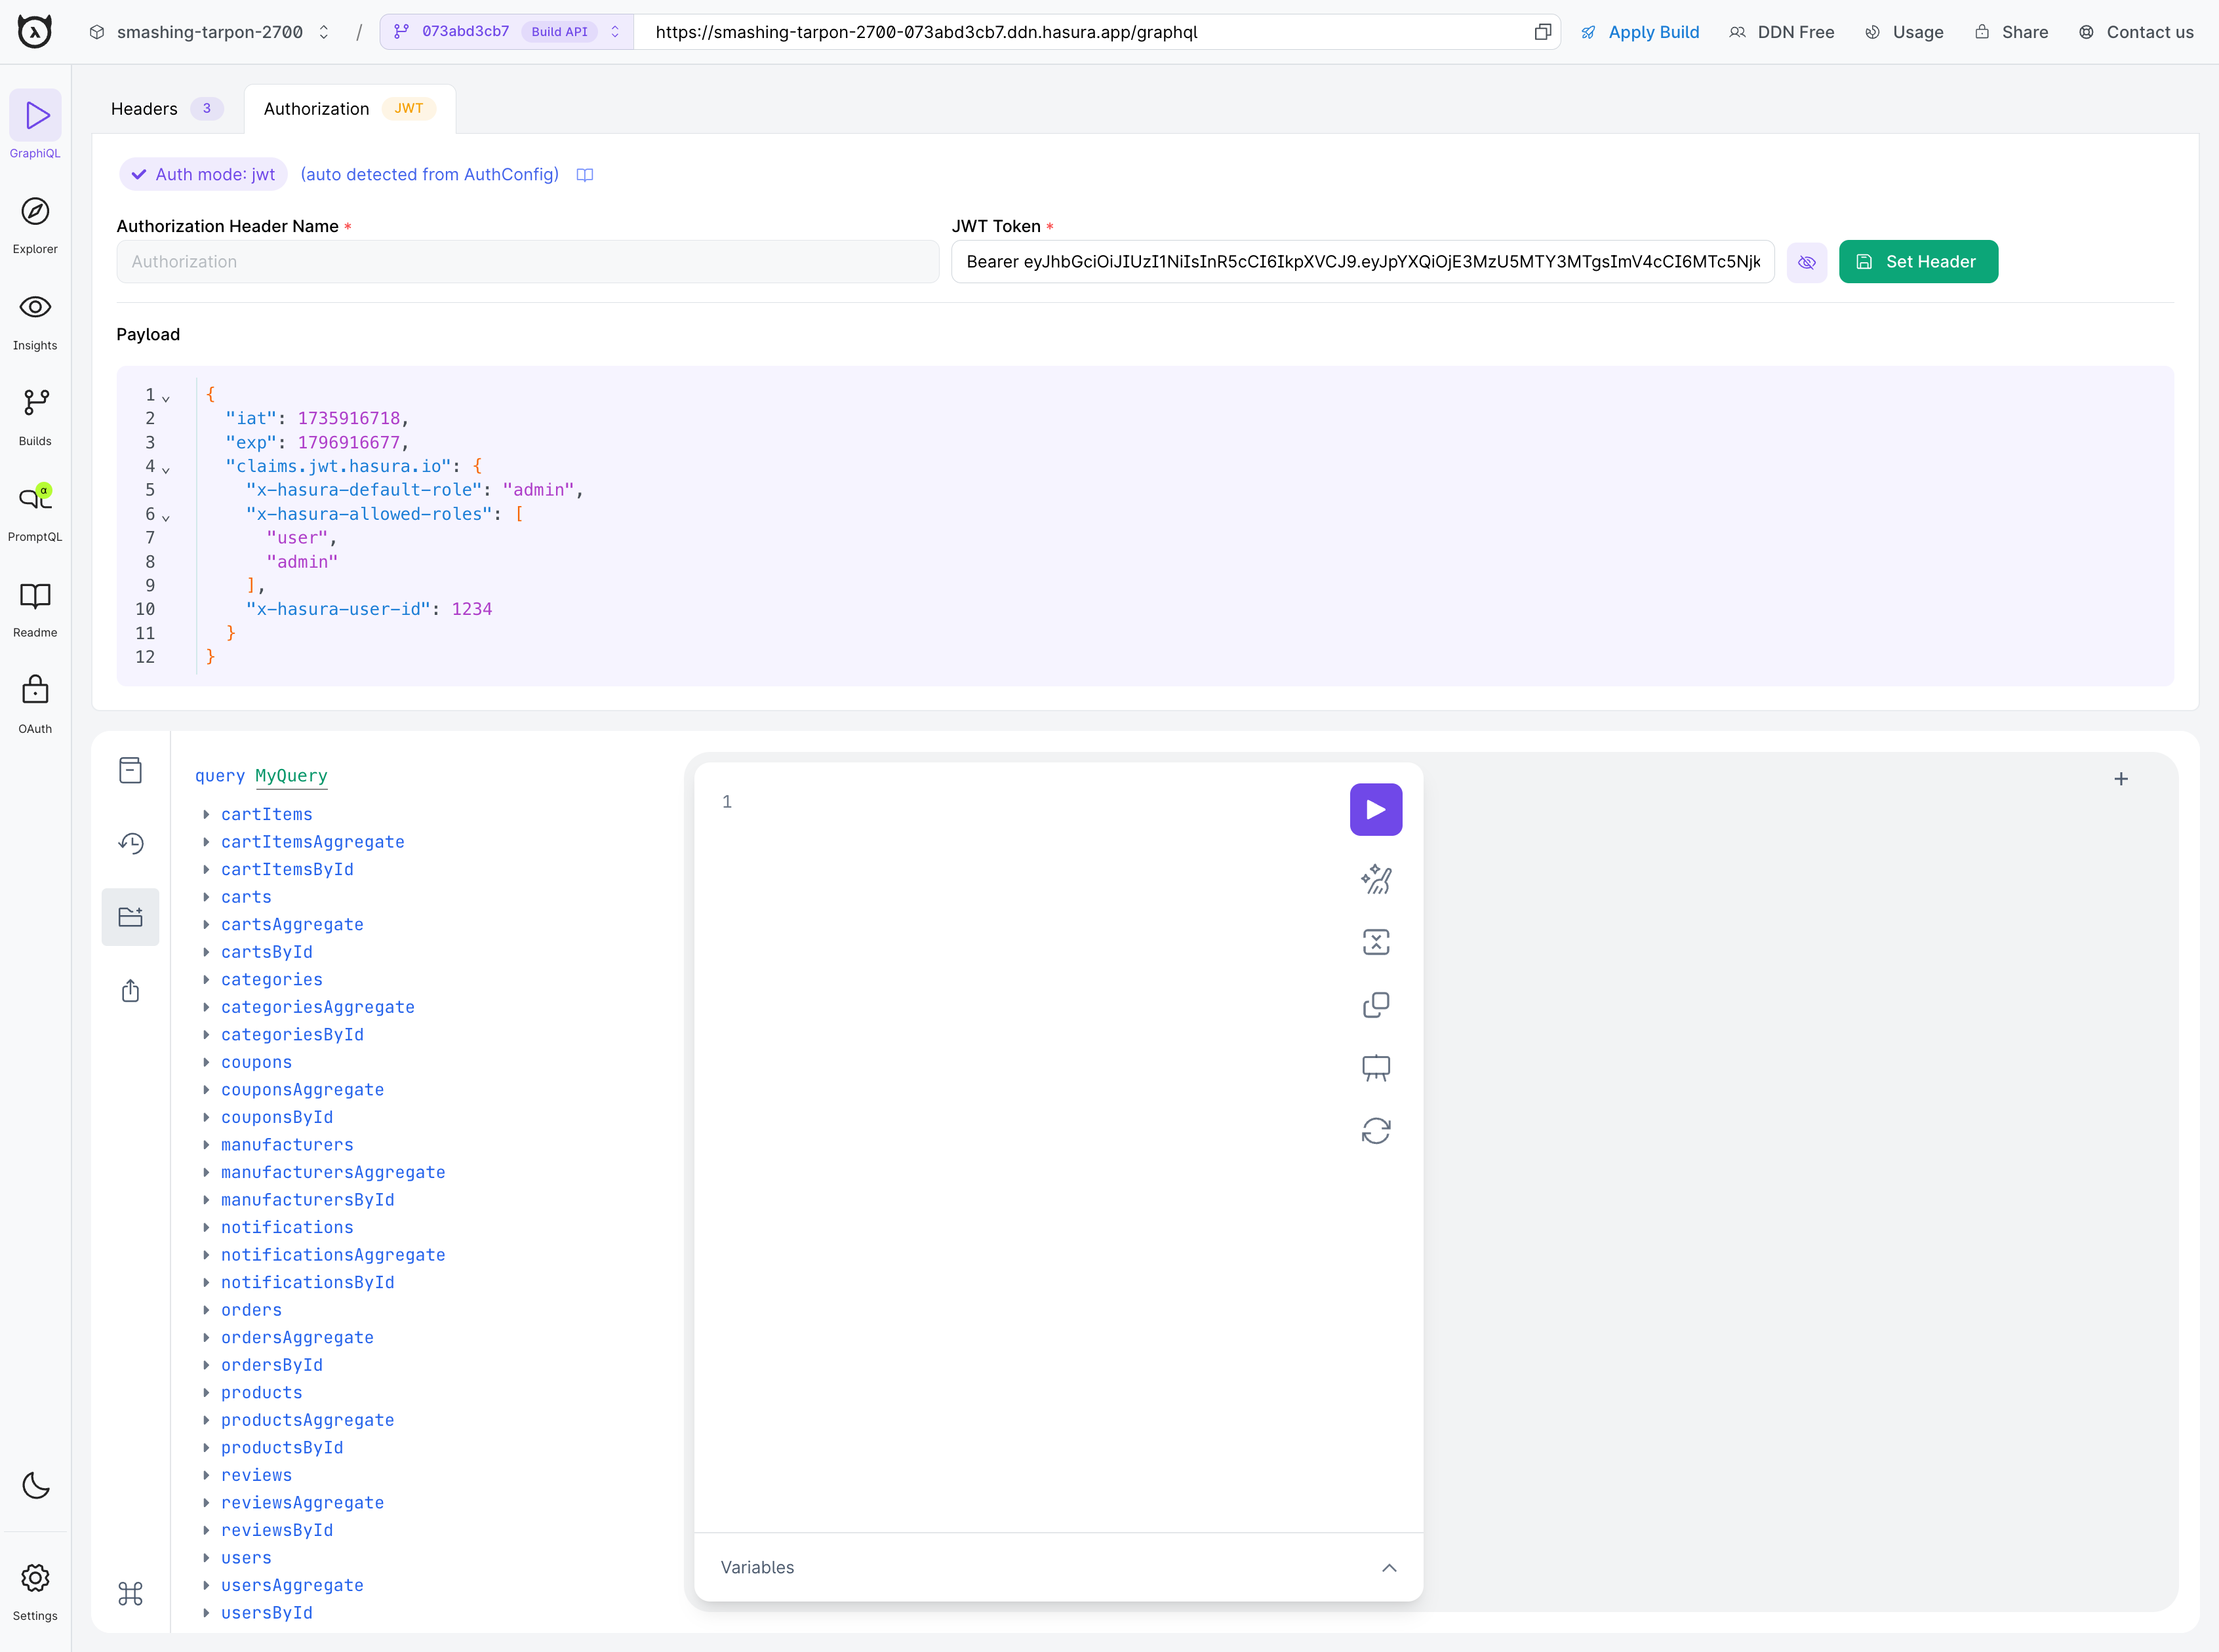
Step 2. Define the JWT with custom claims
Your auth service should include an object with a key of claims.jwt.hasura.io in the JWT. Within this, each claim
should be prefixed with x-hasura-* and include the relevant information. Note that an extra optional x-hasura-role
header can be passed to override the default role found in the JWT's custom claims.
| Key | Required | Value |
|---|---|---|
x-hasura-default-role | Yes | The role that will be used when the optional x-hasura-role header is not passed |
x-hasura-allowed-roles | Yes | A list of allowed roles for the user making the request. |
x-hasura-[custom] | No | Where [custom] is any string you wish (e.g., org, user-id, customer). The value can be any JSON value. |
In the simple example below, we're including the required claims by stating the default role is admin and the list of
available roles is limited to user and admin. Additionally, we're passing a custom key of x-hasura-user-id which
can be used with permissions when executing queries.
Read more about the default claims here.
{
  "iat": 1735916718,
  "exp": 1796916677,
  "claims.jwt.hasura.io": {
    "x-hasura-default-role": "admin",
    "x-hasura-allowed-roles": ["user", "admin"],
    "x-hasura-user-id": 1234
  }
}
Your auth service will encode this object using a secret and create a token which can then be passed to Hasura. You can
see an example of the above token encoded
here.
The signature secret to verify this token with the HS256 algorithm is ultra-secret-very-secret-super-secret-key.
Certain JWT providers (like Firebase) share JWKs between multiple tenants. They use the aud claim of JWT to specify
the intended tenant for the JWT. Setting the audience field in the Hasura JWT configuration will make sure that the
aud claim from the JWT is also checked during verification. Not doing this check will allow JWTs issued for other
tenants to be valid as well.
In these cases, you MUST set the audience field to appropriate value. Failing to do so is a major security
vulnerability. Learn how to set this here.
If your Compatibility Config date is set to 2025-03-11 or
newer, you must set the audience field if your JWTs will contain an aud claim. If you do not, the JWT will be
rejected as invalid and authentication will fail.
Step 3. Add permissions to an object in your supergraph
Let's add some example TypePermissions so that an admin role can access all fields in the Orders type, but we restrict
a user role from accessing the deliveryDate field.
---
kind: TypePermissions
version: v1
definition:
  typeName: Orders
  permissions:
    - role: admin
      output:
        allowedFields:
          - createdAt
          - deliveryDate
          - id
          - isReviewed
          - productId
          - status
          - updatedAt
          - userId
    - role: user
      output:
        allowedFields:
          - createdAt
          - id
          - isReviewed
          - productId
          - status
          - updatedAt
          - userId
Let's also add some example ModelPermissions so that an admin role can access all rows in the Orders model, but a user
role can only access rows where the userId field matches the user id session variable in the JWT.
---
kind: ModelPermissions
version: v1
definition:
  modelName: Orders
  permissions:
    - role: admin
      select:
        filter: null
        allowSubscriptions: true
    - role: user
      select:
        filter:
          fieldComparison:
            field: userId
            operator: _eq
            value:
              sessionVariable: x-hasura-user-id
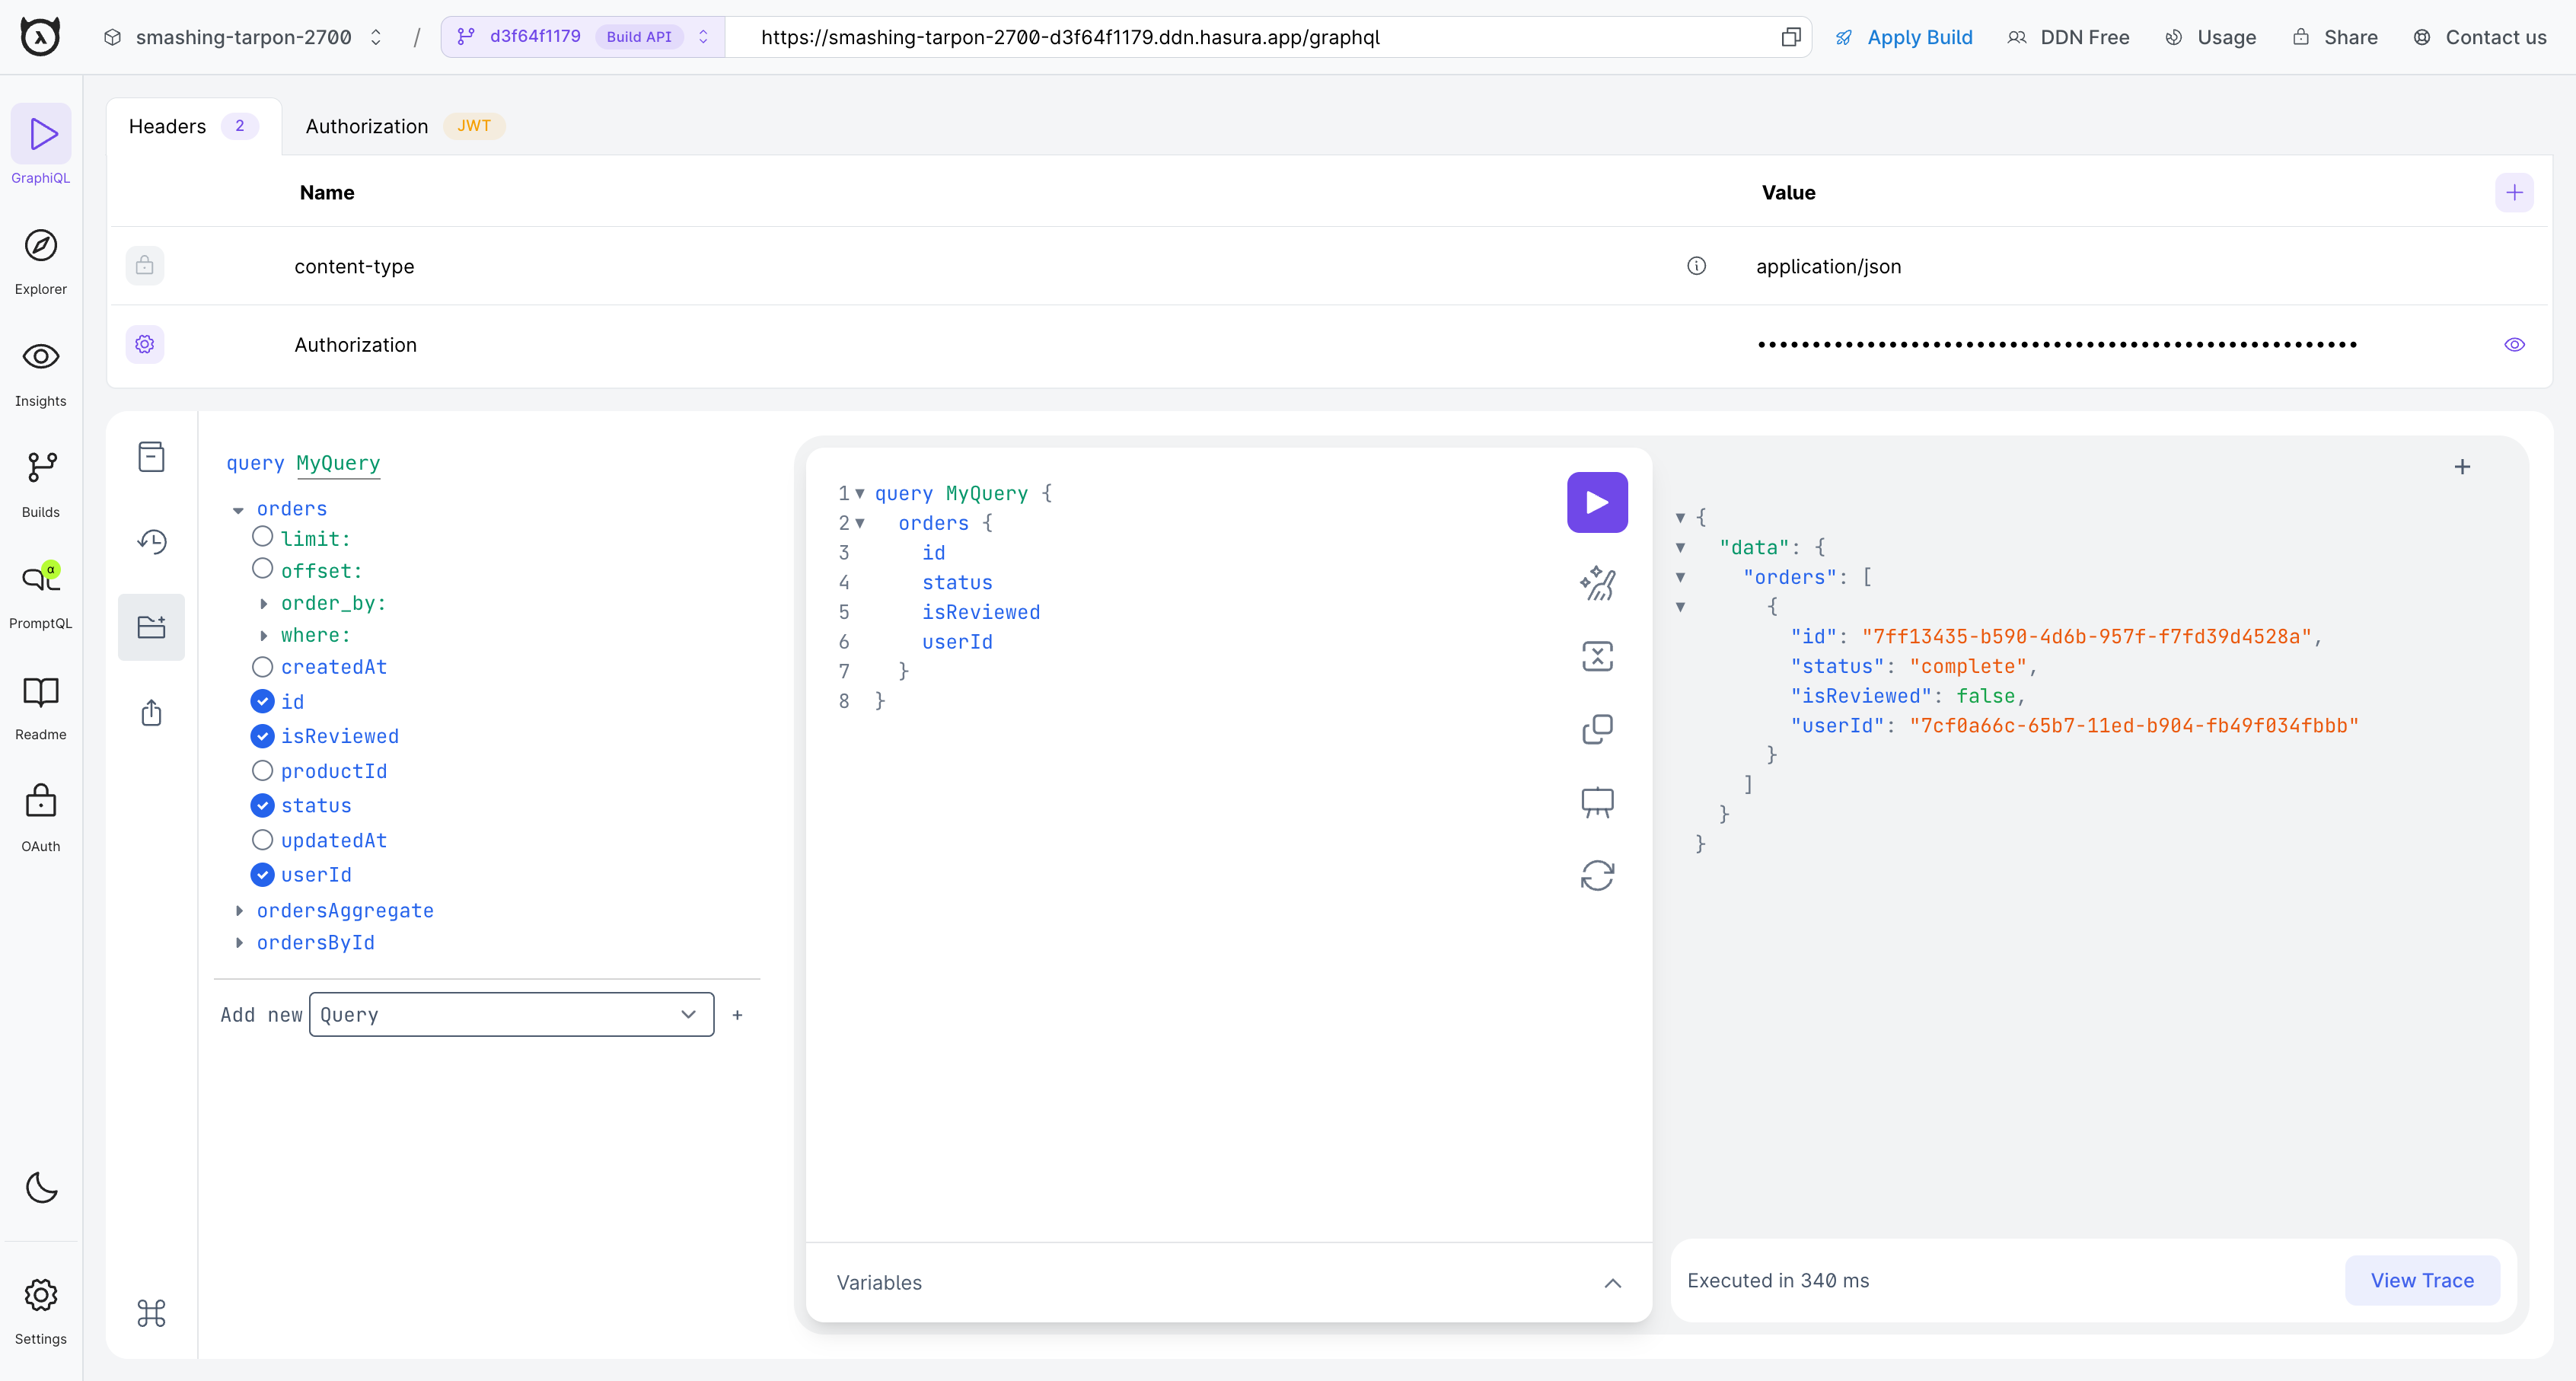
For these examples we'll set the payload of the JWT to specify a user role and a UUID for the user id.
{
  "iat": 1735916718,
  "exp": 1796916677,
  "claims.jwt.hasura.io": {
    "x-hasura-default-role": "user",
    "x-hasura-allowed-roles": ["user"],
    "x-hasura-user-id": "7cf0a66c-65b7-11ed-b904-fb49f034fbbb"
  }
}
Step 4. Rebuild your supergraph
Once you've updated your AuthConfig object in auth-config.hml and updated your claims, you can rebuild your
supergraph and test it locally.
ddn supergraph build local
Step 5. Make an authenticated request
In the example above, we're using the BearerAuthorization method. As such, as we can make a request to our Hasura DDN
instance by including a header with the key-value of Authorization: Bearer <our-encoded-token>. For testing, you can
pass this value in the Hasura DDN console's header section.
If we run a query for Orders, we can see that we only get the orders which this user has made and are not able to access the deliveryDate field.
Step 6. Set your API to public
Now that you have implemented JWT authentication, you can set your API to public. See here for more information on setting your API to public.
Next steps
If you're looking for step-by-step help to get started with common authentication providers, check this section of tutorials.
