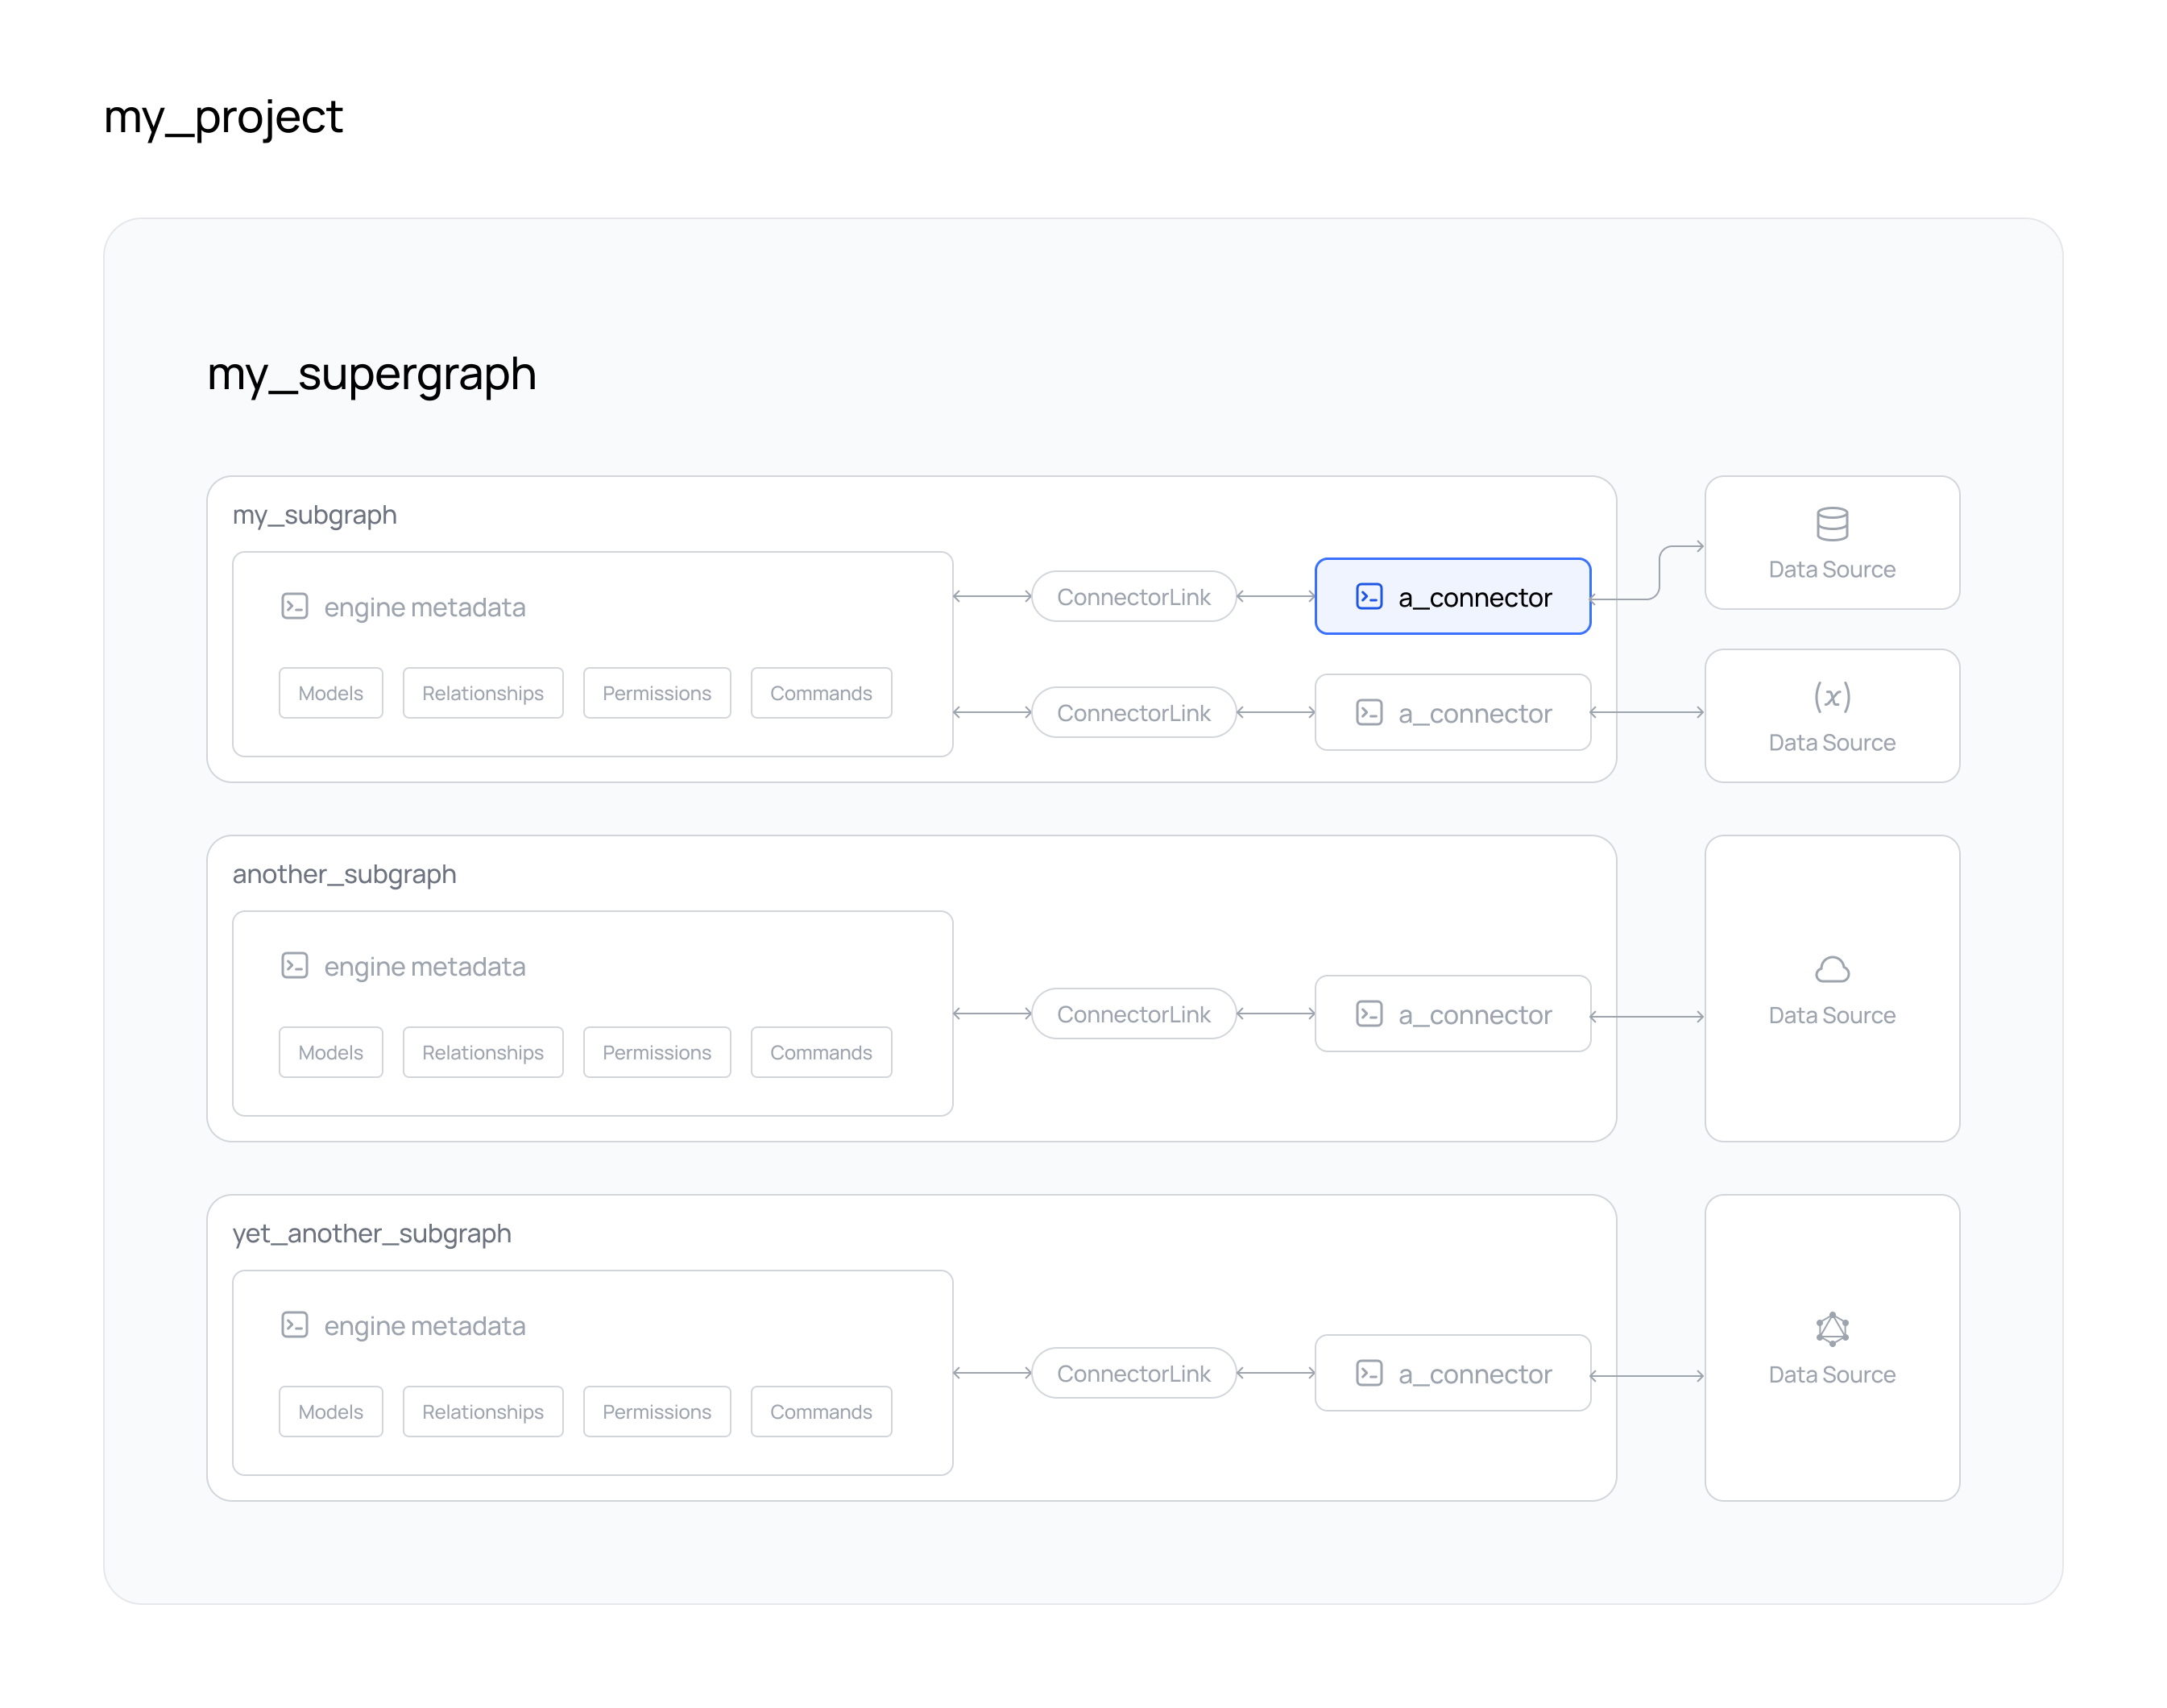
Deploy a Connector
What's about to happen?
Hasura DDN will host your deployed connectors for you, ensuring rapid delivery of data from your API to your consumers.
- PostgreSQL
- MongoDB
- ClickHouse
- TypeScript
- Python
- Go
- OpenAPI
- GraphQL
- Other
For each PostgreSQL connector in a project, follow the steps below.
Steps
- DDN CLI
- A new or existing supergraph
- A new or existing subgraph
- A new or existing data connector
- A new or existing project
- A new or existing subgraph on Hasura DDN
Step 1. Update the root .env.cloud
We need to update the root env.cloud file with the connection URI we need for the cloud hosted connector to be able to
communicate with the PostgreSQL data source.
For example, you may have used a development database while iterating locally. You can now replace that value with your staging or production database, depending on your needs.
If you've been running a local PostgreSQL instance, you can replace the connection string with a cloud instance connection string or set up an ngrok tunnel to a local instance.
CONNECTION_URI=<postgres-connection-uri>
Step 2. Build and deploy your cloud connector
At this stage, you can now build and deploy your connector on Hasura DDN. Simply run the following replacing the directory names with those that reflect your project.
ddn connector build create --connector ./my_subgraph/connector/my_pg/connector.yaml
The CLI will respond with read and write URLs for your deployed connector.
In this command we're passing the --connector argument, which specifies the path to the connector's configuration file
which we want to build.
What did this do?
The steps above built and deployed your PostgreSQL connector to Hasura DDN. So long as the connection URI you provided is reachable by DDN, your connector will be able to communicate between your API and your data source.
Next steps
If you have other connectors needed for a supergraph, repeat these steps for each connector. Otherwise, you're ready to create a new build of your supergraph and deploy it to Hasura DDN!
For each MongoDB connector in a project, follow the steps below.
Steps
- DDN CLI
- A new or existing supergraph
- A new or existing subgraph
- A new or existing data connector
- A new or existing project
- A new or existing subgraph on Hasura DDN
Step 1. Update the .env.cloud for the connector
We need to update the env.cloud file with any connection URI we need for the cloud hosted connector to be able to
communicate with the MongoDB data source.
For example, you may have used a development database while iterating locally. You can now replace that value with your staging or production database, depending on your needs.
If you've been running a local MongoDB instance, you can replace the connection string with a MongoDB Atlas connection string or set up an ngrok tunnel to a local MongoDB instance.
MONGODB_DATABASE_URI="mongodb+srv://<your-mongodb-connection-string>"
This key will depend on your connector.
Step 2. Build and deploy your cloud connector
At this stage, you can now build and deploy your connector Hasura DDN. Simply run the following replacing the directory names with those that reflect your project.
ddn connector build create --connector ./my_subgraph/connector/my_mongo/connector.yaml
The CLI will respond with read and write URLs for your deployed connector.
In this command we're passing a few arguments:
--connectorspecifies the path to the connector's cloud configuration file which we want to build.--target-env-filespecifies the path to the subgraph's cloud environment file to which the read and write URLs for the newly built cloud connector will be written to.--target-subgraphspecifies the path to the subgraph's configuration yaml file to which the target env file belongs.--target-connector-linkwhere the latest schema for the connector will be updated.
You're now ready to build and deploy your supergraph!
What did this do?
The steps above built and deployed your data connector to Hasura DDN. So long as the connection URI you provided is reachable by DDN, your connector will be able to communicate between your API and your data source.
Next steps
If you have other connectors needed for a supergraph, repeat these steps for each connector. Otherwise, you're ready to create a new build of your supergraph and deploy it to Hasura DDN!
For each ClickHouse connector in a project, follow the steps below.
Steps
- DDN CLI
- A new or existing supergraph
- A new or existing subgraph
- A new or existing data connector
- A new or existing project
- A new or existing subgraph on Hasura DDN
Step 1. Update the .env.cloud for the connector
We need to update the env.cloud file with any connection URI we need for the cloud hosted connector to be able to
communicate with the ClickHouse data source.
For example, you may have used a development database while iterating locally. You can now replace that value with your staging or production database, depending on your needs.
If you've been running a local ClickHouse instance, you can replace the connection string with a cloud instance connection string or set up an ngrok tunnel to a local instance.
CLICKHOUSE_URL=<clickhouse-connection-uri>
CLICKHOUSE_USERNAME=<your-username>
CLICKHOUSE_PASSWORD=<your-passowrd>
This key will depend on your connector.
Step 2. Build and deploy your cloud connector
At this stage, you can now build and deploy your connector on Hasura DDN. Simply run the following replacing the directory names with those that reflect your project.
ddn connector build create --connector ./my_subgraph/connector/my_clickhouse/connector.yaml
The CLI will respond with read and write URLs for your deployed connector.
In this command we're passing a few arguments:
--connectorspecifies the path to the connector's cloud configuration file which we want to build.--target-env-filespecifies the path to the subgraph's cloud environment file to which the read and write URLs for the newly built cloud connector will be written to.--target-subgraphspecifies the path to the subgraph's configuration yaml file to which the target env file belongs.--target-connector-linkwhere the latest schema for the connector will be updated.
You're now ready to build and deploy your supergraph!
What did this do?
The steps above built and deployed your ClickHouse connector to Hasura DDN. So long as the connection URI you provided is reachable by DDN, your connector will be able to communicate between your API and your data source.
Next steps
If you have other connectors needed for a supergraph, repeat these steps for each connector. Otherwise, you're ready to create a new build of your supergraph and deploy it to Hasura DDN!
For each TypeScript connector in a project, follow the steps below.
Steps
- DDN CLI
- A new or existing supergraph
- A new or existing subgraph
- A new or existing data connector
- A new or existing project
- A new or existing subgraph on Hasura DDN
Step 1. Build and deploy your cloud connector
You can now build and deploy your connector on Hasura DDN. Simply run the following replacing the directory names with those that reflect your project if necessary.
ddn connector build create --connector ./my_subgraph/connector/my_ts/connector.yaml
The CLI will respond with read and write URLs for your deployed connector.
In this command we're passing a few arguments:
--connectorspecifies the path to the connector's cloud configuration file which we want to build.--target-env-filespecifies the path to the subgraph's cloud environment file to which the read and write URLs for the newly built cloud connector will be written to.--target-subgraphspecifies the path to the subgraph's configuration yaml file to which the target env file belongs.--target-connector-linkwhere the latest schema for the connector will be updated.
You're now ready to build and deploy your supergraph!
What did this do?
The steps above built and deployed your TypeScript connector to Hasura DDN. This means you can now use this connector to enrich or transform data on your DDN-hotsed supergraph 🎉
Next steps
If you have other connectors needed for a supergraph, repeat these steps for each connector. Otherwise, you're ready to create a new build of your supergraph and deploy it to Hasura DDN!
For each Python connector in a project, follow the steps below.
Steps
- DDN CLI
- A new or existing supergraph
- A new or existing subgraph
- A new or existing data connector
- A new or existing project
- A new or existing subgraph on Hasura DDN
Step 1. Build and deploy your cloud connector
You can now build and deploy your connector on Hasura DDN. Simply run the following replacing the directory names with those that reflect your project if necessary.
ddn connector build create --connector ./my_subgraph/connector/my_python/connector.yaml
The CLI will respond with read and write URLs for your deployed connector.
In this command we're passing a few arguments:
--connectorspecifies the path to the connector's cloud configuration file which we want to build.--target-env-filespecifies the path to the subgraph's cloud environment file to which the read and write URLs for the newly built cloud connector will be written to.--target-subgraphspecifies the path to the subgraph's configuration yaml file to which the target env file belongs.--target-connector-linkwhere the latest schema for the connector will be updated.
You're now ready to build and deploy your supergraph!
What did this do?
The steps above built and deployed your Python connector to Hasura DDN. This means you can now use this connector to enrich or transform data on your DDN-hosted supergraph 🎉
Next steps
If you have other connectors needed for a supergraph, repeat these steps for each connector. Otherwise, you're ready to create a new build of your supergraph and deploy it to Hasura DDN!
For each Go connector in a project, follow the steps below.
Steps
- DDN CLI
- A new or existing supergraph
- A new or existing subgraph
- A new or existing data connector
- A new or existing project
- A new or existing subgraph on Hasura DDN
Step 1. Build and deploy your cloud connector
You can now build and deploy your connector on Hasura DDN. Simply run the following replacing the directory names with those that reflect your project if necessary.
ddn connector build create --connector ./my_subgraph/connector/my_go/connector.yaml
The CLI will respond with read and write URLs for your deployed connector.
In this command we're passing a few arguments:
--connectorspecifies the path to the connector's cloud configuration file which we want to build.--target-env-filespecifies the path to the subgraph's cloud environment file to which the read and write URLs for the newly built cloud connector will be written to.--target-subgraphspecifies the path to the subgraph's configuration yaml file to which the target env file belongs.--target-connector-linkwhere the latest schema for the connector will be updated.
You're now ready to build and deploy your supergraph!
What did this do?
The steps above built and deployed your Go connector to Hasura DDN. This means you can now use this connector to enrich or transform data on your DDN-hosted supergraph 🎉
Next steps
If you have other connectors needed for a supergraph, repeat these steps for each connector. Otherwise, you're ready to create a new build of your supergraph and deploy it to Hasura DDN!
For each OpenAPI connector in a project, follow the steps below.
Steps
- DDN CLI
- A new or existing supergraph
- A new or existing subgraph
- A new or existing data connector
- A new or existing project
- A new or existing subgraph on Hasura DDN
Step 1. Update the .env.cloud for the connector
Specifying the OpenAPI base URL
We need our cloud hosted connector to be able to communicate with the OpenAPI API. If we added this URI via an
environment variable in the env.local file, we need to update the env.cloud file with the connection URI for the
cloud hosted connector. Eg:
NDC_OAS_BASE_URL=<your-openapi-base-url>
Eg: NDC_OAS_BASE_URL=https://petstore3.swagger.io/api/v3 However, if you've edited this directly in your
functions.ts file, you can skip this step.
You may have used a development API server while iterating locally. You can now replace that value with your staging or production API server, depending on your needs.
Step 1. Build and deploy your cloud connector
You can now build and deploy your connector to Hasura DDN. Simply run the following, replacing the directory names with those that reflect your project.
ddn connector build create --connector ./my_subgraph/connector/my_openapi/connector.yaml
The CLI will respond with read and write URLs for your deployed connector.
Step 3. Create a .env.cloud for the subgraph
If you haven't already deployed a connector for this subgraph, you'll need to create a .env.cloud.my_subgraph file in
the root directory of the subgraph which contains your connector. Within this, you'll add the cloud connector's URLs
which were returned from the command above. Your file should look like this example with a connector named my_openapi
in the my_subgraph subgraph.
MY_SUBGRAPH_MY_OPENAPI_READ_URL=<cloud-connector-read-url>
MY_SUBGRAPH_MY_OPENAPI_WRITE_URL=<cloud-connector-write-url>
At this stage, you're ready to now build and deploy your supergraph!
What did this do?
The steps above built and deployed your data connector to Hasura DDN. So long as the connection URI you provided is reachable by DDN, your connector will be able to communicate between your API and your data source.
Next steps
If you have other connectors needed for a supergraph, repeat these steps for each connector. Otherwise, you're ready to create a new build of your supergraph and deploy it to Hasura DDN!
For each GraphQL connector in a project, follow the steps below.
Steps
- DDN CLI
- A new or existing supergraph
- A new or existing subgraph
- A new or existing data connector
- A new or existing project
- A new or existing subgraph on Hasura DDN
Step 1. Build and deploy your cloud connector
Simply run the following replacing the directory names with those that reflect your project.
ddn connector build create --connector ./my_subgraph/connector/my_graphql/connector.yaml
The CLI will respond with read and write URLs for your deployed connector.
In this command we're passing a few arguments:
--connectorspecifies the path to the connector's cloud configuration file which we want to build.--target-env-filespecifies the path to the subgraph's cloud environment file to which the read and write URLs for the newly built cloud connector will be written to.--target-subgraphspecifies the path to the subgraph's configuration yaml file to which the target env file belongs.--target-connector-linkwhere the latest schema for the connector will be updated.
You're now ready to build and deploy your supergraph!
What did this do?
The steps above built and deployed your GraphQL connector to Hasura DDN.
Next steps
If you have other connectors needed for a supergraph, repeat these steps for each connector. Otherwise, you're ready to create a new build of your supergraph and deploy it to Hasura DDN!
The process to deploy a connector is more or less the same for all connectors and varies mostly in the environment variables required. See the specific connector's documentation which may be on the GitHub repo for more information.
Steps
- DDN CLI
- A new or existing supergraph
- A new or existing subgraph
- A new or existing data connector
- A new or existing project
- A new or existing subgraph on Hasura DDN
Step 1. Update the root .env.cloud
Usually, we will need to update the root env.cloud file with the connection URI we need for the cloud hosted connector
to be able to communicate with the cloud based data source.
CONNECTION_URI=<connection-uri>
Step 2. Build and deploy your cloud connector
At this stage, you can now build and deploy your connector on Hasura DDN.
You can build the entire supergraph with all subgraphs and connectors.
ddn supergraph build create
You can also specify exactly which subgraphs and connectors you want to build. See incremental builds for more information.
To build a specific connector, run the following replacing the directory names with those that reflect your project.
ddn connector build create --connector ./my_subgraph/connector/my_connector/connector.yaml
The CLI will respond with the URLs required to communicate with your deployed connector.
In this command we're passing the --connector argument, which specifies the path to the connector's configuration file
which we want to build.
What did this do?
The steps above built and deployed your connector to Hasura DDN. So long as the connection URI you provided is reachable by DDN, your connector will be able to communicate between your API and your data source.
Next steps
If you have other connectors needed for a supergraph, repeat these steps for each connector. Otherwise, you're ready to create a new build of your supergraph and deploy it to Hasura DDN!
