REST Connectors for Event Triggers
Introduction
REST Connectors for Event Triggers are used to invoke existing or third-party webhooks without needing any middleware or modifications to the upstream code.
REST Connectors modify the Event Trigger's HTTP request to adapt to your webhook's expected format by adding suitable transforms.
General information about the templating used in REST Connectors can be found in the Kriti templating section of the documentation.
REST Connectors are supported in Hasura GraphQL Engine versions v2.1.0 and above.
Configuring REST Connectors
REST Connectors can be configured either when creating a new Event Trigger or editing an existing one. See the transform options here:
- Console
- CLI
- API
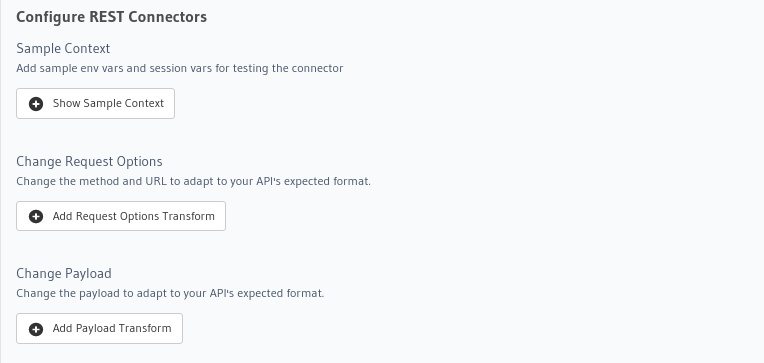
Go to the Events tab on the Console and create or modify an Event Trigger. Scroll down to Configure REST Connectors
section:
Update the databases > [source-name] > tables > [table-name].yaml file inside the metadata directory and add a
request_transform field to the Event Trigger:
table:
  name: users
  schema: public
event_triggers:
  - name: insert_trigger_on_users
    definition:
      insert:
        columns: '*'
    webhook: https://api.somedomain.com
    headers:
      - name: Authorization
        value: bearer-xxxx
    request_transform:
      template_engine: Kriti
      method: POST
      url: '{{$base_url}}/api/v3/endpoint'
      query_params:
        query_param: xxxxx
      content_type: application/json
      body:
        "{\n  \"table\": {\n    \"name\": {{$body.table.name}},\n    \"schema\": {{$body.table.schema}}\n  },\n  \"To\":
        {\n    \"username\": {{$body.event.data.new.name}},\n    \"email\": {{$body.event.data.new.email}}\n  }\n}"
Apply the Metadata by running:
hasura metadata apply
You can configure REST Connectors for Event Triggers using the pg_create_event_trigger Metadata API and adding a request_transform field to the args:
POST /v1/metadata HTTP/1.1
Content-Type: application/json
X-Hasura-Role: admin

{
  "type": "pg_create_event_trigger",
  "args": {
    "name": "insert_trigger_on_users",
    "replace": true,
    "source": "default",
    "table": {
      "name": "users",
      "schema": "public"
    },
    "webhook": "https://api.somedomain.com",
    "insert": {
      "columns": "*"
    },
    "headers": [
      {
        "name": "Authorization",
        "value": "bearer xxxx"
      }
    ],
    "request_transform": {
      "template_engine": "Kriti",
      "method": "POST",
      "url": "{{$base_url}}/api/v3/endpoint",
      "query_params": {
        "query_param": "xxxxx"
      },
      "content_type": "application/json",
      "body": "{\n  \"table\": {\n    \"name\": {{$body.table.name}},\n    \"schema\": {{$body.table.schema}}\n  },\n  \"To\": {\n    \"username\": {{$body.event.data.new.name}},\n    \"email\": {{$body.event.data.new.email}}\n  }\n}"
    }
  }
}
Context Variables
You can use context variables in the transforms to achieve dynamic behavior for each request.
The context variables available in transforms are:
| Context variable | Value |
|---|---|
| $body | Original body of event request |
| $base_url | Original configured webhook URL |
| $session_variables | Session variables |
| $query_params | Query parameters and the values to be sent to the webhook |
| $response.status | HTTP response staus code from the webhook |
Console sample context
The Console allows you to preview your transforms while configuring them. To avoid exposing sensitive information on the console UI the actual environment variables configured on the server are not resolved while displaying the previews. Also any session variables used in the transform will not be available at the time of configuration.
Hence, the Console allows you to provide mock env variables and session variables to verify your transforms. If you configure your transforms without providing the mock env/session variables you might see a UI validation error in the preview sections.
For example: If your webhook handler is set as an env var as shown below then pass a mock value for that env var in the sample context:
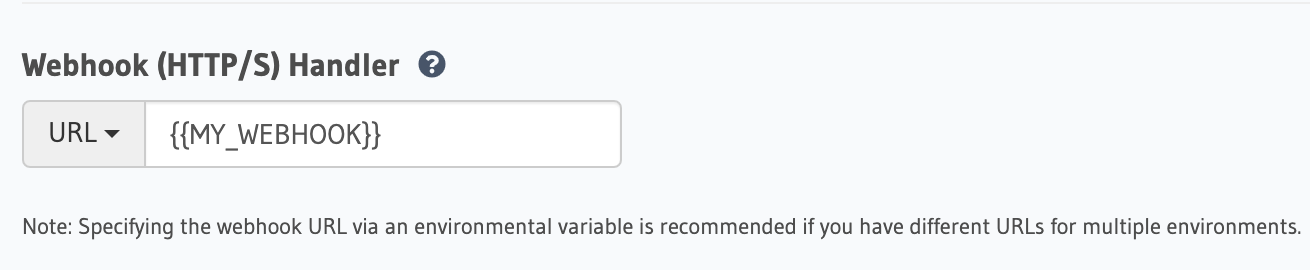
You can enter the mock env/session variables under Configure REST Connectors > Sample Context:

As the sample context is only used for previews, you can still configure the transforms on the Console without setting any sample context.
Types of transforms
REST Connectors allow you to add different transforms to the default HTTP request. You can also use context variables in the transforms to achieve dynamic behavior for each request.
You can transform your:
Request Method
You can change the request method to adapt to your API's expected format.
- Console
- CLI
- API
Head to the Events > [event_trigger_name] page. Under Configure REST Connectors click on
Add Request Options Transform.
Select the Request Method.
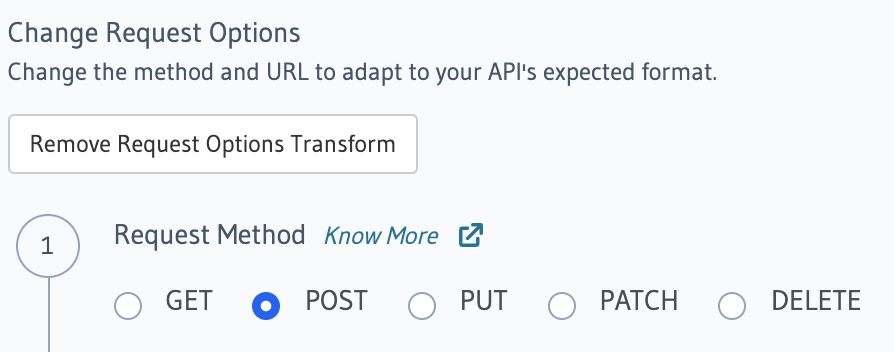
Hit Save Event Trigger to apply your changes.
Update the databases > [source-name] > tables > [table-name].yaml file inside the metadata directory and add a
request_transform field to the Event Trigger:
table:
  name: users
  schema: public
event_triggers:
  - name: insert_trigger_on_users
    definition:
      insert:
        columns: "*"
    webhook: https://api.somedomain.com
  headers:
    - name: Authorization
      value: bearer-xxxx
  request_transform:
    template_engine: Kriti
    method: POST
    url: "{{$base_url}}/api/v3/endpoint"
    query_params:
      query_param: xxxxx
    content_type: application/json
    body: "{\n  \"table\": {\n    \"name\": {{$body.table.name}},\n    \"schema\": {{$body.table.schema}}\n  },\n  \"To\": {\n    \"username\": {{$body.event.data.new.name}},\n    \"email\": {{$body.event.data.new.email}}\n  }\n}"
Apply the Metadata by running:
hasura metadata apply
You can configure REST Connectors for Event Triggers using the pg_create_event_trigger Metadata API and adding a request_transform field to the args:
POST /v1/metadata HTTP/1.1
Content-Type: application/json
X-Hasura-Role: admin

{
  "type": "pg_create_event_trigger",
  "args": {
    "name": "insert_trigger_on_users",
    "replace": true,
    "source": "default",
    "table": {
      "name": "users",
      "schema": "public"
    },
    "webhook": "https://api.somedomain.com",
    "insert": {
      "columns": "*"
    },
    "headers": [
      {
        "name": "Authorization",
        "value": "bearer xxxx"
      }
    ],
    "request_transform": {
      "template_engine": "Kriti",
      "method": "POST",
      "url": "{{$base_url}}/api/v3/endpoint",
      "query_params": {
        "query_param": "xxxxx"
      },
      "content_type": "application/json",
      "body": "{\n  \"table\": {\n    \"name\": {{$body.table.name}},\n    \"schema\": {{$body.table.schema}}\n  },\n  \"To\": {\n    \"username\": {{$body.event.data.new.name}},\n    \"email\": {{$body.event.data.new.email}}\n  }\n}"
    }
  }
}
Request URL
The Request URL template allows you to configure the exact API endpoint to call.
You can use the context variables to construct the final URL.
- Request URL with Query Parmeters (as key-value pairs)
- Request URL with Query Parmeters (as raw string)
Request URL with Query Parmeters (as key-value pairs)
You can provide Key-Value type query params to add to the URL.
You can also use the Kriti templating language to construct any string values here.
- Console
- CLI
- API
Head to the Events > [event_trigger_name] page. Under Configure REST Connectors click on
Add Request Options Transform.
Enter the Request URL Template and Query Params.
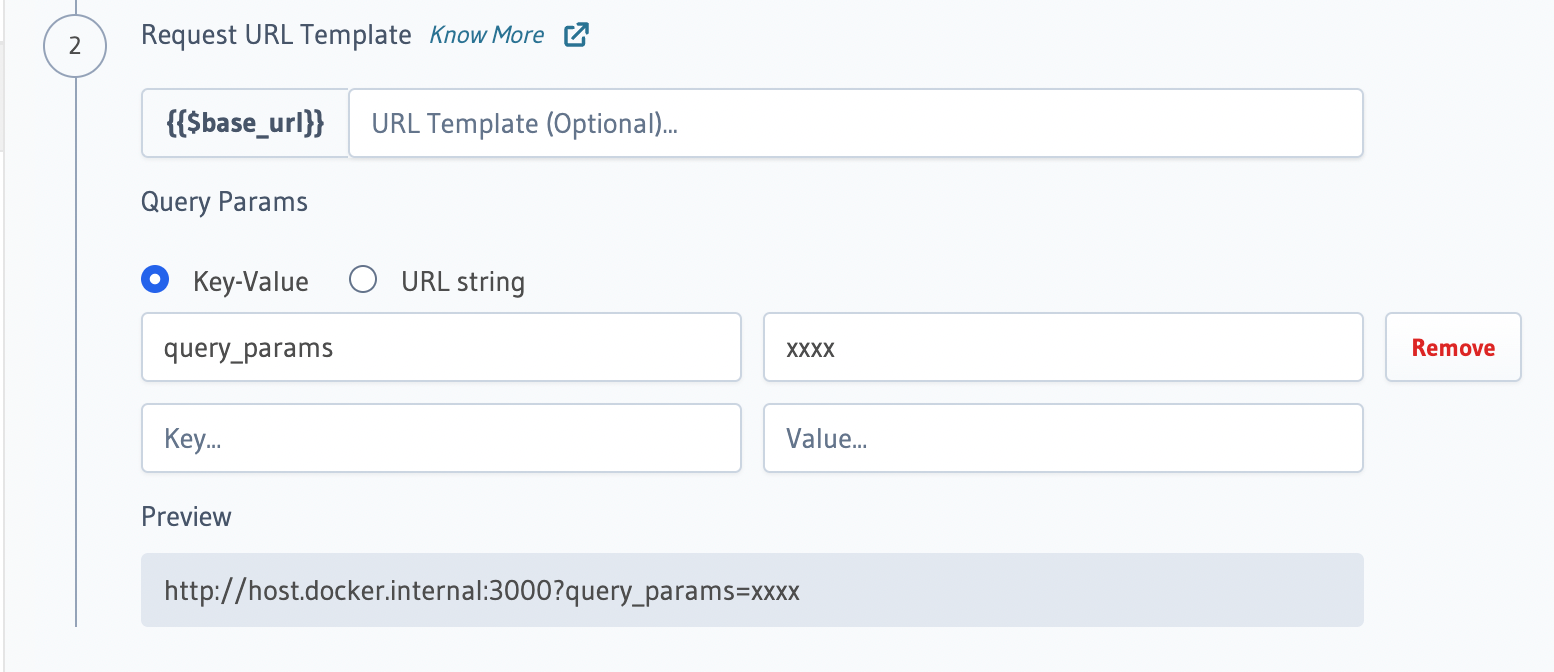
The value of the final url should be reflected in the Preview section given all required
sample context is set.
Hit Save Event Trigger to apply your changes.
Update the databases > [source-name] > tables > [table-name].yaml file inside the metadata directory and add a
request_transform field to the Event Trigger:
table:
  name: users
  schema: public
event_triggers:
  - name: insert_trigger_on_users
    definition:
      insert:
        columns: "*"
    webhook: https://api.somedomain.com
  headers:
    - name: Authorization
      value: bearer-xxxx
  request_transform:
    template_engine: Kriti
    method: POST
    url: "{{$base_url}}/api/v3/endpoint"
    query_params:
      query_param: xxxxx
    content_type: application/json
    body: "{\n  \"table\": {\n    \"name\": {{$body.table.name}},\n    \"schema\": {{$body.table.schema}}\n  },\n  \"To\": {\n    \"username\": {{$body.event.data.new.name}},\n    \"email\": {{$body.event.data.new.email}}\n  }\n}"
Apply the Metadata by running:
hasura metadata apply
You can configure REST Connectors for Event Triggers using the pg_create_event_trigger Metadata API and adding a request_transform field to the args:
POST /v1/metadata HTTP/1.1
Content-Type: application/json
X-Hasura-Role: admin

{
  "type": "pg_create_event_trigger",
  "args": {
    "name": "insert_trigger_on_users",
    "replace": true,
    "source": "default",
    "table": {
      "name": "users",
      "schema": "public"
    },
    "webhook": "https://api.somedomain.com",
    "insert": {
      "columns": "*"
    },
    "headers": [
      {
        "name": "Authorization",
        "value": "bearer xxxx"
      }
    ],
    "request_transform": {
      "template_engine": "Kriti",
      "method": "POST",
      "url": "{{$base_url}}/api/v3/endpoint",
      "query_params": {
        "query_param": "xxxxx"
      },
      "content_type": "application/json",
      "body": "{\n  \"table\": {\n    \"name\": {{$body.table.name}},\n    \"schema\": {{$body.table.schema}}\n  },\n  \"To\": {\n    \"username\": {{$body.event.data.new.name}},\n    \"email\": {{$body.event.data.new.email}}\n  }\n}"
    }
  }
}
Request URL with Query Parmeters (as raw string)
You can provide string type query params to add to the URL.
You can also use the Kriti templating language to construct any string values here.
- Console
- CLI
- API
Head to the Events > [event_trigger_name] page. Under Configure REST Connectors click on
Add Request Options Transform.
Enter the Request URL Template and Query Params.
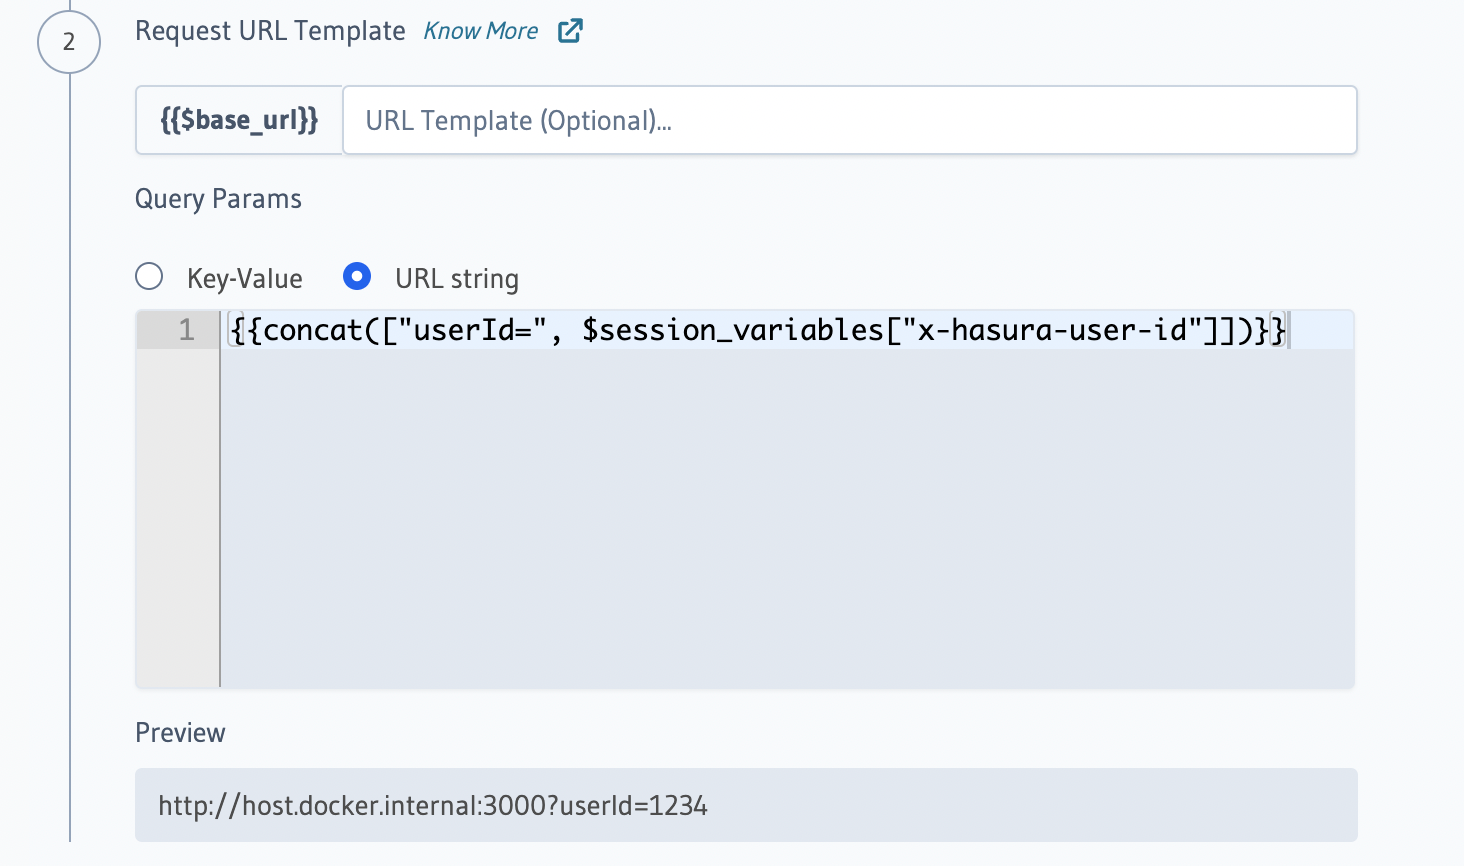
The value of the final url should be reflected in the Preview section given all required
sample context is set.
Hit Save Event Trigger to apply your changes.
Update the databases > [source-name] > tables > [table-name].yaml file inside the metadata directory and add a
request_transform field to the Event Trigger:
table:
  name: users
  schema: public
event_triggers:
  - name: insert_trigger_on_users
    definition:
      insert:
        columns: "*"
    webhook: https://api.somedomain.com
  headers:
    - name: Authorization
      value: bearer-xxxx
  request_transform:
    template_engine: Kriti
    method: POST
    url: "{{$base_url}}/api/v3/endpoint"
    query_params: "{{concat(["userId=", $session_variables["x-hasura-user-id"]])}}"
    content_type: application/json
    body: "{\n  \"table\": {\n    \"name\": {{$body.table.name}},\n    \"schema\": {{$body.table.schema}}\n  },\n  \"To\": {\n    \"username\": {{$body.event.data.new.name}},\n    \"email\": {{$body.event.data.new.email}}\n  }\n}"
Apply the Metadata by running:
hasura metadata apply
You can configure REST Connectors for Event Triggers using the pg_create_event_trigger Metadata API and adding a request_transform field to the args:
POST /v1/metadata HTTP/1.1
Content-Type: application/json
X-Hasura-Role: admin

{
  "type": "pg_create_event_trigger",
  "args": {
    "name": "insert_trigger_on_users",
    "replace": true,
    "source": "default",
    "table": {
      "name": "users",
      "schema": "public"
    },
    "webhook": "https://api.somedomain.com",
    "insert": {
      "columns": "*"
    },
    "headers": [
      {
        "name": "Authorization",
        "value": "bearer xxxx"
      }
    ],
    "request_transform": {
      "template_engine": "Kriti",
      "method": "POST",
      "url": "{{$base_url}}/api/v3/endpoint",
      "query_params": "{{concat(["userId=", $session_variables["x-hasura-user-id"]])}}"
      "content_type": "application/json",
      "body": "{\n  \"table\": {\n    \"name\": {{$body.table.name}},\n    \"schema\": {{$body.table.schema}}\n  },\n  \"To\": {\n    \"username\": {{$body.event.data.new.name}},\n    \"email\": {{$body.event.data.new.email}}\n  }\n}"
    }
  }
}
Use the escapeUri function to urlencode templated values. For example, if you have to use session variables in the
URL and those may contain non-ASCII values, then you should provide the template URL as
{{$base_url}}/{{escapeUri($session_variables['x-hasura-user-id'])}}.
Query params with key/value pairs which evaluate to null are ignored by Hasura while performing the HTTP API call.
Hasura considers such query params optional.
For example, consider a query param value with template {{$session_variables?['x-hasura-user-id']}}. If the variable
x-hasura-user-id is absent in the session variables, then the query param will be omitted from the HTTP API call.
Request Body
You can generate a custom request body by configuring a template to transform the default payload to a custom payload.
Request body could be provided using the body field as an object,
which additionally gives the ability to disable request body, transform request body to application/json, or transform
request body to x_www_form_urlencoded formats.
- Disabling Request Body
- Request Body with application/json format
- Request Body with x_www_form_urlencoded format
Disabling Request Body
If you are using a GET request, you might want to not send any request body, and additionally not send a
content-type header to the webhook. You can do that using the disable body feature.
- Console
- CLI
- API
In the Configure REST Connectors section, click on Add Request Options Transform, and convert the Request Method
as GET.
Then click on Add Payload Transform, disable the payload body by using the dropdown next to the
Configure Request Body section.
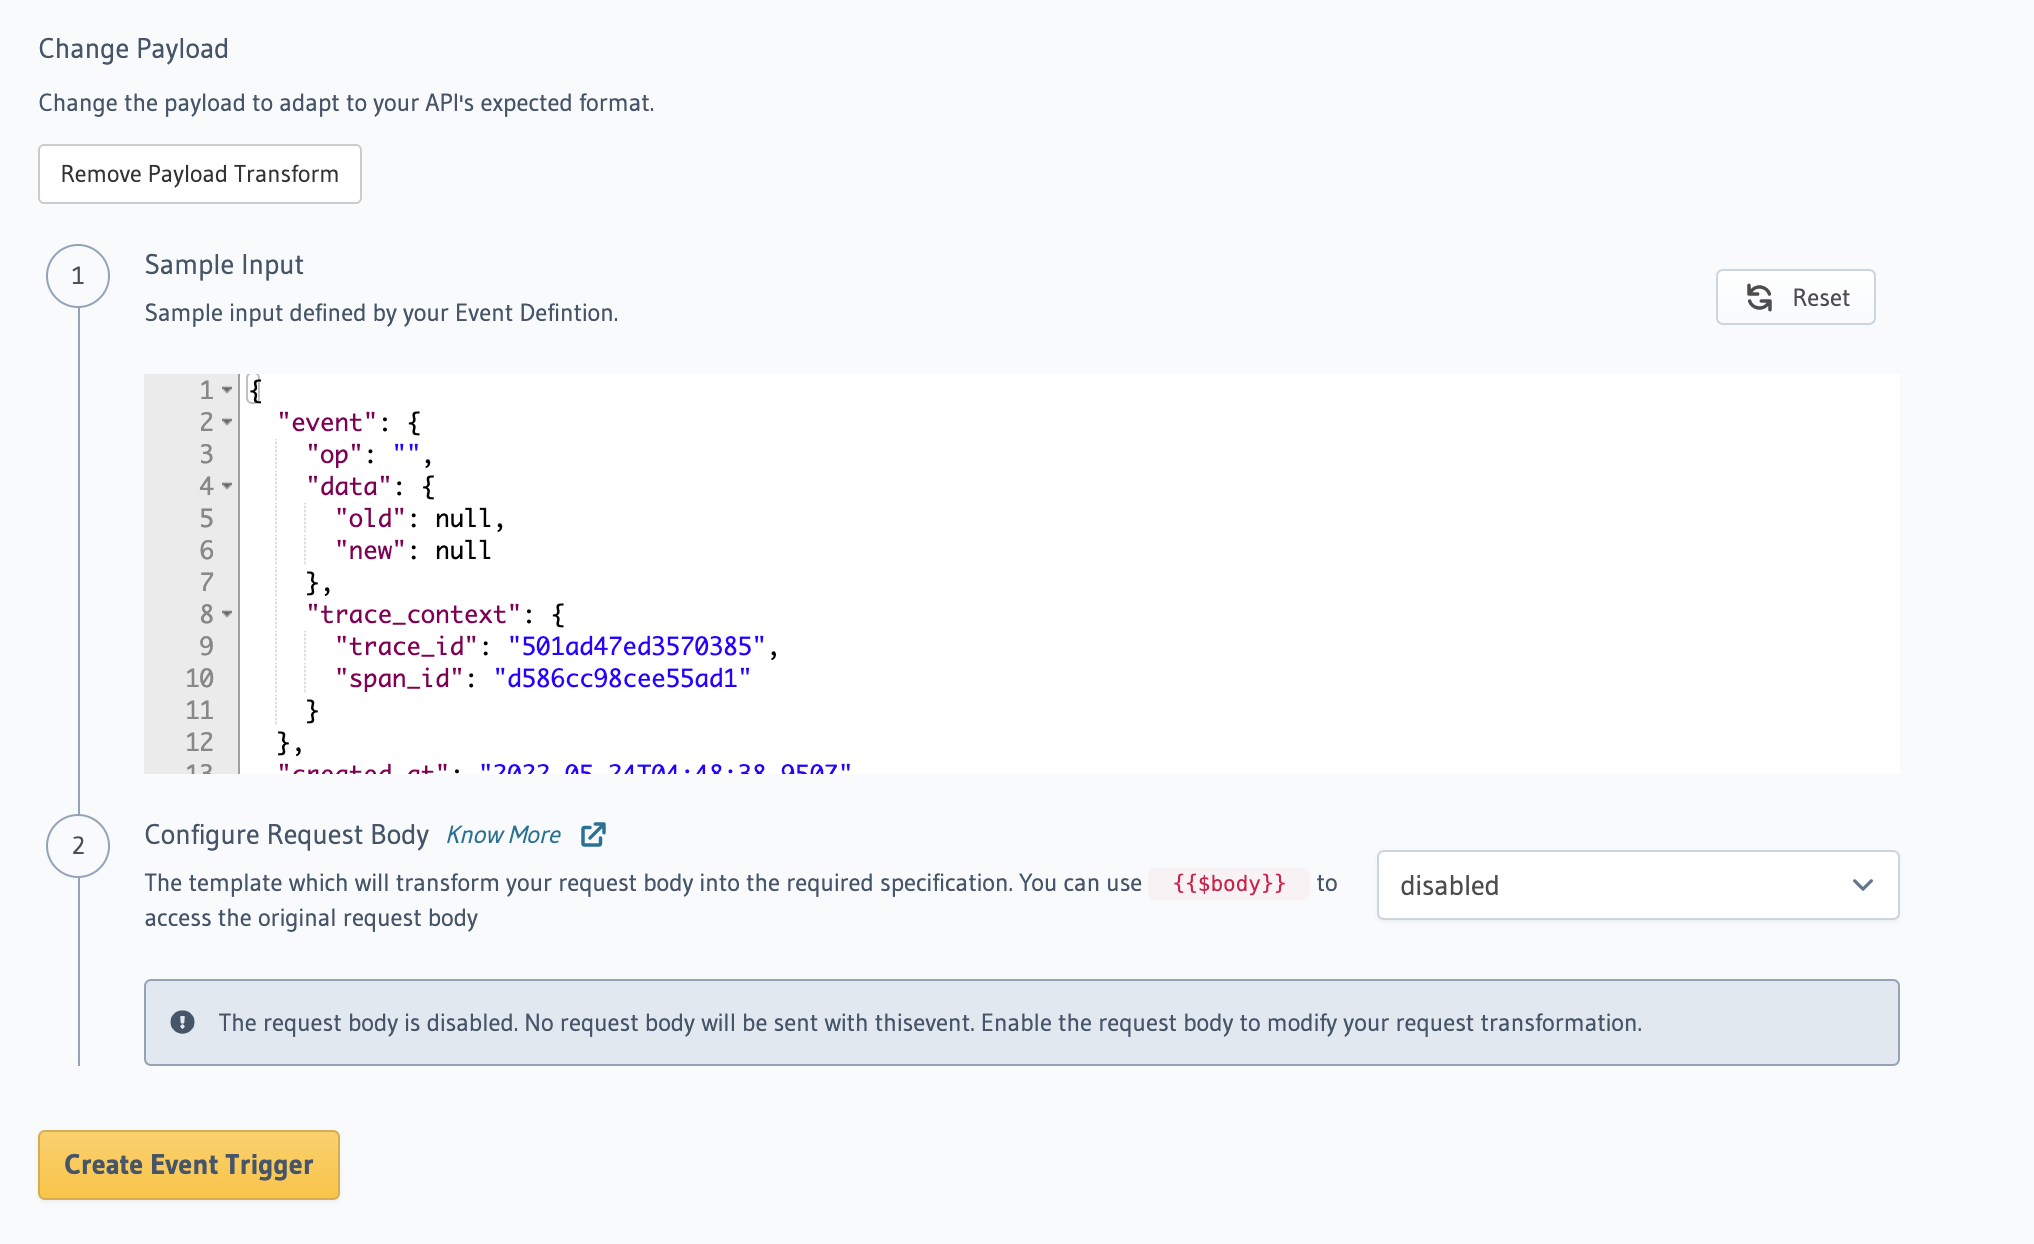
Hit Create Event Trigger to apply your changes.
Update the databases > [source-name] > tables > [table-name].yaml file inside the metadata directory and add a
request_transform field to the Event Trigger:
table:
  name: users
  schema: public
event_triggers:
  - name: insert_trigger_on_users
    definition:
      insert:
        columns: "*"
    webhook: https://api.somedomain.com
  headers:
    - name: Authorization
      value: bearer-xxxx
  request_transform:
    template_engine: Kriti
    version: 2
    method: GET
    url: "{{$base_url}}/api/v3/endpoint"
    query_params:
      query_param: xxxxx
    body:
      action: 'remove'
    request_headers:
      remove_headers: ['content-type]
Apply the Metadata by running:
hasura metadata apply
You can configure REST Connectors for Event Triggers using the pg_create_event_trigger Metadata API and adding a request_transform field to the args:
POST /v1/metadata HTTP/1.1
Content-Type: application/json
X-Hasura-Role: admin

{
  "type": "pg_create_event_trigger",
  "args": {
    "name": "insert_trigger_on_users",
    "replace": true,
    "source": "default",
    "table": {
      "name": "users",
      "schema": "public"
    },
    "webhook": "https://api.somedomain.com",
    "insert": {
      "columns": "*"
    },
    "headers": [
      {
        "name": "Authorization",
        "value": "bearer xxxx"
      }
    ],
    "request_transform": {
      "template_engine": "Kriti",
      "version": 2,
      "method": "GET",
      "url": "{{$base_url}}/api/v3/endpoint",
      "query_params": {
        "query_param": "xxxxx"
      },
      "body": {
        "action": "remove"
      },
      "request_headers": {
        "remove_headers": ["content-type"],
      },
    }
  }
}
Request Body with application/json format
You can transform Request Body to application/json format using the following steps:
- Console
- CLI
- API
In the Configure REST Connectors section, click on Add Payload Transform. By default Console sends the body as
application/json which can be seen in the dropdown next to the Configure Request Body section.

Hit Create Event Trigger to apply your changes.
Update the databases > [source-name] > tables > [table-name].yaml file inside the metadata directory and add a
request_transform field to the Event Trigger:
table:
  name: users
  schema: public
event_triggers:
  - name: insert_trigger_on_users
    definition:
      insert:
        columns: "*"
    webhook: https://api.somedomain.com
  headers:
    - name: Authorization
      value: bearer-xxxx
  request_transform:
    template_engine: Kriti
    version: 2
    method: POST
    url: "{{$base_url}}/api/v3/endpoint"
    query_params:
      query_param: xxxxx
    body:
      action: 'transform'
      template: '{"username": {{$body.table.username}}}'
Apply the Metadata by running:
hasura metadata apply
You can configure REST Connectors for Event Triggers using the pg_create_event_trigger Metadata API and adding a request_transform field to the args:
POST /v1/metadata HTTP/1.1
Content-Type: application/json
X-Hasura-Role: admin

{
  "type": "pg_create_event_trigger",
  "args": {
    "name": "insert_trigger_on_users",
    "replace": true,
    "source": "default",
    "table": {
      "name": "users",
      "schema": "public"
    },
    "webhook": "https://api.somedomain.com",
    "insert": {
      "columns": "*"
    },
    "headers": [
      {
        "name": "Authorization",
        "value": "bearer xxxx"
      }
    ],
    "request_transform": {
      "template_engine": "Kriti",
      "version": 2,
      "method": "POST",
      "url": "{{$base_url}}/api/v3/endpoint",
      "query_params": {
        "query_param": "xxxxx"
      },
      "body": {
        "action": "transform",
        "template": "{\"username\": {{$body.table.username}}}"
      },
    }
  }
}
Request Body with x_www_form_urlencoded format
While doing x_www_form_urlencoded transformation, please note that as all changes to the request must be made explicit
when calling the API, so you will need to remove the default application/json header and add a
application/x-www-form-urlencoded header.
- Console
- CLI
- API
In the Configure REST Connectors section, click on Add Payload Transform. Change the dropdown next to
Configure Request Body section to x_www_form_urlencoded. You can see the body transformed body in the
Transformed Request Body section.
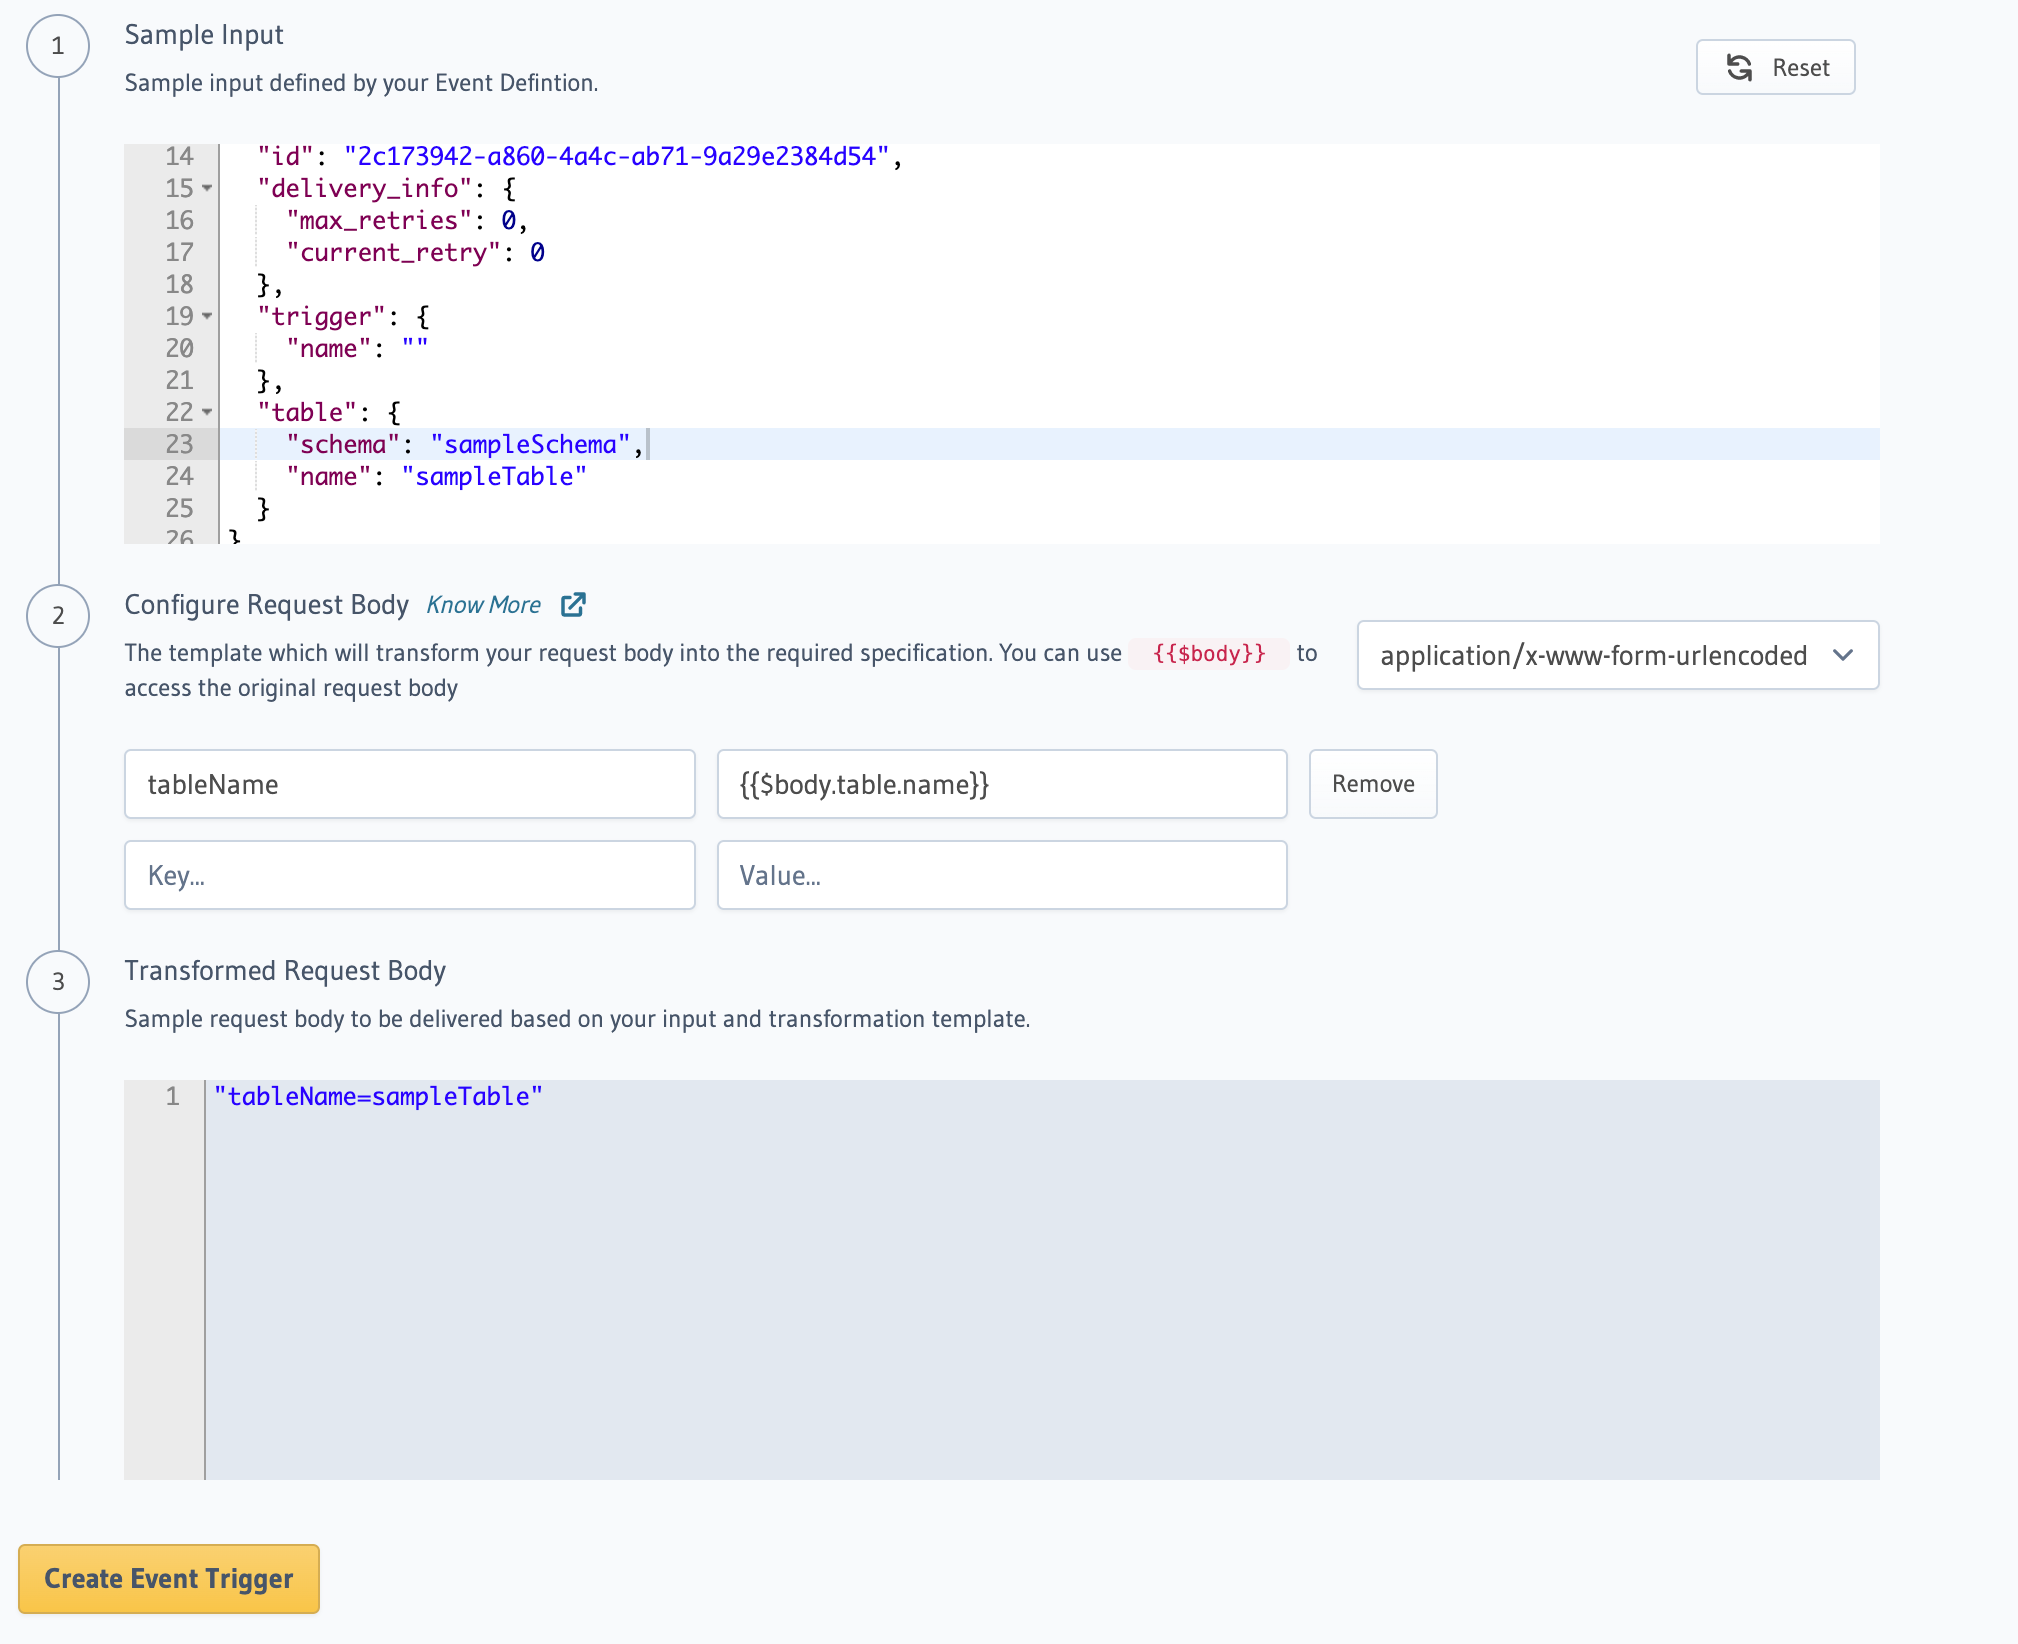
Hit Create Event Trigger to apply your changes.
Update the databases > [source-name] > tables > [table-name].yaml file inside the metadata directory and add a
request_transform field to the Event Trigger:
table:
  name: users
  schema: public
event_triggers:
  - name: insert_trigger_on_users
    definition:
      insert:
        columns: "*"
    webhook: https://api.somedomain.com
  headers:
    - name: Authorization
      value: bearer-xxxx
  request_transform:
    template_engine: Kriti
    version: 2
    method: POST
    url: "{{$base_url}}/api/v3/endpoint"
    query_params:
      query_param: xxxxx
    body:
      action: 'x_www_form_urlencoded'
      form_template:
        username: '{{$body.table.username}}'
    request_headers:
      remove_headers: ['content-type']
      add_headers:
        'content-type': 'application/x-www-form-urlencoded'
Apply the Metadata by running:
hasura metadata apply
You can configure REST Connectors for Event Triggers using the pg_create_event_trigger Metadata API and adding a request_transform field to the args:
POST /v1/metadata HTTP/1.1
Content-Type: application/json
X-Hasura-Role: admin

{
  "type": "pg_create_event_trigger",
  "args": {
    "name": "insert_trigger_on_users",
    "replace": true,
    "source": "default",
    "table": {
      "name": "users",
      "schema": "public"
    },
    "webhook": "https://api.somedomain.com",
    "insert": {
      "columns": "*"
    },
    "headers": [
      {
        "name": "Authorization",
        "value": "bearer xxxx"
      }
    ],
    "request_transform": {
      "template_engine": "Kriti",
      "version": 2,
      "method": "POST",
      "url": "{{$base_url}}/api/v3/endpoint",
      "query_params": {
        "query_param": "xxxxx"
      },
      "body": {
        "action": "x_www_form_urlencoded",
        "form_template": {
          "username": "{{$body.table.username}}"
        },
      },
      "request_headers": {
        "remove_headers": ["content-type"],
        "add_headers": {
          "content-type": "application/x-www-form-urlencoded"
        },
      },
    }
  }
}
Example: Trigger SendGrid's Mail Send API
To see the REST Connectors for Event Triggers in action, let's set up an Event Trigger to send an email using the SendGrid Mail Send API.
Let's say you have a table users (id int, name text, email text) and you would like to send the user an email whenever
a new user is inserted into the users table.
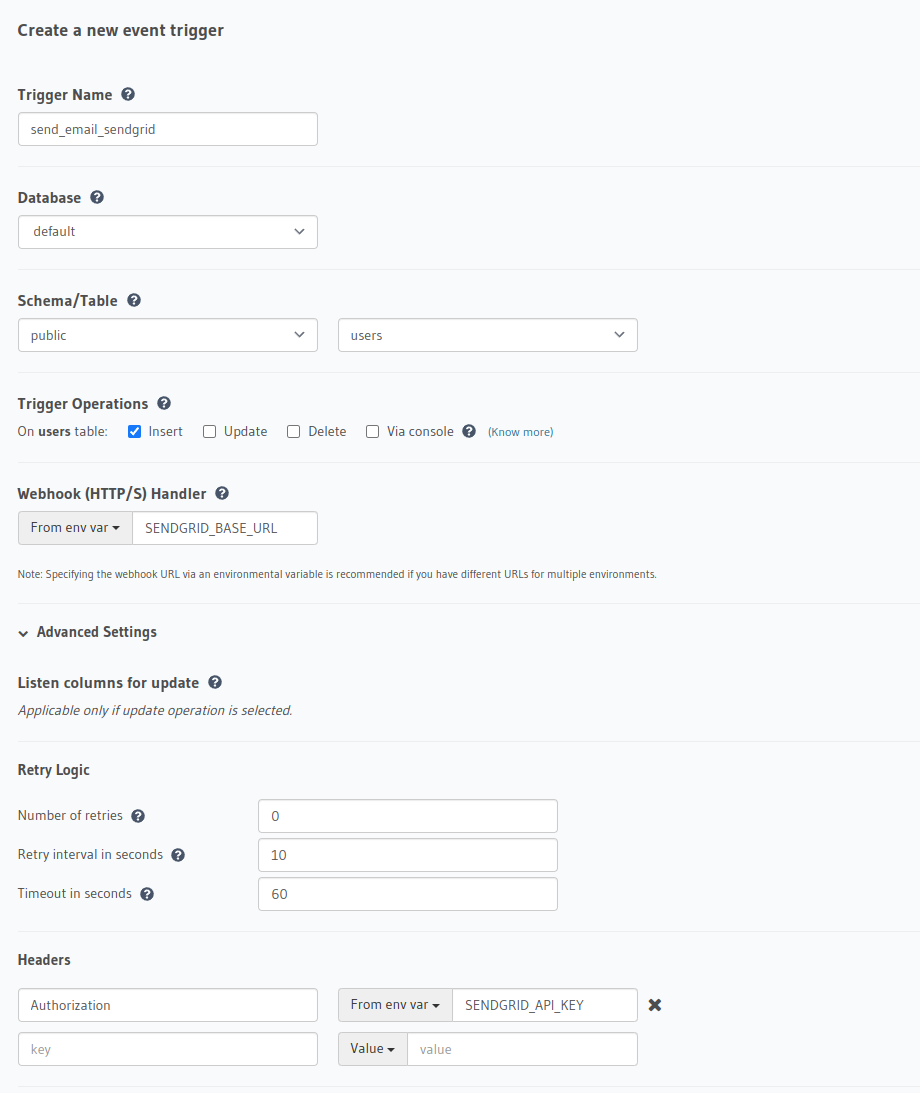
Step 1: Configure Event Trigger details
Head to the Events tab on your Console and create a new Event Trigger.
The SendGrid Mail Send API is available at POST https://api.sendgrid.com/v3/mail/send and expects an Authorization
header to be passed with a SendGrid API key for access (see
docs).
You can configure env vars, say SENDGRID_BASE_URL with the value https://api.sendgrid.com and SENDGRID_API_KEY
with the value Bearer <sendgrid-api-key> on the server so that they can be used for this Event Trigger and any other
SendGrid requests we might want to use in the future.
You can now configure the Event Trigger as follows:
Table: users
Operations: Insert
Webhook: SENDGRID_BASE_URL
Headers: Authorization: SENDGRID_API_KEY
Step 2: Configure REST connector
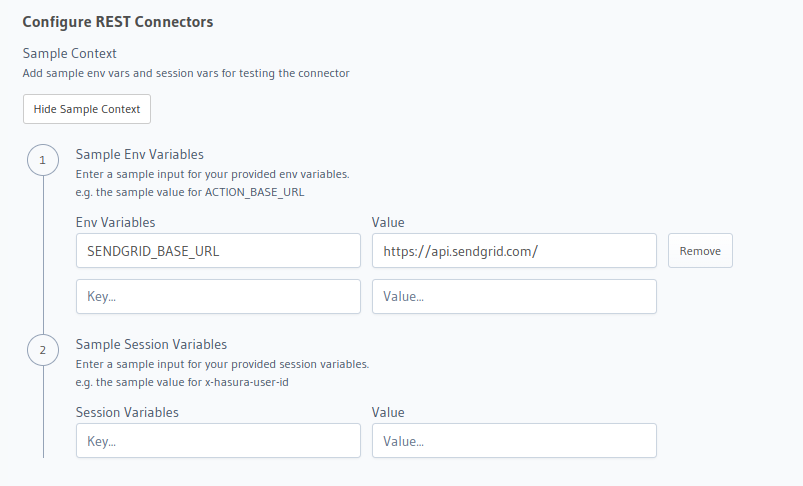
Step 2.1: Add Sample Context
Set a mock value for the SENDGRID_BASE_URL env var to verify your URL transform that we will be configuring next as
the actual value is not exposed to the Console.
Step 2.2: Add Request Transforms
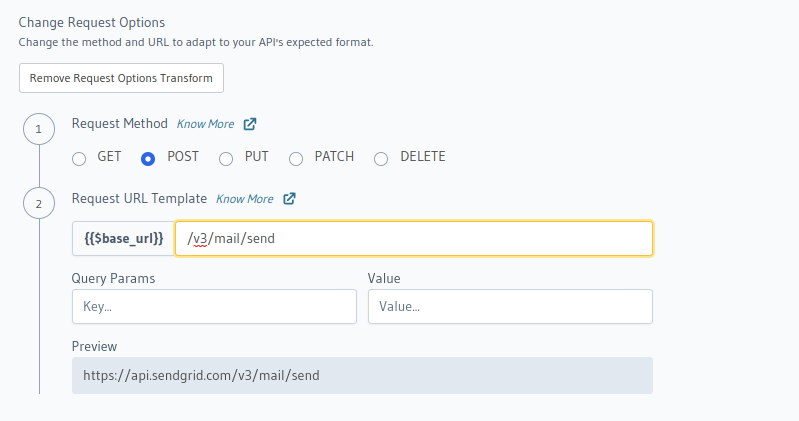
Request Method and URL template
The SendGrid API request uses the POST request method so you can choose that.
We need to add /v3/mail/send to the SendGrid base URL (https://api.sendgrid.com) that we configured in the env var.
This can be done by setting the URL template as {{$base_url}}/v3/mail/send.
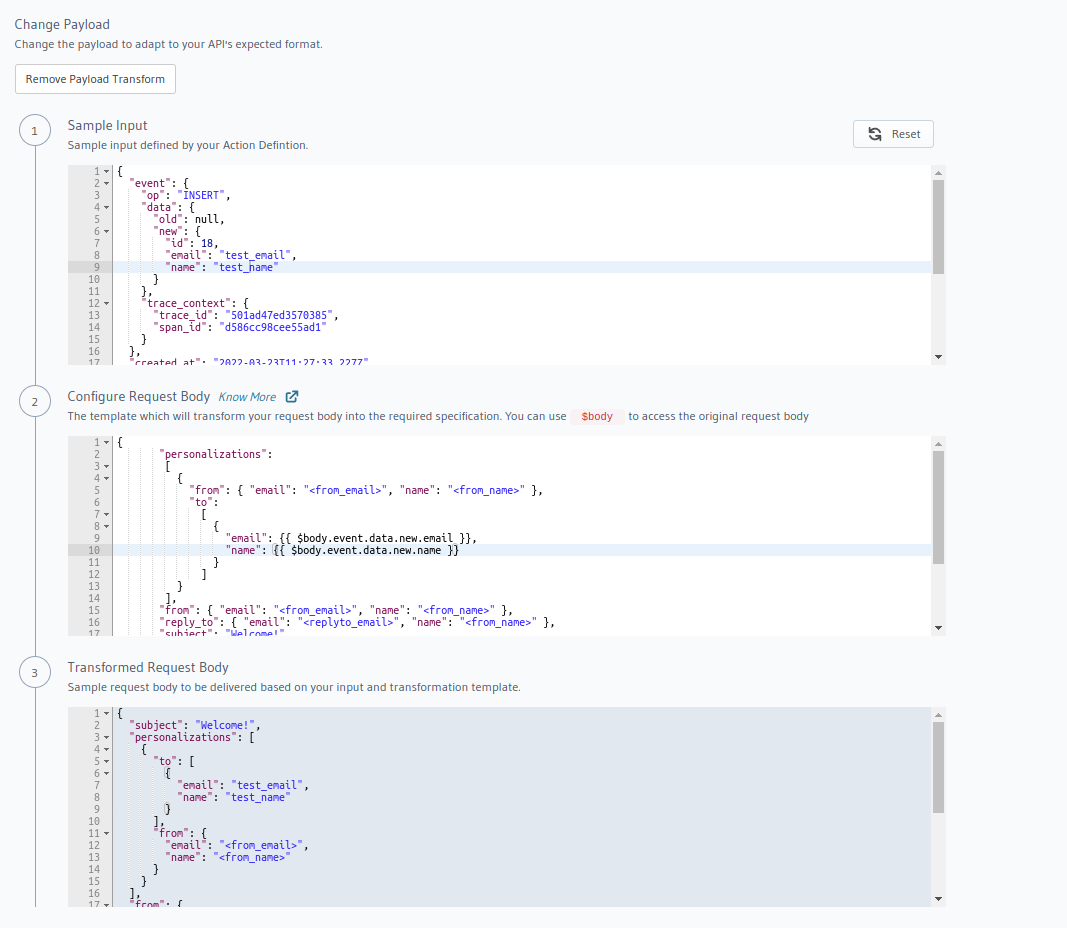
Request Body
Here is the request body template we would need for the SendGrid Mail Send API (see docs).
We replace the email and name values from the Event Trigger body:
{
  "personalizations":
   [
     {
       "from": { "email": "<from_email>", "name": "<from_name>" },
       "to":
         [
           {
             "email": {{ $body.event.data.new.email }},
             "name": {{ $body.event.data.new.name }}
           }
         ]
     }
   ],
  "from": { "email": "<from_email>", "name": "<from_name>" },
  "reply_to": { "email": "<replyto_email>", "name": "<from_name>" },
  "subject": "Welcome!",
  "content":
    [
      {
        "type": "text/html",
        "value": "<p>Mail from a Hasura Event Trigger!</p>"
      }
    ]
}
Hit Create Event Trigger to complete the Event Trigger set up.
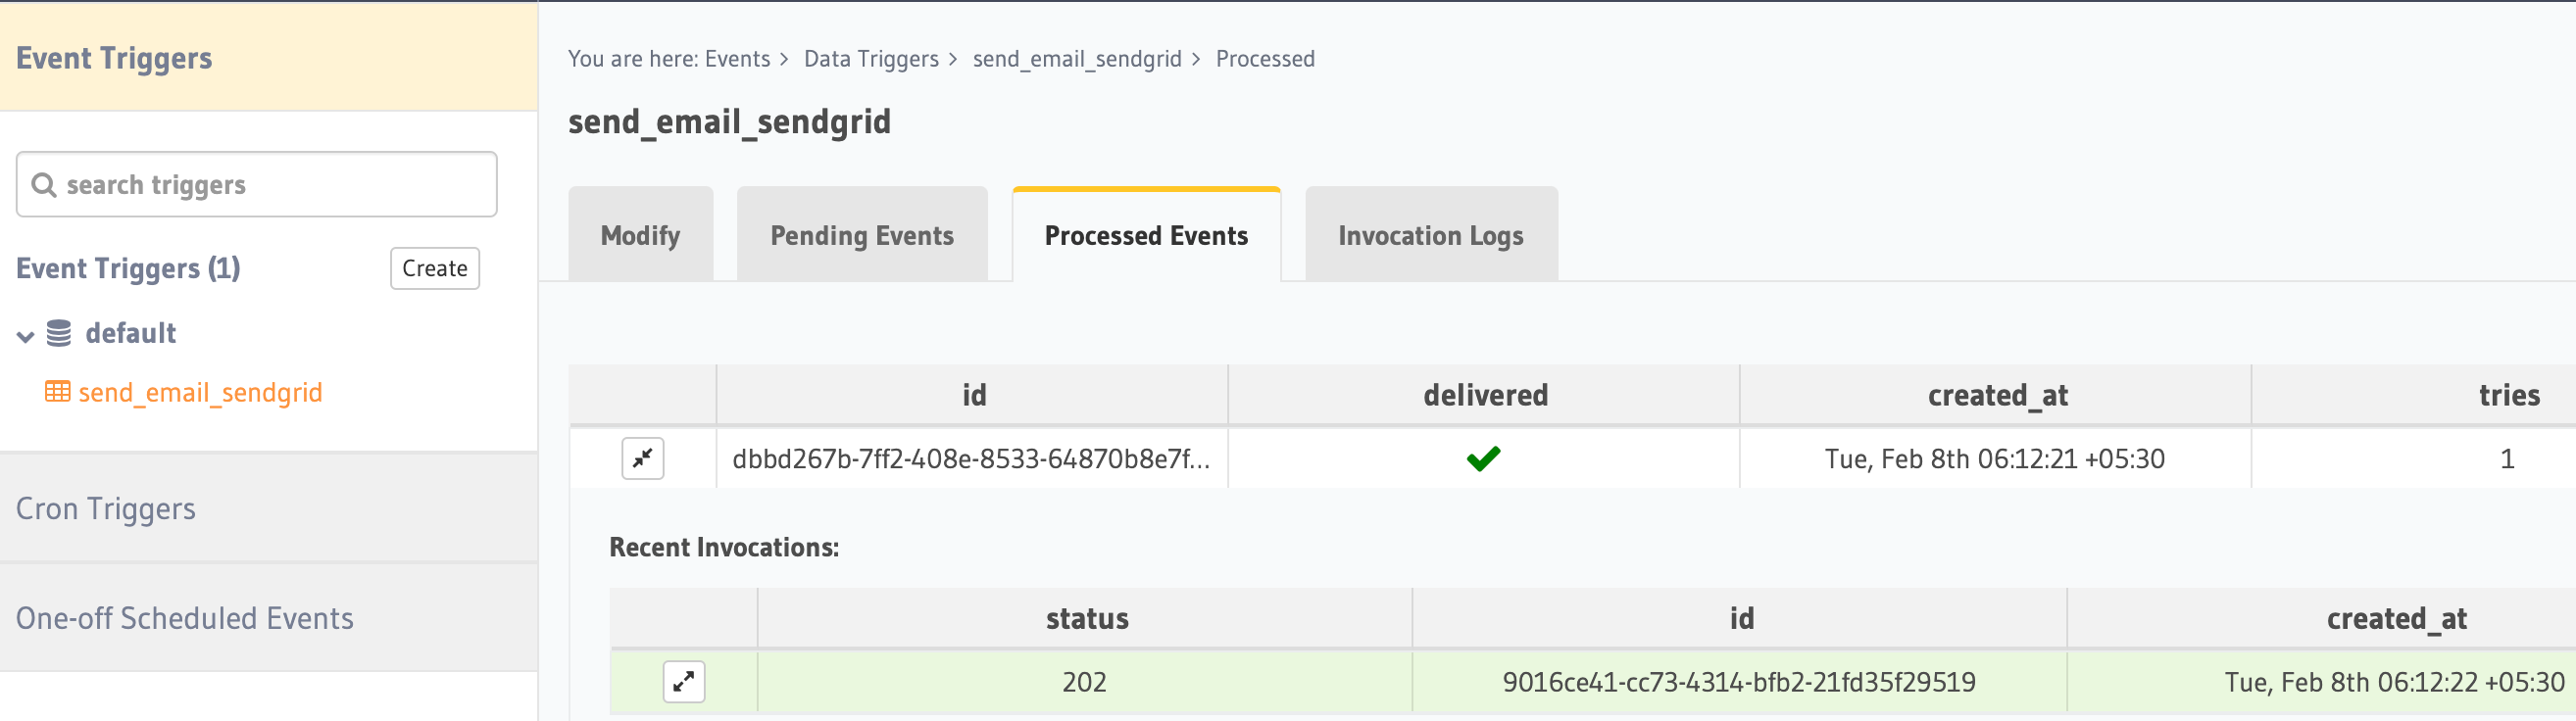
Step 3: Test the Event Trigger
Insert a new user to the users table to call the SendGrid API.
Navigate to Data > [database-name] > public > users and insert a new row.
The insert operation triggers the Event Trigger and sends the transformed request to the SendGrid API which should
send an email to the inserted user.
You can view the Processed Events and Invocation Logs for the Event Trigger to check the SendGrid API response.
Explore the Hasura Data Hub source code for Event Connectors with different platform integrations.