Build an API gateway
Introduction
This guide, and the others contained in this directory, are intended to be a step-by-step resource to build an application using Hasura. If you arrived here from the Hasura Cloud Console, you'll have already created a project and are ready to follow the steps below. If you're here from elsewhere, you can create a Hasura Cloud project for free and get started right away.
What we're building

The application we will be building is an API gateway that unifies multiple GraphQL APIs into one. While we'll focus on integrating a payment processor, a social networking API, and a CMS, the concepts and techniques we will be using apply to any application seeking to unify multiple GraphQL APIs.
This can be a daunting task for developers and systems architects. It requires a deep understanding of the different APIs, their schemas, and how they can be combined in a way that makes sense for the end user. However, with Hasura, this process can be streamlined and simplified. Hasura allows you to bring in many GraphQL APIs and turn them into one, eliminating the need for complex integration work. With Hasura, you can focus on creating a powerful and intuitive API gateway that delivers a seamless experience to end users.
In the example below, we're mimicking a scenario wherein an application is reliant on three APIs to deliver a single experience to its users end users. The first is a social networking API that allows users to create accounts, follow other users, and make comments on their posts. The second API is a payment processor that allows administrators to create products and accept payments. Finally, we have a CMS that allows users to create and edit content. As you stitch together these three APIs, you will be able to create a powerful API gateway that allows users to query information about their accounts and network, see their orders, and manage content — all seamlessly from a single, easy-to-manage endpoint.
By the end of this guide, you'll have an API gateway that you can translate into your own application.
Fully-functional gateway
Steps 1 through 5 will cover everything needed to create a fully-functional API gateway.
Step 1. Connect the APIs
In the modern era of building applications, it's common to rely on multiple APIs. Each of these APIs typically has its own schema, which can make it difficult to stitch them together into a single, simple-to-use API for your teams. Hasura can help you unify these APIs into a single API that can be accessed by your application. And, you can do this by simply pasting in a few URLs.
To save you time, we've generated three read-only GraphQL APIs for you to use in this guide:
| API | Description | URL |
|---|---|---|
socials | Allows users to create accounts, follow other users, and make comments on their posts | https://growth-gateway-1.hasura.app/v1/graphql |
payments | Allows administrators to create products and accept payments | https://growth-gateway-2.hasura.app/v1/graphql |
CMS | Allows users to create and edit content | https://growth-gateway-3.hasura.app/v1/graphql |
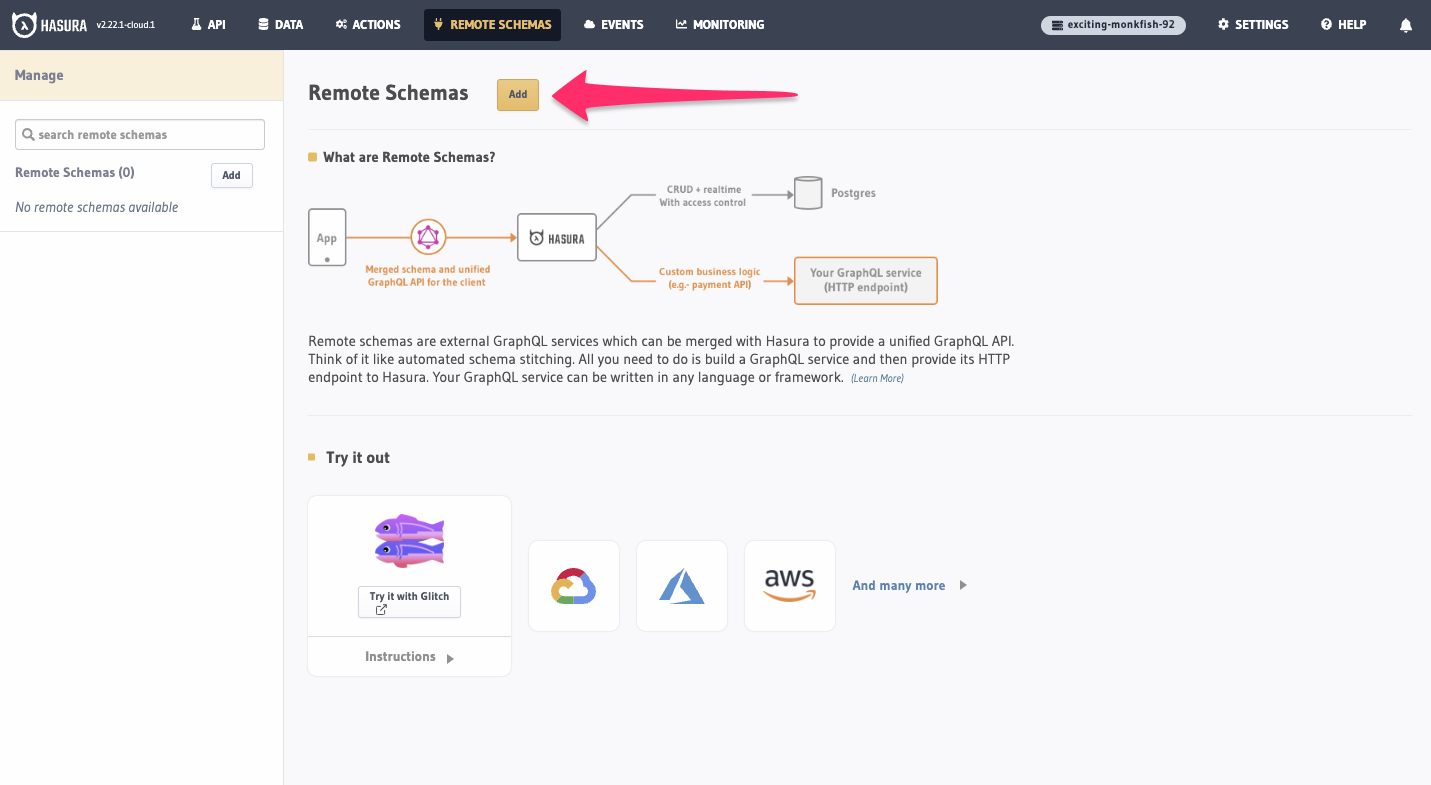
We call these GraphQL APIs Remote Schemas because they are not hosted on the same server as your Hasura instance. To
connect to these, head to the Remote Schemas tab of your Hasura Console - the UI that allows you to interact with
your Hasura instance - and click Add:
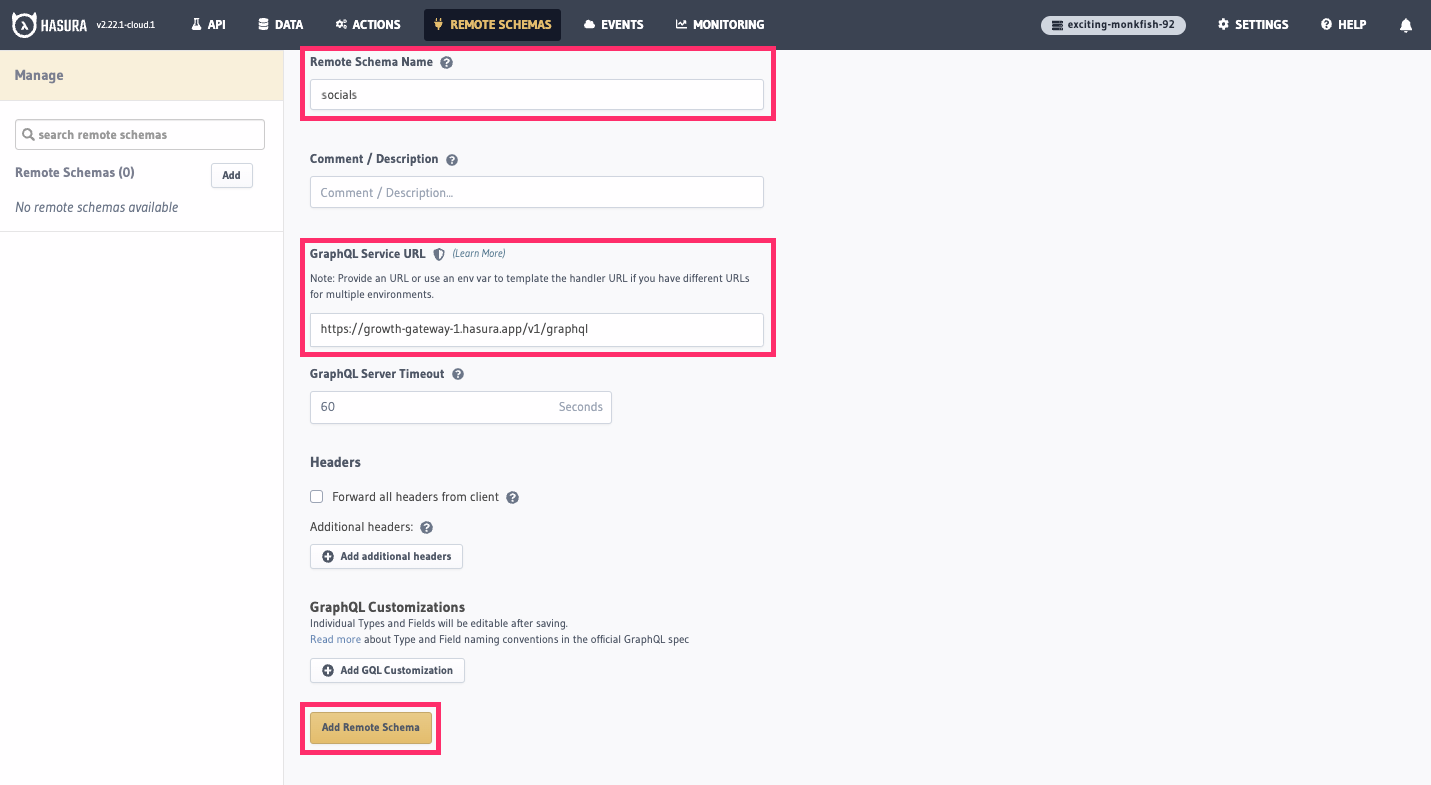
We'll give the first Remote Schema the name of socials and paste in this URL before clicking Add Remote Schema:
https://growth-gateway-1.hasura.app/v1/graphql
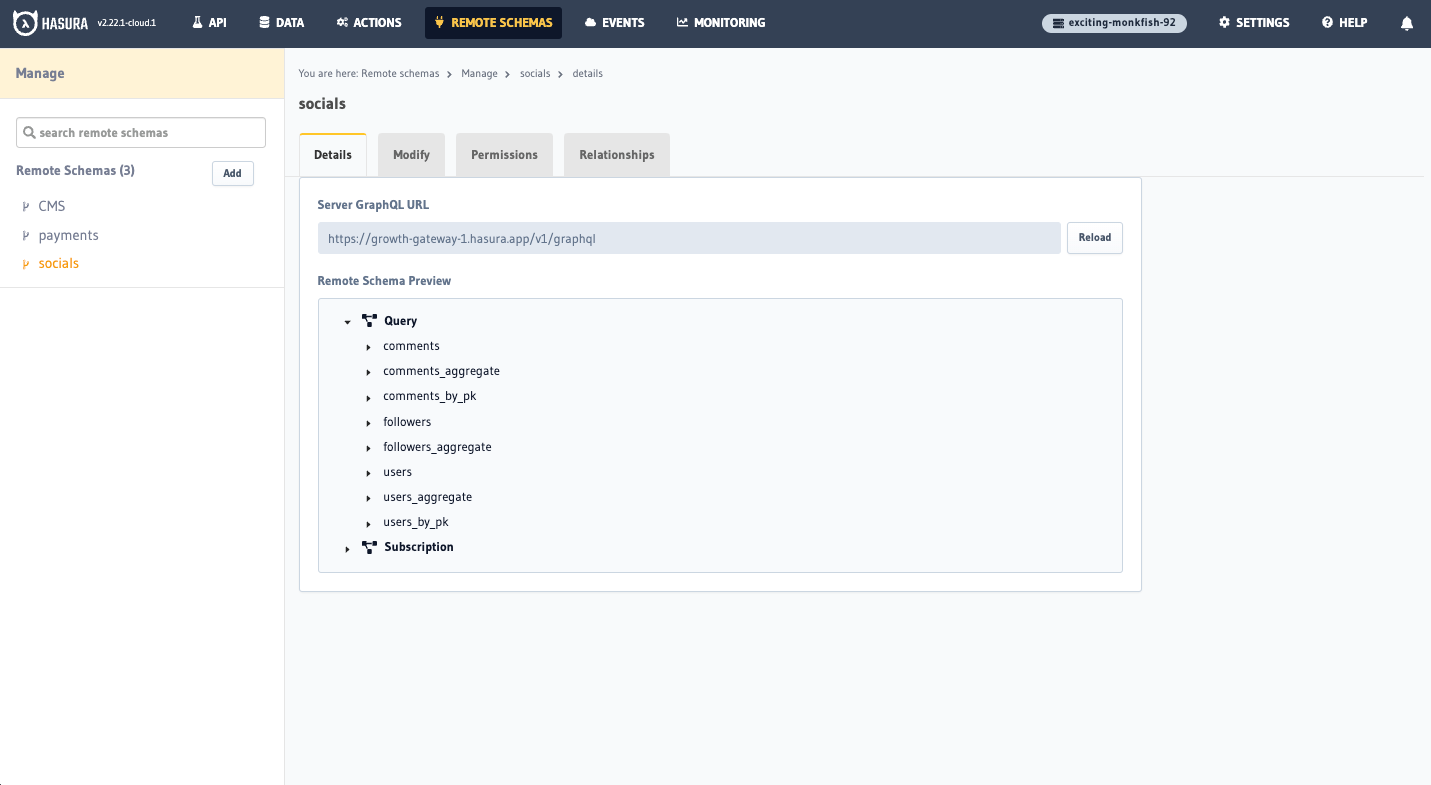
Repeat this process for the other two APIs by clicking Add in the sidebar and naming them based on the table above,
before pasting in the URLs. Once complete, your Remote Schemas should look like this:
That's it?! Yes, that's it! You've just created an API gateway that unifies three GraphQL APIs into one. You can now execute a myriad of GraphQL operations across all three APIs. However, we can do better. Let's take a look at what we can do to make this API gateway even more powerful and simple to use for your teams.
Step 2. Customize your schema
If we head over to the API tab of our the Console and take a look at the root-level fields of our API, we can see that
we have a lot:
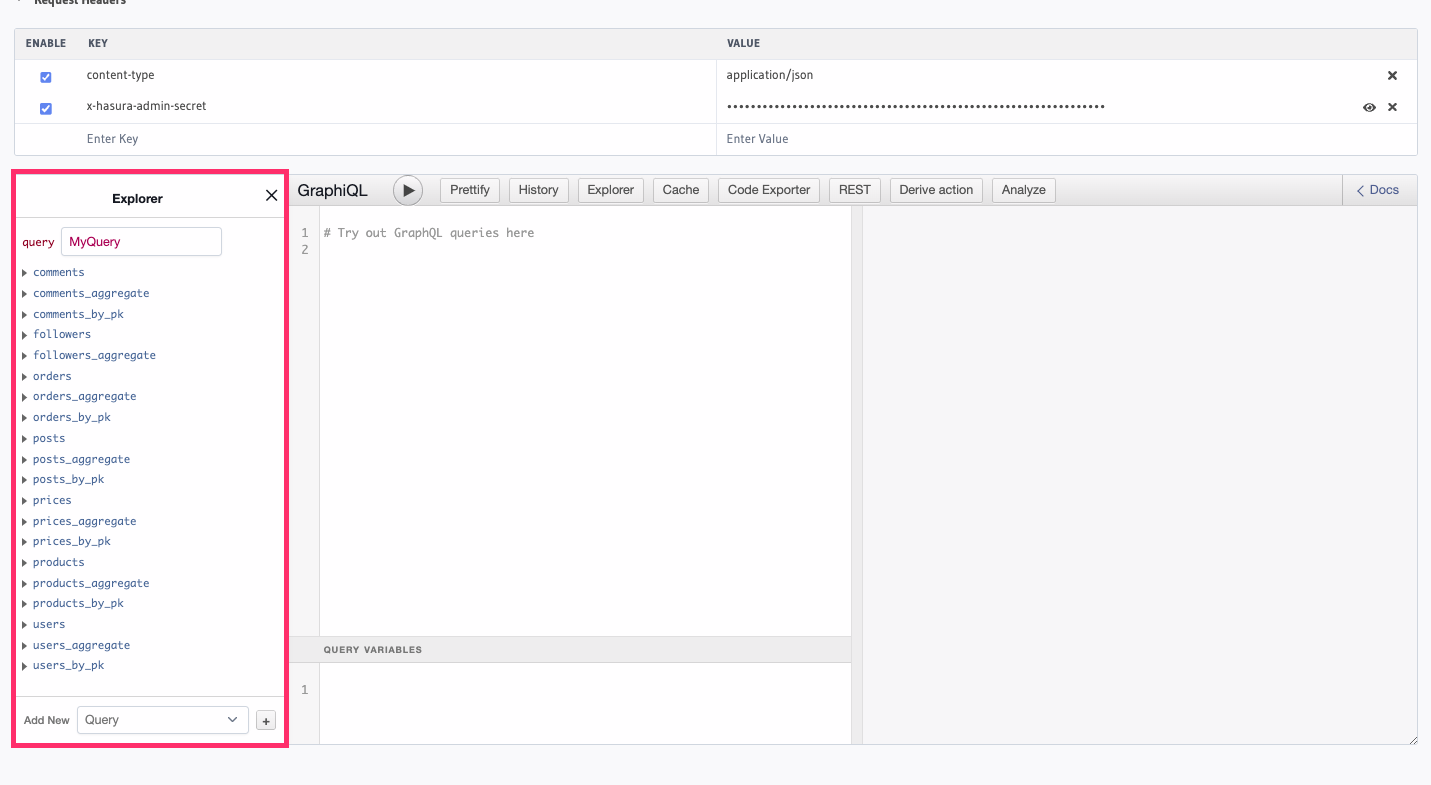
These APIs are relatively simple, so you can imagine how much more overwhelming it would be if you had your own, production-grade set of APIs. This can make it difficult for your teams to understand which fields are available and how they can be used.
Not to worry. Hasura can help us simplify this by allowing us to customize the root-level fields of our API. This means that we can add a namespace to each API, keeping each set of fields organized.
To do this, head back to the Remote Schemas tab of the Console and choose our CMS Remote Schema from the side bar.
Then, click Modify and head down to the GraphQL Customizations section. If you click Edit here, you'll be able to
add a Root Field Namespace to each of the fields. After adding cms to the first field, click Save:
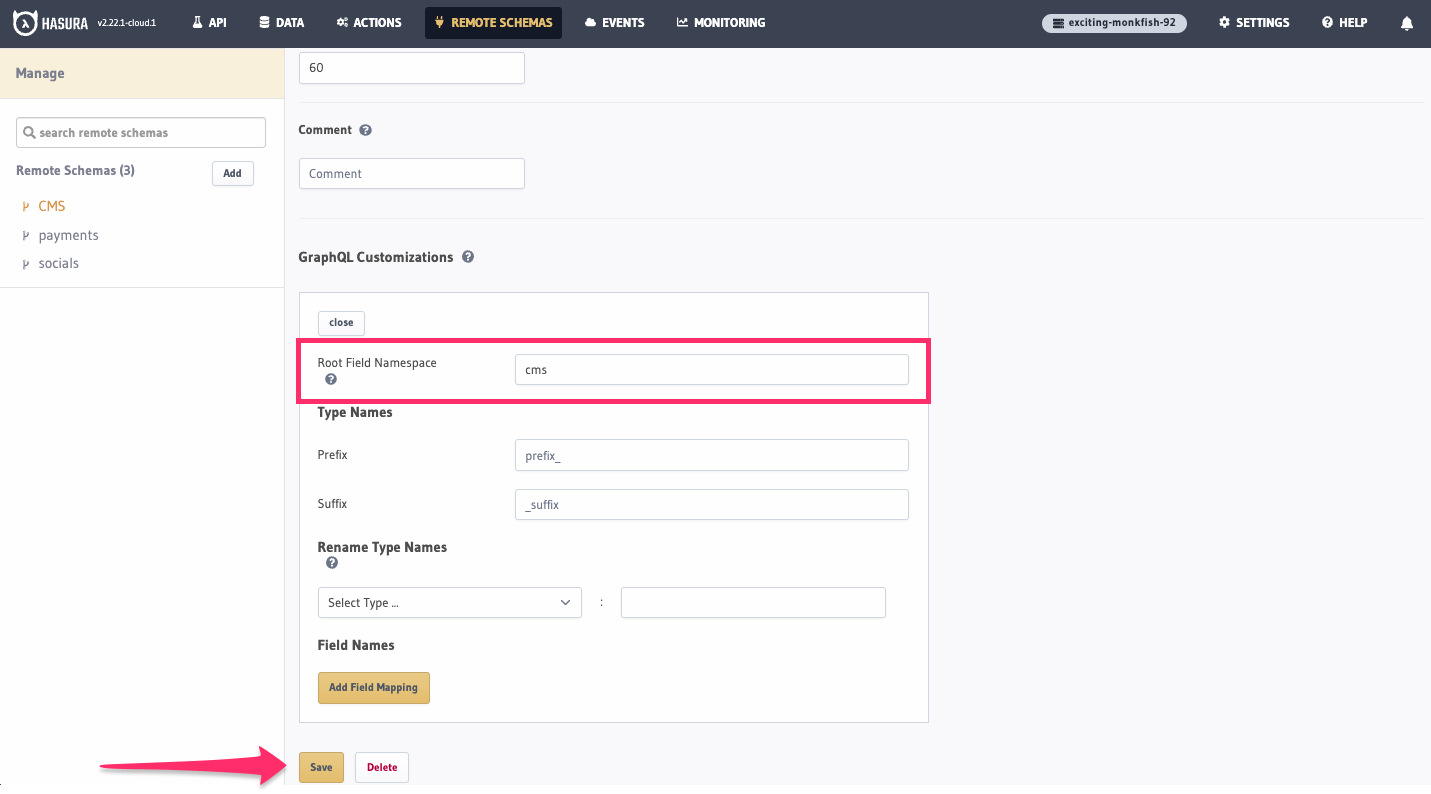
Repeat this process for the other two APIs, adding payments and socials as the namespace for each. Once complete,
head back to your API tab and take a look at the root-level fields of your API. You should now see that each field has
been consolidated into a single namespace:
Hasura allows you to customize your schema even further! You can add custom fields, change the names of fields, and even add custom types.
Step 3. Create relationships & query across APIs
It's great that we have an easy-to-navigate, unified API, but it'd be nice if we could query across the three APIs. For example, we might want to query for a user's posts and the comments that have been made on those posts. This is where relationships come in.
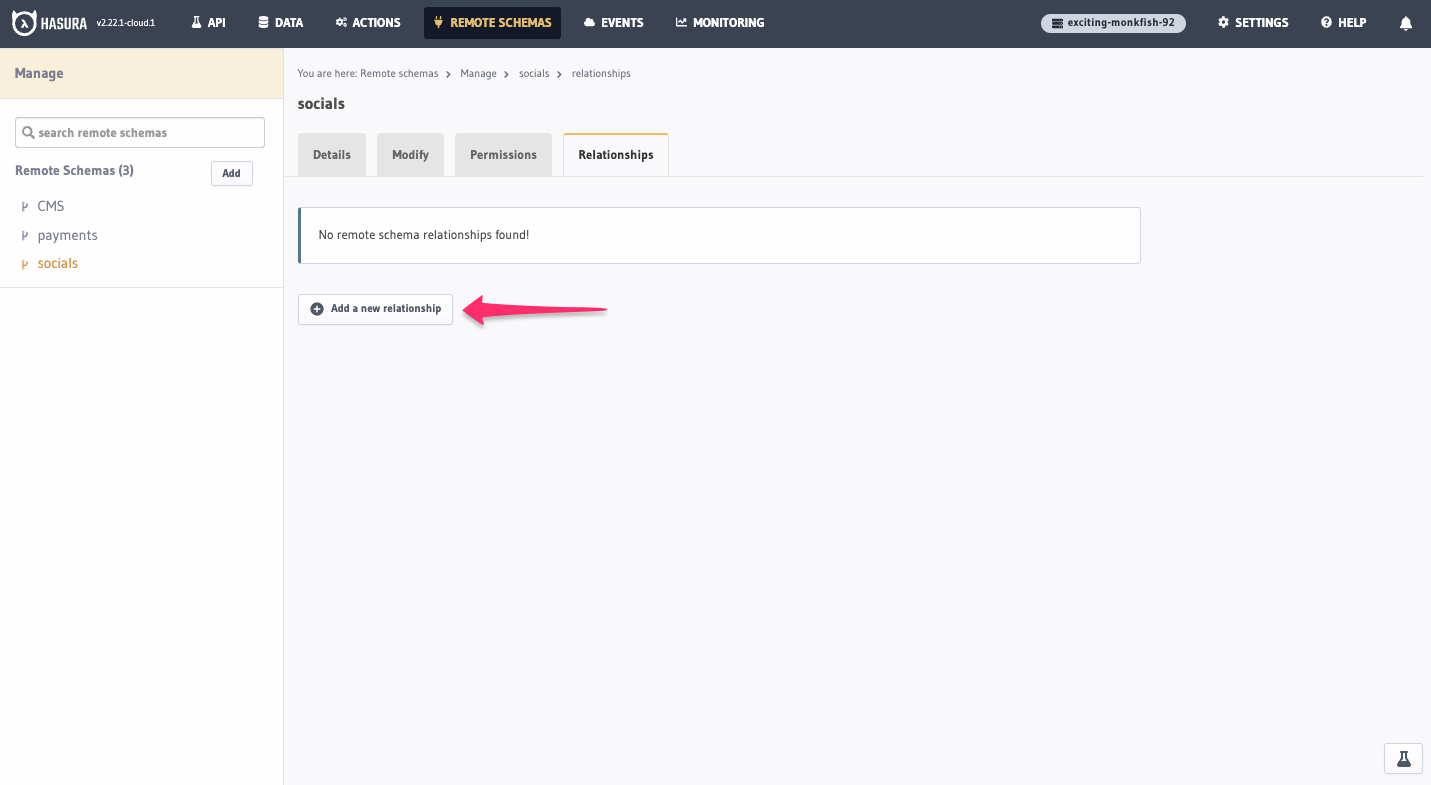
Since our CMS API has a posts table with a user_id column, we can create a relationship between the CMS API and
the socials API. To do this, we'll need to head to the Remote Schemas tab, select the socials API from the side
bar, click Relationships, and then Add a new relationship:
We'll give the relationship the name of posts and a Source Type of users while referencing the CMS Remote Schema:
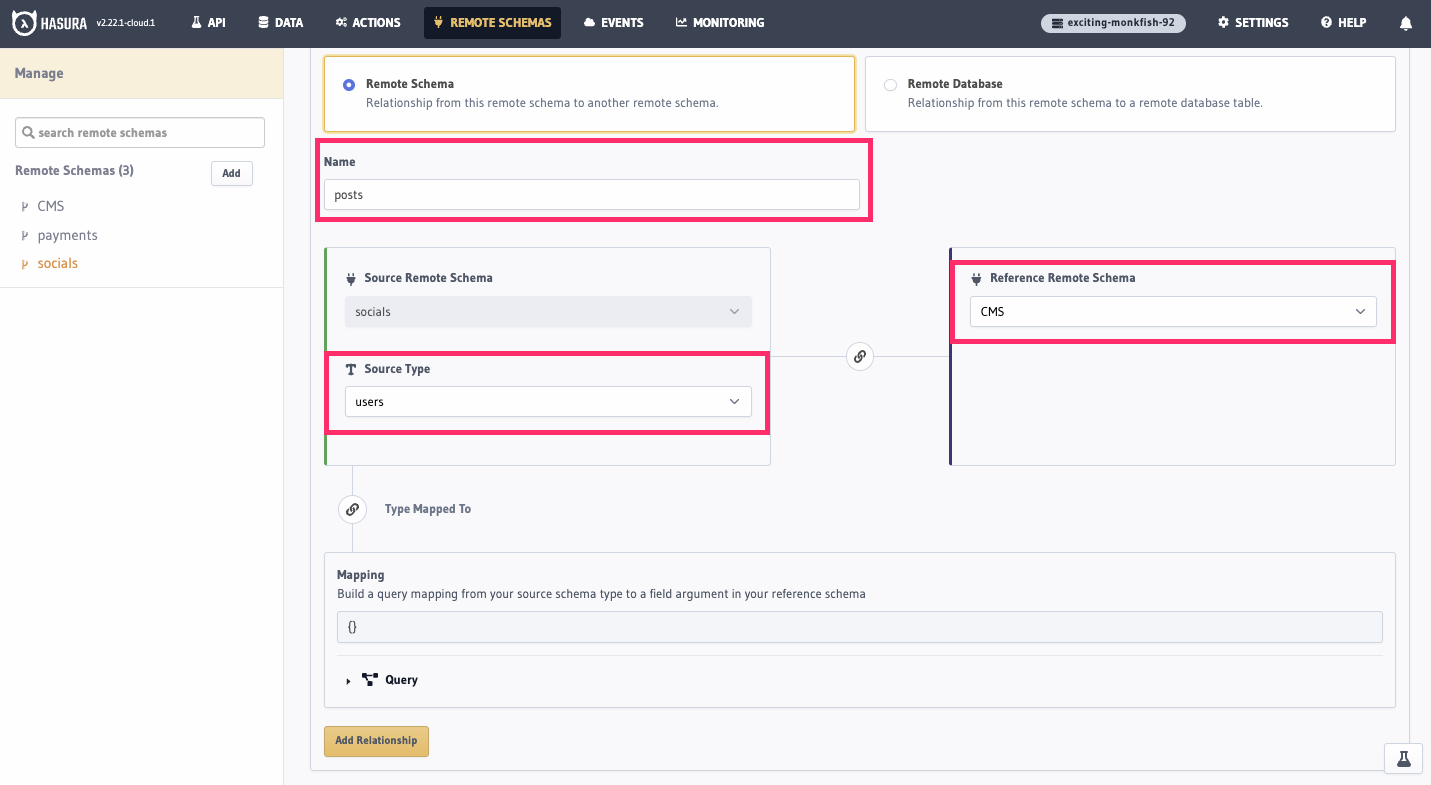
Next, expand the Query option and add a where clause for user_id to be equal to id of the users table:

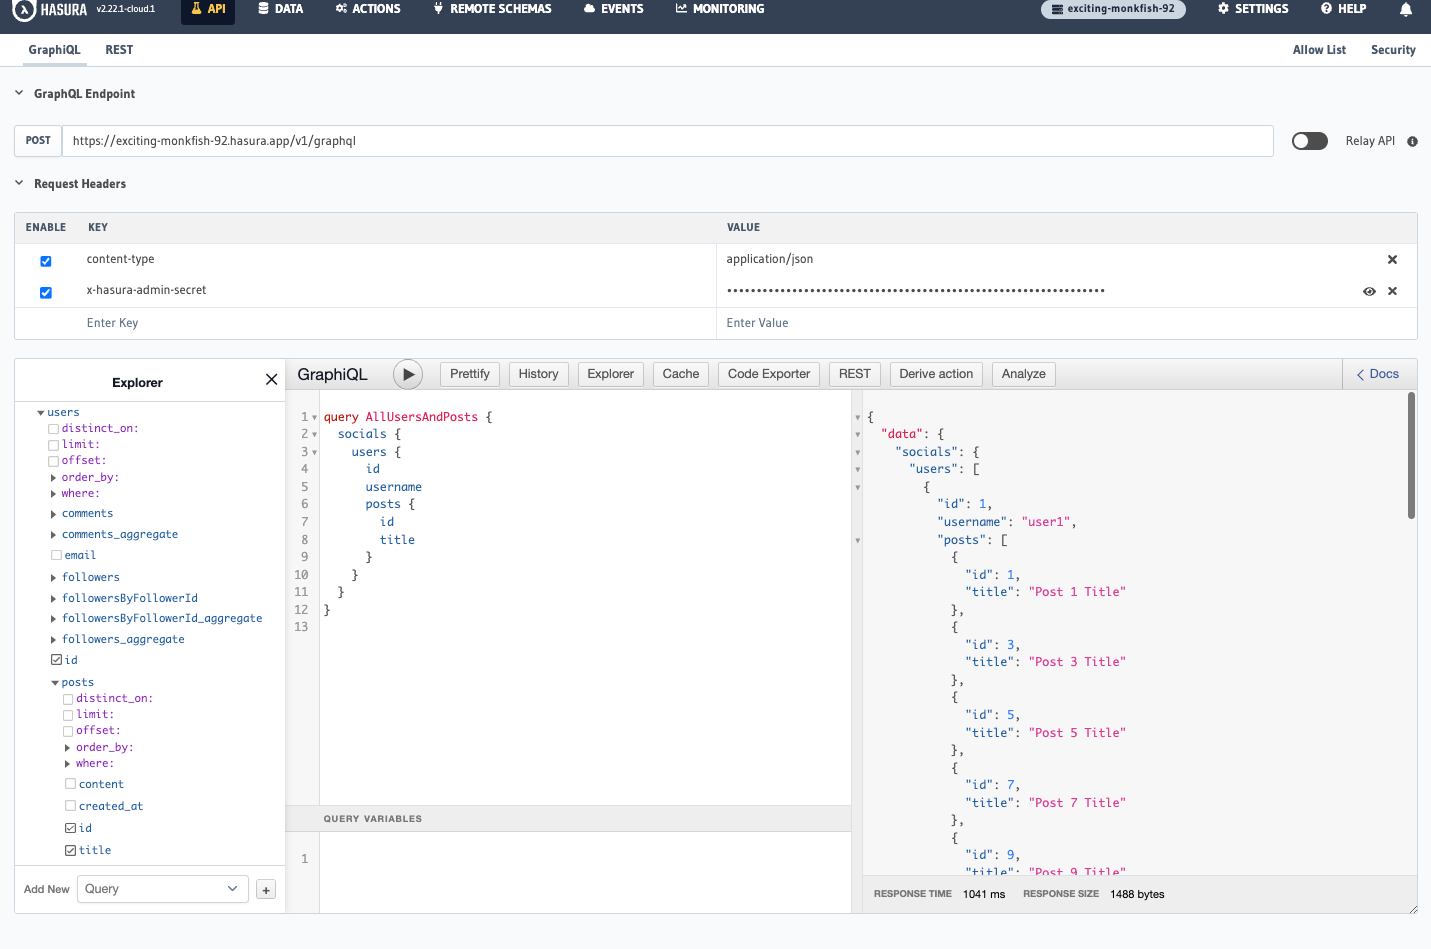
Finally, click Add Relationship. We can now query across the two APIs! If you head back to your API tab, you can try
running this query:
query AllUsersAndPosts {
  socials {
    users {
      id
      username
      posts {
        id
        title
      }
    }
  }
}
Step 4. Connect all three
Suppose we have a dashboard that we want to display to our users. This dashboard might include a user's posts, the comments that have been made on those posts, and the products that the user has purchased. We can do this by writing a single query across all three APIs.
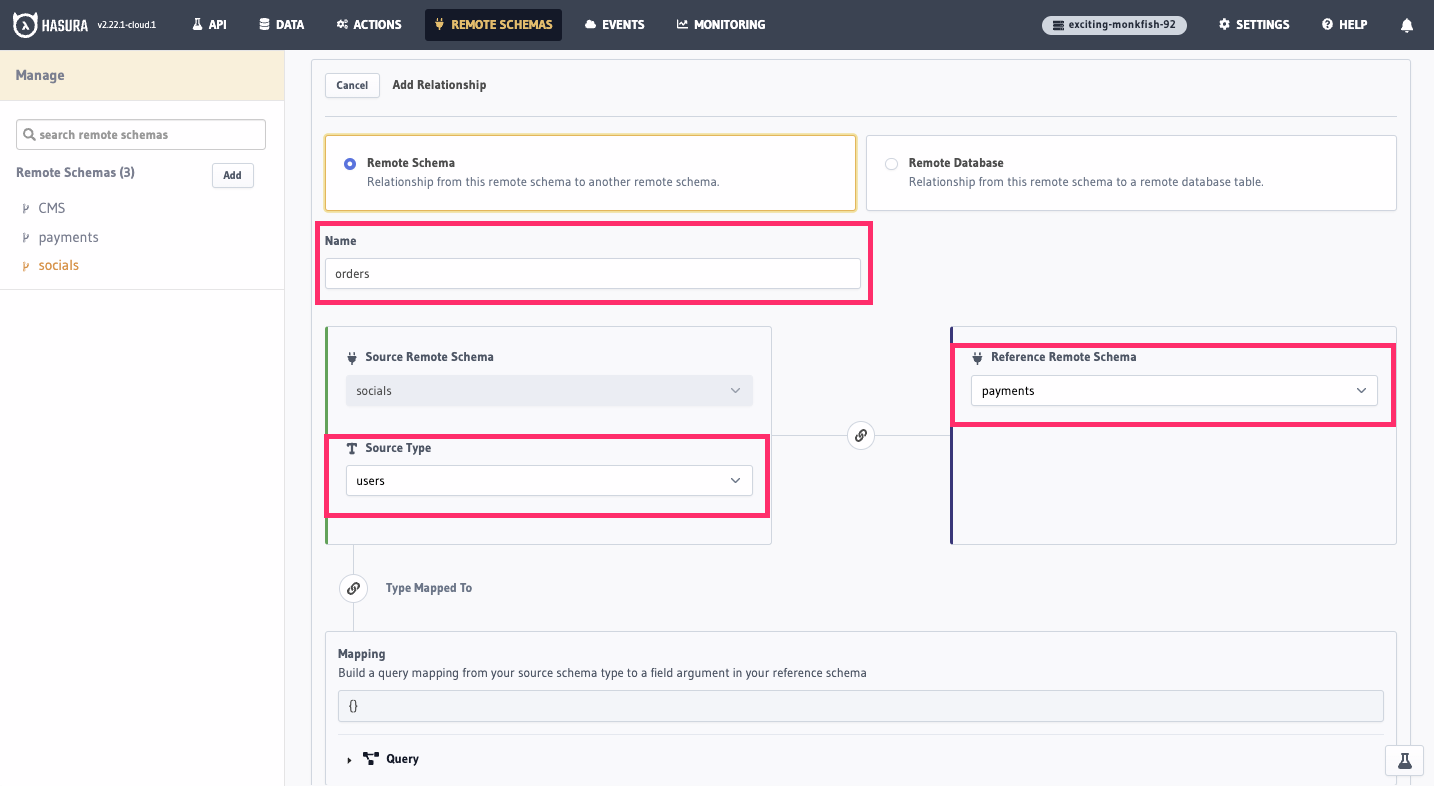
To do this, we'll need to create a relationship between the socials API and the payments API. Head over to the
Remote Schemas tab of the Console and select the socials API from the side bar. Then, click Relationships and
Add a new relationship just as before.
In the users table of our socials API, we store the email address of each user; in our payments API, we store the
email address of each order in a field called customer_email. We can use this to create a relationship between the two
APIs.
We'll give the relationship the name of orders and a Source Type of users while referencing the payments Remote
Schema:
Next, expand the Query option and add a where clause for customer_email to be equal to email of the users
table:
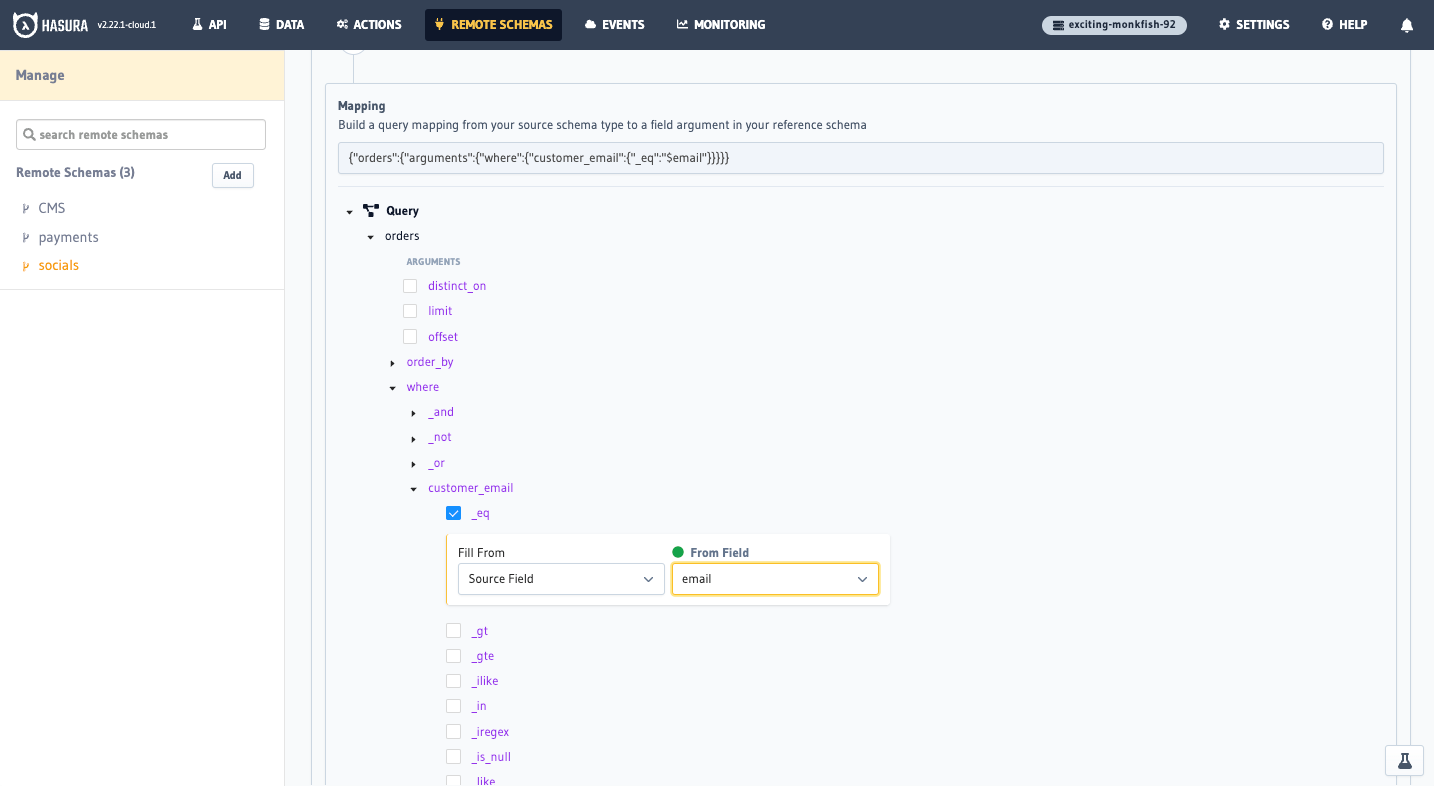
Finally, click Add Relationship. We can now query across all three APIs! If you run the following query in the API
tab, you should see results similar to what's below:
Step 5. Add authorization
With our current setup, anyone can query our API. This is fine for some use cases, but we might want to add
authorization to our API. For example, we might want to restrict access to the users table of our socials API so
that only the user who owns the account can query their own data. We can do this by adding permissions to our Remote
Schemas.
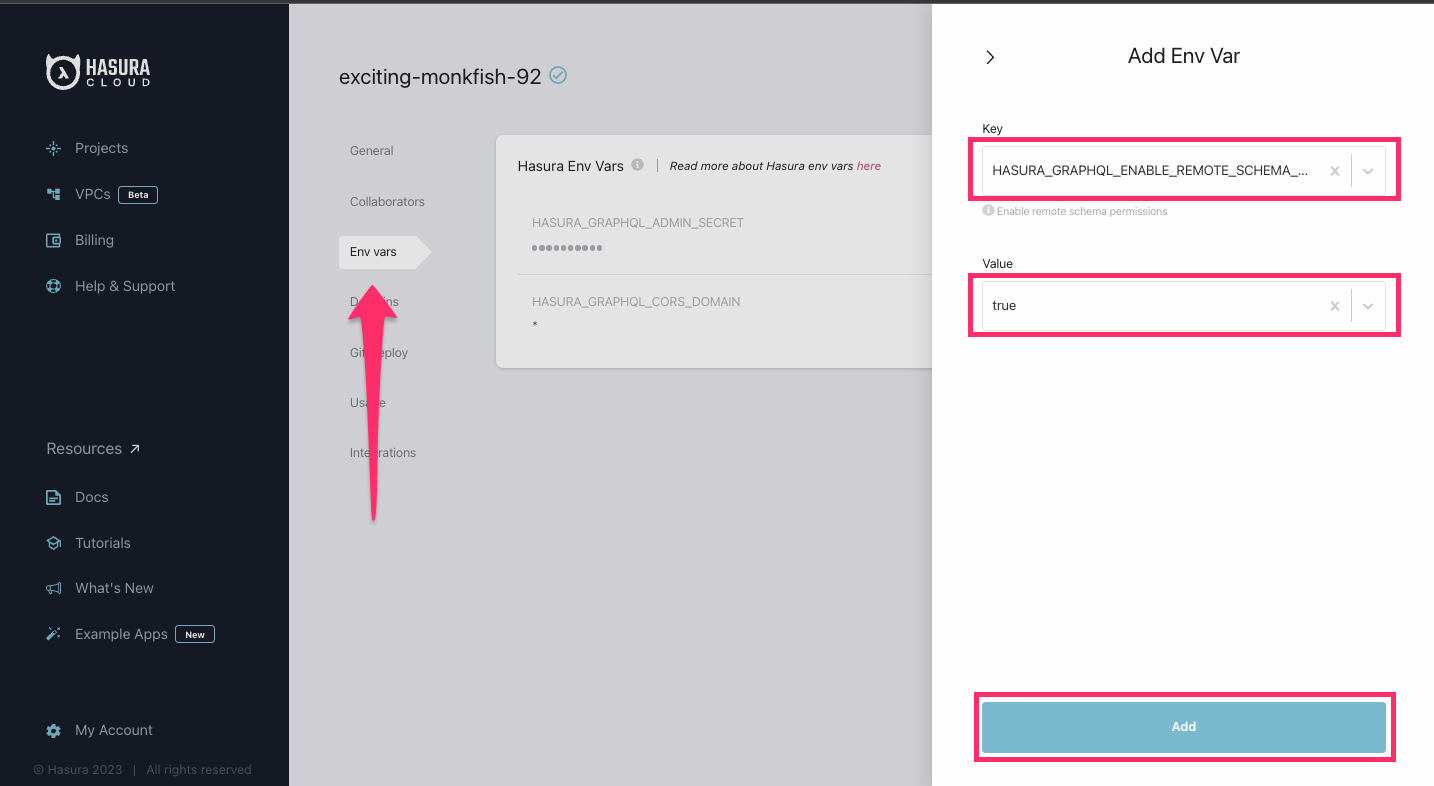
To do this, we first need to set an environment variable for our project. In Hasura Cloud, your environment variables
are controlled via the project's settings. You can reach these by clicking on the name of your project in the top-right
corner of the Console. Then, click on the Env vars in the project's sidebar and + New Env Var before entering
HASURA_GRAPHQL_ENABLE_REMOTE_SCHEMA_PERMISSIONS and setting its value to true:
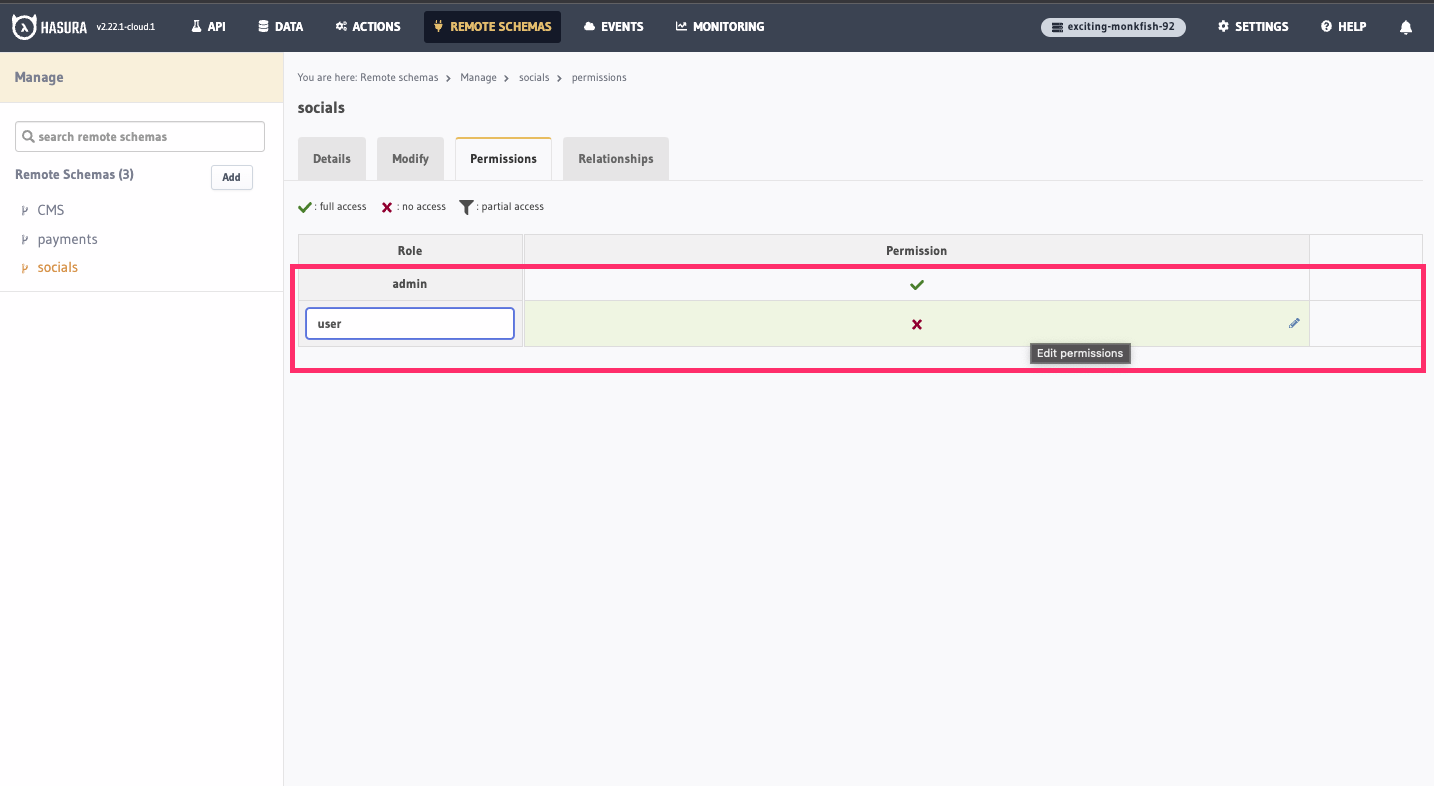
Click Add and then head back to your project's Console. In the Remote Schemas tab, select the socials API from the
side bar and click Permissions. Here, we'll enter a new role called user and click on the ❌ icon to edit the
permissions:
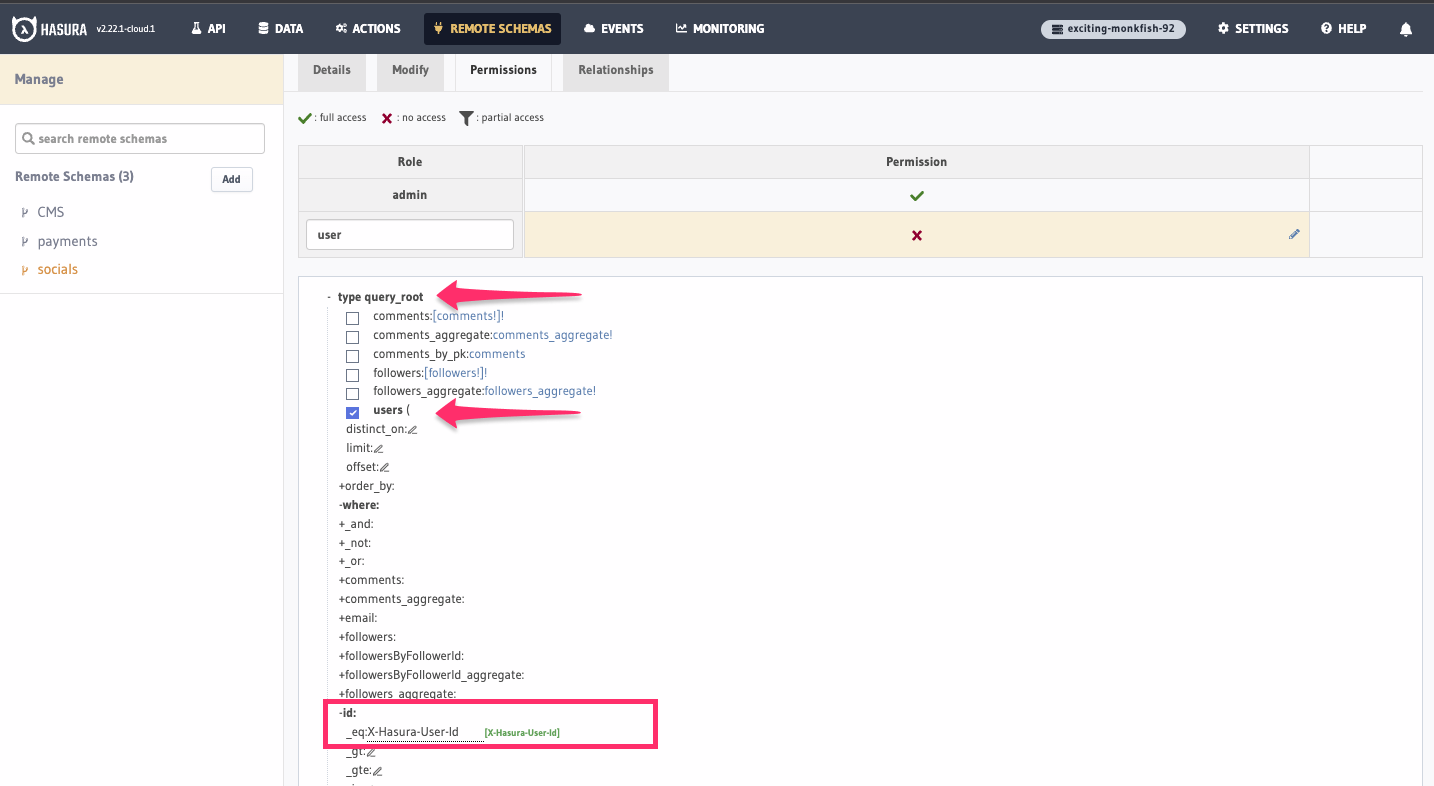
Click type query_root and check users, then click where and choose id -> _eq and enter X-Hasura-User-Id:
As our users table has a number of relationships, we'll need to allow access to those as well. Check the boxes for
each of the remaining tables highlighted below:
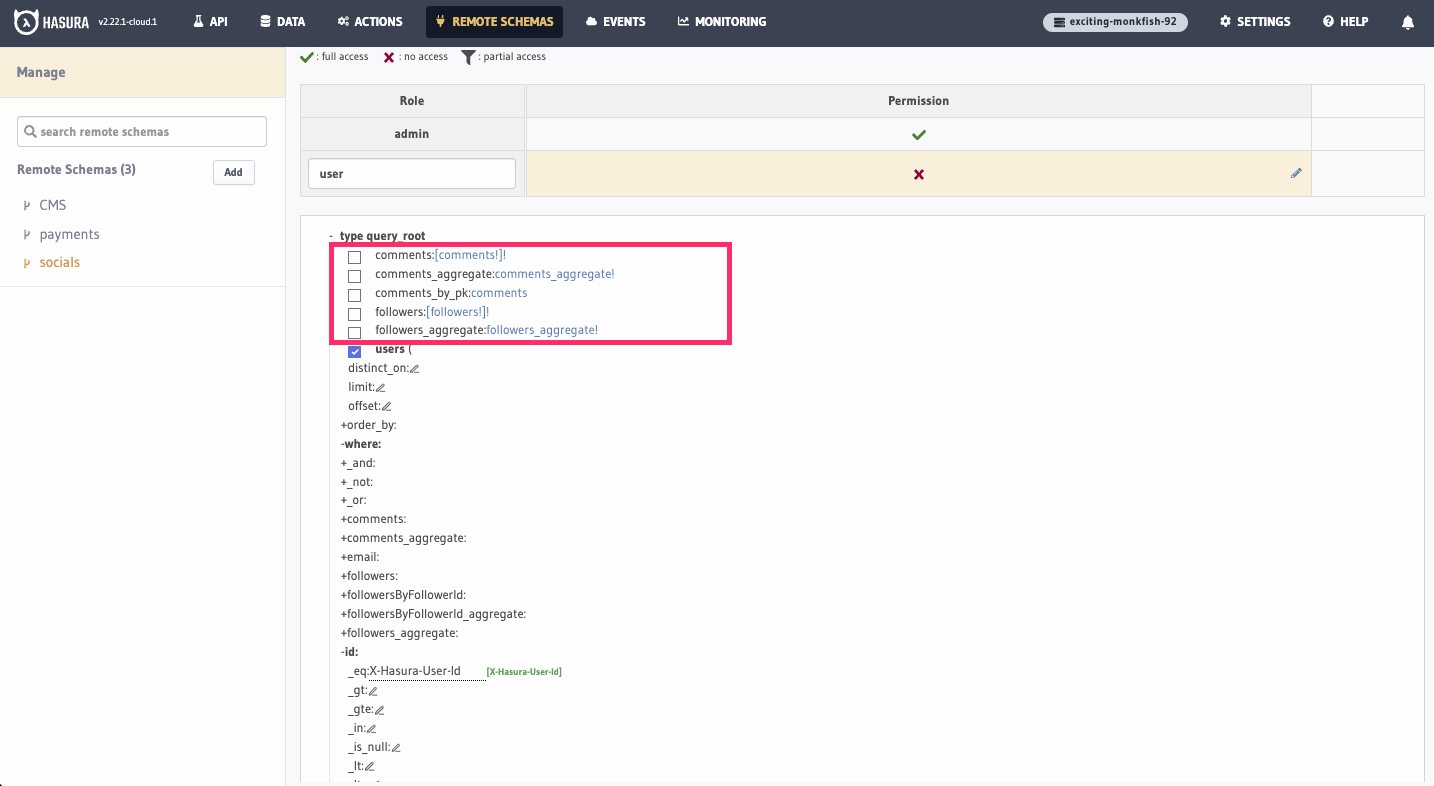
Then, click Save Permissions at the bottom of the page.
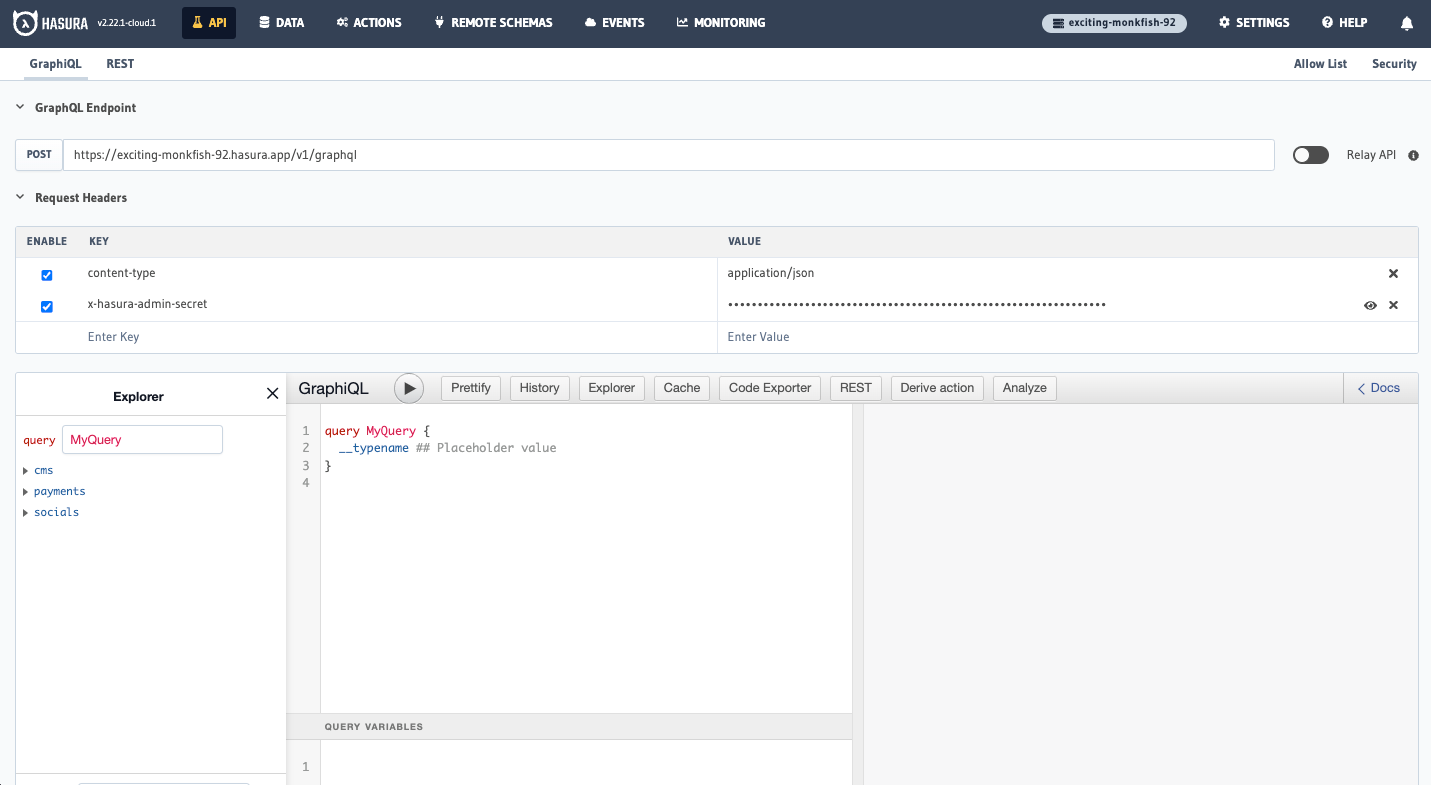
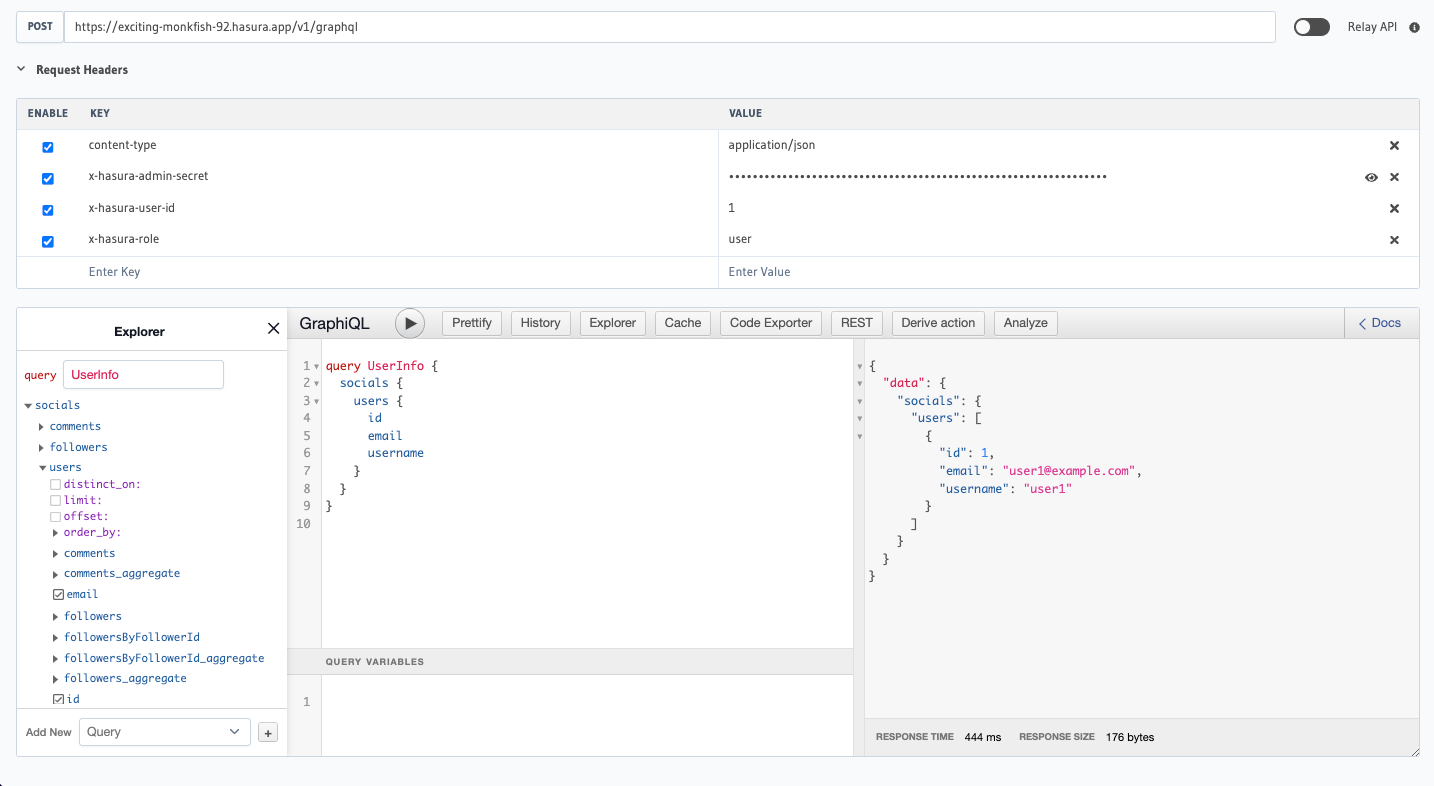
Head back to the API tab where we're going to add a couple of new headers. First, we'll add x-hasura-user-id and set
its value to 1. Then, we'll add a second header called x-hasura-role which is set to user:
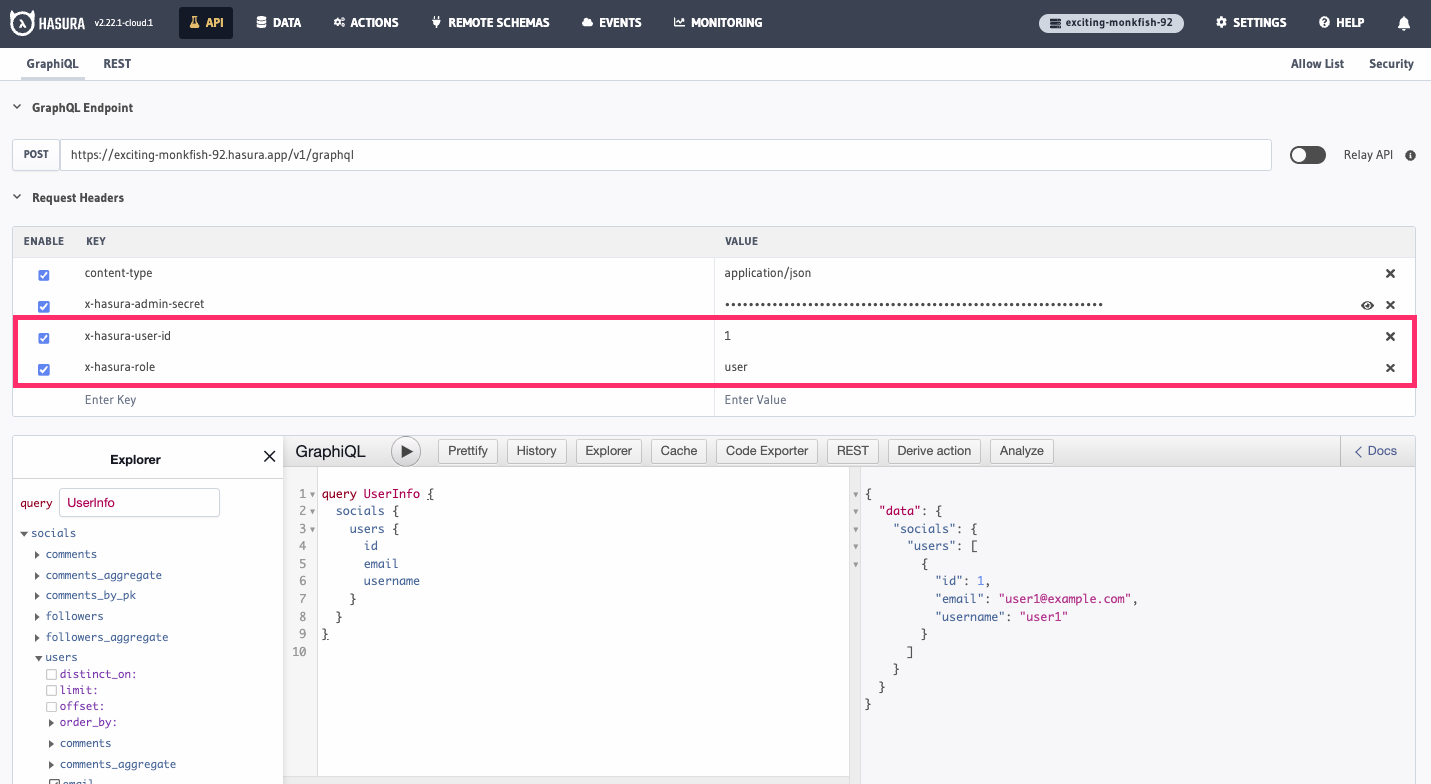
Hopefully you noticed something change. The socials namespace is now the only visible portion of our schema. This is
because we've created a role of user and only given it access to the users table of the socials API. By including
this header, the GraphiQL Explorer reflects the schema available to a user with the role of user.
If we run this query, we'll see that we only get back the data for the user with an id of 1:
query UserInfo {
  socials {
    users {
      id
      email
      username
    }
  }
}
Hasura is agnostic about how you authenticate your users. You can use any authentication provider you like, including Auth0, Firebase, or even your own custom solution. You can learn more about authentication and authorization in Hasura in the docs.
If you want to see more details about handling Remote Schema permissions, check out this page.
If you've reached this point and followed along with everything, you should be proud! You've just created an API gateway with Hasura that can act as a single endpoint for all your different GraphQL services. You can now use this API to build your frontend and focus on what matters most - building your product. 🎉
Enhanced capabilities
While everything covered above is enough to get you up and running with a gateway, Hasura has a number of enhanced capabilities that can help you build an ever more robust API gateway. In this section, we'll cover some of the most common use-cases and how you can use Hasura to solve them. We'll also provide links to more in-depth documentation so you can learn more.
Step 6. Hide fields
One added bonus of using Hasura as an API gateway is that you can hide fields from your underlying services. For
example, if you wanted to hide the email field from the users table of the socials API, you could do so with just
a few clicks.
Show me how to do this
Head back to the Permissions tab of the socials API under Remote Schemas. Then, find email in the list of fields
and un-check it. Click Save Permissions and then head back to the API tab. You should now see that the email field
is no longer visible in the GraphiQL Explorer.
Step 7. Monitor the gateway
When you're responsible for a production API, you need to be able to monitor it. You need to know when it's up, when it's down, and when it's slow. You need to know when errors are happening and what those errors are. You need to know when your API is being used and how it's being used. You need to know when your API is being abused and how it's being abused.
With Hasura, you can monitor your API with ease. Hasura provides a number of observability tools out of the box and integrates with popular third-party services like Datadog, Prometheus, and any other service that supports OpenTelemetry.
Observability tools are available on our Cloud Professional, Cloud Enterprise, and Self-hosted Enterprise plans. You can learn more about observability in Hasura in the docs.
Recap
At this point, you should have a pretty impressive API gateway powered by Hasura 🎉
Are you production-ready? Not quite. If you're looking to round out your application, check out the following resources:
Auth
Hasura provides a number of ways to handle authentication. Check out the following resources to learn more:
Monitoring
For production applications, you'll want to monitor your Hasura instance. Check out the following observability resources to learn more:
CI/CD
Hasura's Migrations, Metadata, and Seeds - which can be managed via the Hasura CLI - allow you to version control your Hasura instance and seamlessly move between environments. Check out the following resources to learn more: