Build a Data Access Layer
Introduction
This guide, and the others contained in this directory, are intended to be a step-by-step resource to build an application using Hasura. If you arrived here from the Hasura Cloud Console, you'll have already created a project and are ready to follow the steps below. If you're here from elsewhere, you can create a Hasura Cloud project for free and get started right away.
What we're building

The application we will be building is a fintech application that allows for a single read-only access layer to three different databases: one for a banking website, another for a stock and bond trading data, and a real estate database. The concepts and techniques we will be using apply to any application seeking to build a single data access layer for their existing databases.
If you've ever been tasked with maintaining numerous sets of data, you know how difficult it can be to keep track of all the different endpoints, schemas, and access control. With Hasura, you can build a single data access layer that makes your and your developers' lives easier and allows you to focus on building new features instead of maintaining existing ones. With all your organization's data accessible through a single GraphQL endpoint, you can monitor and secure your data with ease, all from a single place.
In the example below, we will be building a data access layer for an existing fintech organization that has three disparate sources. We will be using Hasura's GraphQL Engine to build a single data access layer that will allow our teams to access all three sets of data through a single GraphQL endpoint.
By the end of this guide, you will have a fully-functional data access layer that will allow you to build a single application that can access, join, and secure multiple databases.
Fully-functional data layer
Steps 1 through 4 will cover everything needed to create a fully-functional data access layer for your existing APIs.
Step 1. Connect the data sources
In the modern era of building applications, it's not uncommon to have multiple, disparate databases. Additionally, these data sources may be owned by different teams within the organization. Suppose our banking organization has three different data sources that need to be accessible to different teams.
To save you time, we've generated three read-only databases for you to use in this guide:
| Database | Description | Connection String |
|---|---|---|
| Banking | A database containing banking information of the account holders | postgresql://read_only_user:[email protected]:5432/growth-docs-data-layer-1 |
| Stocks | A database containing historic, proprietary market information | postgresql://read_only_user:[email protected]:5432/growth-docs-data-layer-2 |
| Real Estate | A database containing real estate information | postgresql://read_only_user:[email protected]:5432/growth-docs-data-layer-3 |
These databases are only accessible from Hasura Cloud.
To connect to these, head to the Data tab of your Hasura Console — the UI that allows you to interact with your
Hasura instance. Connecting an existing database to Hasura is as easy as pasting in a connection string. Let's name the
first database Banking and paste in the connection string from the table above:

Repeat this process for our other two sources.
With Hasura, you can use environment variables to secure your connection strings. This is especially useful when connecting to databases that are not owned by your organization or when moving between environments. To learn more, check out our documentation.
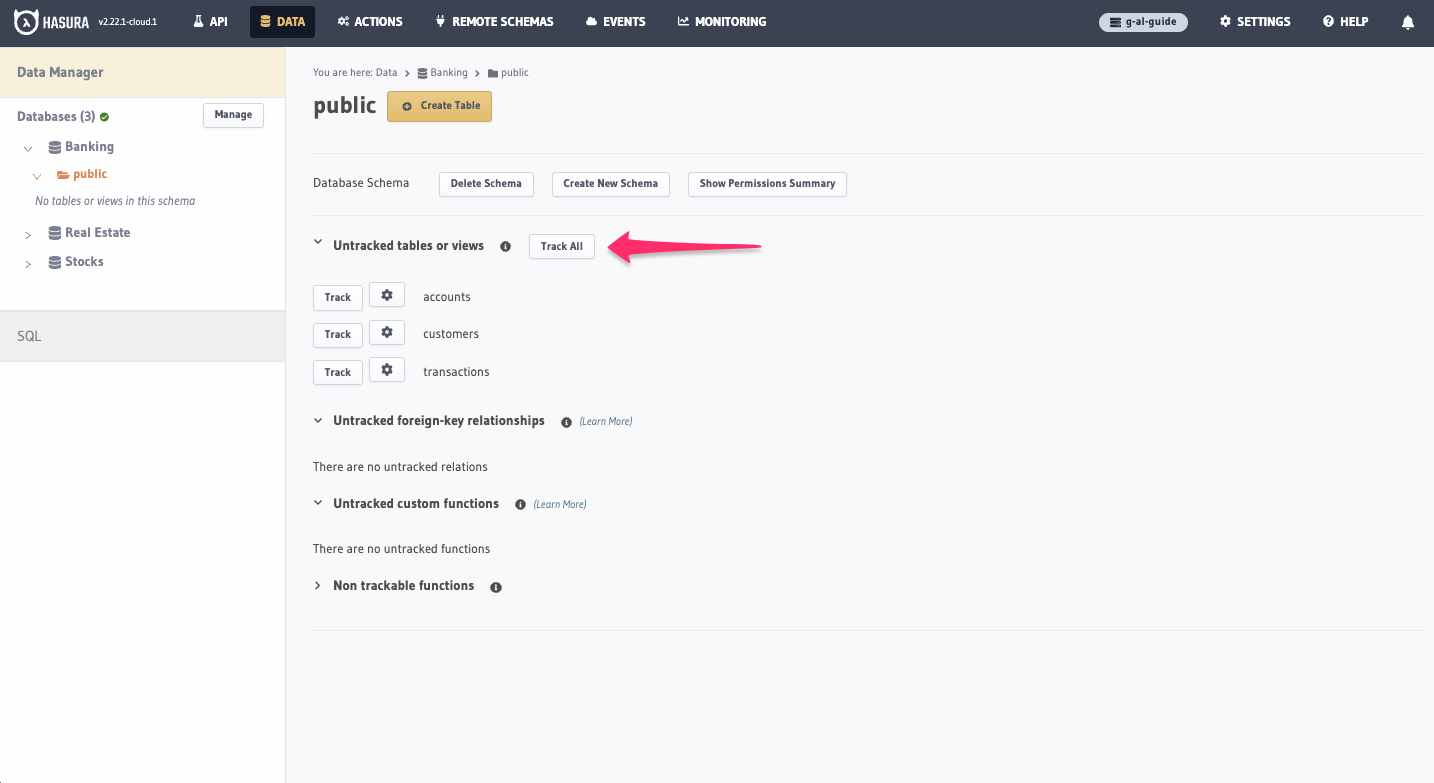
We'll need to tell Hasura which tables to track. To do this, we simply need to click the Track All button for the
tables present on each database. In the example below, you can see we're on the Banking database's public schema
inside the Data tab:
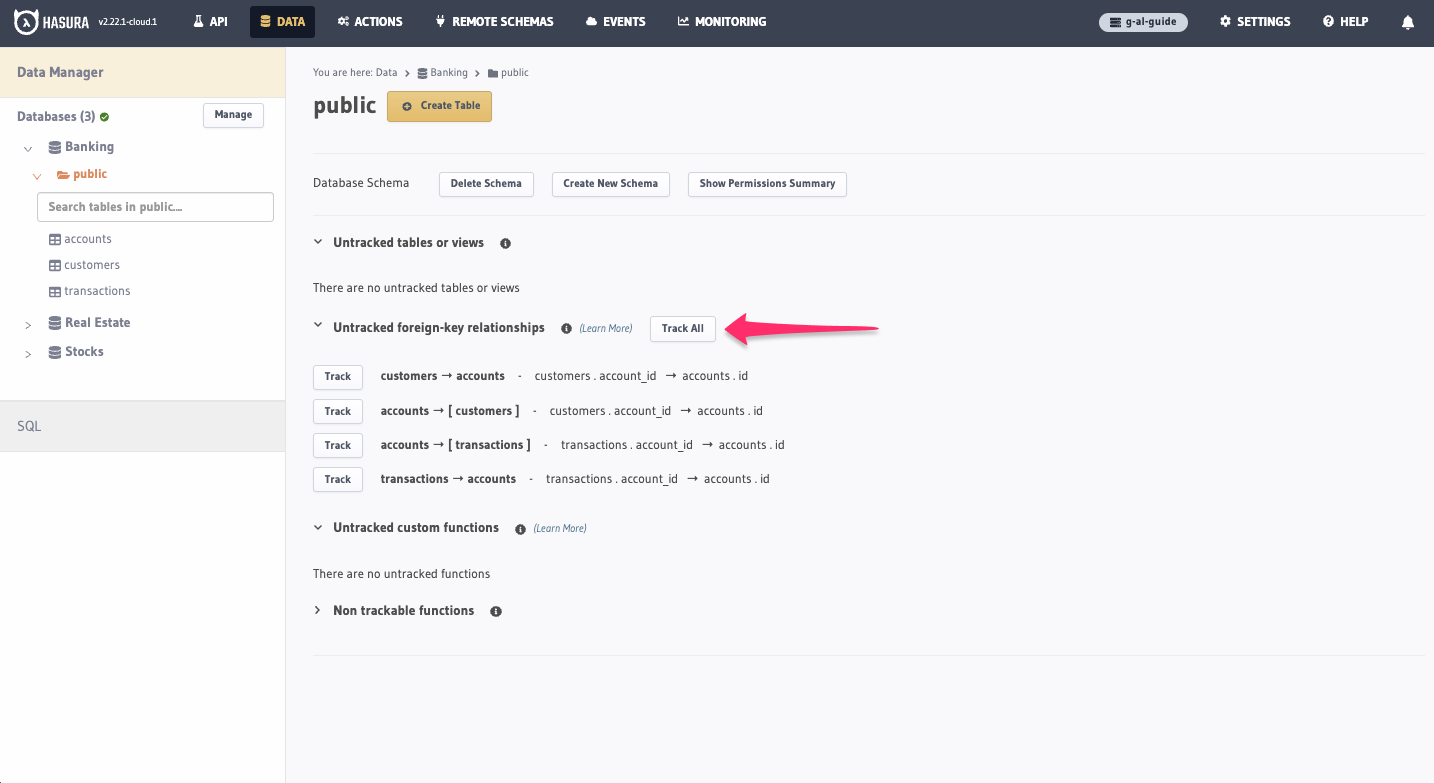
Hasura can track relationships between tables in your database and expose them as GraphQL fields. To do this, similar to
what we just did, click the Track All button for the relationships present on each database:
At this point, we've connected our three databases to Hasura and can now access them through a single GraphQL endpoint.
Step 2. Customize your schema
If we head over to the API tab of our the Console and take a look at the root-level fields of our API, we can see that
we have a lot:
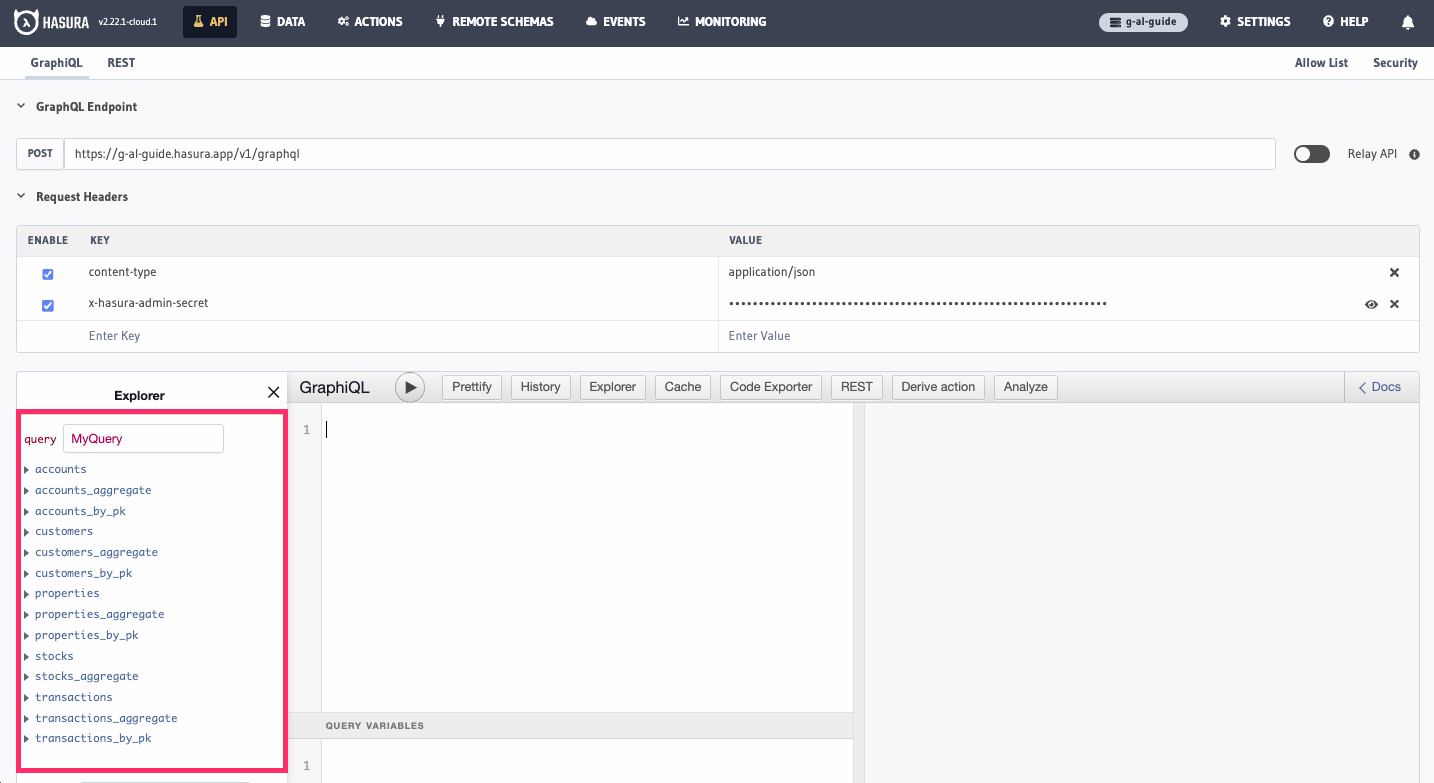
These databases are relatively simple and only contain a few tables each, so you can imagine how much more overwhelming it would be if you had your own, production-grade set of data sources. This can make it difficult for your teams to understand which fields are available and how they can be used.
Not to worry. Hasura can help us simplify this by allowing us to customize the root-level fields of our sources. This means that we can add a namespace to each database, keeping each set of fields organized.
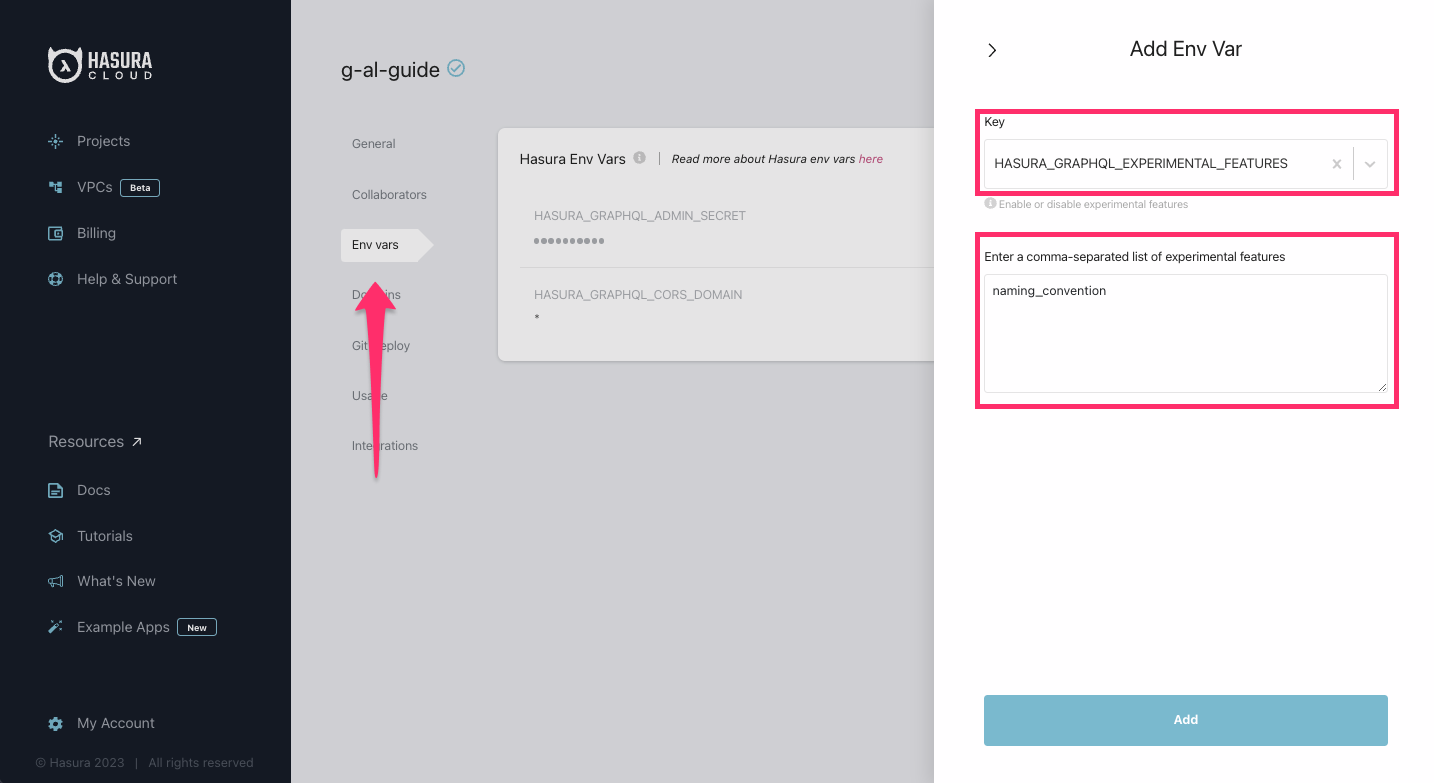
To do this, we first need to set an environment variable for our project. In Hasura Cloud, your environment variables are controlled via the project's settings. You can reach these by clicking on the name of your project in the top-right corner of the Console.
Then, click on the Env vars in the project's sidebar and + New Env Var before entering
HASURA_GRAPHQL_EXPERIMENTAL_FEATURES and setting its value to naming_convention:
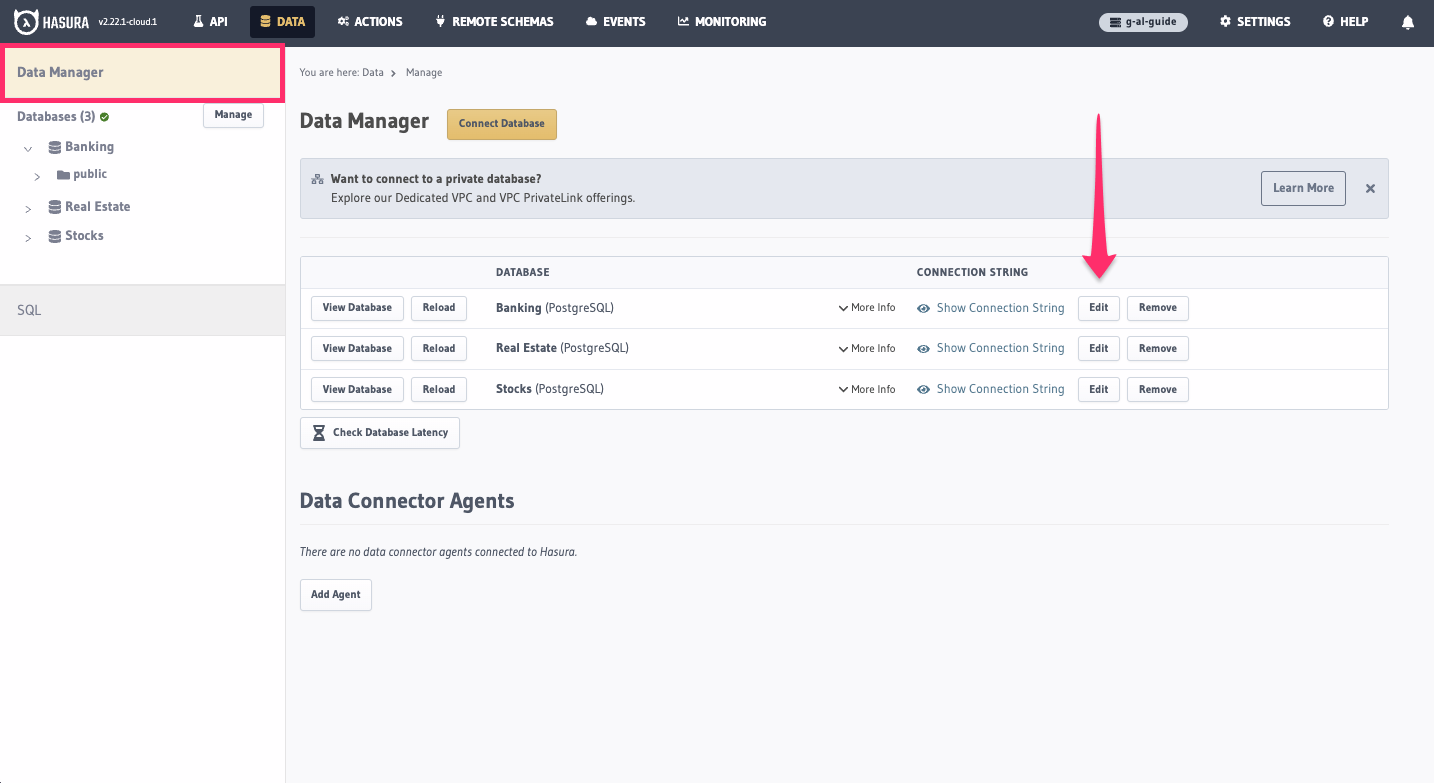
Finally, head back to the Data tab of the Console and choose Data Manager in the side bar. Click Edit for our
Banking source:
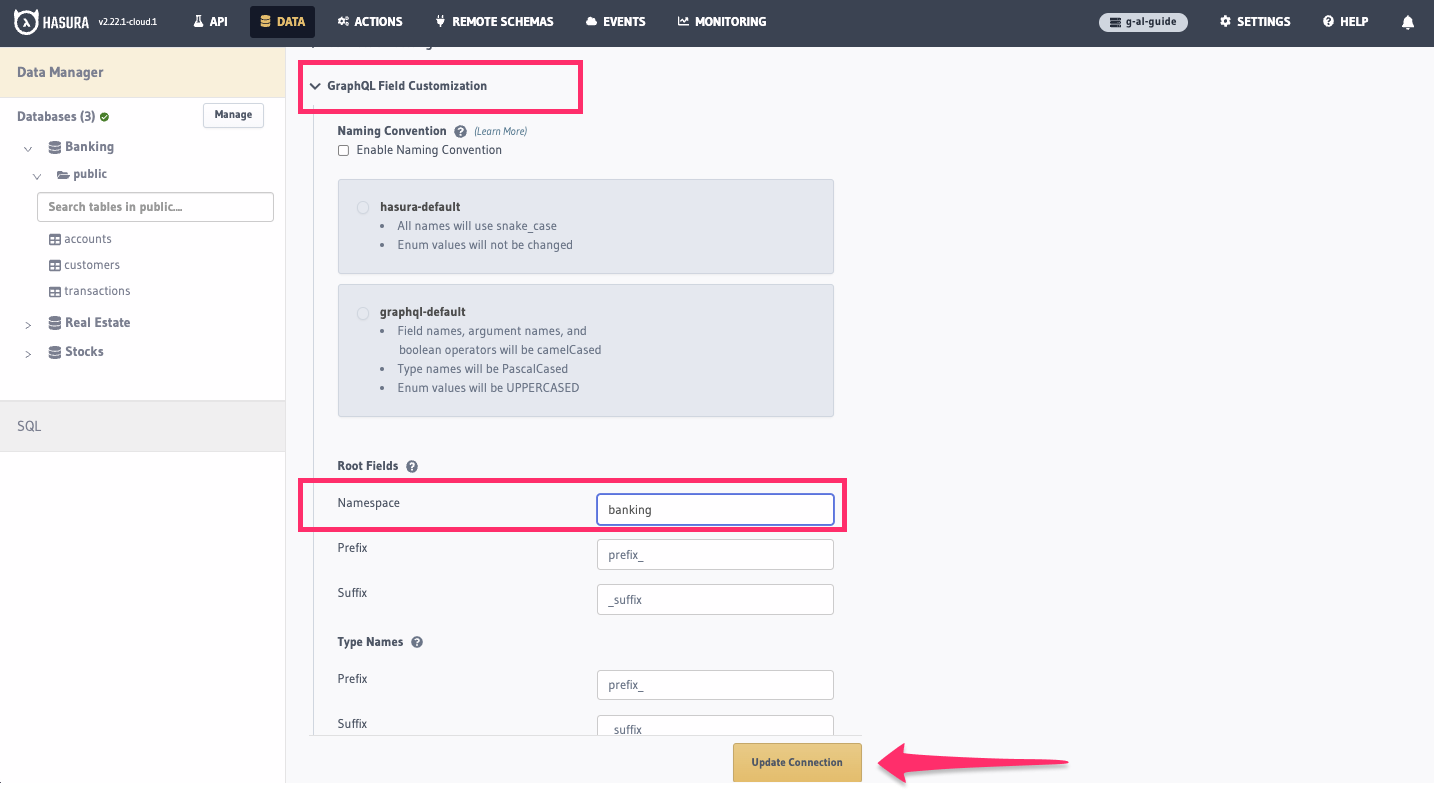
Then, head down to the GraphQL Customizations section. If you expand this, you'll be able to add a
Root Field Namespace to each of the fields. After adding banking to the first field, click Update Connection:
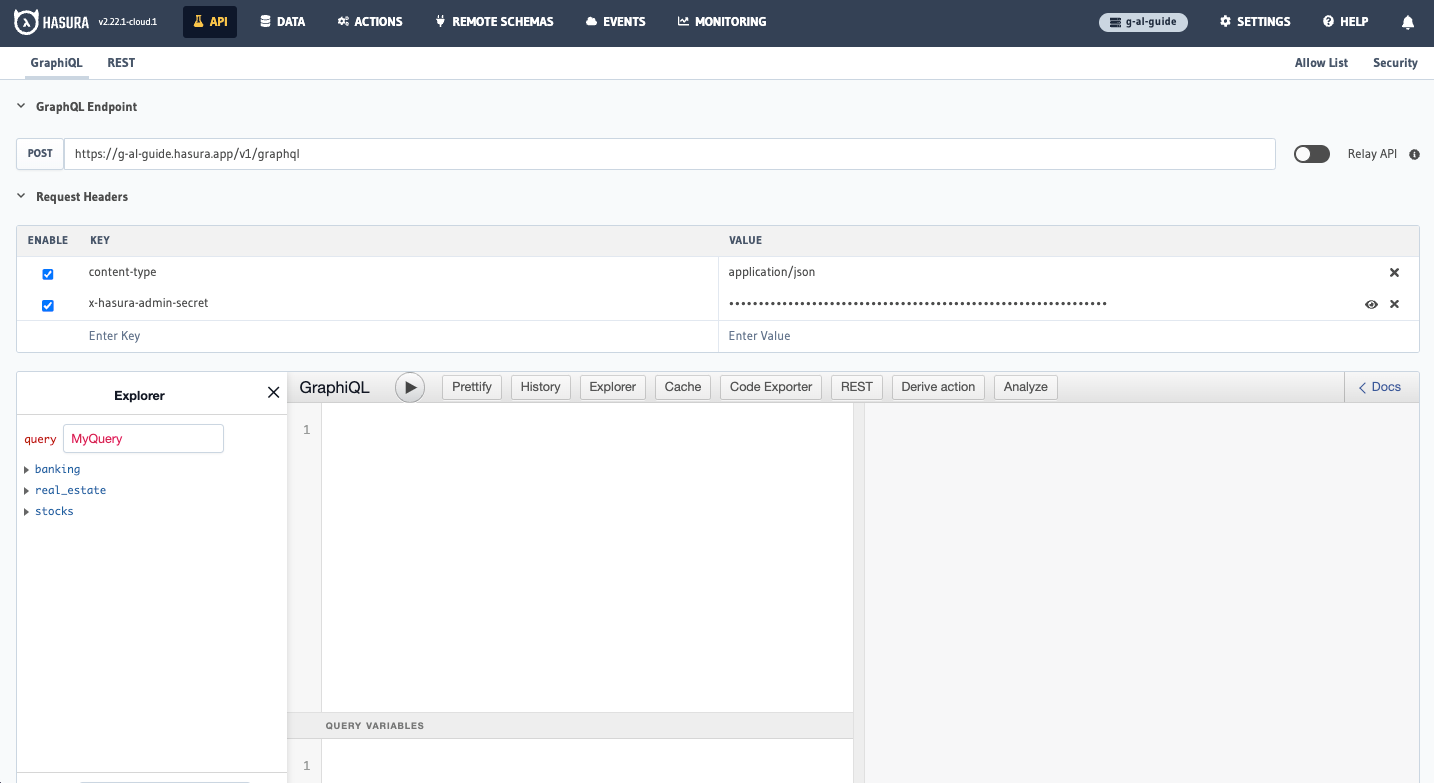
Repeat this process for the other two APIs, adding real_estate and stocks as the namespace for each. Once complete,
head back to your API tab and take a look at the root-level fields of your API. You should now see that each field has
been consolidated into a single namespace:
Hasura allows you to customize your schema even further! You can add custom fields, change the names of fields, and even add custom types.
Step 3. Join the data sources and query data
It's great that we have an easy-to-navigate, unified API, but it'd be nice if we could query across the three data sources. For example, we might want to query for a user's recent transactions and also get real estate information about their home.
Hasura allows you to create remote relationships between tables in your database and tables in other databases. We can
create a relationship between the user's account data and the home's historic data by creating a relationship between
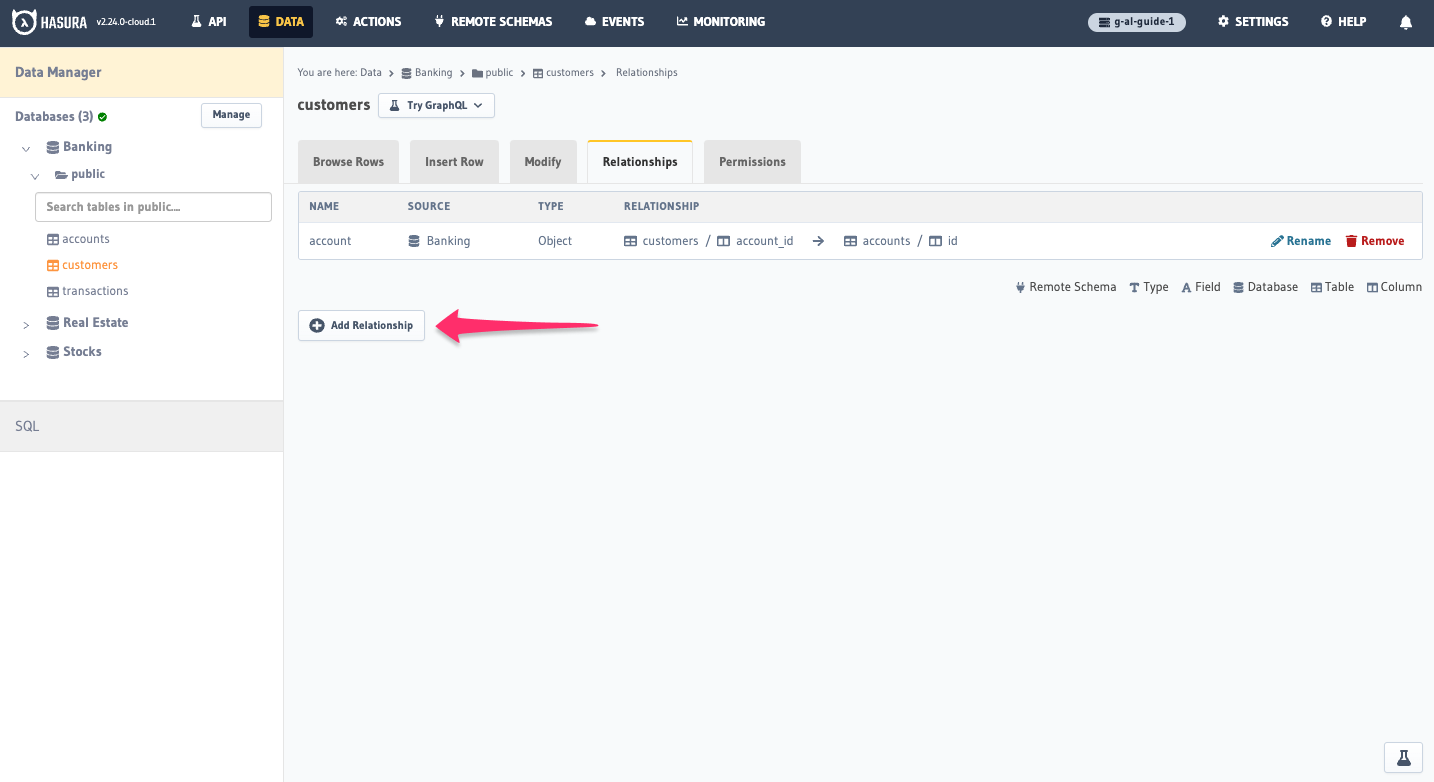
these two tables. First, head over to the Data tab, choose the Banking database, and click on the customers table.
Then, choose the Relationships tab and click on + Add Relationship:
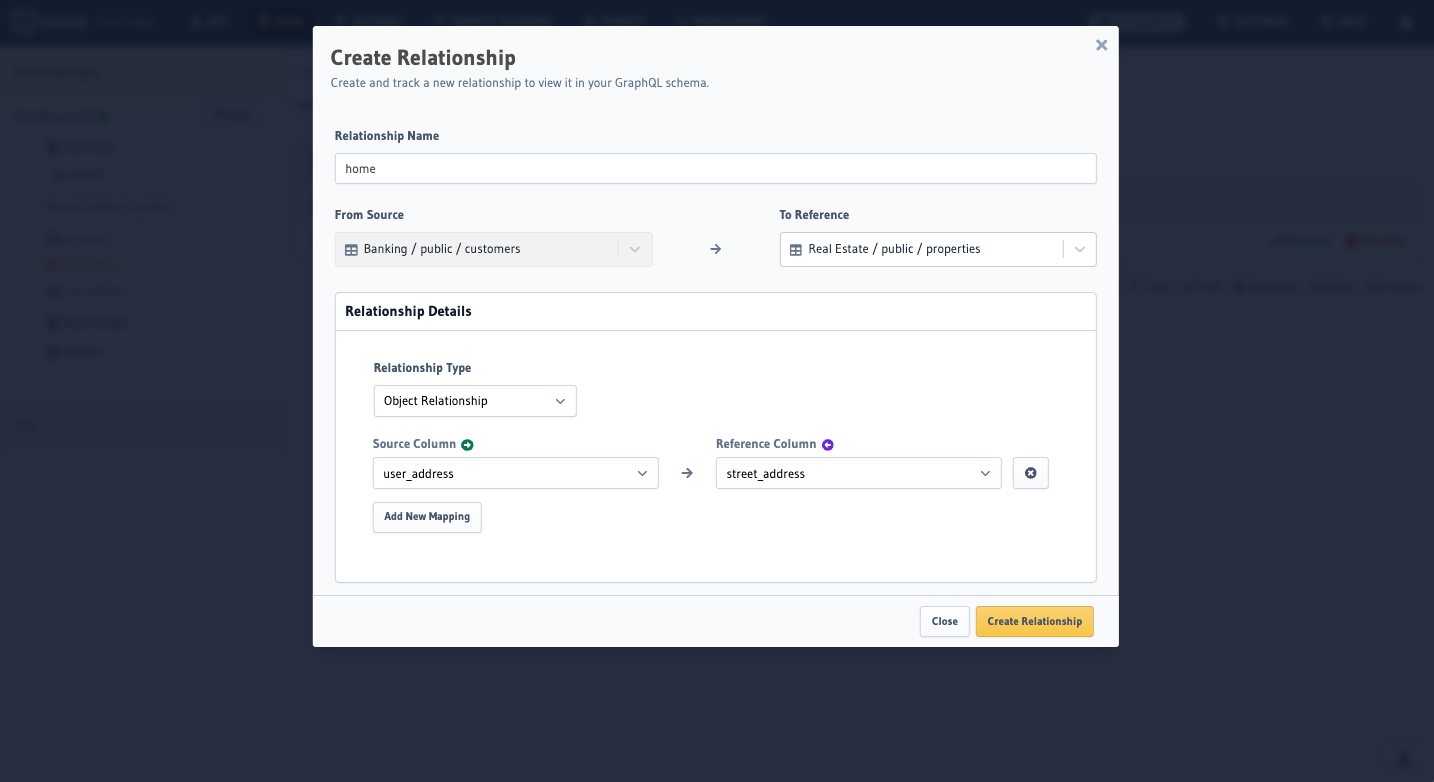
We'll call the relationship home and reference the Real Estate / public / properties table. Then, within the
details, we'll leave the type of relationship as an object relationship and configure our source column to be
user_address while referencing street_address from the properties table before clicking Create Relationship. In
all, it should look like this:
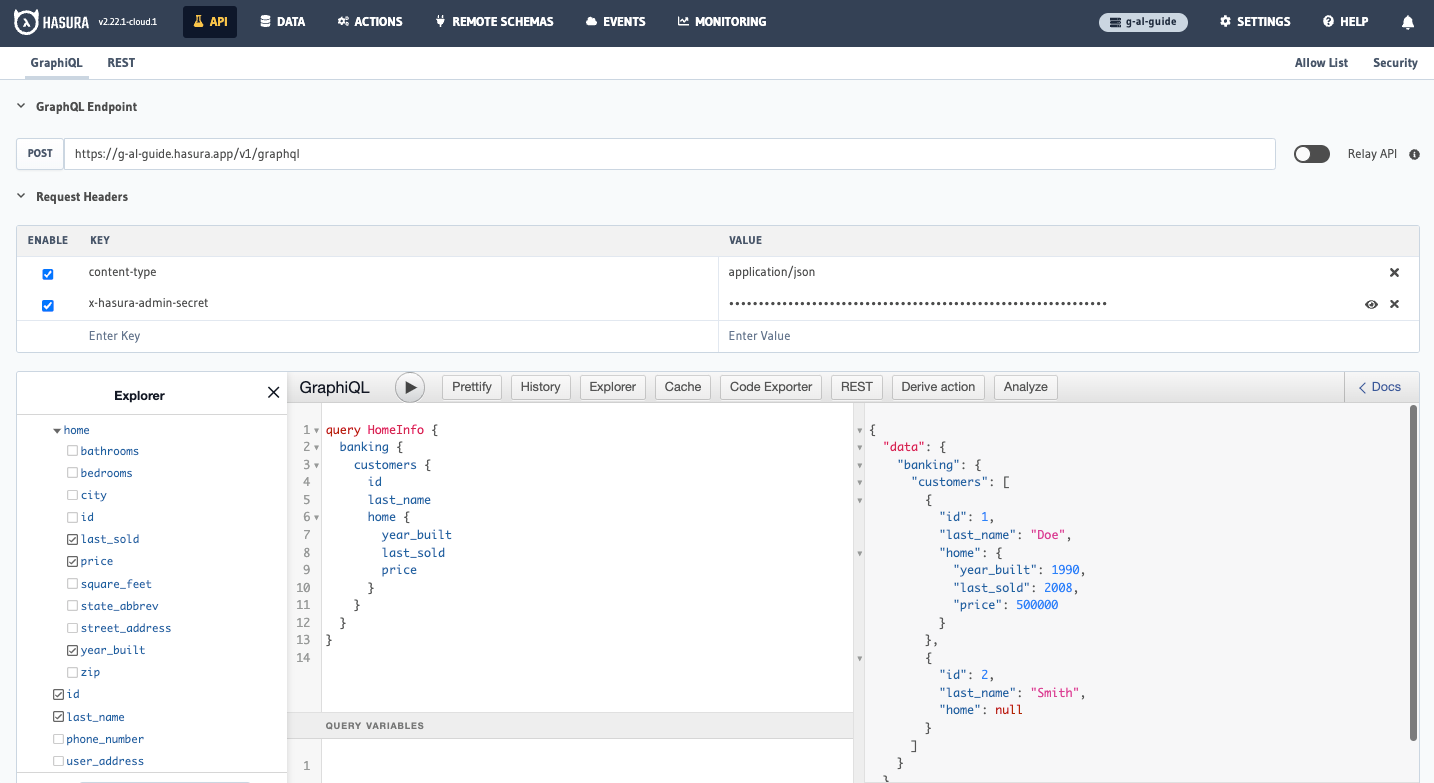
Let's head back to our API tab and query across these two tables! If you enter the query below, you should see that
the first user has a home with returned values while the second user's home is not in the system.
query HomeInfo {
  banking {
    customers {
      id
      last_name
      home {
        year_built
        last_sold
        price
      }
    }
  }
}
With remote relationships, you can join tables across different databases. However, Hasura also has powerful joins capabilities for GraphQL APIs - called Remote Schemas - and REST APIs - called Actions.
Step 4. Add authorization to the data sources
With our current setup, anyone can query all the information in these sources. This is fine for some use cases, but we
might want to add authorization to our API. For example, we might want to restrict access to the users table of our
banking source - and any related data - so that only the user who owns the account can query their own information. We
can do this by adding permissions to our sources.
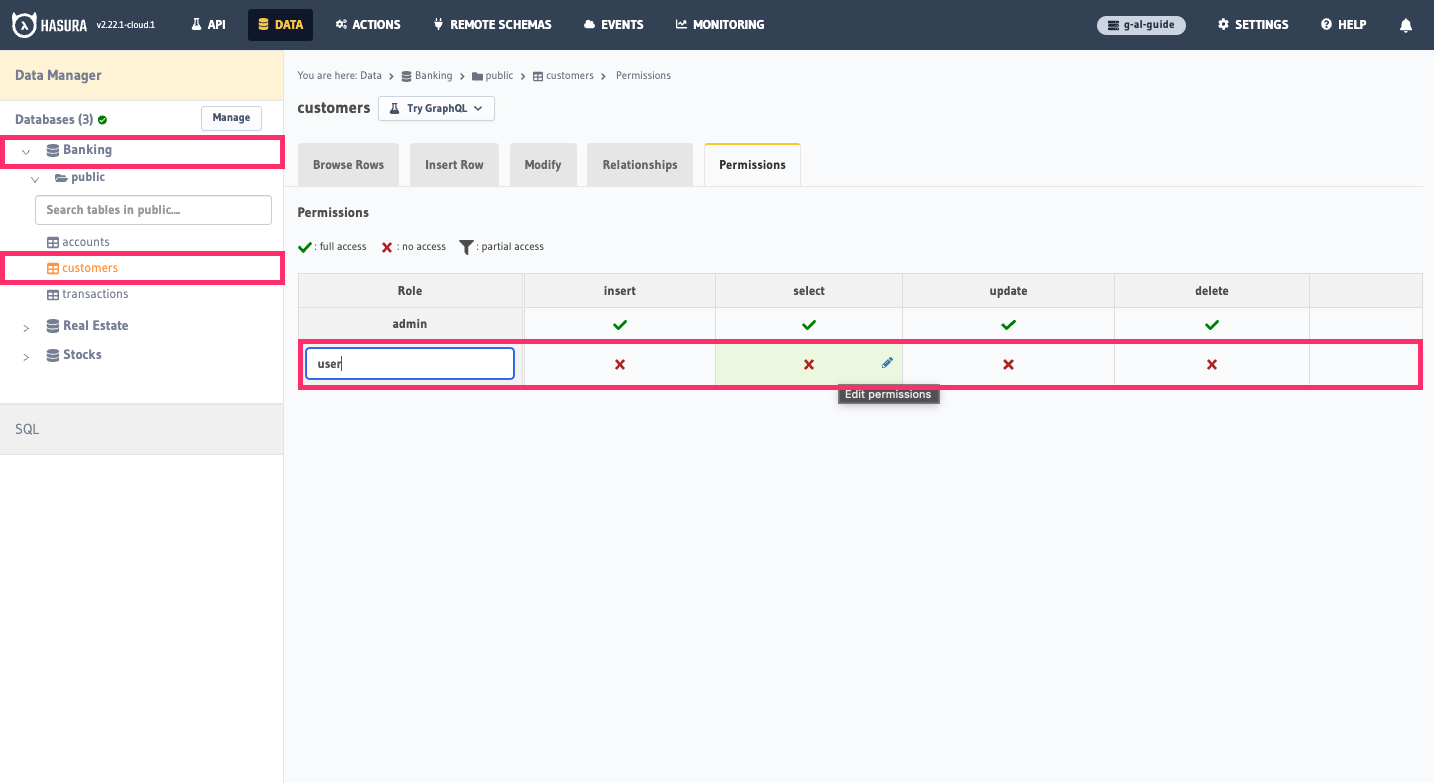
To begin, head to the Data tab and select the customers table of the Banking database. Then, click on the
Permissions tab. We'll enter user as the role and then click on the ❌ in the select column:
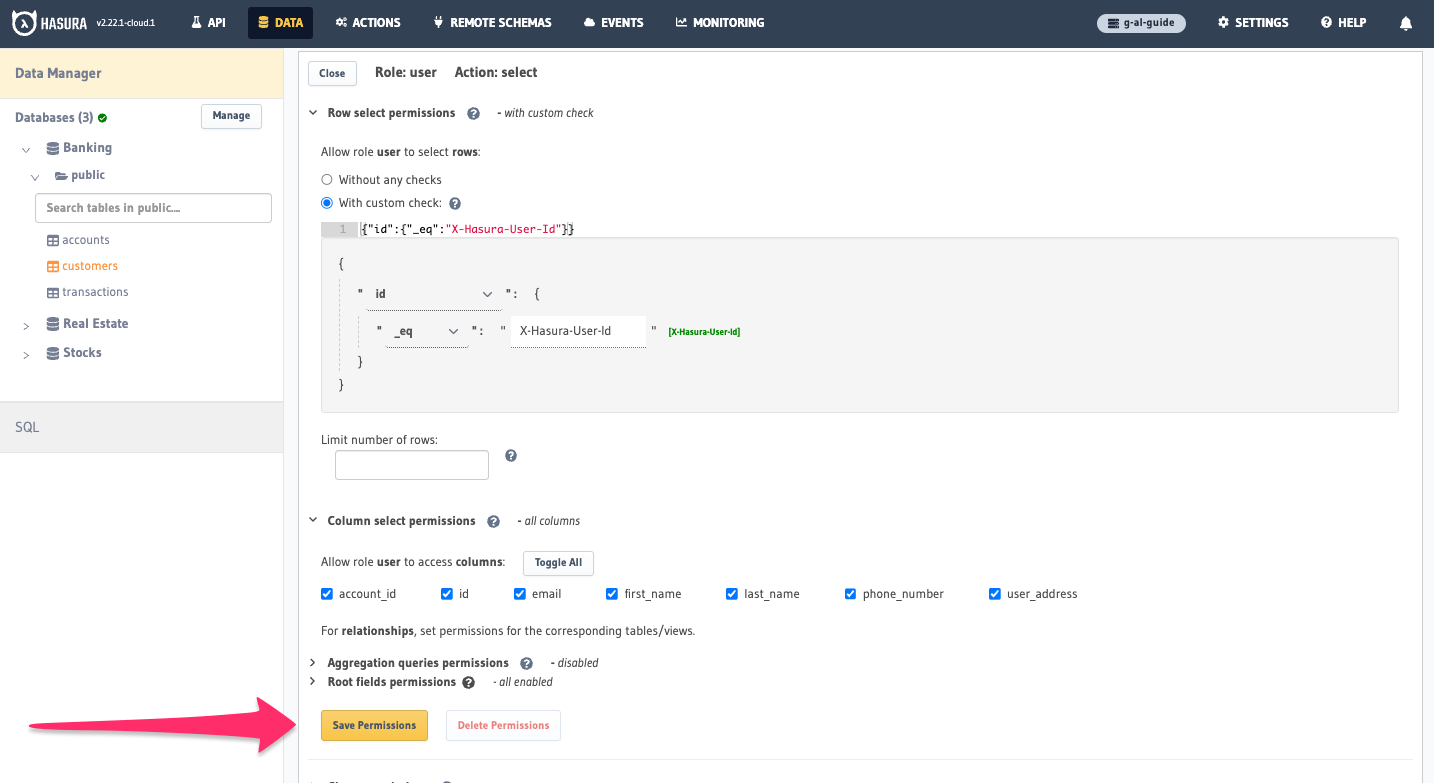
We'll add a custom check that we can either create using the GUI's dropdowns, or by pasting this into the Custom check
editor:
{ "id": { "_eq": "X-Hasura-User-Id" } }
Then, we'll click Toggle All so a user can access all columns. Finally, we'll click Save Permissions:
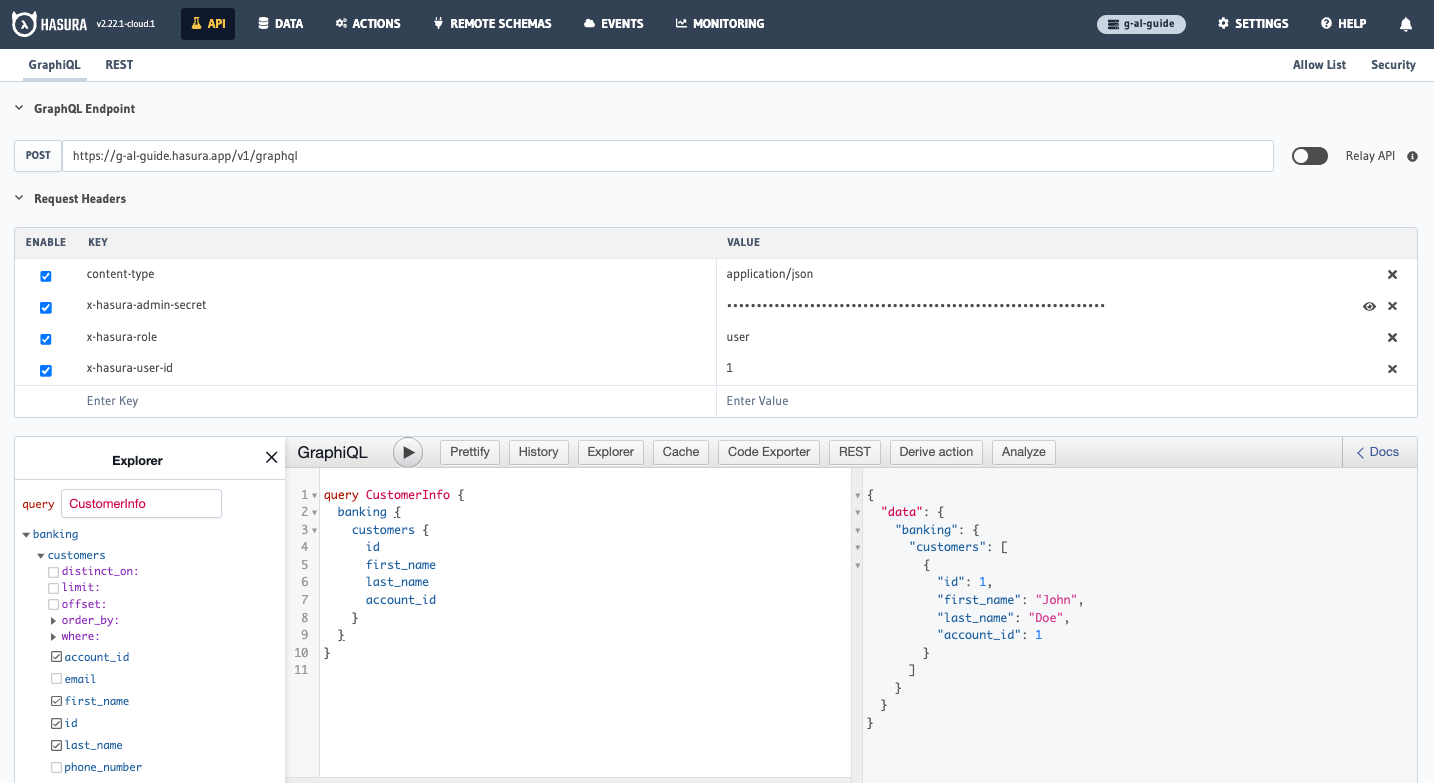
Head back to the API tab where we're going to add a couple of new headers. First, we'll add x-hasura-user-id and set
its value to 1. Then, we'll add a second header called x-hasura-role which is set to user:

Hopefully you noticed something change. The Banking namespace is now the only one that is visible in the GraphiQL
Explorer and, within that, the customers table is the only one that is visible. This is because we've added the
x-hasura-role header. By including this header, the GraphiQL Explorer reflects the schema available to a user with the
role of user.
If we run this query, we'll get data from the customers table in the banking namespace for the user with the ID of
1:
query CustomerInfo {
  banking {
    customers {
      id
      first_name
      last_name
      account_id
    }
  }
}
If you've reached this point and followed along with everything, you should be proud! You've just created an data access layer with Hasura that can act as a single endpoint for all your different databases. You can now use this API to build your frontend and focus on what matters most - building your product. 🎉
Enhanced capabilities
While everything covered above is enough to get you up and running with a data access layer, Hasura has a number of enhanced capabilities that can help you build an ever more robust service. In this section, we'll cover some of the most common use-cases and how you can use Hasura to solve them. We'll also provide links to more in-depth documentation so you can learn more.
Step 5. Connect a REST API
So far, we've looked at adding remote databases. But, what about remote APIs? For our fintech app, imagine being able to query exchange rates using an already-existing API. With Hasura, we can connect to any REST API and use it as a data source.
Show me how to do this
In the Actions tab of our Console, click Create and copy and paste the block below into the Action Definition
field. It will take the place of all placeholder text:
type Query {
  currencyConverter(CurrencyInfo: InputParams!): ConvertedCurrency
}
Then, copy and paste the block below into the Type Configuration field. It will take the place of all placeholder
text:
input InputParams {
  from: String
  to: String
  amt: Int
}

type Info {
  rate: Float
}

type Query {
  amount: Int
  from: String
  to: String
}

type ConvertedCurrency {
  date: String
  info: Info
  query: Query
  result: Float
  success: Boolean
}
In the Webhook Handler field, copy and paste the following:
https://api.exchangerate.host/convert
Click Add Request Options Transform and change the Request Method to GET. Add the following query parameters and
values as separate pairs in the available fields:
| Query Param | Value |
|---|---|
| from | {{$body.input.CurrencyInfo.from}} |
| to | {{$body.input.CurrencyInfo.to}} |
| amount | {{$body.input.CurrencyInfo.amt}} |
Scroll to the bottom of the page, click Create Action, then head to your API page.
Copy and paste this query into your GraphiQL Explorer and execute the query by clicking the Play button.
query CurrencyQuery {
  currencyConverter(CurrencyInfo: { amt: 1, from: "EUR", to: "USD" }) {
    result
  }
}
Step 6. Mutate data
We've given you a read-only user on these databases. However, with Hasura, you get instant GraphQL mutations for all your data sources. This means you can create, update, and delete data from your databases using GraphQL. The same permissions system which protects our queries also protects our mutations.
Recap
At this point, you should have a pretty impressive data access layer powered by Hasura 🎉
Are you production-ready? Not quite. If you're looking to round out your application, check out the following resources:
Auth
Hasura provides a number of ways to handle authentication. Check out the following resources to learn more:
Monitoring
For production applications, you'll want to monitor your Hasura instance. Check out the following observability resources to learn more:
CI/CD
Hasura's Migrations, Metadata, and Seeds - which can be managed via the Hasura CLI - allow you to version control your Hasura instance and seamlessly move between environments. Check out the following resources to learn more: