Build a GraphQL Backend
Introduction
This guide, and the others contained in this directory, are intended to be a step-by-step resource to build an application using Hasura. If you arrived here from the Hasura Cloud Console, you'll have already created a project and are ready to follow the steps below. If you're here from elsewhere, you can create a Hasura Cloud project for free and get started right away.
What we're building

The application we will be building is a simple to-do app, but the concepts and techniques we will be using apply to any GraphQL backend.
If you're a developer who's attempted to create your own GraphQL backend from scratch, you know the challenges that come with it. From writing resolvers and setting up authorization, to handling subscriptions, it can be a time-consuming and tedious process. However, Hasura provides a solution to this problem by delivering a GraphQL backend instantly, and with a few simple steps. In a matter of minutes, you can have a fully-functional GraphQL backend that doesn't require you to write a single line of code and will save you countless hours of development time.
In the example below, we'll create a backend for a to-do app. This app will allow users to create to-do items, mark them as complete, and delete them. Using Hasura's built-in permissions system, we'll also allow users to only see their own to-do items and dial in granular permissions for each user. Once we've checked-off the must-haves for our app, we'll also add some enhanced capabilities like instantly integrating with existing REST and GraphQL APIs.
By the end of this guide, you'll have a GraphQL backend that you can translate into your own application.
Fully-functional backend
Steps 1 through 5 will cover everything needed to create a fully-functional GraphQL backend.
Step 1. Connect a database
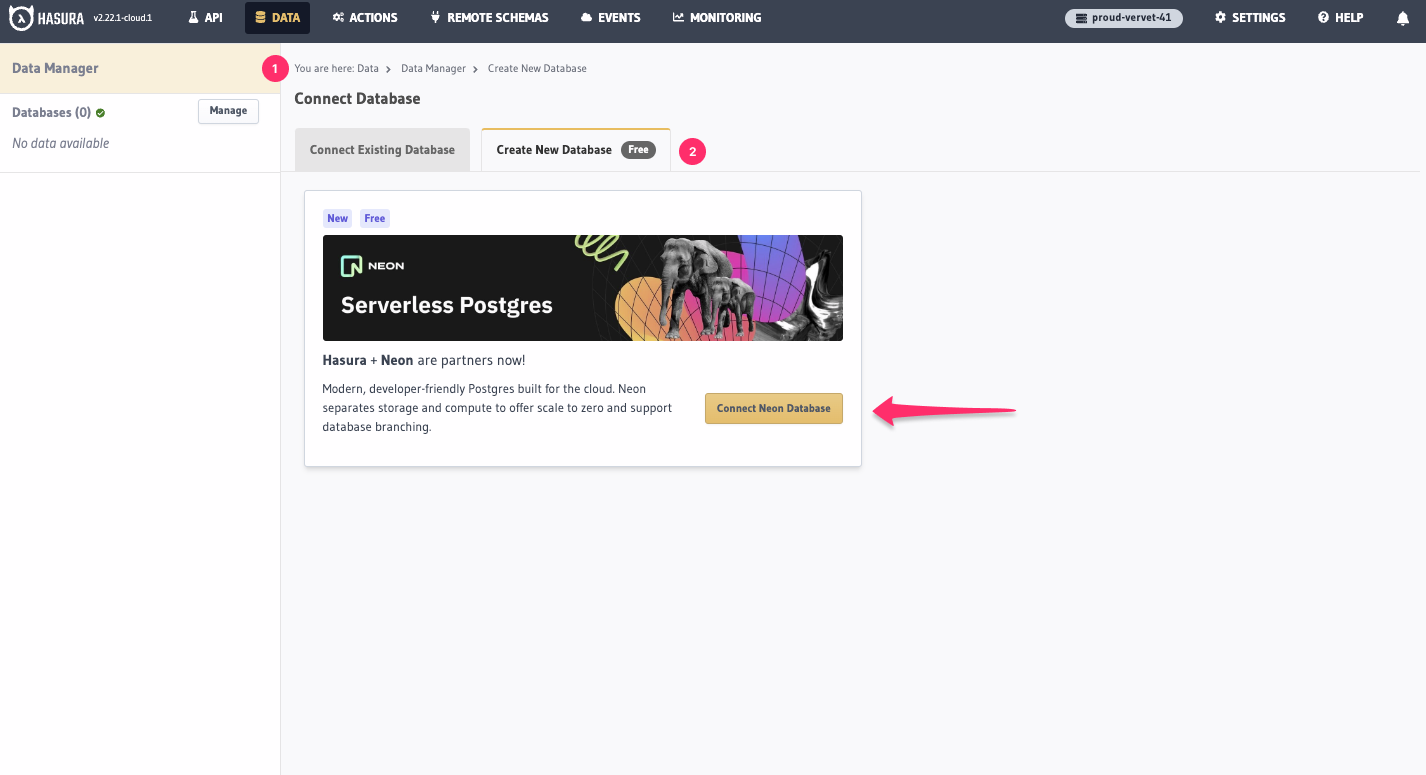
Every application needs a database to store its data. Typically, this is a time-consuming process that requires you to search for a database provider, create an account, and then provision a database. However, Hasura makes this process instant and easy. With a few clicks, you can spin up a database and connect it to your Hasura project. We have a partnership with Neon, a cloud database provider, that allows you to instantly provision a serverless Postgres database and connect it to your Hasura project.
From your project's Console - the UI that allows you to interact with your Hasura instance - navigate to the Data tab
and click Connect New Database. From here, you'll be able to select Neon as your database provider and provision a
database. Once you've done that, we'll automatically connect it to your Hasura project.
Using Neon is a quick and easy way to get started, but you can also connect databases from other hosts. If you're interested to see what the process looks like, check out our guides for many of the most popular providers.
Step 2. Create a data model
After connecting a database, we'll then need to create a data model. This is the process of creating tables and
relationships between them. In our example, we'll create a users table and a todos table. We'll also create a
relationship between them so that each user can have many to-do items.
While we could create these tables and relationships manually using a database management tool, Hasura makes this
process easy with the Data tab in the Console. From here, we can create tables and relationships with a few clicks. In
the example below, let's create the users table by entering the fields and types from the diagram above. Your finished
product should look like this:
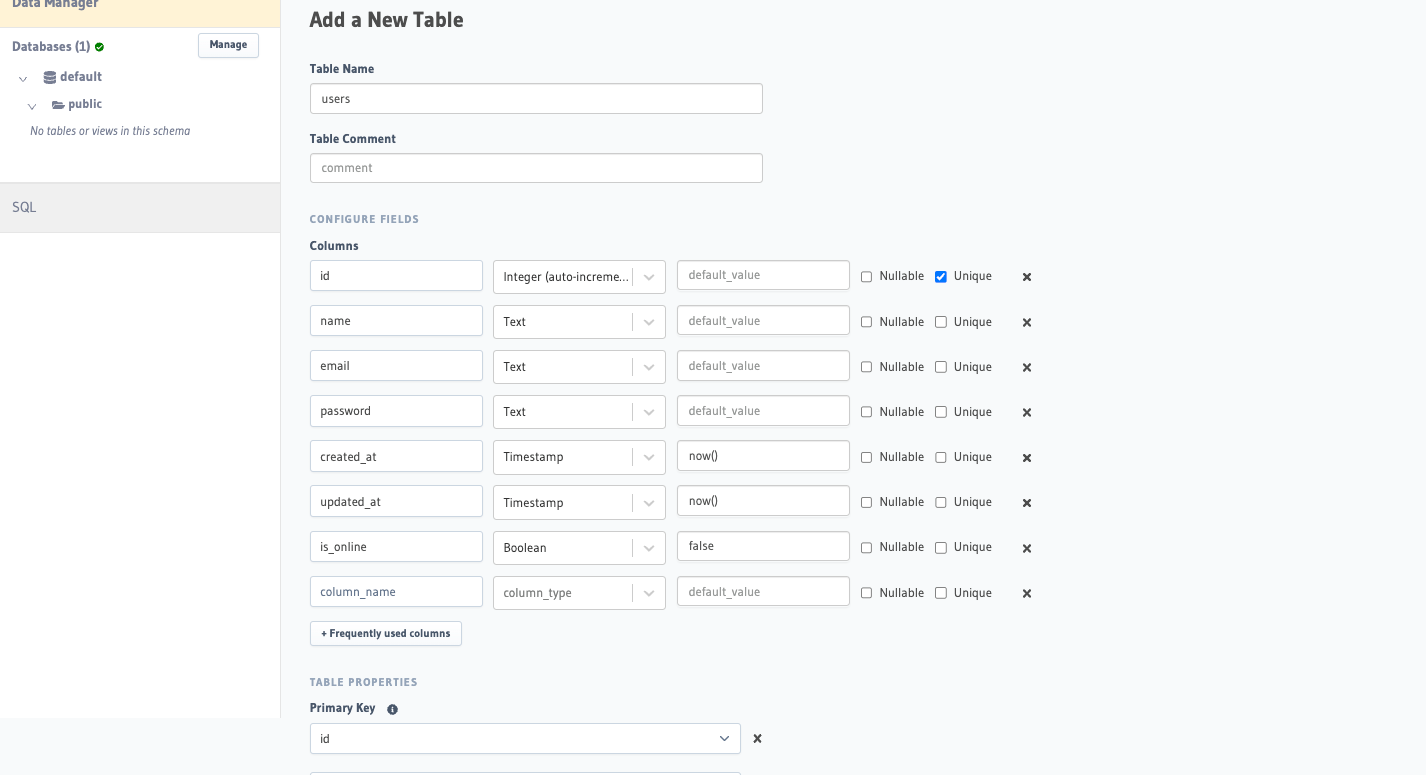
After entering the information, click Create and Hasura will create the table for us.
If we're feeling adventurous, we can even write SQL and execute it directly in the Console. This allows us to input a
tremendous amount of seed data in just a flash. To access the SQL editor, click the SQL option in the sidebar on the
Data tab.
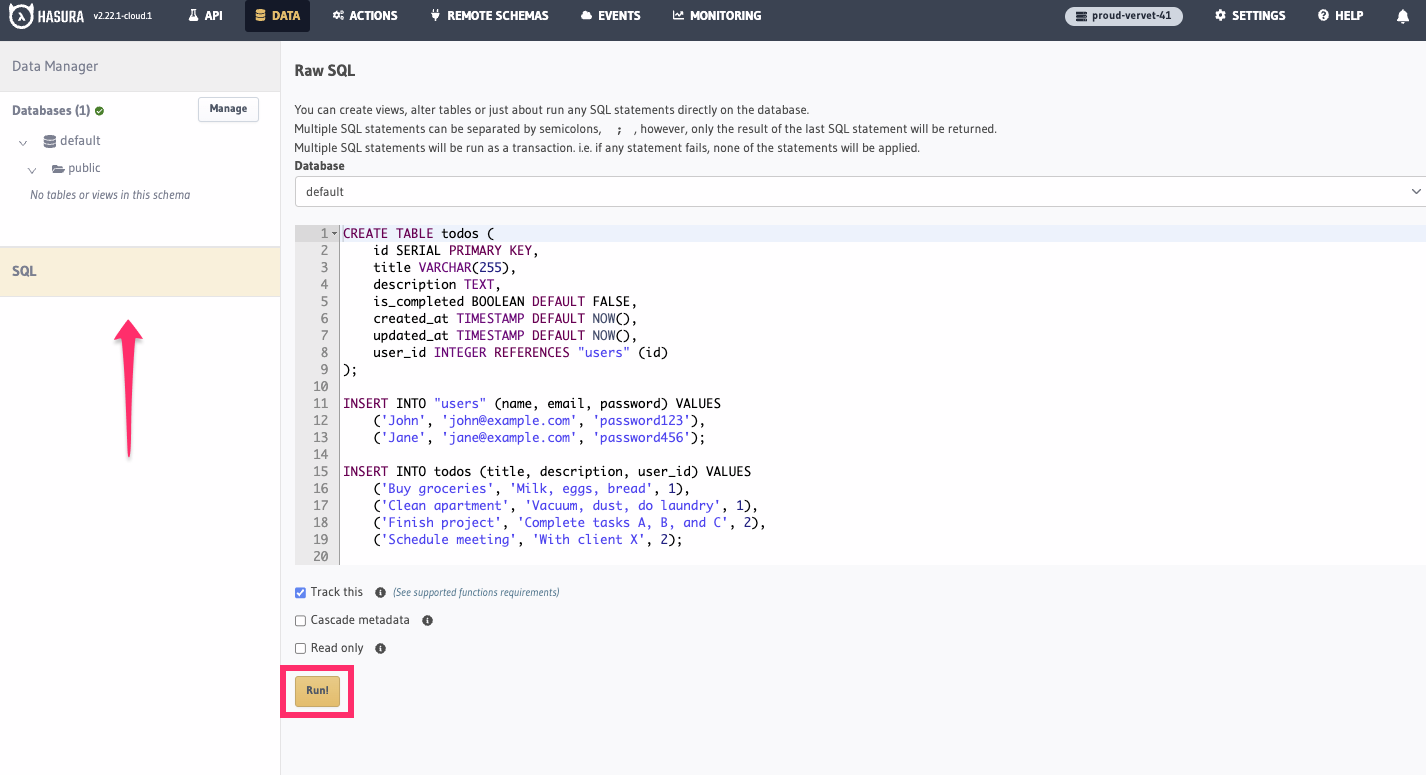
From here, copy and paste the following SQL into the Console and execute it to create the todos and seed data for both
tables:
CREATE TABLE todos (
    id SERIAL PRIMARY KEY,
    title VARCHAR(255),
    description TEXT,
    is_completed BOOLEAN DEFAULT FALSE,
    created_at TIMESTAMP DEFAULT NOW(),
    updated_at TIMESTAMP DEFAULT NOW(),
    user_id INTEGER REFERENCES "users" (id)
);

ALTER TABLE "users" ADD COLUMN country VARCHAR(255);

INSERT INTO "users" (name, email, password, country) VALUES
    ('John', '[email protected]', 'password123', 'US'),
    ('Jane', '[email protected]', 'password456', 'GB');

INSERT INTO todos (title, description, user_id) VALUES
    ('Buy groceries', 'Milk, eggs, bread', 1),
    ('Clean apartment', 'Vacuum, dust, do laundry', 1),
    ('Finish project', 'Complete tasks A, B, and C', 2),
    ('Schedule meeting', 'With client X', 2);
Hasura gives you the flexibility to create our data model in whichever way you prefer. Whether you - or people in your team - are more comfortable with a GUI or with SQL, Hasura has you covered to help you quickly create or modify your data model and get back to building your application.
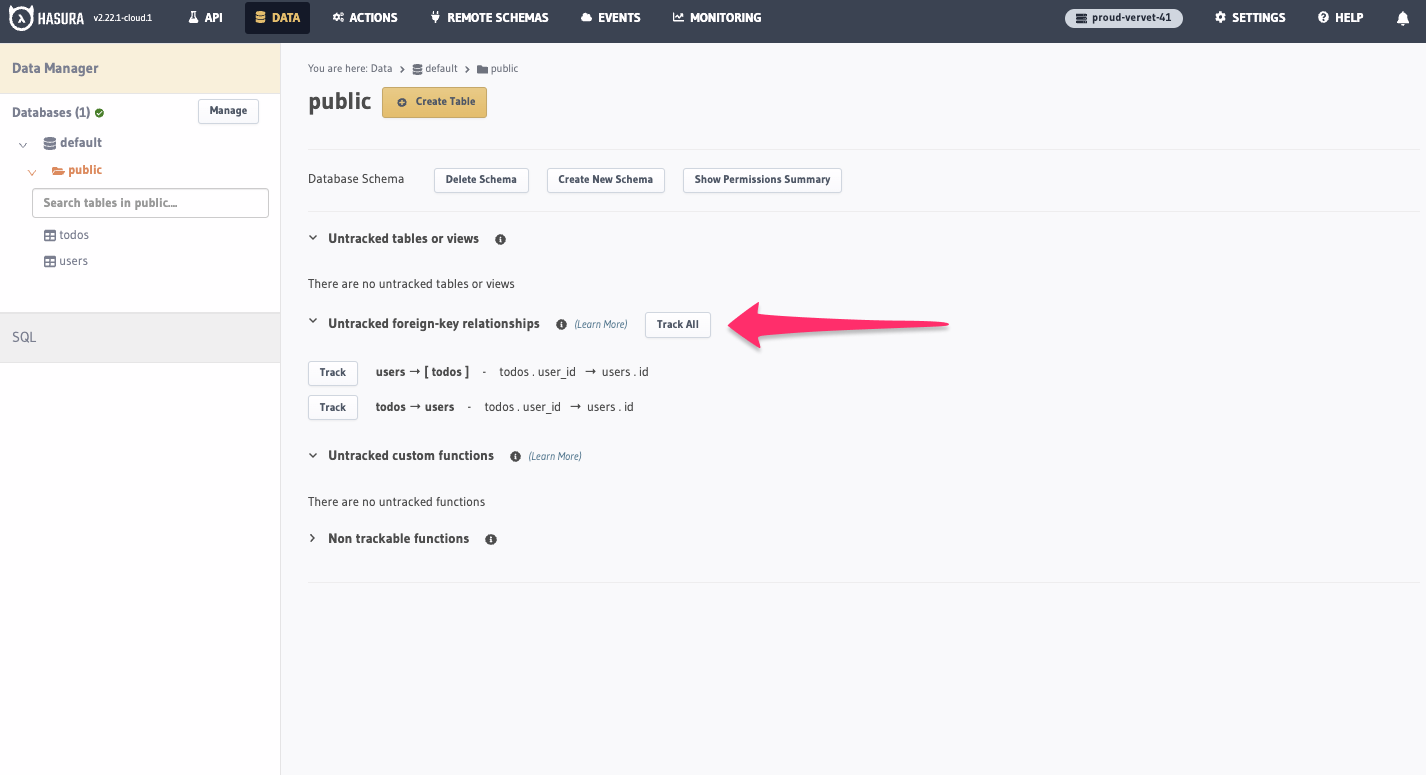
The final thing we'll do is create relationships between the tables. This will allow us to query data from both tables
in a single query. To do this, navigate to the Data tab and click the Track All button above the untracked
foreign-key relationships:
Step 3. Query data
With our data model created, and seed data in place, we can now query our data. With traditional tools, this would require us to write resolvers and set up a GraphQL server. However, Hasura makes this process instant and easy. With a few clicks, we can query our data and get back the results we need.
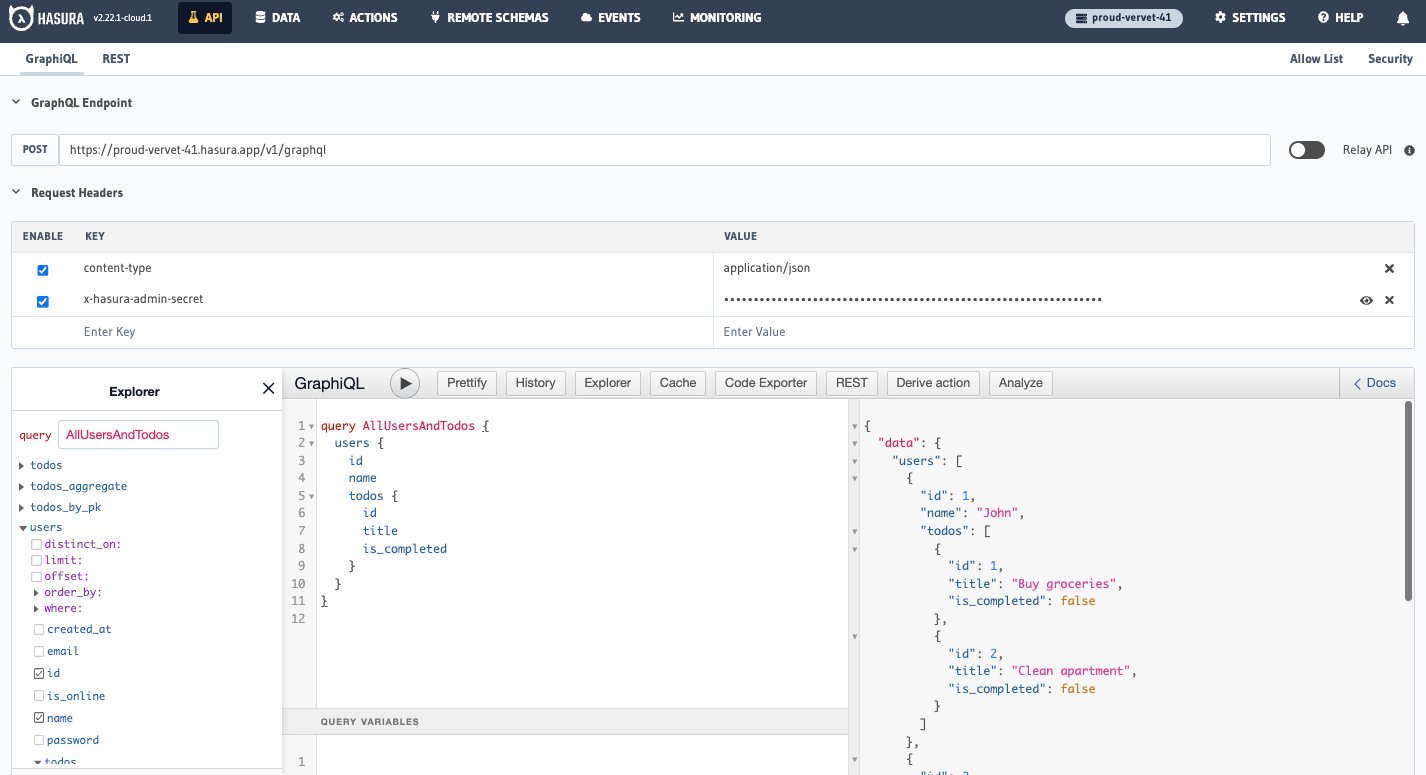
We achieved the example above by querying all of the users and their to-do items. We can do this with the GraphiQL
Explorer, which is a tool that allows us to execute queries, mutations, and subscriptions. To access the GraphiQL
Explorer, navigate to the API tab. We can build a query using the Explorer by clicking on the fields we want to
return, or we can write the query manually.
While we executed some SQL, we didn't have to write a single line of code to create a GraphQL API. Hasura automatically creates a GraphQL schema based on the tables and relationships we created. This means we can instantly query our data!
Step 4. Set up authorization
One of the most important - and painfully difficult - aspects of any application is authorization. This is the process of ensuring that users can only access the data that they are allowed to access. If we were building this API ourselves, we would need to write a lot of code to handle this. However, Hasura ships with a robust permissions system that allows us to dial in granular permissions for each user. With a few clicks, we can set up permissions that will ensure that users can only access their own to-do items.
Query data with permissions
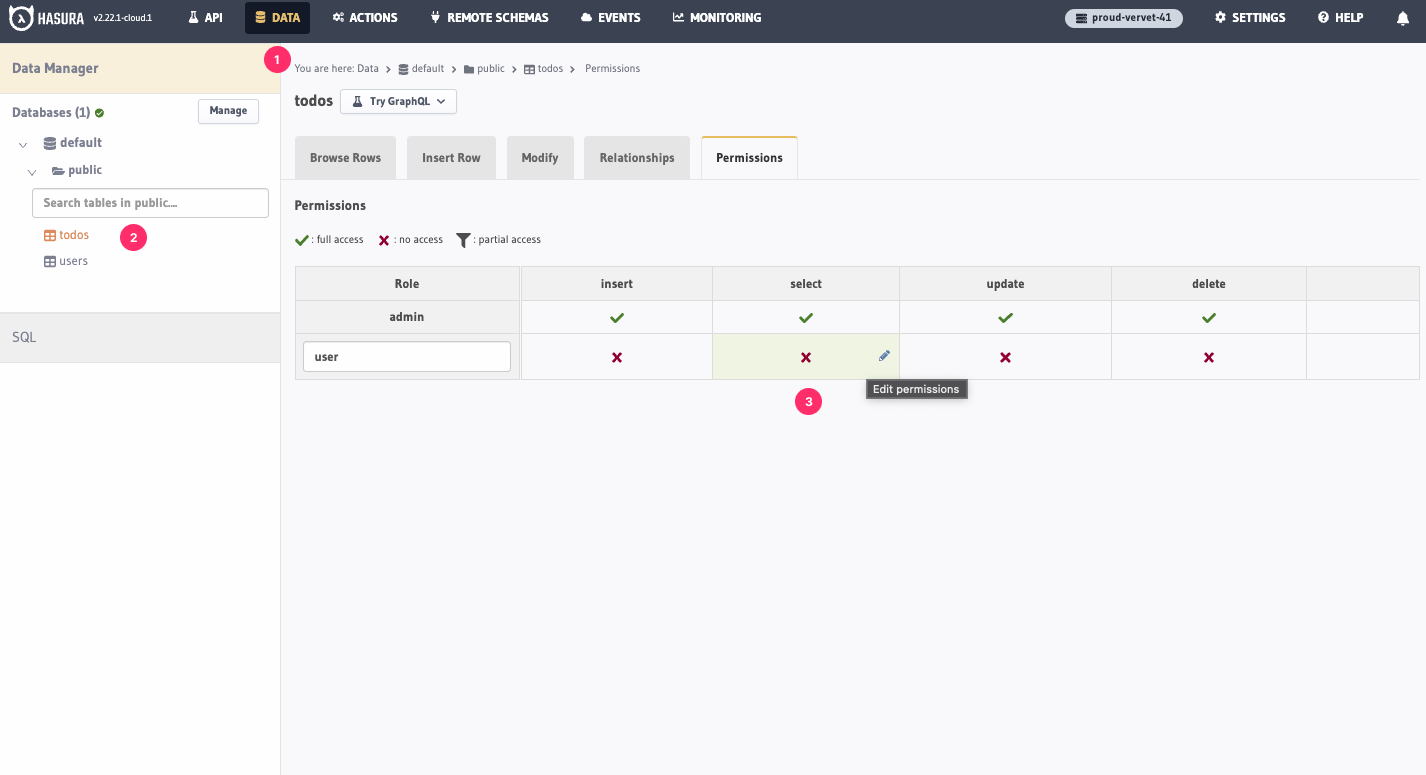
To do this, we'll create a user role and set up permissions for that role. We'll create a rule that checks if a user's
ID is equal to the ID of the user who created the to-do item. If it is, we'll allow them to access it. If it isn't,
we'll deny them access.
To do this, navigate to the Data tab and choose our todos table. Then, click the Permissions tab. From here, we'll
name the role user by entering it into the input and then clicking on the select column:
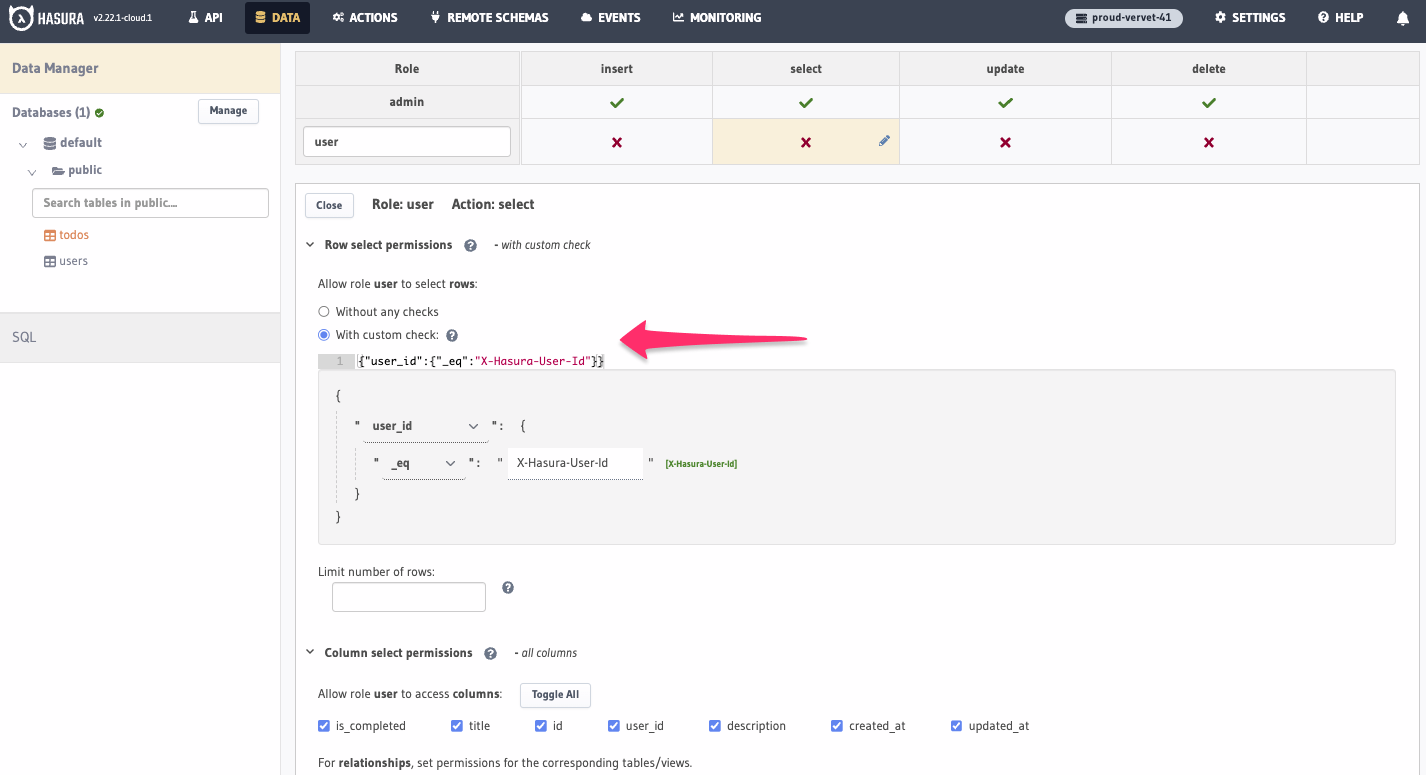
Once in the editor, we'll select With custom check and write the check to reflect the rule we described above. The GUI
allows you to build a rule using a series of dropdowns, but we can also write it manually. You can copy and paste the
following into the editor:
{"user_id":{"_eq":"X-Hasura-User-Id"}}
There's a series of other configuration options that we can set up, but for now, we'll simply choose Toggle All for
the columns in the todos table someone with the user role can access. Once we've done that, we can click
Save Permissions and Hasura will automatically modify our GraphQL schema to reflect the changes we made.
Now that we've set up permissions, let's test them out. We'll use the GraphiQL Explorer to query the to-do items for a
user with admin privileges and then for a user with user privileges. If you run the following query, you should see an
output - being the to-do items of all users - like this:
Of course, we can see all of the to-do items because we have admin privileges. These are enabled in our GraphiQL
Explorer because we have the x-hasura-admin secret header included. By adding two new headers, we can test out the
permissions we just set up. Add the following and check yourself against the screenshot before executing the query:
| Header | Value |
|---|---|
x-hasura-role | user |
x-hasura-user-id | 1 |
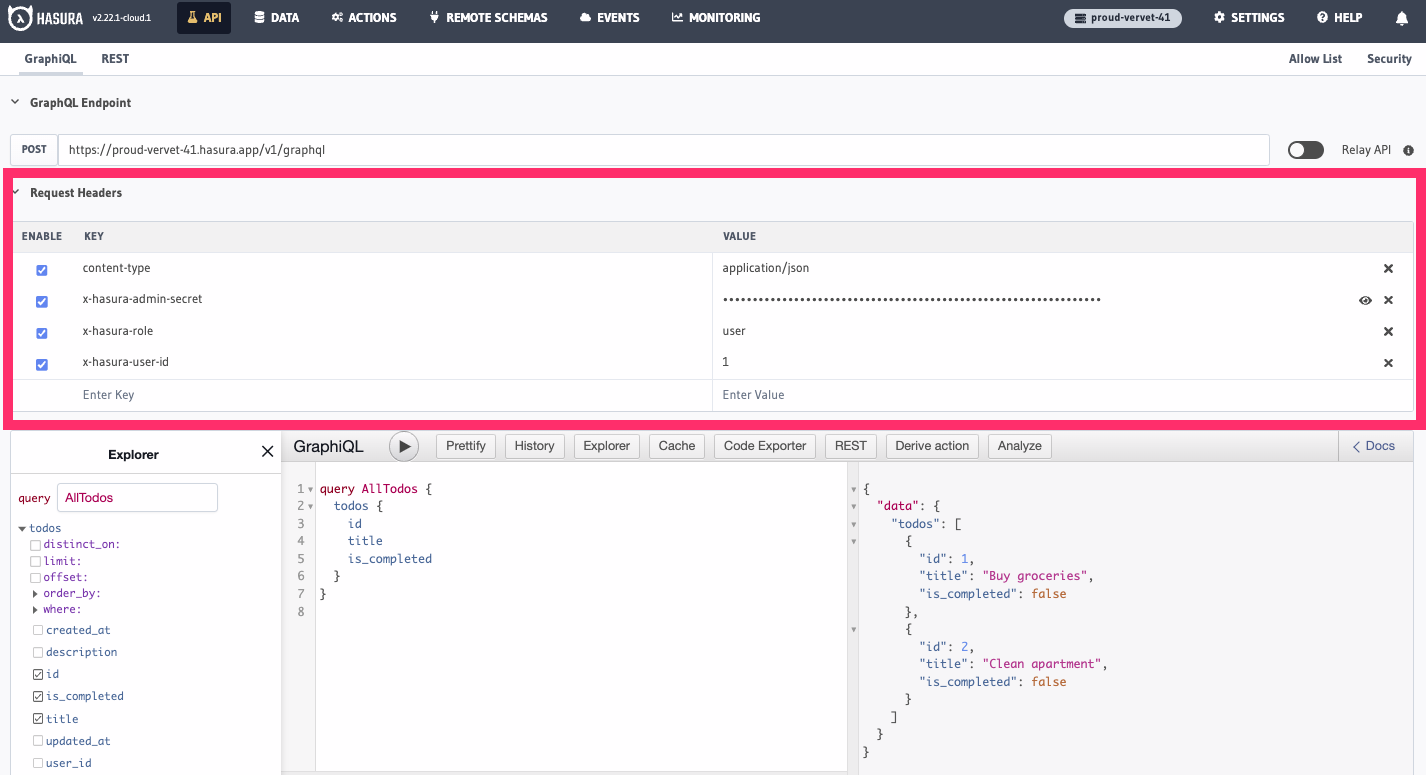
If you make this change and then run the query again, you should see an output like this:
Let's break down what's happening here. We're simulating a user with the ID of 1 making a request to the API. Hasura
is agnostic about how you handle authentication, but it can decode user information stored in the header of a request.
In this case, we're using the Authorization header to pass in the user ID. Hasura then checks the permissions we set
up and determines that the user with the ID of 1 should only be able to access the to-do items that they created.
Yep! Hasura automatically modifies the schema to reflect the permissions a particular role can access. This means you can write a clean, simple query and Hasura will handle the rest 🎉
Mutate data with permissions
Now that we've set up permissions for querying data, let's set up permissions for mutating data. We'll create a rule that checks if a user's ID is equal to the ID of the user who is creating the to-do item. If it is, we'll allow them to create it. If it isn't, we'll deny them access.
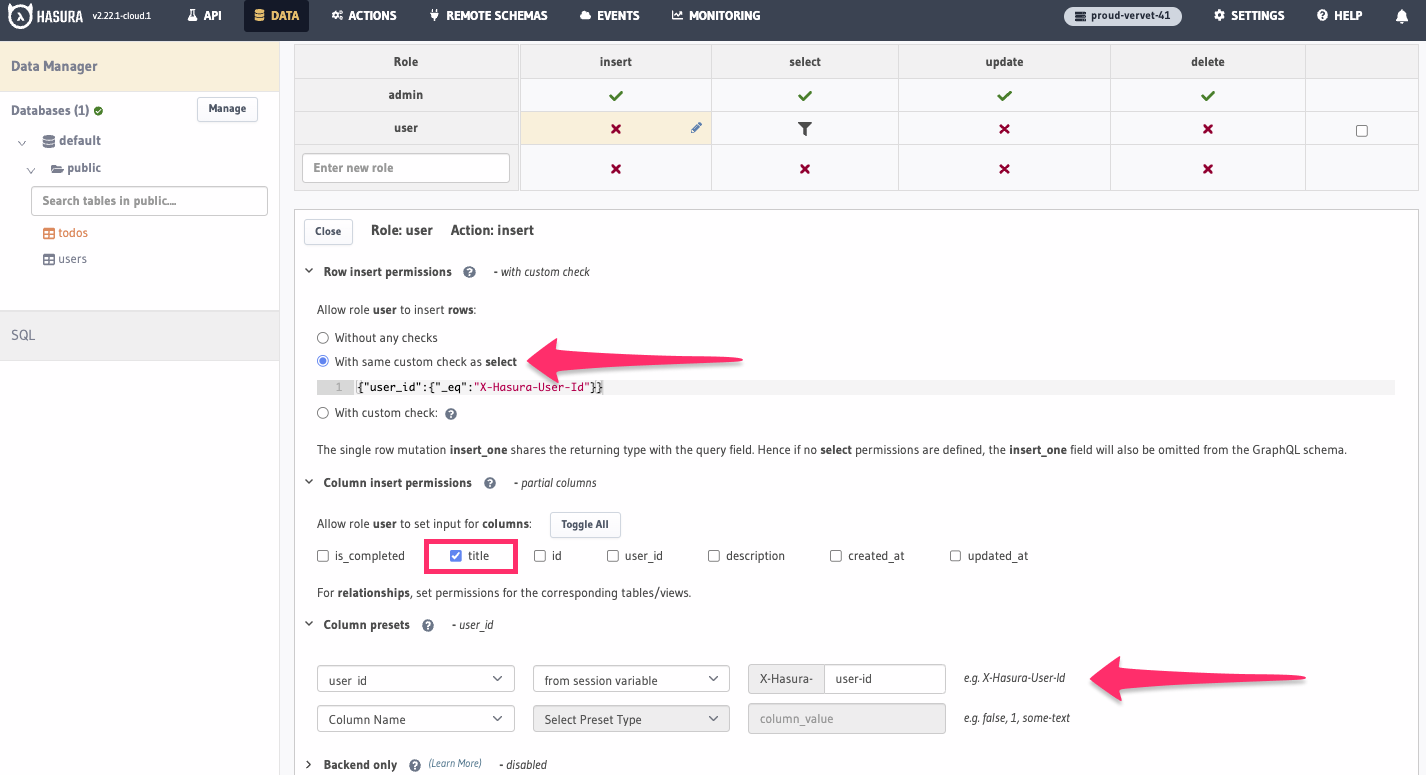
To do this, navigate to the Data tab and choose our todos table. Then, click the Permissions tab. From here, we'll
click the ❌ in the Insert column on the user row. Since this is the same logic we used for querying data, Hasura
can apply the same rules to inserts; choose With same custom check as select.
Under the Column insert permissions, we could choose Toggle All, however, Hasura can automatically determine values
for different fields using column presets. As an added layer of security, we'll restrict a user's ability to set the
user_id field.
For now, let's only select title under Column insert permissions. Then, under Column presets, we'll choose
user_id for the name of the column, from session variable for the preset type, and Hasura-User-Id for the session
variable.
Now that we've set up permissions, let's test them out. We'll use the GraphiQL Explorer to create a to-do item for a
user with an id of 1. If you run the following mutation, you should see an output - being the to-do item that was
created - like this:
Because Hasura not only leverages the power of native database constructs, but also allows you to determine presets for different fields, you can simplify the DX for your team by allowing them to write clean, simple queries and mutations without having to worry about the underlying logic.
Step 5. Add custom business logic
A common need for any backend is to add custom business logic. This is the process of adding custom code to your backend to handle a specific use case. For bespoke needs that are unique to your application, you don't need an entire backend to handle them. Instead, you can use Hasura Actions to add custom business logic to your API. True, the handlers executing the logic are running on a separate server, but they can be written in the language and framework of your choice and hosted wherever you like. Simply point Hasura to the endpoint and it will handle the rest.
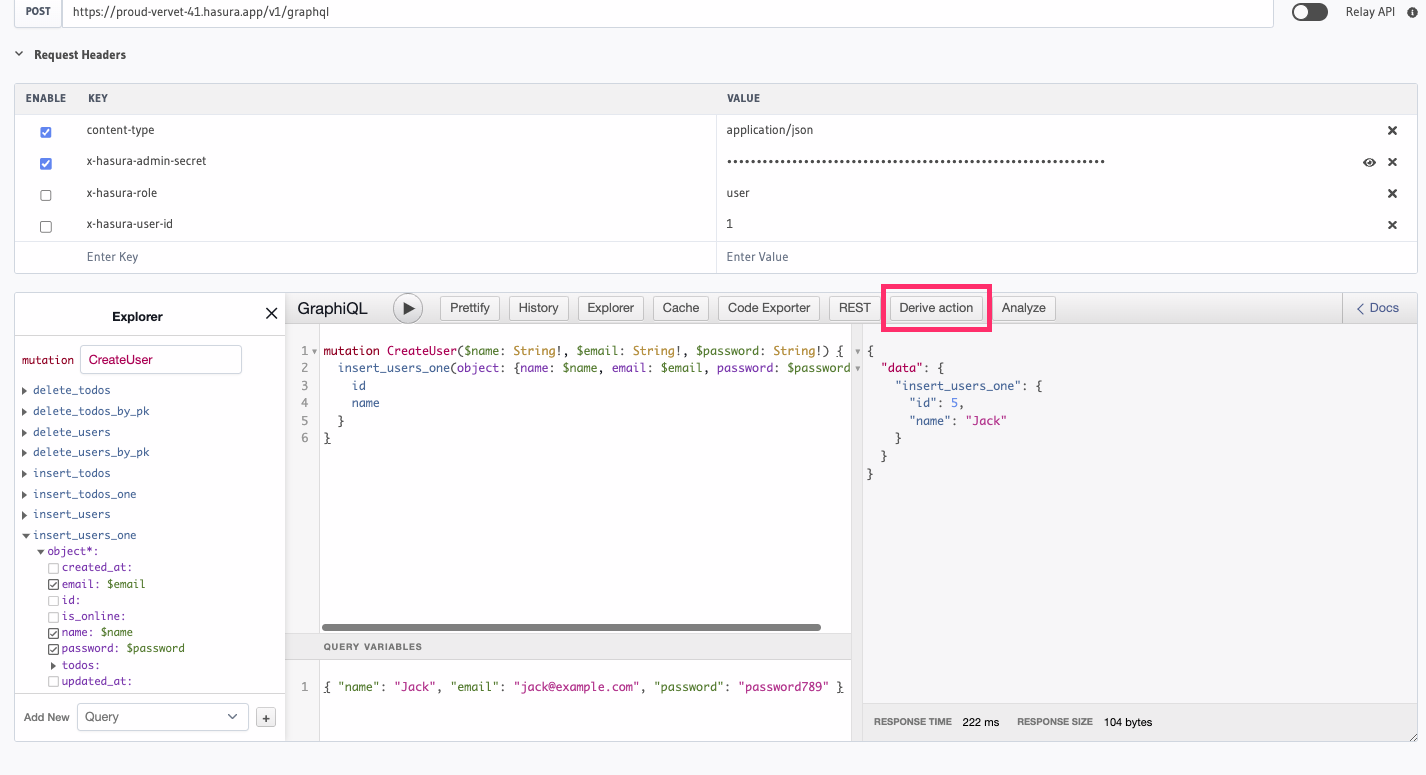
In the example below, we'll create an Action that will hash a user's password when they sign up. To begin, let's write a mutation that will create a user and return their ID and name. We'll use the GraphiQL Explorer to do this.
Ensure you've unchecked the x-hasura-role and x-hasura-user-id headers in the GraphiQL Explorer.
If you run the following mutation, you should see an output - being the user that was created - like this:
Now that we've confirmed our mutation works, let's create an Action that will hash a new user's password before entering
it into the database. To do this, click Derive action in the GraphiQL Explorer:
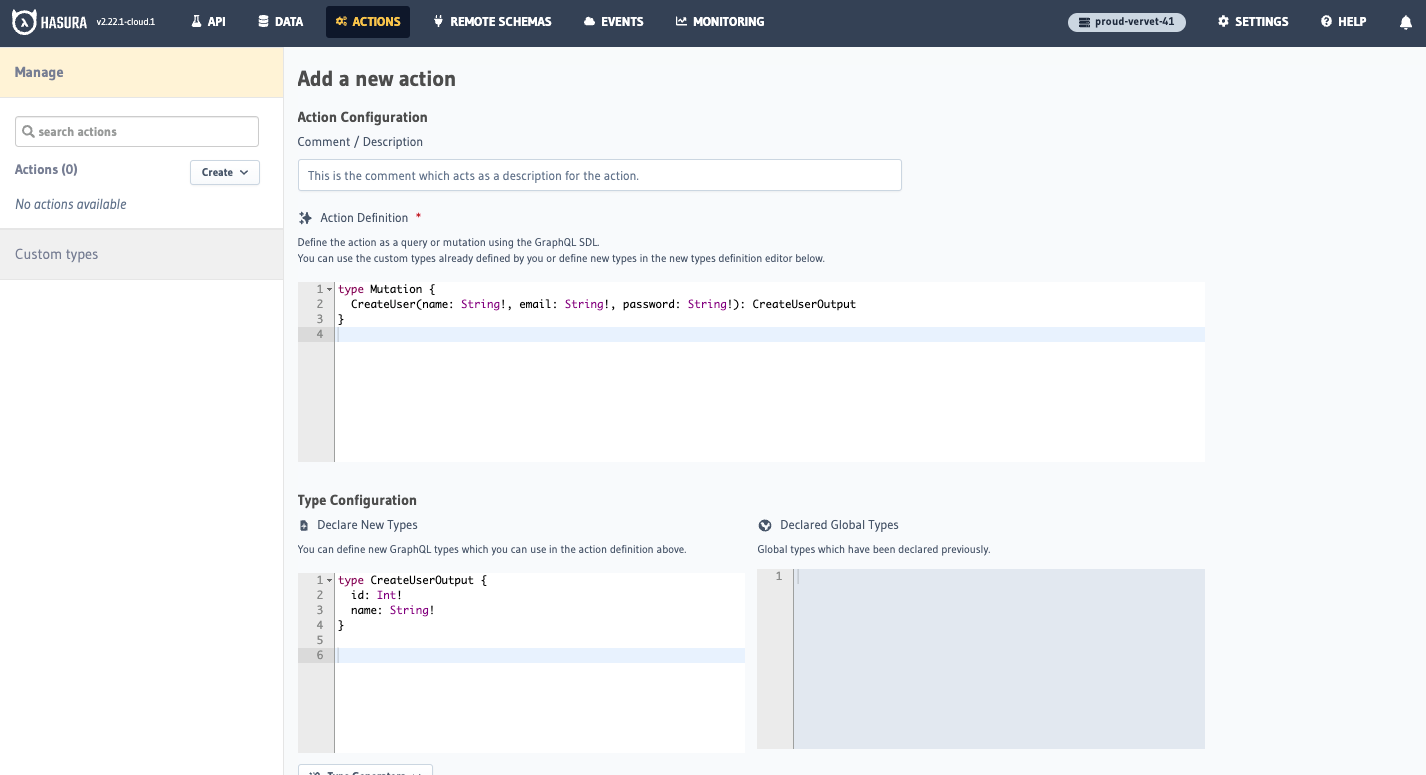
Hasura automatically picks up the context of the mutation we just wrote and uses it to populate the Action. As you can
see from the screenshot below, it's named the mutation CreateUser and defined an output type of CreateUserOutput.
It's also automatically populated the arguments with the fields we used in the mutation. This means when we run this
mutation, we'll get back the ID and name of the user that was created.
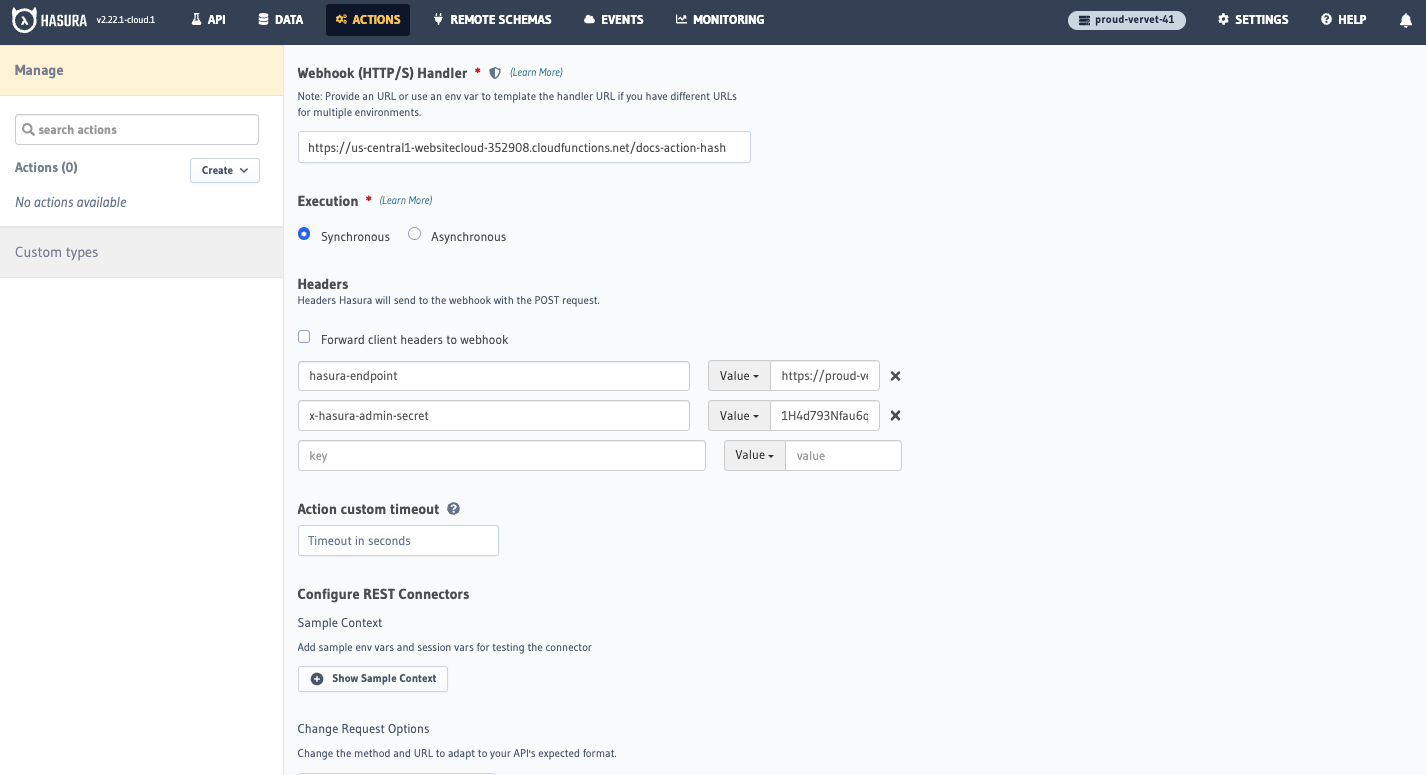
Next, we'll enter a webhook URL. This is the endpoint that Hasura will hit when the Action is executed. We've created a simple endpoint that will hash the password and return the user's ID and name. You can copy and paste the following into the input:
https://us-central1-websitecloud-352908.cloudfunctions.net/docs-action-hash
As we're handling the logic for you, you'll also need to add a couple of headers so our handler can access your
project's API. Add the following in the Headers section of the Action:
| Key | Value |
|---|---|
hasura-endpoint | https://<YOUR_PROJECT_NAME>.hasura.app/v1/graphql |
x-hasura-admin-secret | <YOUR_PROJECT_SECRET> |
When copying and pasting the headers, ensure you don't include any whitespace or extra characters.
Check yourself against this screenshot before moving on:
If everything is in place, we can now click Create Action and test it out. If you run the following mutation in the
GraphiQL Explorer of the API tab, you should see an output - being the user that was created - like this:
If you head to the Data tab and choose the users table, you should see the user that was created and the password
hashed:
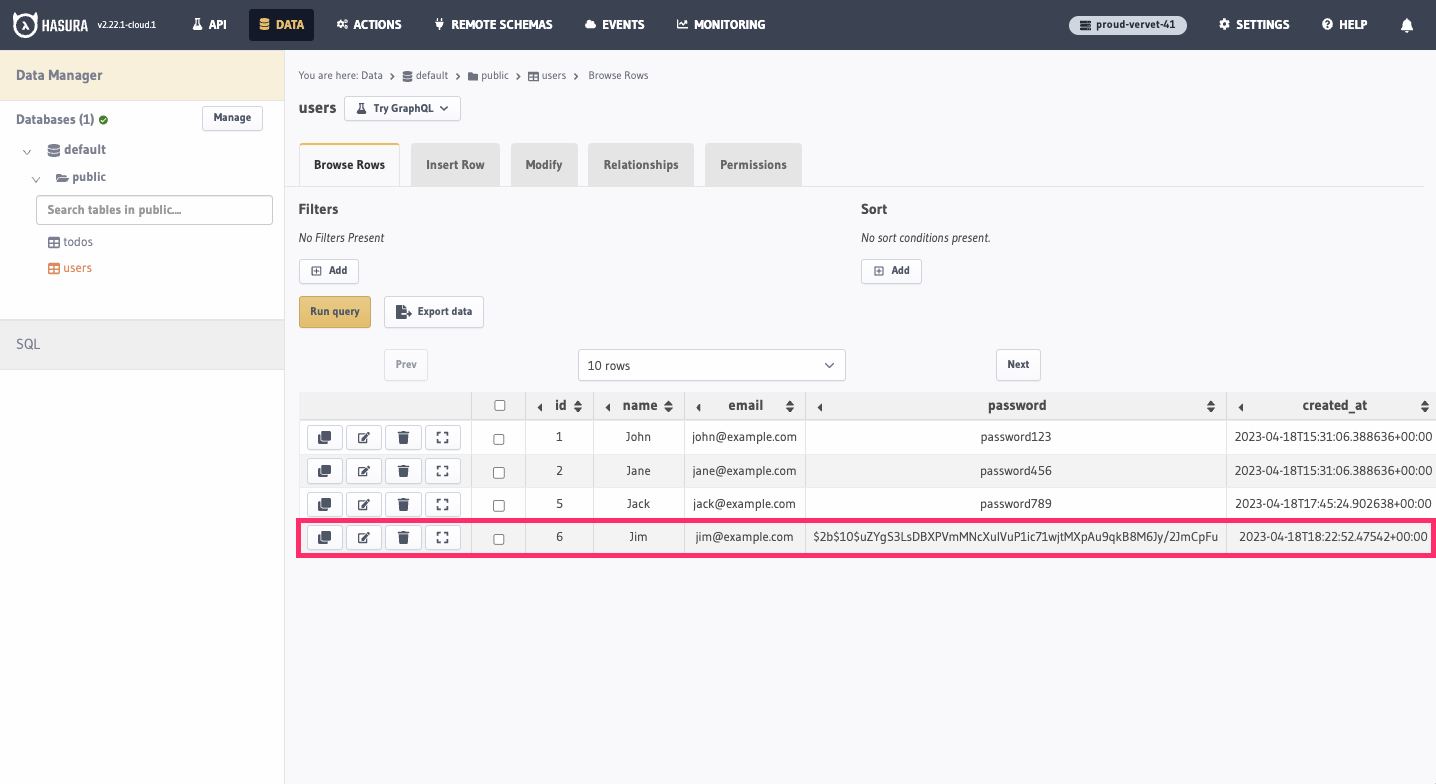
As this is a demo, we've created the simple endpoint for you. However, in production, you'll need to create your own endpoints that can handle the logic you need. Check out our codegen docs for more information on how to do this.
Additionally, you should never pass your project secret in the headers of a request in a production environment.
If you've reached this point and followed along with everything, you should be proud! You've just created a GraphQL API with Hasura that can handle all of your CRUD operations and execute custom business logic. You can now use this API to build your frontend and focus on what matters most - building your product. 🎉
Enhanced capabilities
While everything covered above is enough to get you up and running with a GraphQL API, Hasura has a number of enhanced capabilities that can help you build a robust backend. In this section, we'll cover some of the most common use-cases and how you can use Hasura to solve them. We'll also provide links to more in-depth documentation so you can learn more.
Step 6. Execute event-driven logic
It's common to have event-driven logic in your application. For example, when a new user signs up, you may want to send them a welcome email. With Hasura, you can execute event-triggered logic by creating a trigger that will hit an endpoint when a new user is created. We call these Event Triggers. Similar to Actions, you can point these Event Triggers at endpoints that you host anywhere and execute any logic you wish whenever a prescribed database event occurs.
Show me how to do this
In this example, we're simulating sending a welcome email by creating an Event Trigger that will hit an endpoint when a
new user is created. To do this, navigate to the Events tab and click Create Trigger. Then, choose users as the
table and insert as the operation. Finally, we'll enter the endpoint below as the Webhook:
http://httpbin.org/post
We can now click Save Trigger and test it out. Try inserting a new user in the GraphiQL Explorer. Then, if you head to
the Events tab, you can see a log of the event that was triggered.
Step 7. Incorporate an existing REST API
Often, you'll have an existing REST API that you want to incorporate into your GraphQL API. With Hasura, you can do this with Actions. This allows you to add a GraphQL wrapper around routes in your REST API and use them as if they were native GraphQL queries and mutations. Suppose you have a REST API that returns the location of an IP address. You can create an Action that will hit the endpoint and return the location of the IP address whenever the Action is executed.
Show me how to do this
Navigate to the Actions tab and click Create Action. Then, enter the following information:
Add the description:
Translate ip addresses to city names.
Then, the Action Definition:
type Query {
  GetCityName(ip: String!): City
}
Followed by the Type Configuration:
type City {
  city: String!
}
We'll then hit the handler at the following endpoint:
https://api.techniknews.net/ipgeo
And finally Transform the Request Options by selecting GET and adding the following to the base url:
/{{$body.input.ip}}
We can now click Create Action and test it out. If you run the following query, you should see an output - being the
city of Boston - like this:
query MyQuery {
  GetCityName(ip: "43.225.189.85") {
    city
  }
}
Step 8. Incorporate an existing GraphQL API
We've seen how to handle custom business logic and REST APIs, but what if you have an existing GraphQL API? With Hasura,
you can incorporate an existing GraphQL API into your backend using Remote Schemas.
This allows you to have a single GraphQL API that can handle all of your needs. Imagine we have a country field on our
users table. We can create a Remote Schema that will point to an existing GraphQL API that will return the emoji flag
for a given country. We can then create a relationship between the users table and the Remote Schema so that when we
query a user, we can also get their country's emoji flag.
Show me how to do this
To begin, we'll create a Remote Schema that will point to the GraphQL API. To do this, navigate to the Remote Schemas
tab and click Add. We'll call our Remote Schema countries and then, enter the following endpoint:
https://countries.trevorblades.com/graphql
We can now click Add Remote Schema and create our relationships.
From the Data tab, we'll open the users table and click Relationships. Choose, Add a remote schema relationship
and name it emoji and choose our countries Remote Schema.
Then, we'll check the boxes for countries, filter, code, and eq. We'll choose to connect these fields via the
country column on the users table.
Now, if you run the following query, you should get a response that includes all of your users along with their country's emoji flag:
query GetUsers {
  users {
    id
    name
    country
    emoji {
      emoji
    }
  }
}
Step 9. Execute logic on a schedule
Typical of most applications, we'll need to execute certain tasks on a schedule. For example, we may want to send users a summary of their incomplete tasks - from the previous day - every day at 9am. With Hasura, you can do this with Scheduled Triggers. This allows you to hit an endpoint on a schedule and execute any logic you wish. As with Actions and Event Triggers, you can point these Scheduled Triggers at endpoints that you host anywhere.
Show me how to do this
We'll simulate this example using httpbin. We'll create a Scheduled Trigger that will hit an endpoint every minute and
return a message that says, "You have incomplete tasks!" We'll set the cron schedule to * * * * * so you can see this
in action. Though, in production, you'll want to set this to 0 9 * * * so it runs every day at 9am.
Simply name the trigger notify_incomplete_tasks and enter the following endpoint:
http://httpbin.org/post
Then, add a payload:
{
  "message": "You have incomplete tasks!"
}
Now that we've created the Scheduled Trigger, we can test it out. If you head to the Events tab, you should see a log
of the event that was scheduled.
Step 10. Stream your data in real-time
One of the greatest benefits of GraphQL is that it allows you to stream data in real-time. With Hasura, you can do this with Subscriptions. This allows you to subscribe to changes in your database and receive updates in real-time. For example, as an admin, you may want to see a list of all currently logged-in users. You can create a subscription that will return a list of all users that are currently logged-in and that will update in real-time as users log in and out.
Show me how to do this
Subscriptions work out of the box with Hasura. All you need to do is subscribe to the changes you want to receive. In
the example below, we'll subscribe to changes in the users table. Write this subscription in the GraphiQL Explorer and
hit run:
subscription MySubscription {
  users(where: { is_online: { _eq: true } }) {
    id
    is_online
    name
  }
}
Then, execute the following mutation - with your endpoint and secret values added - via a curl request:
curl --location --request POST '<YOUR_PROJECT_ENDPOINT>' --header 'Content-Type: application/json' --header 'x-hasura-admin-secret: <YOUR_PROJECT_SECRET>' --data-raw '{"variables": {"id": 1, "is_online": true}, "query": "mutation MyMutation($id: Int!, $is_online: Boolean!) { update_users_by_pk(pk_columns: {id: $id}, _set: {is_online: $is_online}) { id name is_online }}" }'
Recap
At this point, you should have a pretty impressive GraphQL backend powered by Hasura 🎉
Are you production-ready? Not quite. If you're looking to round out your application, check out the following resources:
Auth
Hasura provides a number of ways to handle authentication. Check out the following resources to learn more:
Monitoring
For production applications, you'll want to monitor your Hasura instance. Check out the following observability resources to learn more:
CI/CD
Hasura's Migrations, Metadata, and Seeds - which can be managed via the Hasura CLI - allow you to version control your Hasura instance and seamlessly move between environments. Check out the following resources to learn more: