Create a One Click Deploy to Hasura Cloud App
Introduction
A One Click Deploy to Hasura Cloud app enables anyone to create a Hasura Cloud Project, based on the Hasura assets
available in a GitHub repository, with a click of a Deploy to Hasura button. Below, you can find the step-by-step
guide to setting up a One Click Deploy to Hasura App.
Step 1: Create a public GitHub repository with Hasura assets
One Click Deploy to Hasura Cloud applies Hasura assets, i.e. Metadata, Migrations and Seeds, from a Hasura CLI project directory present in a public GitHub repository.
If you haven't set up a Hasura CLI project directory, follow the instructions here to create one from a running Hasura instance.
The file structure of the project directory containing the Metadata, Migration, Seeds should look something like this:
📂 hasura
├─ 📄 config.yaml
├─ 📂 metadata
├─ 📂 migrations
└─ 📂 seeds
Once the project directory is created with the application assets, push them to a public GitHub repository to be used as the source of your One Click Deploy app.
Check out what a Hasura project directory looks like with this e-commerce app.
Step 2: Add a hasura-cloud-deploy-config.yaml file (optional)
If you want to configure some extra details about the One Click Deploy app, a hasura-cloud-deploy-config.yaml file can
be added to the hasura assets directory (i.e., the directory containing Migrations, Metadata, and Seeds).
The file structure of the project directory with the hasura-cloud-deploy-config.yaml should look something like this:
📂 hasura
├─ 📄 config.yaml
├─ 📂 metadata
├─ 📂 migrations
├─ 📂 seeds
└─ 📄 hasura-cloud-deploy-config.yaml
The hasura-cloud-deploy-config.yaml accepts the following fields:
name: user-friendly name for your appstatic-env: a list of pre-configured environment variables required by the appuser-env: a list of environment variables required by the app that users need to add during deploymentdescription: a description for the environment variable to help the user during deploymentmandatory: whether the user can skip setting the environment variabledefault: (optional) a default value for the environment variable which the user can override during deployment
Example: hasura-cloud-deploy-config.yaml file
name: 'hasura-ecommerce-sample-app'

static-env:
  HASURA_GRAPHQL_UNAUTHORIZED_ROLE: anonymous

user-env:
  PG_DATABASE_URL:
    description: 'Postgres database URL'
    mandatory: true
  NEXTJS_SERVER_URL:
    default: 'http://localhost:3000'
    description: 'Next.js Server URL for authentication and custom business logic'
    mandatory: true
  HASURA_GRAPHQL_JWT_SECRET:
    default: '{"key": "this-is-the-hasura-nextjs-secret-key-replace-it-with-something-secure","type": "HS256"}'
    description: 'JWT Secret key'
    mandatory: true
The prompt to enter the above set of environment variables during deployment would look like the following:

Adding a hasura-cloud-deploy-config.yaml is optional if the app doesn't need any special environment variables.
Hasura Cloud automatically detects environment variables used for database connection strings from the app metadata and
prompts users to set them even if a hasura-cloud-deploy-config.yaml file is not added.
Hasura Cloud also automatically sets the HASURA_GRAPHQL_ADMIN_SECRET environment variable to secure the project. :::
Step 3: Add a sample-requests.graphql file (optional)
A sample-requests.graphql can be added to the hasura assets directory (i.e. the directory containing Migrations,
Metadata, and Seeds) to pre-fill GraphQL request(s) in the Console API explorer once the project has been set up.
The file structure of the project directory with the sample-requests.graphql should look something like this:
📂 hasura
├─ 📄 config.yaml
├─ 📂 metadata
├─ 📂 migrations
├─ 📂 seeds
├─ 📄 hasura-cloud-deploy-config.yaml
└─ 📄 sample-requests.graphql
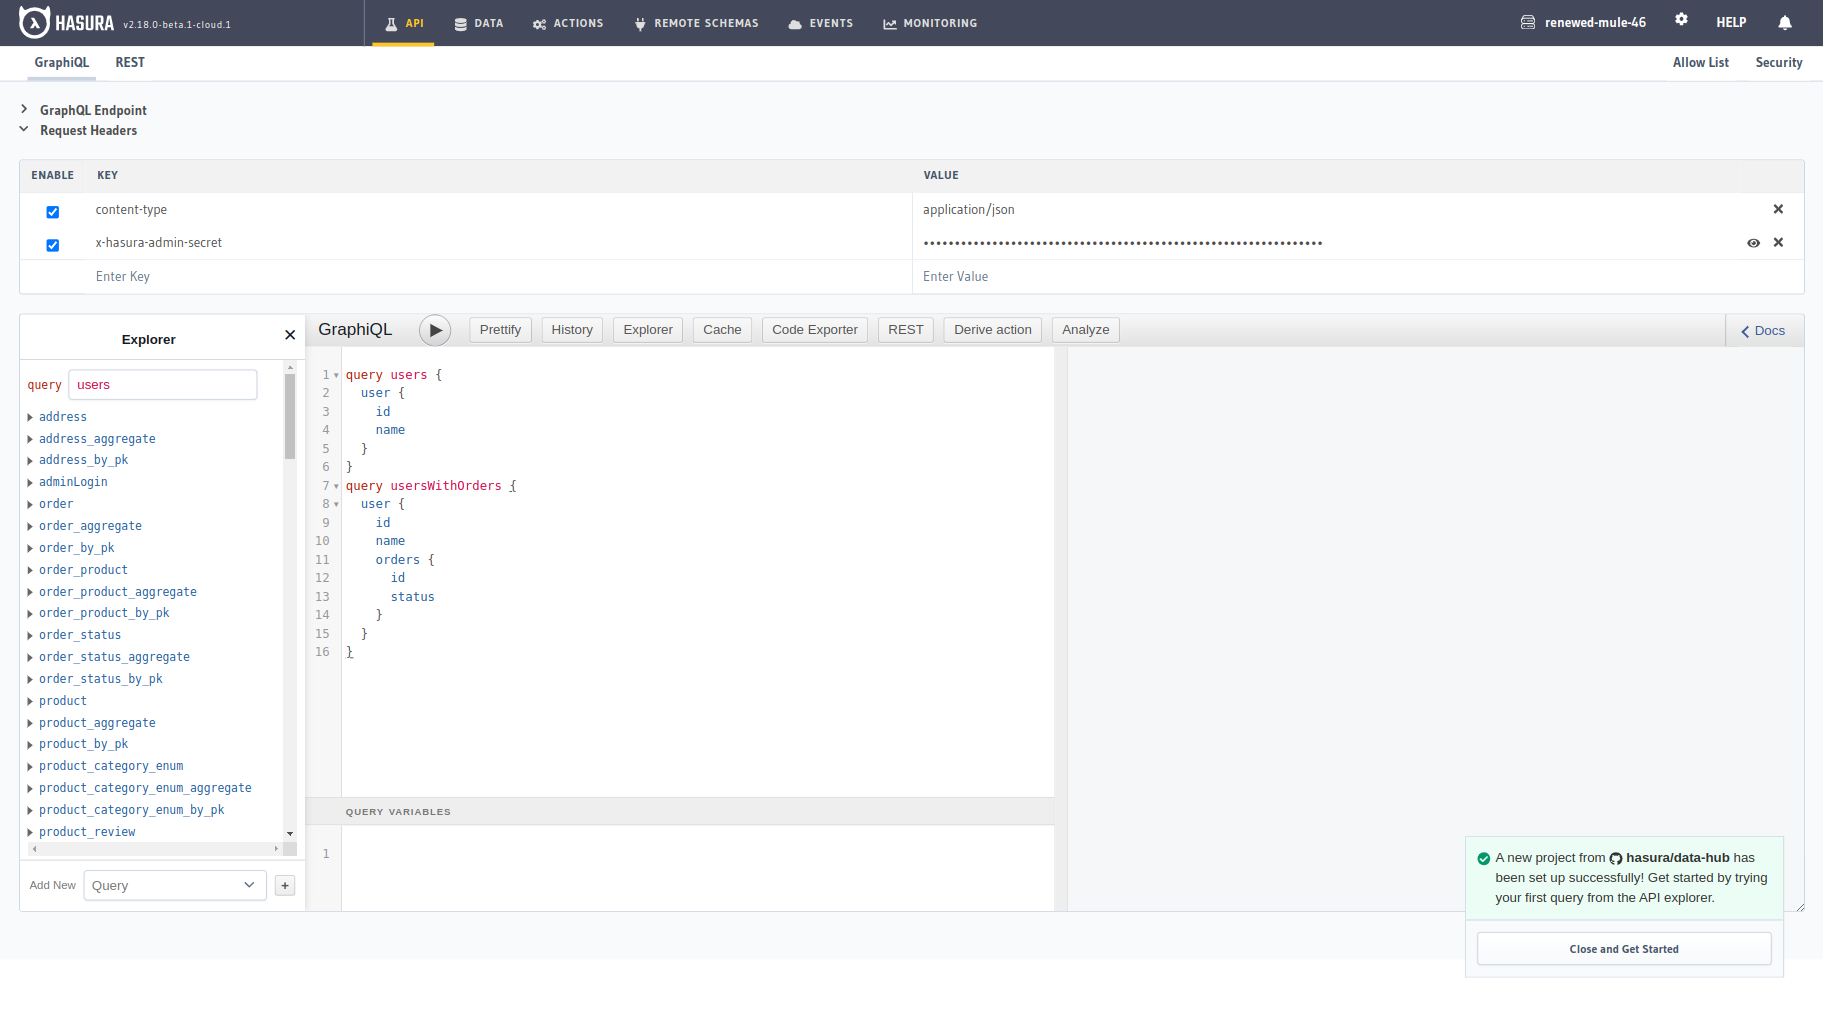
Example: sample-requests.graphql file
query users {
  user {
    id
    name
  }
}

query usersWithOrders {
  user {
    id
    name
    orders {
      id
      status
    }
  }
}
This will render the Console as follows on deployment completion:
Step 4: Generate the Deployment URL and button
The following is the structure of the One Click Deploy URL which can also be linked to a Deploy to Hasura Cloud
button:
https://cloud.hasura.io/deploy?github_repo=<LINK-TO-GIT-REPO
  >&hasura_dir=<PATH-TO-HASURA-DIRECTORY-IN-REPO>&branch=<BRANCH-NAME></BRANCH-NAME></PATH-TO-HASURA-DIRECTORY-IN-REPO
></LINK-TO-GIT-REPO>
One Click Deploy URL
The following form can be used to generate a One Click Deploy to Hasura Cloud URL:
The generated URL can now be used to trigger a One Click Deploy workflow for your app.
Deploy to Hasura Cloud Button
You can create a Deploy to Hasura Cloud button as shown below that can be used to trigger a One Click Deploy workflow
for your app using the URL generated above.

Snippets to Embed Button
You can use the following snippets to add this button to a markdown file, such as your GitHub repository README.md or
your dashboards for users to deploy:
Markdown
[](https://cloud.hasura.io/deploy?github_repo=<LINK-TO-GIT-REPO>&hasura_dir=<PATH-TO-HASURA-DIRECTORY-IN-REPO>&branch=<BRANCH-NAME>)
HTML
<a
  href="https://cloud.hasura.io/deploy?github_repo=<LINK-TO-GIT-REPO>&hasura_dir=<PATH-TO-HASURA-DIRECTORY-IN-REPO>&branch=<BRANCH-NAME>"
  ><img src="https://hasura.io/deploy-button.svg" alt="Deploy to Hasura Cloud"
/></a>
URL
https://cloud.hasura.io/deploy?github_repo=<LINK-TO-GIT-REPO>&hasura_dir=<PATH-TO-HASURA-DIRECTORY-IN-REPO>&branch=<BRANCH-NAME>
The Deploy to Hasura Cloud button image asset can be found here.
Step 5: Verify Deployment URL
Once the One Click Deploy URL is generated, verify the link by executing the One Click Deploy workflow as described here.
Troubleshooting your app
If you encounter any errors in the One Click Deploy workflow for you app, you can attempt to troubleshoot them by manually deploying your Hasura app via the Hasura CLI.
Navigate to Hasura Cloud and create a new Hasura Cloud project.
Connect the required database(s) needed for your app as shown here.
Set any environment variables required for your app as shown here.
Navigate to the project's
hasuradirectory in your command prompt:cd hasuraVerify your Migrations, Metadata and Seeds are in the right format by deploying your app to Hasura Cloud using this command:
hasura deploy --with-seeds --endpoint "<hasura-cloud-project-endpoint>" --admin-secret "<admin-secret>"YOUR ENDPOINTPlease take note that the endpoint should end with
hasura.appnothasura.app/v1/graphql.This command deploys your Hasura project, including Metadata, Migrations and Seeds. If there is any issue with the Metadata, Migrations, or Seed data in your
hasuradirectory, it will provide detailed logs to help you resolve it.