Quickstart Scheduled Triggers
This quickstart will help you create your first Scheduled Trigger. We're going to simulate an automated process wherein a Hasura instance will hit an endpoint and email users who have abandoned carts older than 24 hours.
DOCS E-COMMERCE SAMPLE APP
This quickstart/recipe is dependent upon the docs e-commerce sample app. If you haven't already deployed the sample app, you can do so with one click below. If you've already deployed the sample app, simply use your existing project.

Step 1: Click create
Head to the Events tab of the Hasura Console and choose Cron Triggers on the left-hand side:

Then, click Create.
Step 2: Enter the basics
Let's call this Scheduled Trigger abandoned_carts_notification by entering this value in the Name field.
Additionally, we have an endpoint you can hit to simulate a real-world scenario. Enter this value in the Webhook URL
field:
https://us-central1-websitecloud-352908.cloudfunctions.net/docs-scheduled-trigger-sample-app
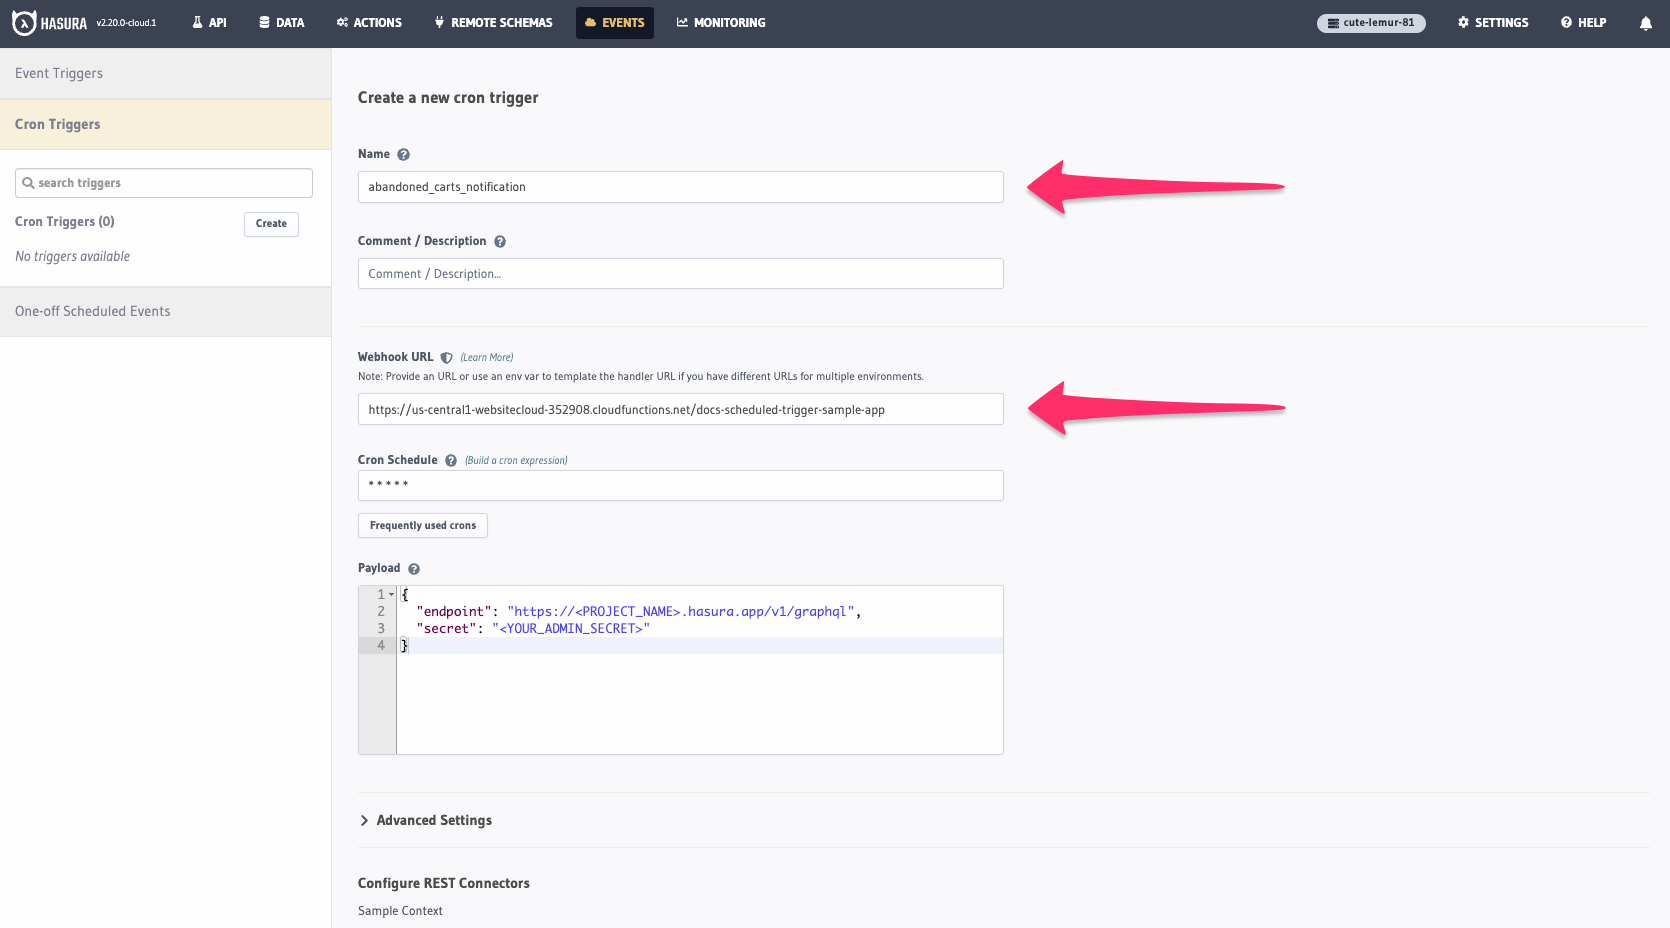
Step 3: Add the cron expression
Next, we'll enter a cron expression to determine when this Scheduled Trigger should fire. We'll use the following expression to execute this Scheduled Trigger every minute:
* * * * *
Step 4: Add the request payload
Next, we'll add the request payload. This is the data that will be sent to the endpoint we specified in Step 2. We'll
use the following values, replacing <PROJECT_NAME> with your own project name`:
{
  "endpoint": "https://<PROJECT_NAME>.hasura.app/v1/graphql",
  "secret": "<YOUR_ADMIN_SECRET>"
}
This is a quickstart, so we're cutting some corners by providing you an endpoint to demonstrate the power of Scheduled Triggers. In a real-world scenario, you'd want to handle validating your project's admin secret on the server-side.
Our webhook is expecting a POST request, so we'll change the Request Method to POST by clicking
Add Request Options Transform and selecting POST:
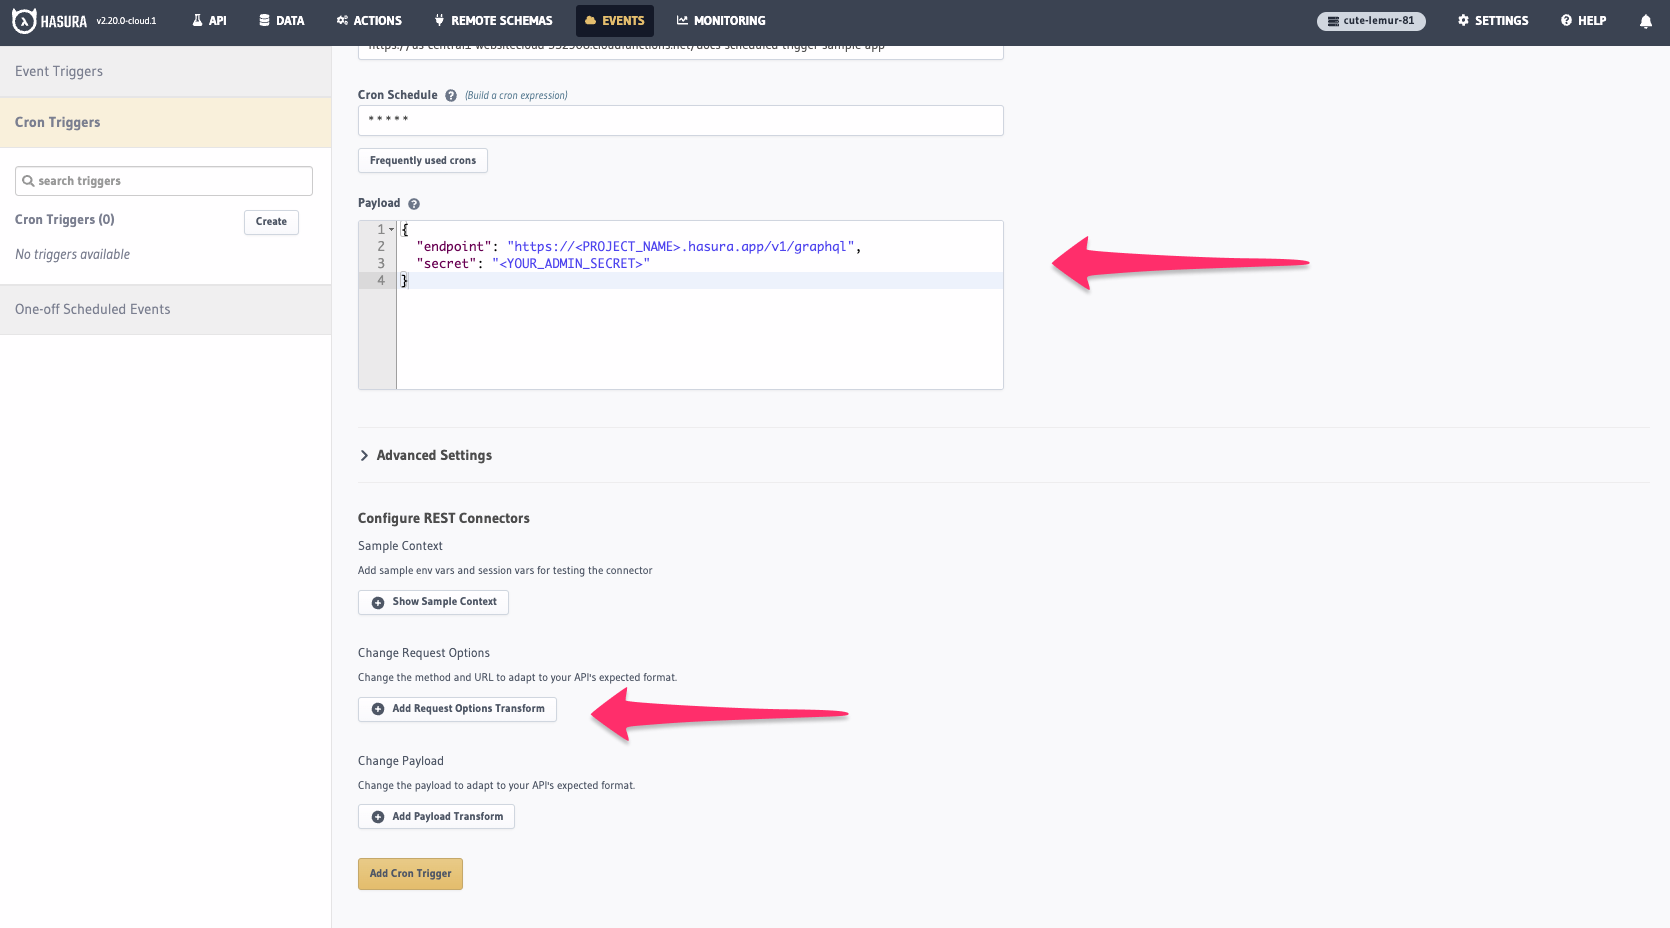
With the payload configured, click Add Cron Trigger.
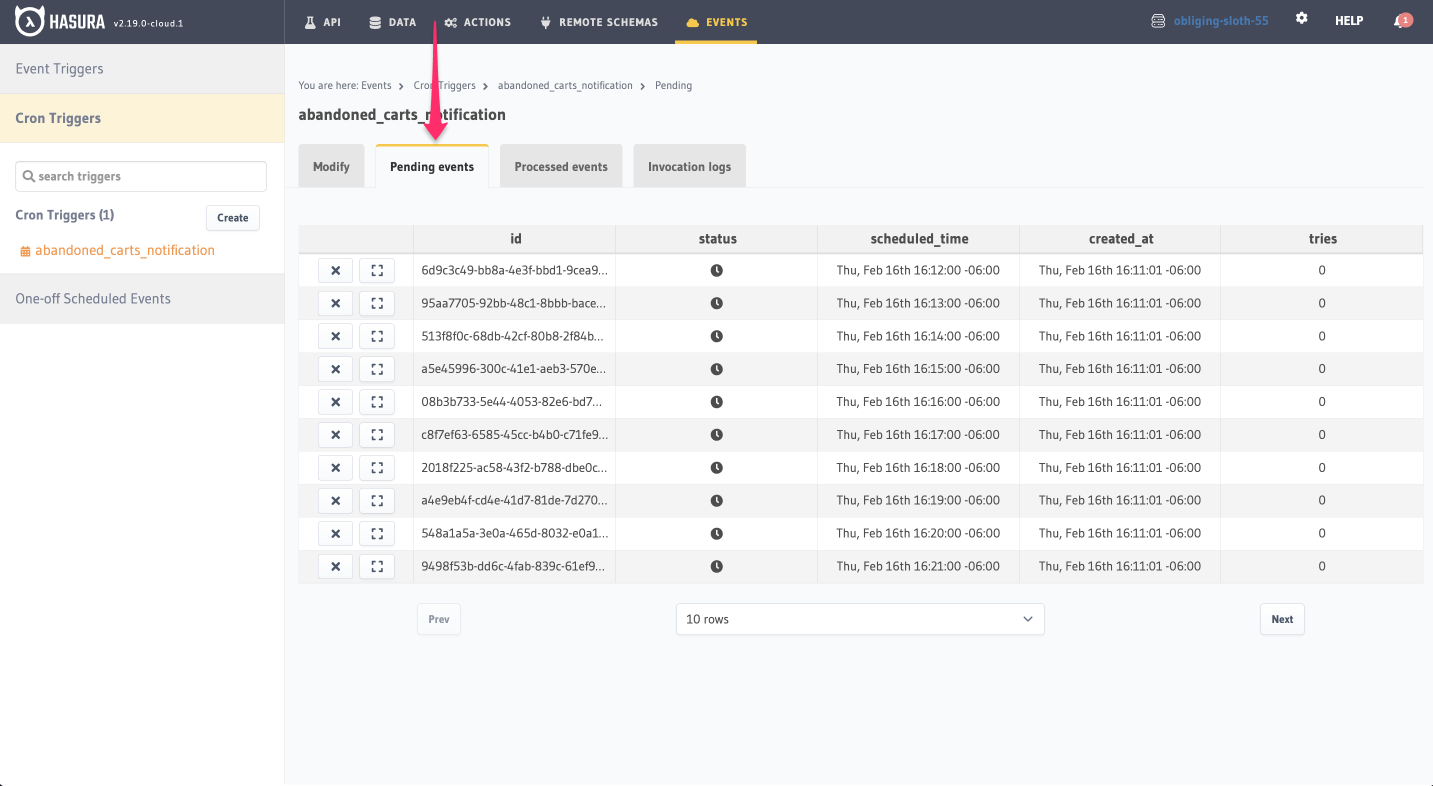
Step 5: 🍿
First, we'll check the Pending events tab. Here, you'll see a list of all the Scheduled Triggers that are pending. The
schedule should match the cron expression we specified in Step 3:
After a minute, we can head over to the Processed events tab. Here, you'll see a list of all the Scheduled Triggers
that have been processed along with their status.
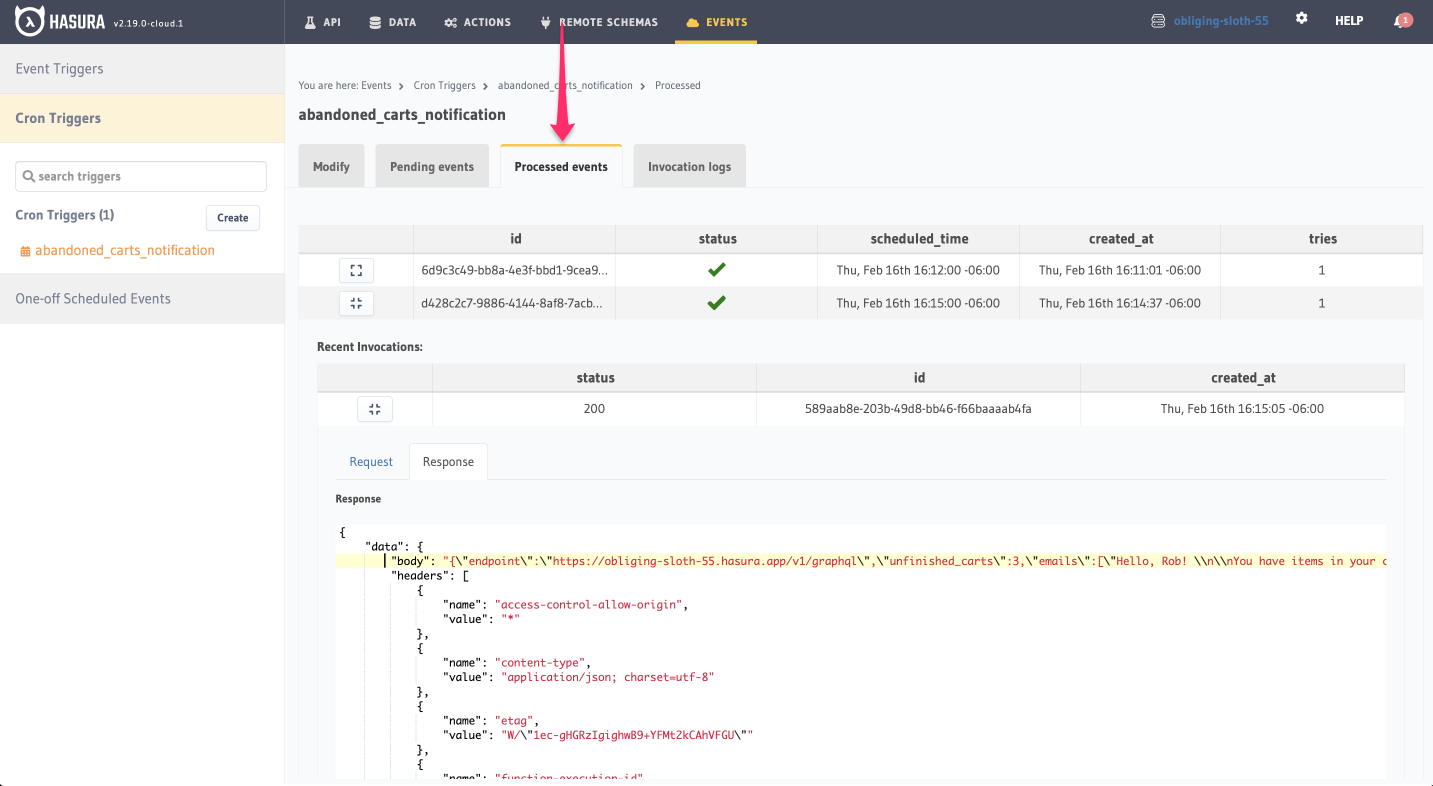
For each invocation, we can expand the request and response sections to see more information about what Hasura sent
to the webhook, and what was received. You'll see the body of your response contains a list of users, specific to your
instance, who have abandoned carts older than 24 hours:
{
  "data": {
    "body": "{\"endpoint\":\"https://<PROJECT_NAME>.hasura.app/v1/graphql\",\"unfinished_carts\":3,\"emails\":[\"Hello, Rob! \\n\\nYou have items in your cart: Hasuras in The Cloud Tee, Get Ship Done Mug, Sticker Sheet. \\n\\nDon't you want to buy them?\",\"Hello, Marion! \\n\\nYou have items in your cart: Monogram Baseball Cap, The Original Tee, Sticker Sheet. \\n\\nDon't you want to buy them?\",\"Hello, Abby! \\n\\nYou have items in your cart: Monogram Baseball Cap, The Original Tee. \\n\\nDon't you want to buy them?\"]}",
    // headers
    "status": 200
  },
  "type": "webhook_response",
  "version": "1"
}
Recap
What just happened? Well, you just created your first Scheduled Trigger! You can now use triggers to automate processes like sending emails, notifying users, or even updating your database. As a cron job, this trigger will fire based on the schedule you specified.
First, we provided Hasura a webhook as an endpoint. This webhook is simply our demo serverless function that's hosted on Google Cloud. It will parse the value you send from Hasura's Scheduled Trigger and query against your own GraphQL API. In a real application, you'd use your own webhook that's either a serverless function, a third-party service, or a custom endpoint to validate your admin secret and execute your custom logic.
Next, we provided Hasura with a cron expression. This expression determines when the Scheduled Trigger should fire.
We're using this value (* * * * *) as a simulation. In a real-world scenario, you'd probably want to use a value like
0 0 * * * so that this Scheduled Trigger fires once a day at midnight. You can easily create your own cron expression
using this tool.
Finally, we provided Hasura with a request payload before changing the request method to POST. This payload is the
data that will be sent to the webhook. When the Scheduled Trigger fires, Hasura will send this payload to the webhook
and the webhook will execute the logic you've written. For the scenario in our example, we returned the bodies of emails
that our webhook would have sent to users so you can see that we're actually able to query data from this instance and
use it in our application.