Webhook Mode
Introduction
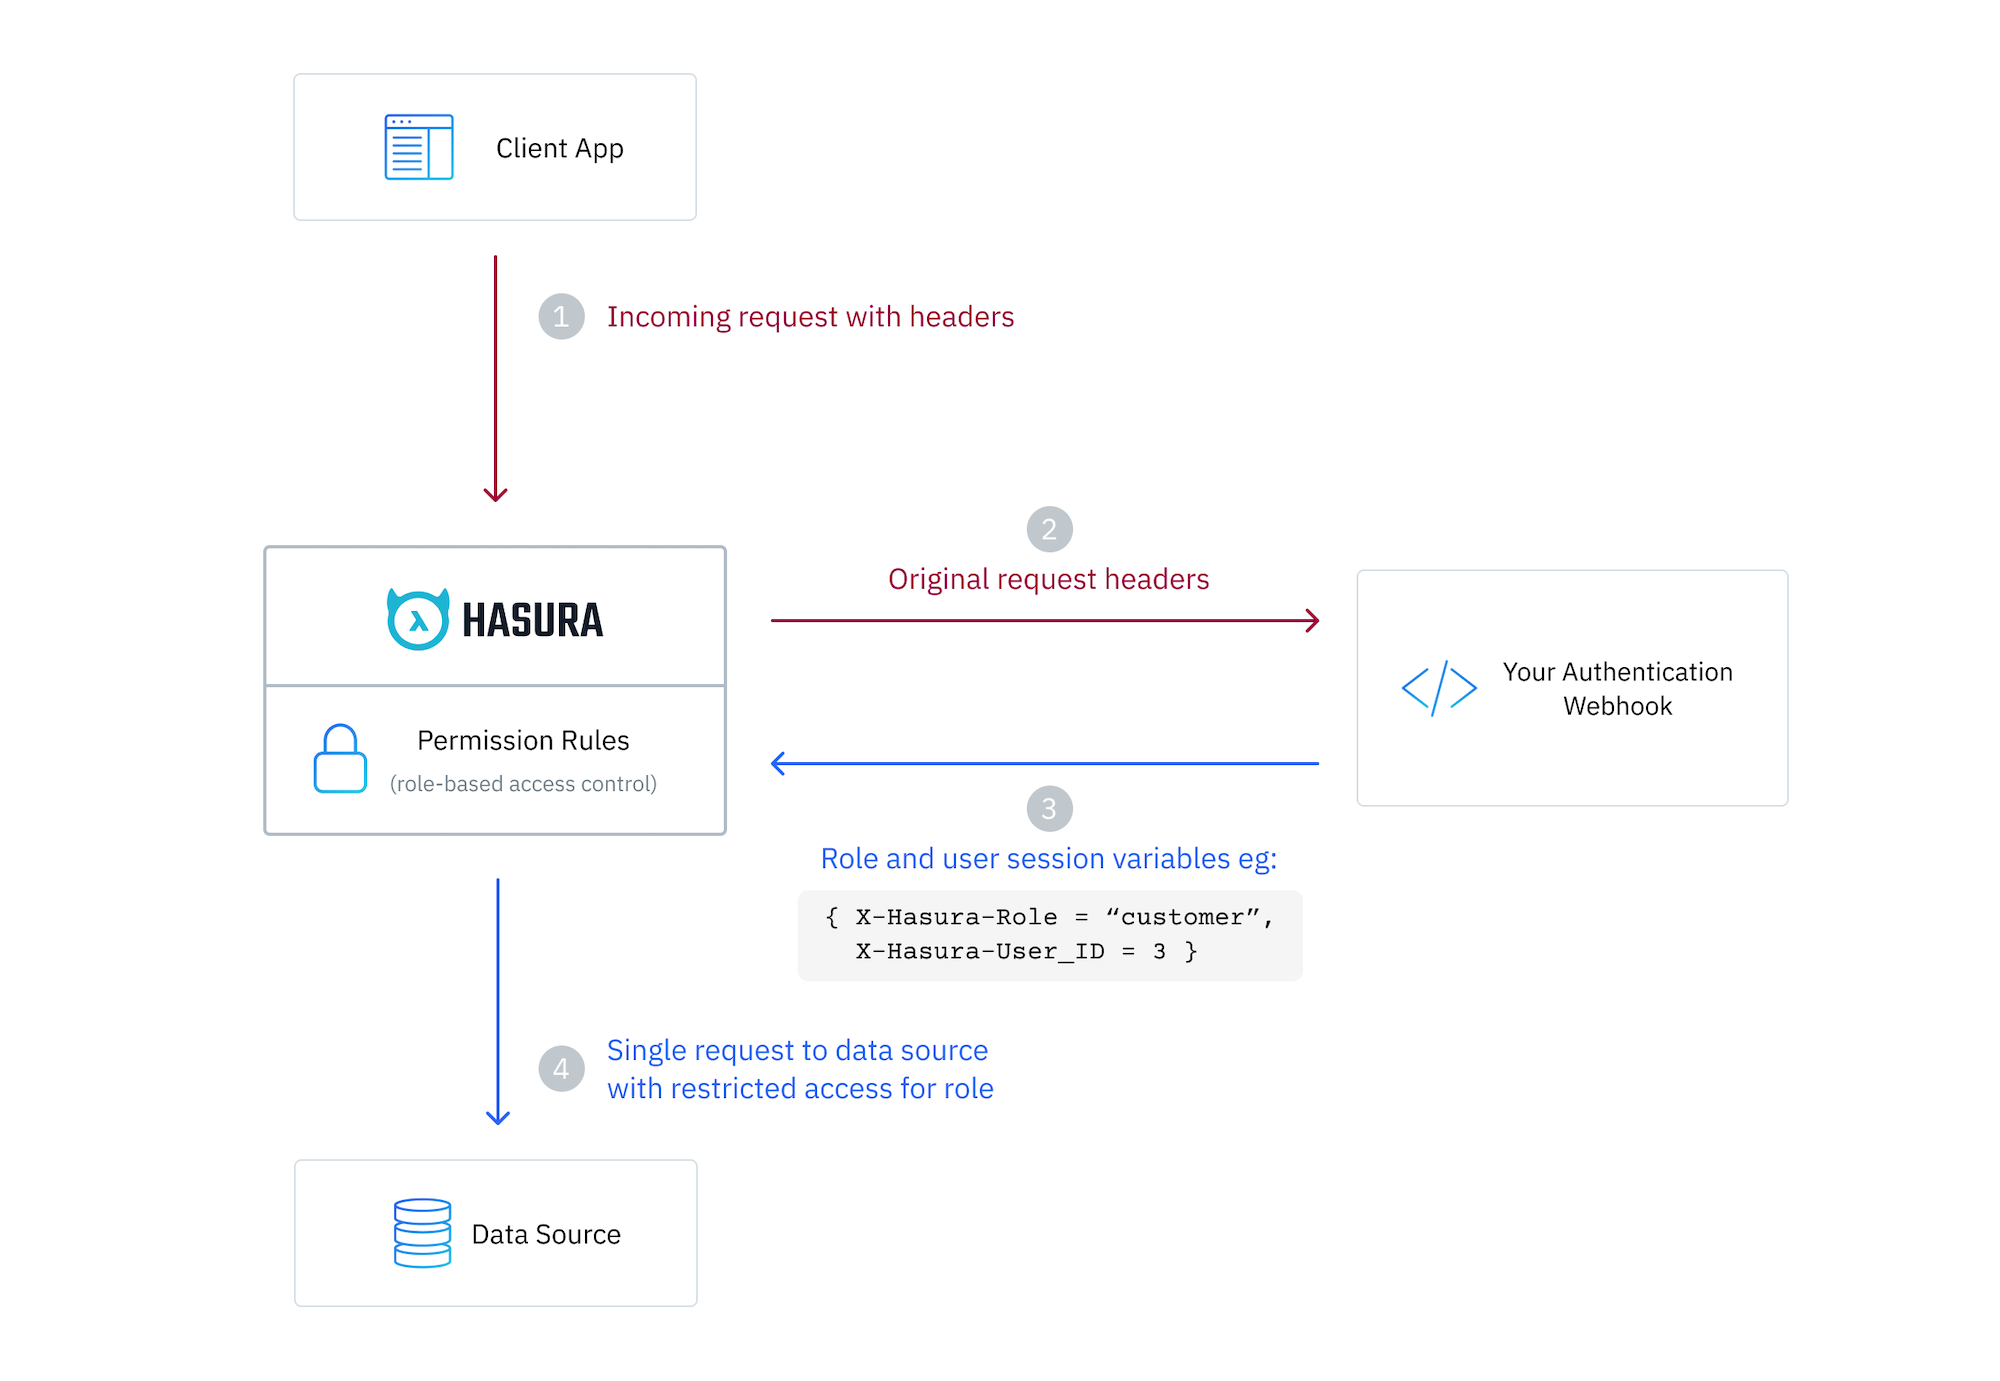
You can enable your Hasura DDN instance to use an auth webhook in just a few steps.
You will need to provide a URL that Hasura will call with the original request headers, and it should return a body with the session variables after the request is authenticated.
Session variable requirements
The only session variable required is x-hasura-role appearing in the response body.
In contrast to JWT mode, you do not have to pass x-hasura-allowed-roles or x-hasura-default-role session variables
and a x-hasura-role header will no be checked.
Session variable keys are case-insensitive. Values are case-sensitive.
Enabling Webhook authentication
Step 1. Update your AuthConfig
Hasura utilizes an AuthConfig object that allows you to define the
configuration for your authentication service. In a standard setup the auth-config.hml file can be found in your
globals directory.
You can use Hasura's VS Code extension to
scaffold out your AuthConfig object by typing AuthConfig and selecting this object from the list of available
options. As you navigate through the skeleton, you can type CTRL+SPACEBAR at any point to reveal options for the
different key-value pairs.
In the example below, we're demonstrating a sample authentication webhook.
kind: AuthConfig
version: v4
definition:
  mode:
    webhook:
      url:
        valueFromEnv: AUTH_WEBHOOK_URL
      method: POST
      customHeadersConfig:
        body:
          headers:
            forward:
              - authorization
              - content-type
        headers:
          additional:
            user-agent: "Hasura DDN"
AUTH_WEBHOOK_URL=http://auth_hook:3050/validate-request
GET vs POST
For a POST request, the headers received by the DDN engine on the query can be forwarded to the webhook in a JSON object
in the body of the request under a headers key.
For a GET request, the headers received by the DDN engine on the query can be forwarded to the webhook as actual headers on the request and the body will be empty.
What we've provided above is a sample configuration as a POST request but it can be configured as a GET request. See the
reference for AuthHookConfig here. For
the sample configuration above, the webhook will receive the Authorization and Content-Type headers in the body of
the request:
{
  "headers": {
    "Authorization": "Bearer some-token",
    "Content-Type": "application/json"
  }
}
Also, the webhook will receive the user-agent header as an actual header on the request.
You can use environment variables to dynamically and securely add the webhook URL to your AuthConfig. You can add these
values to your root-level .env and then map them in the globals subgraph.yaml file. Alternatively, you can include
raw strings here using value instead of valueFromEnv.
Step 2. Shaping the webhook request and response
Request
Below is an example of the header object your webhook might receive in the body of a POST request:
{
  "headers": {
    "Authorization": "Bearer some-token",
    "Content-Type": "application/json"
  }
}
Headers are forwarded to the auth webhook from the client on each request received by the Hasura engine either as
headers for a GET request or as a JSON object in the body of a POST request under a headers key.
You can configure the headers that are sent to the webhook in the optional customHeadersConfig field. If the field is
not provided, the default behavior is to forward all headers (after filtering out commonly used headers) received by the
DDN engine on the query to the webhook.
Accept
Accept-Datetime
Accept-Encoding
Accept-Language
Cache-Control
Connection
Content-Length
Content-MD5
Content-Type
DNT
Host
Origin
Referer
User-Agent
When using customHeadersConfig, you can explicitly forward any headers, including those that are ignored by default.
This gives you full control over which headers are sent to the webhook.
It is recommended to use the customHeadersConfig field to configure only the headers that are required by the webhook
and not forward any other headers. This will help in reducing the size of the request and improve the performance of the
webhook.
In this example, we're passing an encoded JWT in the Authorization header, however webhook mode is flexible and you
can pass any headers you wish.
If you want to forward all headers received by the DDN engine on the query to the webhook, you can set forward: "*".
This will forward all headers received by the DDN engine on the query to the webhook, excluding the ignored headers.
Token Parsing
In this example, the webhook is then responsible for validating and parsing the token passed in the header. It will need to:
-
Extract the Token: Retrieve the Authorization header from the incoming request and extract the token.
-
Validate the Token: Use a library or your own logic to validate the token. This involves verifying the token's signature with the secret key.
-
Extract Claims: Decode the token to extract the claims.
Response
Based on the validation result, the webhook will need to respond with either a 200 status code (for a valid token) or
a 401 status code (for an invalid or missing token).
You should respond with session variables beginning with X-Hasura-* in an object in the body of your response. The
value of each session variable can be any JSON value. These will be available to your
permissions in Hasura.
You will, at least, need to set the X-Hasura-Role session variable to let the Hasura DDN know which role to use for
this request. Unlike JWT auth mode, you do not have to pass X-Hasura-Allowed-Roles or
X-Hasura-Default-Role session variables.
In the example below the X-Hasura-Is-Owner and X-Hasura-Custom are examples of custom session variables which can be
used to enforce permissions in your supergraph.
HTTP/1.1 200 OK
Content-Type: application/json

{
    "X-Hasura-Role": "user",
    "X-Hasura-User-Id": 25,
    "X-Hasura-Is-Owner": "true",
    "X-Hasura-Custom": "custom value"
}
When sessionVariableToTraceAttributeMap is configured on AuthConfigV4, session variable values returned by the
webhook are also mapped to OpenTelemetry trace attributes and propagated as baggage to downstream services.
If your webhook response includes explicit baggage values, these take precedence over values derived from the same
session variable via sessionVariableToTraceAttributeMap.
For more details, see the AuthConfig reference.
Step 3. Define permissions
Let's add some example TypePermissions so that an admin role can access all fields in the Orders type, but we restrict
a user role from accessing the deliveryDate field.
---
kind: TypePermissions
version: v1
definition:
  typeName: Orders
  permissions:
    - role: admin
      output:
        allowedFields:
          - createdAt
          - deliveryDate
          - id
          - isReviewed
          - productId
          - status
          - updatedAt
          - userId
    - role: user
      output:
        allowedFields:
          - createdAt
          - id
          - isReviewed
          - productId
          - status
          - updatedAt
          - userId
Let's also add some example ModelPermissions so that an admin role can access all rows in the Orders model, but a user
role can only access rows where the userId field matches the user id session variable in the JWT.
---
kind: ModelPermissions
version: v1
definition:
  modelName: Orders
  permissions:
    - role: admin
      select:
        filter: null
        allowSubscriptions: true
    - role: user
      select:
        filter:
          fieldComparison:
            field: userId
            operator: _eq
            value:
              sessionVariable: x-hasura-user-id
Step 4. Rebuild your supergraph
ddn supergraph build local
Step 5. Make an authenticated request
Here we're making a request to our Hasura DDN instance which will be validated by our webhook which returns a payload of session variables.
{
  "x-hasura-user-id": "7cf0a66c-65b7-11ed-b904-fb49f034fbbb",
  "x-hasura-role": "user"
}
If we run a query for Orders, we can see that we only get the orders which this user has made and are not able to access the deliveryDate field.

Step 6. Set your API to public
Now that you have implemented webhook authentication, you can set your API to public. See here for more information on setting your API to public.
