Add Authorization
What's about to happen?
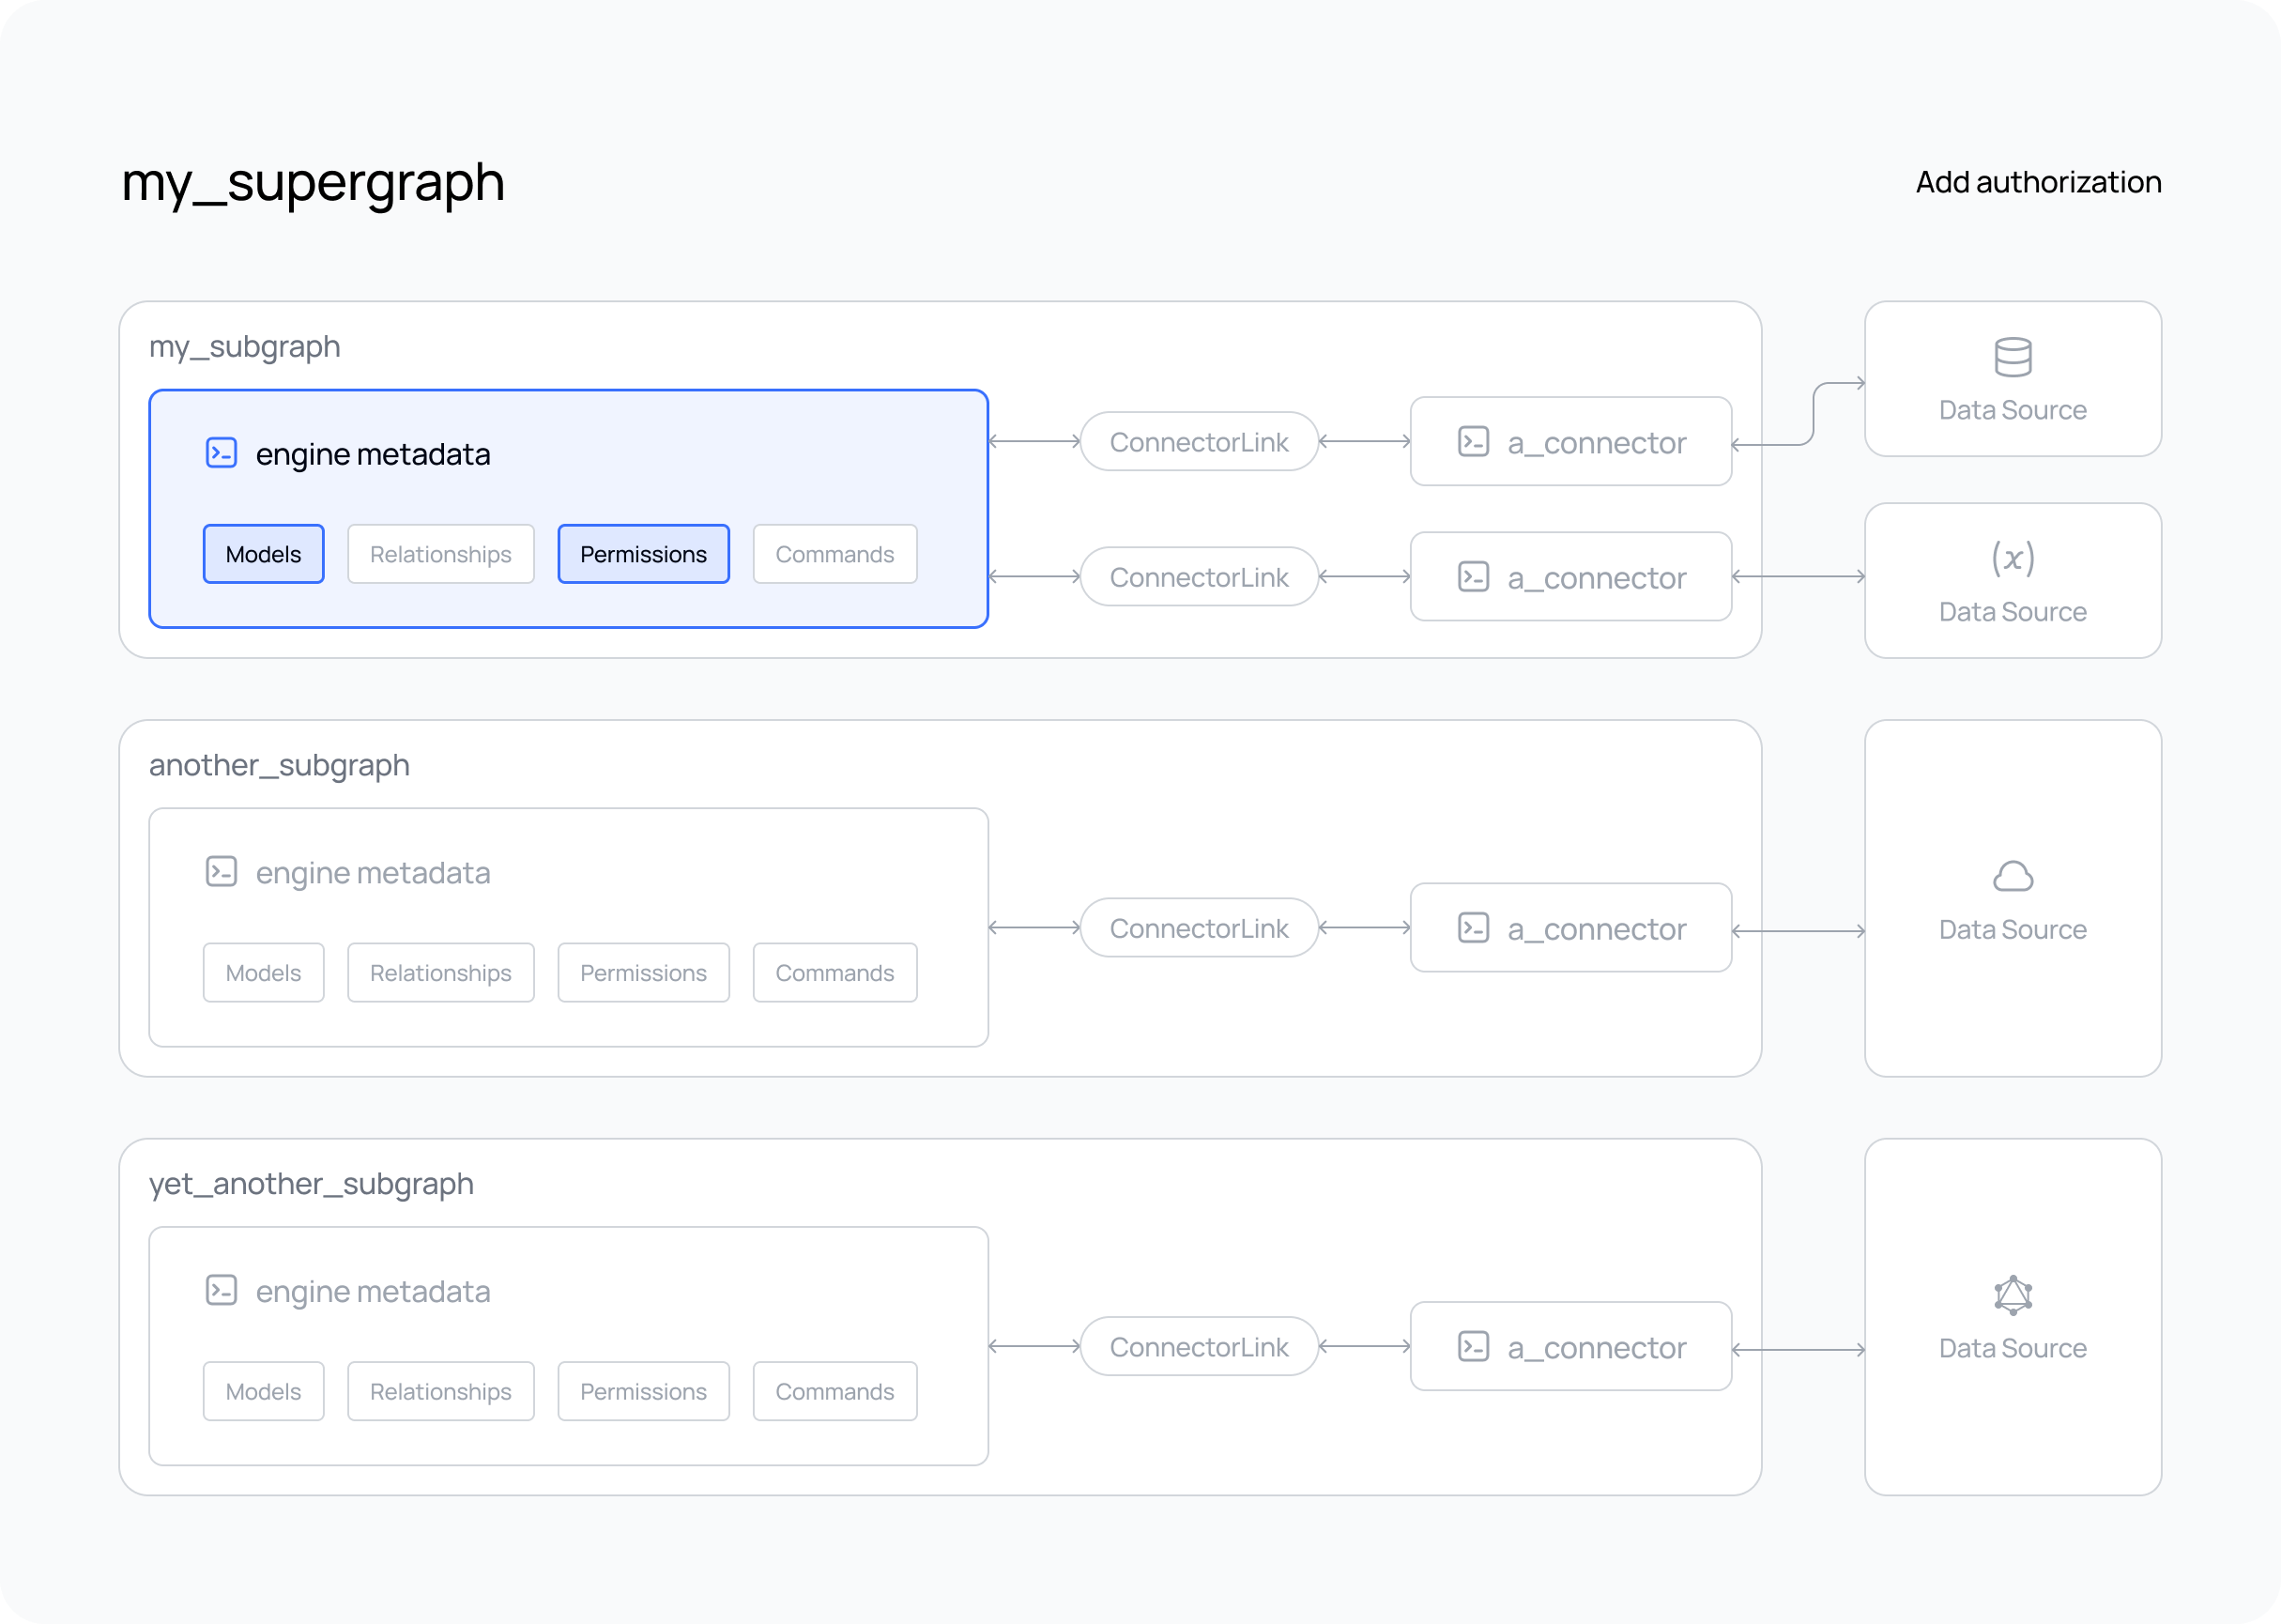
If you've already created and tested your supergraph, you'll have seen that queries are executed by default without authorization and your API is open to the public.
However, you can easily add authorization rules — what we term permissions — by declaring them in metadata. This allows you to control what data can be accessed and what fields can be returned by your API based on the user role, or any other value in session variables.
In the steps below, we'll add
modelPermissions to filter the data that can
be accessed by a role and typePermissions to
control what fields are returned.
We will then test these permissions by creating a JWT token with the role of user and a specific user id value, and
pass this token in the Authorization header of our request.
You can use the Hasura VS Code extension to help you author any metadata objects or updates, including
modelPermissions and typePermissions. You can activate its autocomplete abilities using CTRL+SPACEBAR inside of
any hml file.
Steps
- The DDN CLI, VS Code extension, and Docker installed
- A new or existing project
- At least one subgraph
- At least one data connector running
- Models and/or Commands added to your subgraph
Step 1. Create a modelPermission
By default, a role of admin exists for your API and can access all models. To create a new role, such as user,
simply add the role to the list of permissions for a model and set up your access control rules. In the example below,
we'll allow users with the role of user to access only their own rows from a Users model by checking for a header
value matching their id:
---
kind: ModelPermissions
version: v1
definition:
  modelName: Users
  permissions:
    - role: admin
      select:
        filter: null
    - role: user
      select:
        filter:
          fieldComparison:
            field: id
            operator: _eq
            value:
              sessionVariable: x-hasura-user-id
Remember, models are under the metadata subdirectory under the subgraph directory.
Step 2. Create a typePermission
The admin role also has access to all fields for each model. However, adding a new role and limiting what columns can
be returned from your data source is just as simple. For example, let's restrict what a user can see by omitting
several fields from the typePermissions:
---
kind: TypePermissions
version: v1
definition:
  typeName: Users
  permissions:
    - role: admin
      output:
        allowedFields:
          - createdAt
          - email
          - favoriteArtist
          - id
          - isEmailVerified
          - lastSeen
          - name
          - password
          - updatedAt
    - role: user
      output:
        allowedFields:
          - email
          - favoriteArtist
          - id
          - name
          - password
Step 3. Add sample JWT authentication
In a production environment, you would be creating JWT tokens using your authentication provider or custom business
logic solution. In this guide, we're going to encode a test JWT token with the information we need using the
jwt.io site and configure our AuthConfig object to use this token.
Step 3.1. Generate a JWT secret key
Generate a random string that we'll use as the JWT secret key:
openssl rand -hex 16
Copy the value returned by the terminal.
If you don't want to use openssl, you can use any other random string. The only requirement is that it must be at least 32 characters.
Step 3.2. Update your AuthConfig object
Edit your AuthConfig object in your project with the following information and to use the secret key we just
generated.
kind: AuthConfig
version: v2
definition:
  mode:
    jwt:
      claimsConfig:
        namespace:
          claimsFormat: Json
          location: "/claims.jwt.hasura.io"
      key:
        fixed:
          algorithm: HS256
          key:
            value: "<insert-the-key-generated-in-previous-step>"
      tokenLocation:
        type: BearerAuthorization
Note that in our AuthConfig object, we've set the token location to be in standard Authorization: Bearer <token>
format. This means that when we test our permissions, we'll need to pass the JWT token value in a header in this format.
Read more about the AuthConfig object format here.
Step 3.3. Create a new supergraph build
Create a supergraph build using this AuthConfig.
ddn supergraph build local
Want to test your supergraph? Don't forget to start your GraphQL engine and connectors using the following command.
ddn run docker-start
If you haven't included your connector(s) in your compose.yaml,
don't forget to start it as well.
Step 4. Generate a JWT token
Head to the jwt.io site and encode a new token with HS256 algorithm.
Paste the secret key you generated in the previous step in the "verify signature" field bottom right.
Paste the following claims object in the "Payload" field:
{
  "exp": 1739905122,
  "iat": 1708369122,
  "claims.jwt.hasura.io": {
    "x-hasura-default-role": "user",
    "x-hasura-allowed-roles": ["user"],
    "x-hasura-user-id": "<insert-the-id-of-a-user-in-your-data-source>"
  }
}
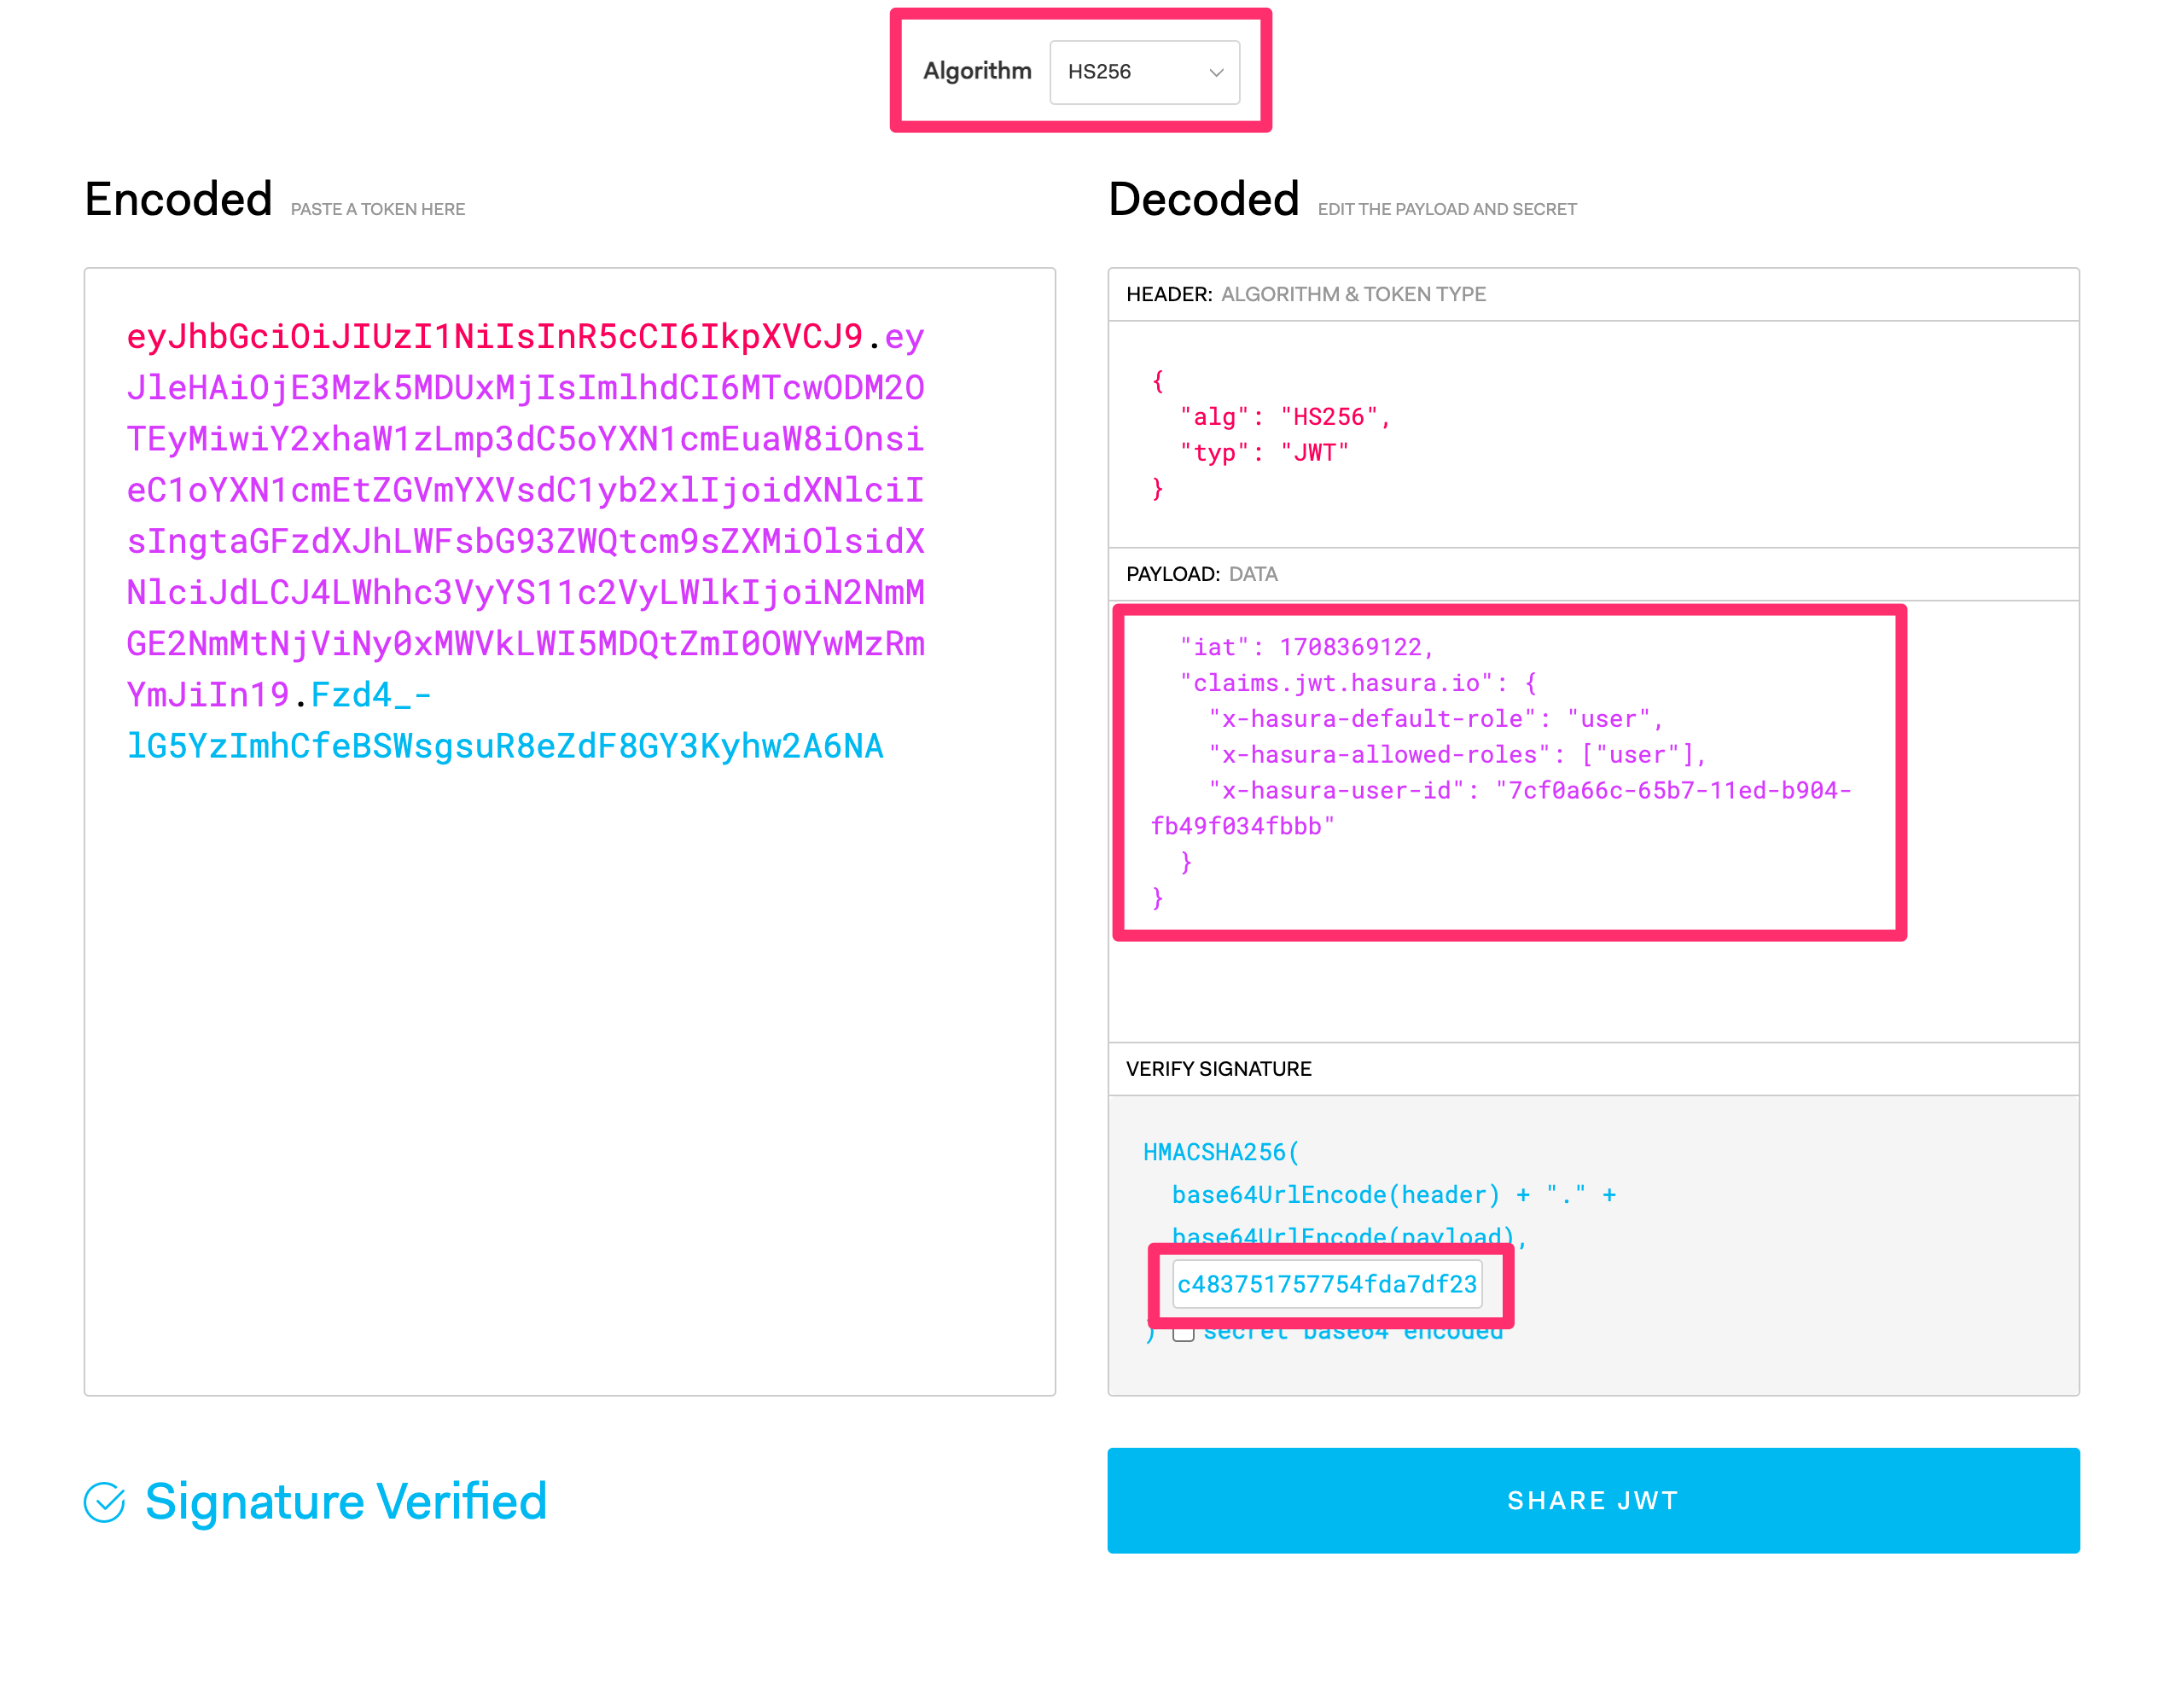
Copy the encoded token value generated by jwt.io on the left side beginning with ey....
In the example above, we're setting the following values:
- The issued (
iat) time asFeb. 19 2024, at 18:58:42as a Unix epoch timestamp. - The expiration (
exp) time asFeb. 18, 2025 at 18:58:42. - The default role as
user. - The allowed roles as
user - The
x-hasura-user-idvalue as theidof a user in your data source.
The values in the claims.jwt.hasura.io object are our session variables. For more information about the claims Hasura
expects, check out this page.
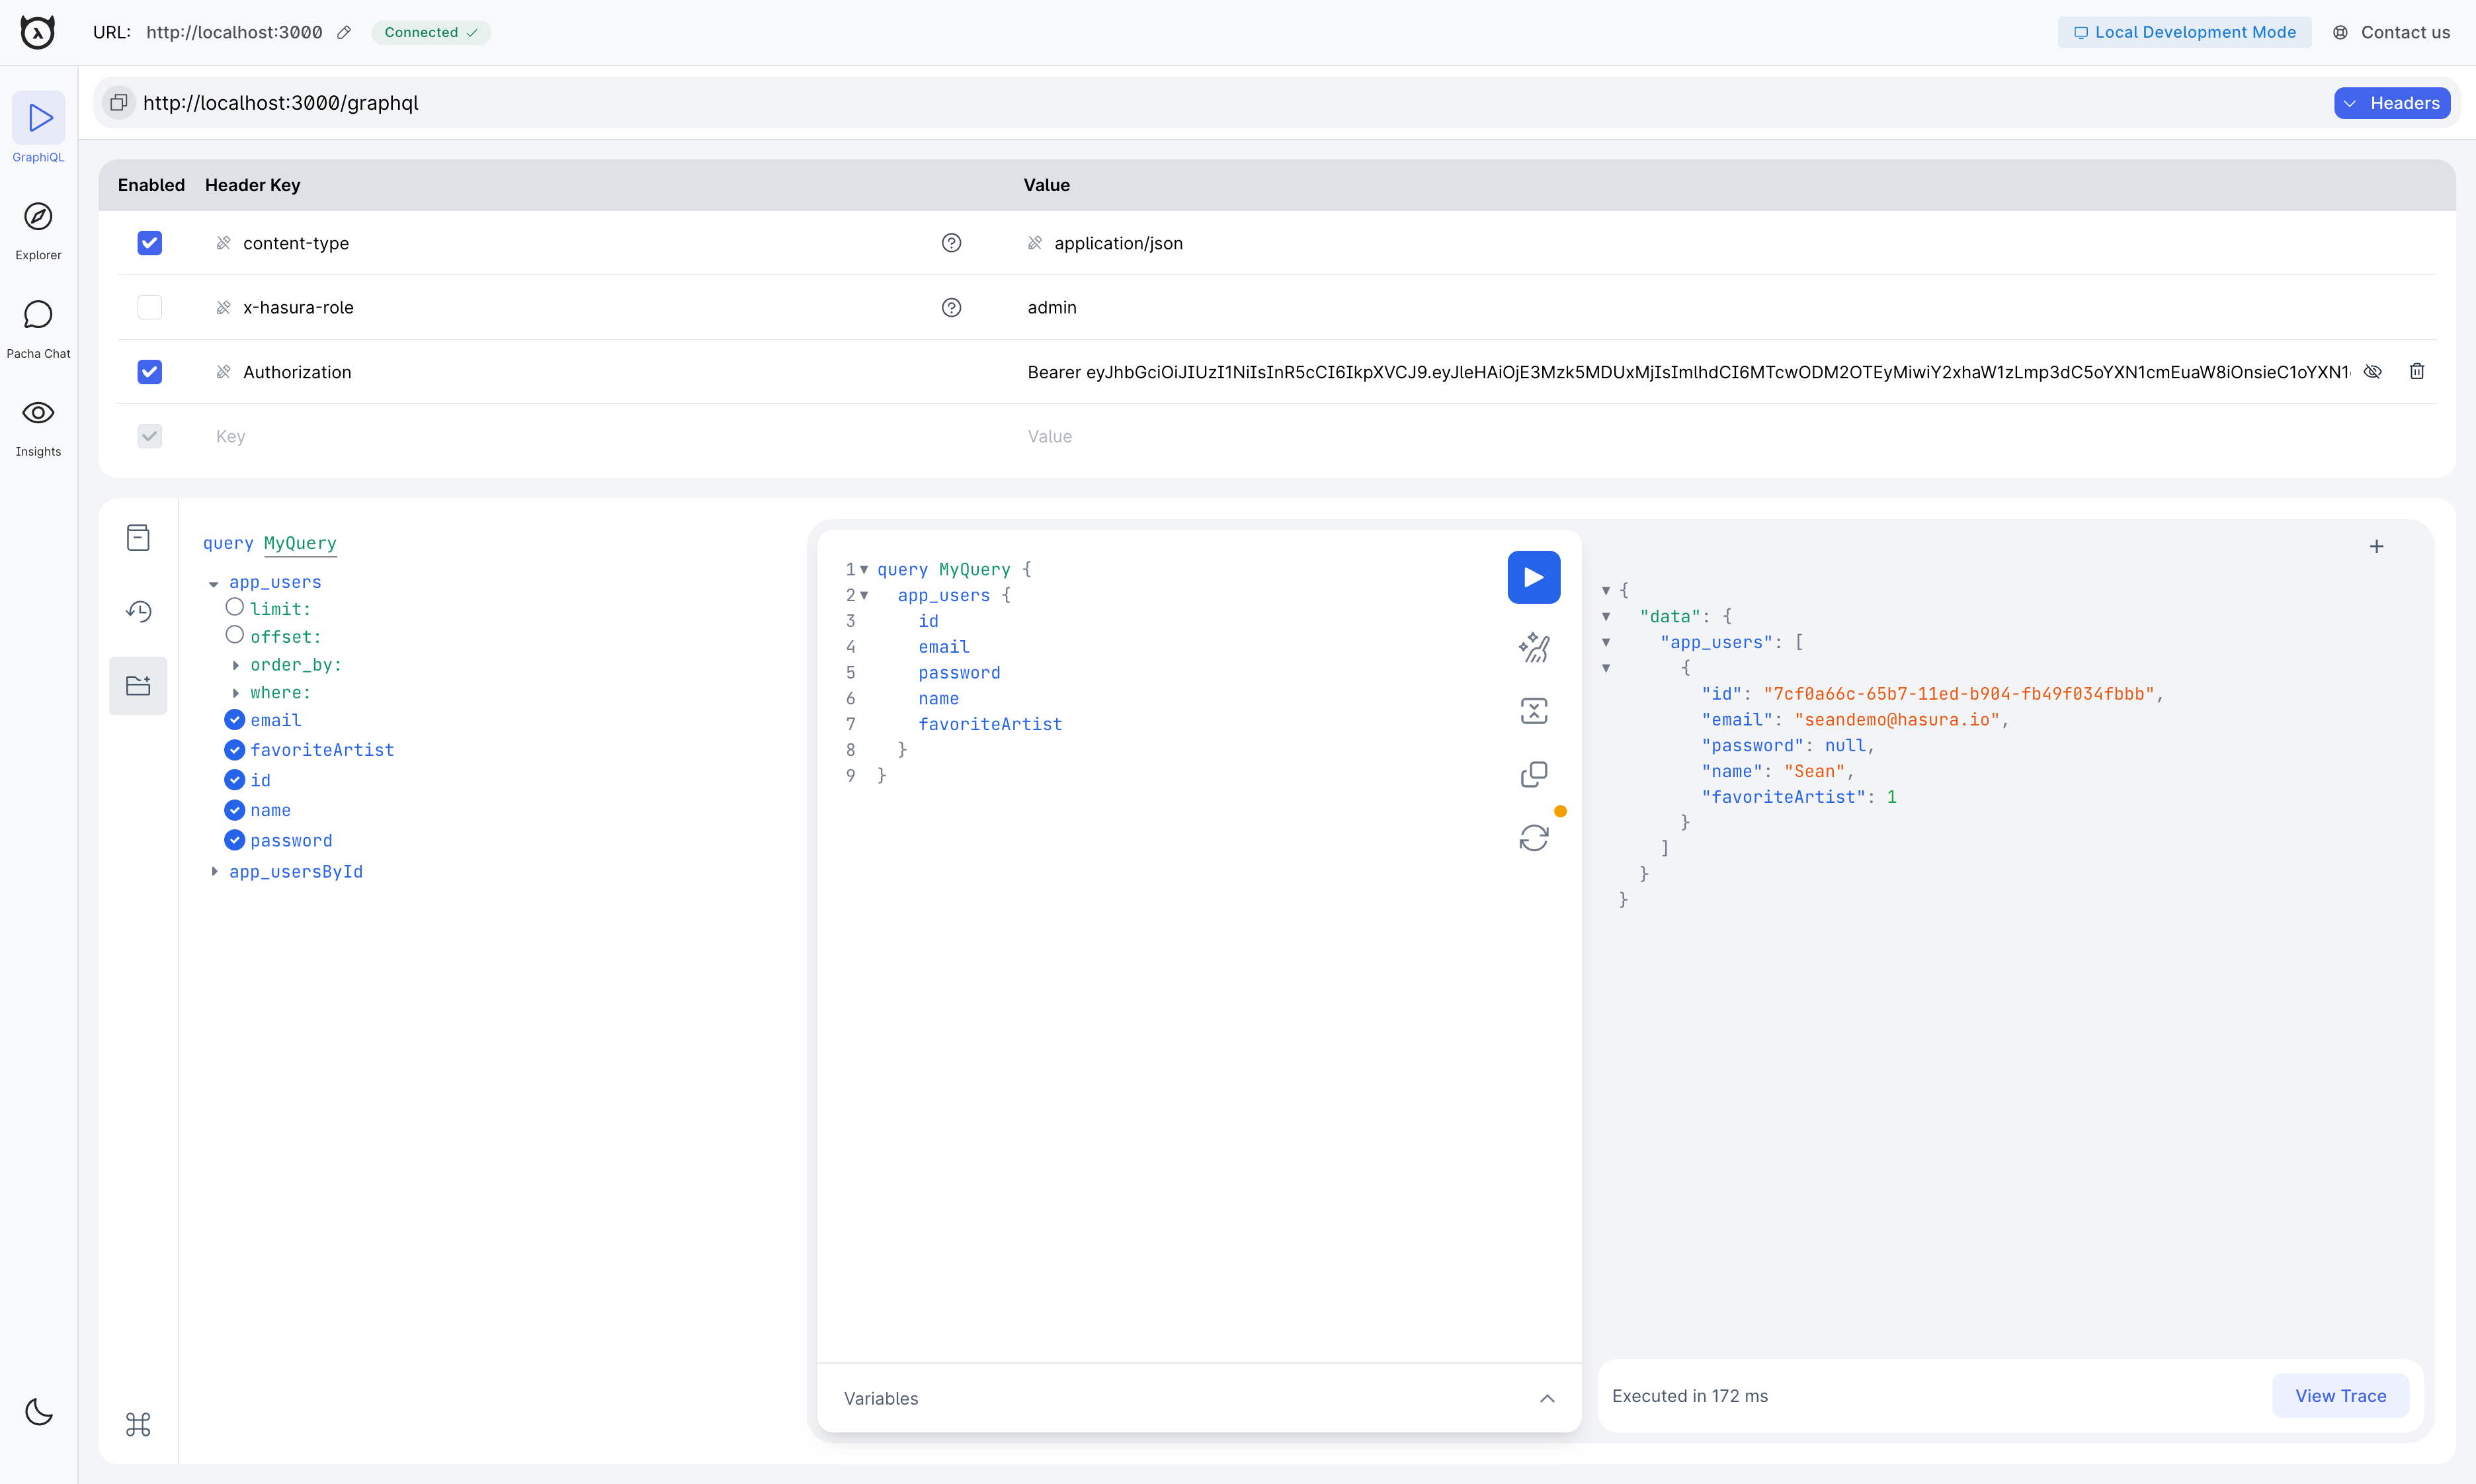
Step 5: Test your permissions with your custom JWT
In the Hasura console, add the JWT generated by the console as the value of a new header called Authorization on the
GraphiQL tab. The value should be in the format Bearer <token>
Now, you can execute queries with your custom JWT. For example::
query PermissionTest {
  users {
    id
    email
    favoriteArtist
    name
    password
  }
}
Step 6. Check the results
If you've followed the steps correctly, you should see only the email of the user you've tested with, securing your API from unauthorized access from anyone without a valid JWT token.
Step 7. Revert changes to authentication (optional)
With the update to your AuthConfig made in the above steps you will now need to provide an Authorization header with
JWT tokens to make any queries to your API.
To make requests with an admin role you will need to pass a JWT token with the following claims:
{
  "exp": 1739905122,
  "iat": 1708369122,
  "claims.jwt.hasura.io": {
    "x-hasura-default-role": "admin",
    "x-hasura-allowed-roles": ["admin"]
  }
}
Instead, you can choose to revert your AuthConfig to the following to make all API requests to be made with the
admin role without need for any authentication.
kind: AuthConfig
version: v2
definition:
  mode:
    noAuth:
      role: admin
      sessionVariables: {}
Create a supergraph build using this AuthConfig.
ddn supergraph build local
Want to test your supergraph? Don't forget to start your GraphQL engine and connectors using the following command.
ddn run docker-start
What did this do?
By adding modelPermissions, we've enabled access to the Users model for the user role. This means that only the
Users model is available to a consumer with the x-hasura-role value of user.
Additionally, modelPermissions are used to filter the rows that can be returned from this model. They don't simply
check if the returned data is allowed; instead, they filter the data before it can be returned. In our example, this is
achieved by validating the x-hasura-user-id value against the matching record with the same id in the data source.
We limited the fields they can access to the ones listed above, thereby preventing someone with the user role from
accessing information not meant for them, such as when users were last seen.
We've then encoded a test JWT token with the user role and x-hasura-user-id value of a user in our data source.
We've passed this token in the Authorization: Bearer <token> header to test our permissions, which we've set up to
allow only the Users model to be accessed by a user with the user role. Hasura verified this token against our
secret key, decoded the token, extracted the x-hasura-* session variables, and applied the permissions we've set up to
the request.
In a production environment, you would be creating JWT tokens for your users using your authentication provider and
passing them in the Authorization header of your requests.
