Developing with DDN workspace
Introduction
DDN Workspace provides a browser-based development environment for working with Private DDN, eliminating the need to install DDN CLI and its dependencies locally. It features a familiar VS Code-like UI, runs directly on your data plane, and includes all necessary dependencies required to work with DDN pre-installed.
This guide will walk you through the steps for using DDN workspace to develop your API on a Data Plane in Private Hasura DDN. Before proceeding, you'll first need to be invited to a Data Plane.
To provision a new workspace in Private DDN, please reach out to us here.
We recommend a dedicated workspace for each developer working on Private DDN API development. Once the workspace has been provisioned, it can be launched from the Private DDN page.
Advantages
- Get started with just your browser. No need to install DDN CLI and its dependencies (e.g. Docker Engine) on your local machine.
- Network connectivity - Since the workspace runs on your data plane, it has direct access to all data sources and services within the data plane network. There is no need to set up complex VPN/network policies to access your DBs from your local machine.
- Collaboration - Multiple developers can work on the same project simultaneously within the same workspace, if needed.
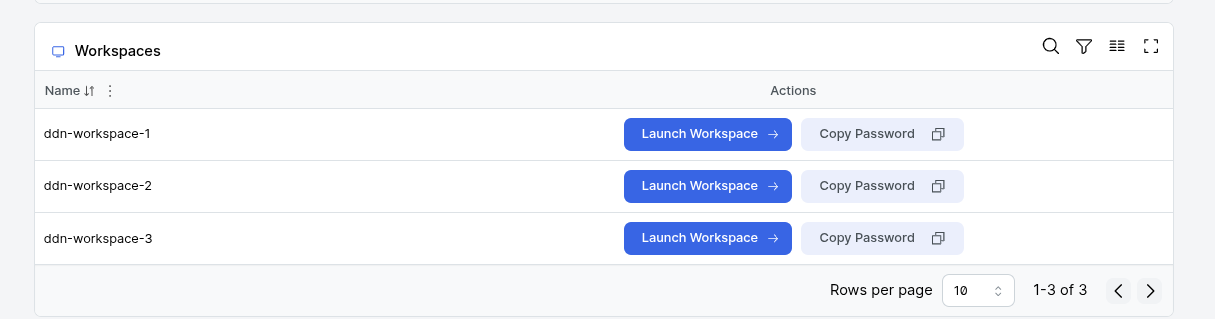
Step 1. Launch a workspace
-
To launch a workspace, click on the
Launch Workspacebutton on the Private DDN. You can find a list of all available Private DDN instances here. This will open a new tab in your browser with the workspace UI. -
Click on the
Copy Passwordbutton to copy the password to your clipboard. Use this password to login to the workspace.
Step 2. Create a <service-account-token>
In order to perform a ddn auth login --access-token <service-account-token>, you need to have a project created in your data plane under which a <service-account-token> has been generated.
If you have already done this, continue to the next step. Otherwise, proceed with the steps below and ensure that you are executing this on your local machine since a browser login is required
during this step.
Alternate Approach:
If you are unable to generate a <service-account-token>, you can instead create a Personal Access Token (PAT) by heading on over to Hasura dashboard
and creating a new access token there.
You can find all the Data Planes you have access to on this page: https://console.hasura.io/data-plane
- ddn_base
- ddn_advanced
Read more about plans here
# Perform a ddn auth login using your personal Hasura Cloud account
ddn auth login

# Create a project
ddn project create --data-plane-id <data-plane-id> --plan <plan-name>
Next, follow these steps to generate a <service-account-token>.
Step 3. Authenticate the DDN CLI
Once you're logged into the DDN Workspace, you will be greeted with the familiar VS Code UI. You can perform all typical development tasks, such as installing extensions, customizing key bindings, and applying themes—all within your browser.
Bring up the terminal using the shortcut Ctrl + `.
Run the command below to authenticate the CLI with a service account token. If you don't have a token, follow these steps to generate one.
ddn auth login --access-token <service-account-token>
Alternatively, if you have opted to use a Personal Access Token (PAT), run the following command instead:
ddn auth login --pat <personal-account-token>
Step 4. Scaffold out a new local project
ddn supergraph init my-project && cd my-project
After navigating into the directory, you will see the project structure scaffolded for you. You can view the project
structure by running ls in the terminal or by exploring it in the VS Code interface.
Step 5. Add a data source
If you have established private connectivity to your data source, you will need to ensure that you are using a hostname/IP for your database which is specific to your private connectivity connection. This hostname/IP will be communicated to you by the Hasura team during the coordination of the private connectivity setup.
The command below launches a wizard in the DDN CLI to guide you through adding a data connector. You can learn more about adding sources via data connectors here.
ddn connector init <connector_name> -i
This will provision the necessary files using your configuration for connecting a data source to your supergraph API.
You can also organize your API into subgraphs. Subgraphs are generally organized around team functions or business outcomes and allow for independent ownership and governance of data sources. Learn more here.
Step 6. Generate your metadata
ddn connector introspect <connector_name>
ddn model add <connector_name> '*'
ddn command add <connector_name> '*'
ddn relationship add <connector_name> '*'
Metadata files will be generated for each entity in your data source. You can learn more here.
ddn supergraph build local, ddn run docker-start and ddn console --local are not supported in DDN workspace. Once
the metadata is generated, create a cloud project and deploy your supergraph to your Private DDN to query the API.
Step 7. Initiate against a project on your Data Plane
In this step, use the <project-name> from Step 2.
ddn project init --with-project <project-name>
Step 8. Build and deploy your supergraph
ddn supergraph build create
When this process is complete, the CLI will return a link to the hosted API where you can query your data.
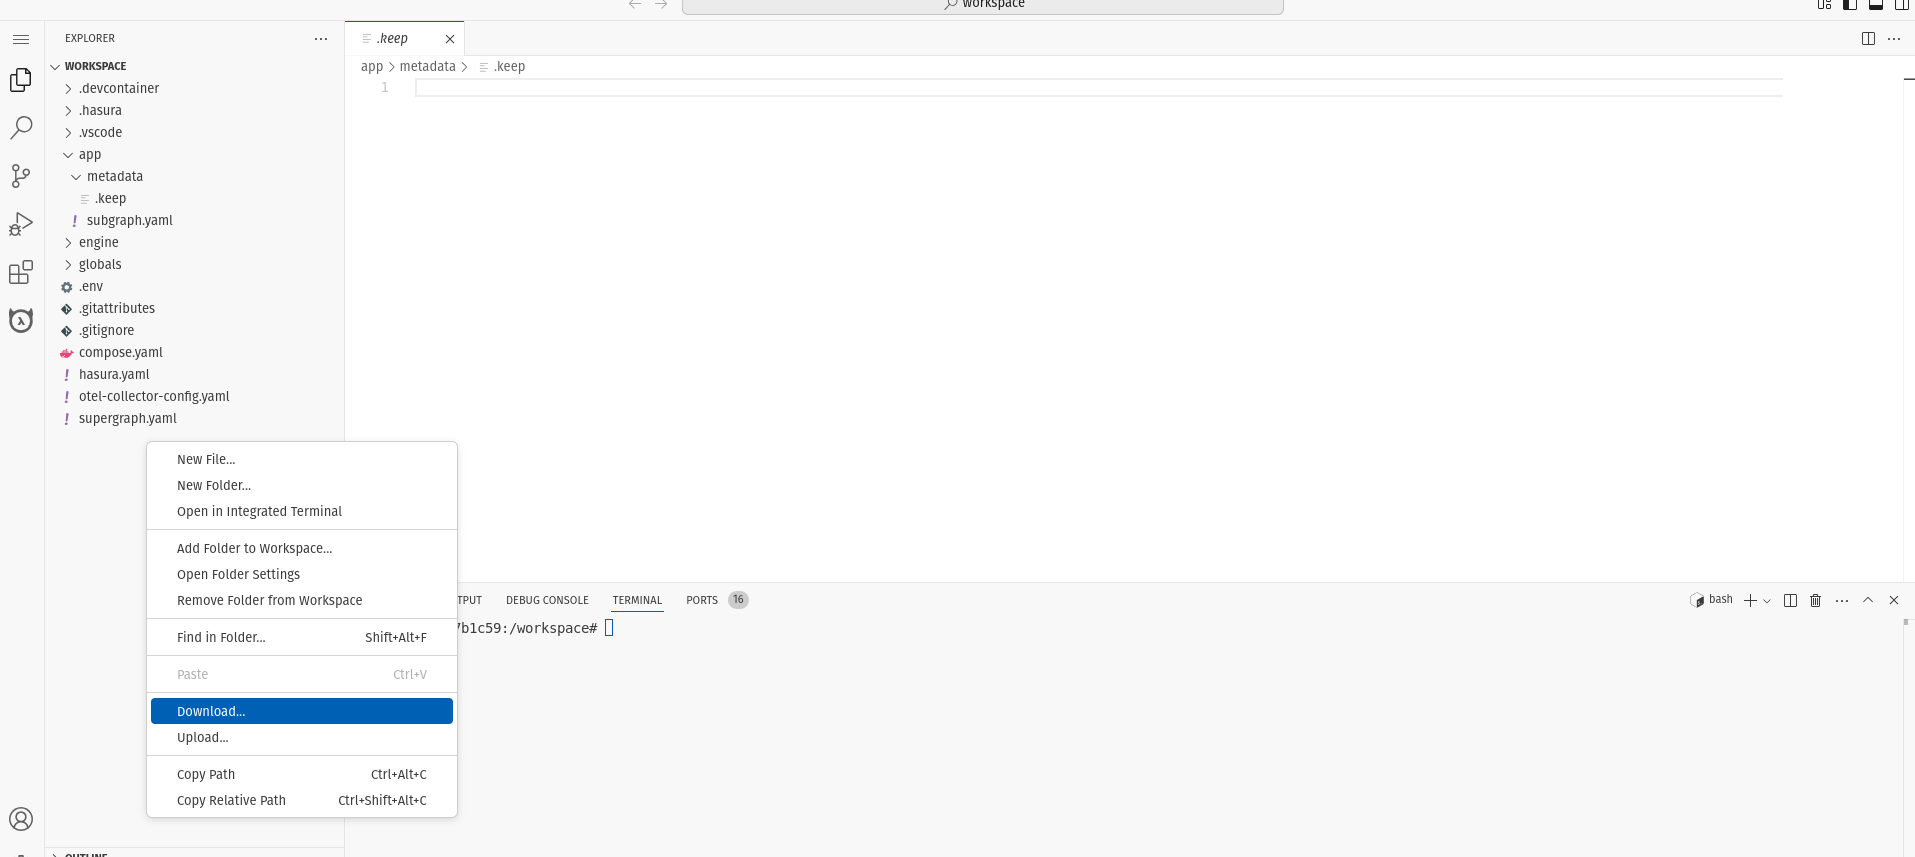
Step 9. Exporting your metadata
To export metadata, right-click the Explorer pane and select Download. This will download the entire workspace
directory to your local machine. Since Git is pre-installed in the workspace, you can also configure it and push changes
directly to a remote repository.
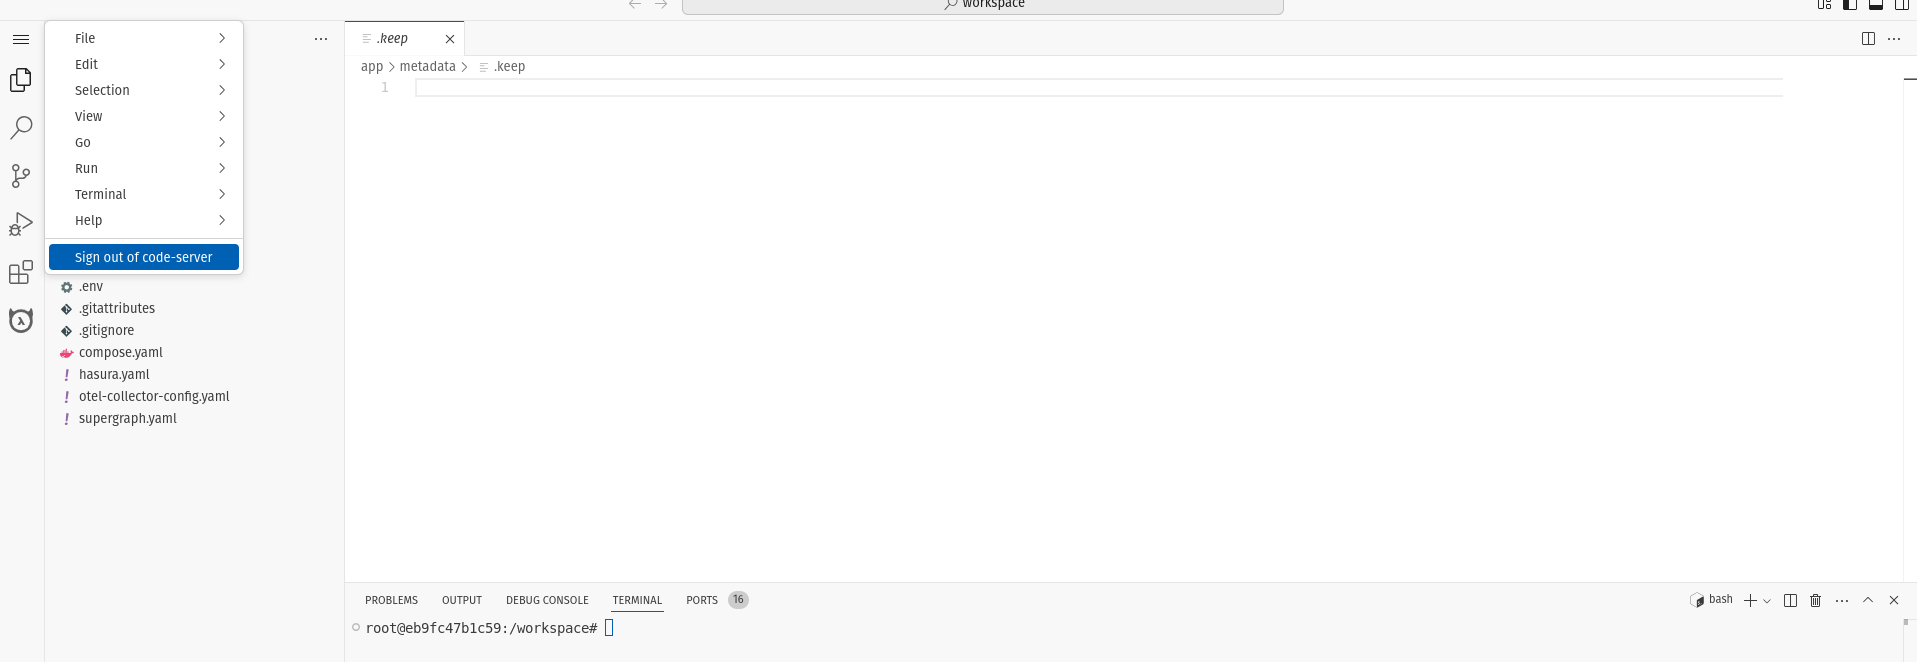
Logout
To log out of the workspace, click the Menu button in the top-left corner and select Sign out of code-server. This
will close the workspace and you will be redirected to the workspace login page. The state of your local project will be
preserved and you can login again to continue working on it.