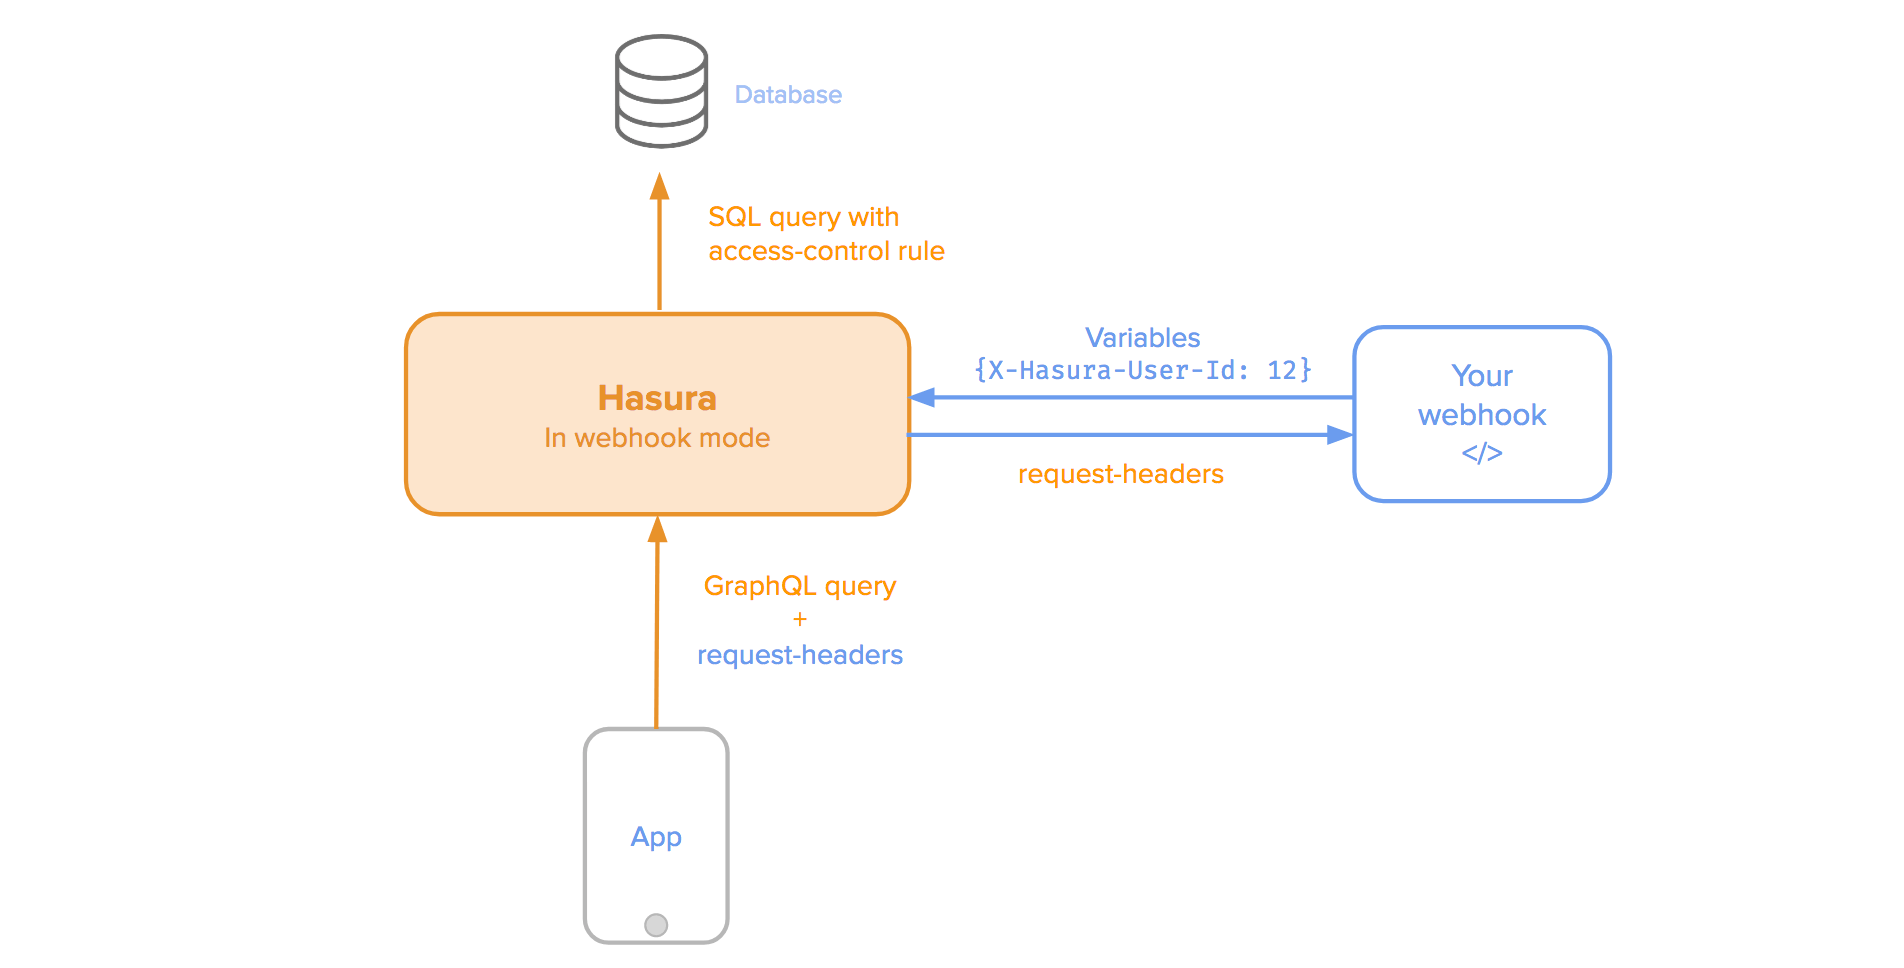
Authentication using webhooks
Table of contents
Introduction
You can configure the GraphQL engine to use a webhook to authenticate all incoming requests to the Hasura GraphQL engine server.

Prerequisite
It is mandatory to first secure your GraphQL endpoint for the webhook mode to take effect.
In webhook mode, on a secured endpoint:
- The configured webhook is called when the
X-Hasura-Admin-Secretheader is not found in the request. - The configured webhook is ignored when the
X-Hasura-Admin-Secretheader is found in the request and admin access is granted.
Configuring webhook mode
- You can configure Hasura to run in webhook mode by running the GraphQL engine with the
--auth-hookflag or theHASURA_GRAPHQL_AUTH_HOOKenvironment variable (see GraphQL engine server options), the value of which is the webhook endpoint. - You can configure Hasura to send either a
GETor aPOSTrequest to your auth webhook. The default configuration isGETand you can override this withPOSTby using the--auth-hook-modeflag or theHASURA_GRAPHQL_AUTH_HOOK_MODEenvironment variable (in addition to those specified above; see GraphQL engine server options).
Note
If you are running Hasura using Docker, ensure that the Hasura Docker container can reach the webhook. See this page for Docker networking.
Spec for the webhook
Request
GET request
GET https://<your-custom-webhook>/ HTTP/1.1
<Header-Key>: <Header-Value>
If you configure your webhook to use GET, then Hasura will forward all client headers except:
Content-LengthContent-TypeContent-MD5User-AgentHostOriginRefererAcceptAccept-EncodingAccept-LanguageAccept-DatetimeCache-ControlConnectionDNT
POST request
POST requests will receive the contents of the request body in addition to client headers. Given a request like
query UserQuery($a: Int) {
  users(where: {id: {_eq: $a}}){
    id
  }
}
with variables {“a”: 1}, the webhook will receive a request of the following form:
POST https://<your-custom-webhook>/ HTTP/1.1
Content-Type: application/json

{
  "headers": {
    "header-key1": "header-value1",
    "header-key2": "header-value2"
  },
  "request": {
    "variables": {
      "a": 1
    },
    "operationName": "UserQuery",
    "query": "query UserQuery($a:  Int) {\n  users(where:  {id:  {_eq:  $a}}){\n    id\n  }\n}\n"
  }
}
If you configure your webhook to use POST, then Hasura will send all client headers in payload.
Response
Success
To allow the GraphQL request to go through, your webhook must return a 200 status code.
You should send the X-Hasura-* “session variables” to your permission rules in Hasura.
HTTP/1.1 200 OK
Content-Type: application/json

{
    "X-Hasura-User-Id": "25",
    "X-Hasura-Role": "user",
    "X-Hasura-Is-Owner": "true",
    "X-Hasura-Custom": "custom value"
}
Note
All values should be String. They will be converted to the right type automatically.
There is no default timeout on the resulting connection. You can optionally add one; to do so, you need to return either:
- a
Cache-Controlvariable, modeled on the Cache-Control HTTP Header, to specify a relative expiration time, in seconds.
HTTP/1.1 200 OK
Content-Type: application/json

{
    "X-Hasura-User-Id": "26",
    "X-Hasura-Role": "user",
    "X-Hasura-Is-Owner": "false",
    "Cache-Control": "max-age=600"
}
- an
Expiresvariable, modeled on the Expires HTTP Header, to specify an absolute expiration time. The expected format is"%a, %d %b %Y %T GMT".
HTTP/1.1 200 OK
Content-Type: application/json

{
    "X-Hasura-User-Id": "27",
    "X-Hasura-Role": "user",
    "X-Hasura-Is-Owner": "false",
    "Expires": "Mon, 30 Mar 2020 13:25:18 GMT"
}
Failure
If you want to deny the GraphQL request, return a 401 Unauthorized exception.
HTTP/1.1 401 Unauthorized
Note
Anything other than a 200 or 401 response from webhook makes the server raise a 500 Internal Server Error
exception.
Auth webhook samples
We have put together a GitHub Node.js repo that has some sample auth webhooks configured.
You can deploy these samples using glitch:

Once deployed, you can use any of the following endpoints as your auth webhook in the GraphQL engine:
/simple/webhook(View source)/firebase/webhook(View source)
Note
If you are using Firebase, you will have to set the associated environment variables.
