Manage Migrations
Introduction
Hasura will create pure SQL files representing every change made to tracked databases made while using the Console served by the Hasura CLI.
The Migrations files are automatically generated in a series of Unix nanosecond timestamped directories consisting of
up.sql and down.sql files in pure SQL syntax, which describe to Hasura Server both how to create, (up.sql) and how
to roll back (down.sql) each of your database changes step-by-step.
When these files are committed to version control, your database schema state can be kept in-sync with your codebase.
When used in combination with CI/CD, changes to your database schema can automatically and elegantly be applied to your app's development, staging or production versions.
Example migrations directory created with the Hasura CLI:
📂 migrations
└─ 📂 default
   └─ 📂 1654696186008_init
      └─ 📄 up.sql
   └─ 📂 1654698227514_create_table_public_address
      ├─ 📄 down.sql
      └─ 📄 up.sql
Migrations File Format
Migrations are saved in a series or "versions" of Unix nanosecond timestamped directories consisting of up.sql and
down.sql files in pure SQL syntax, which describe to Hasura Server both how to create, (up.sql) and how to roll back
(down.sql) each of your database changes step-by-step.
Create Migrations
Usually Migrations are created step-by-step whenever you make a change to our database schema on the Console served by the Hasura CLI.
Only changes to the database schema made using the Console served by the Hasura CLI will be tracked with
Migrations. Changes made using the Console served by the Hasura Server itself at /console will not be tracked.
Create an initial Migration with the current database schema
By using the migrate create command on the Hasura CLI you can create a full up.sql file to recreate the entire
database(s) schema.
hasura migrate create "init" --from-server
This will create a new folder named in the format <timestamp>_init within another folder of the name of the database
in Hasura which is being referenced. It will contain only an up.sql file which describes in SQL how to create the
schema in full for that database.
Please note that when using the migrate create init --from-server command, Hasura only supports Postgres databases.
Should you wish to use a different database, you will need to manually create the migration files. For more information,
please see the section below.
Create a Migration manually
While the Hasura Console can auto generate Migrations for every action, sometimes you might want to write the migrations yourself, by hand. Using the Hasura CLI, you can bootstrap these Migration files and manually write the SQL for the database schema.
Set up the migration files:
hasura migrate create <name-of-migration> --database-name <database-name>
This command will create up and down migration SQL files in the Migrations directory.
Edit the file and add your migration actions. For the file format and instructions on what Actions can be added, refer to migration file format.
The corresponding Hasura Metadata changes, if any, can be made directly in the appropriate Metadata file in the /metadata directory, refer to Metadata format.
Apply the Metadata and Migrations:
hasura metadata apply
hasura migrate apply --database-name <database-name>
hasura metadata reload
Create a Migration to insert data
You can also write manual SQL insert statements which can then be saved as a Hasura Migration and used in the normal Hasura Migration workflow. You can do this by using the Console served by the Hasura CLI to create the Migration file for you based on the SQL statements you give it.
You can create a Migration file inserting data using the Console served by the Hasura CLI as follows:
Step 1: Navigate to the SQL section
On the Hasura Console, click on the Data tab and then on the SQL link on the left. This is a form which allows you
to enter and then execute standard SQL statements on your chosen database.
Step 2: Write an insert statement
The next step is to write an insert statement that populates the database with seed data like the following:
INSERT INTO days_of_week (id, value) VALUES
  (1, 'Monday'),
  (2, 'Tuesday'),
  (3, 'Wednesday'),
  (4, 'Thursday'),
  (5, 'Friday'),
  (6, 'Saturday'),
  (7, 'Sunday');
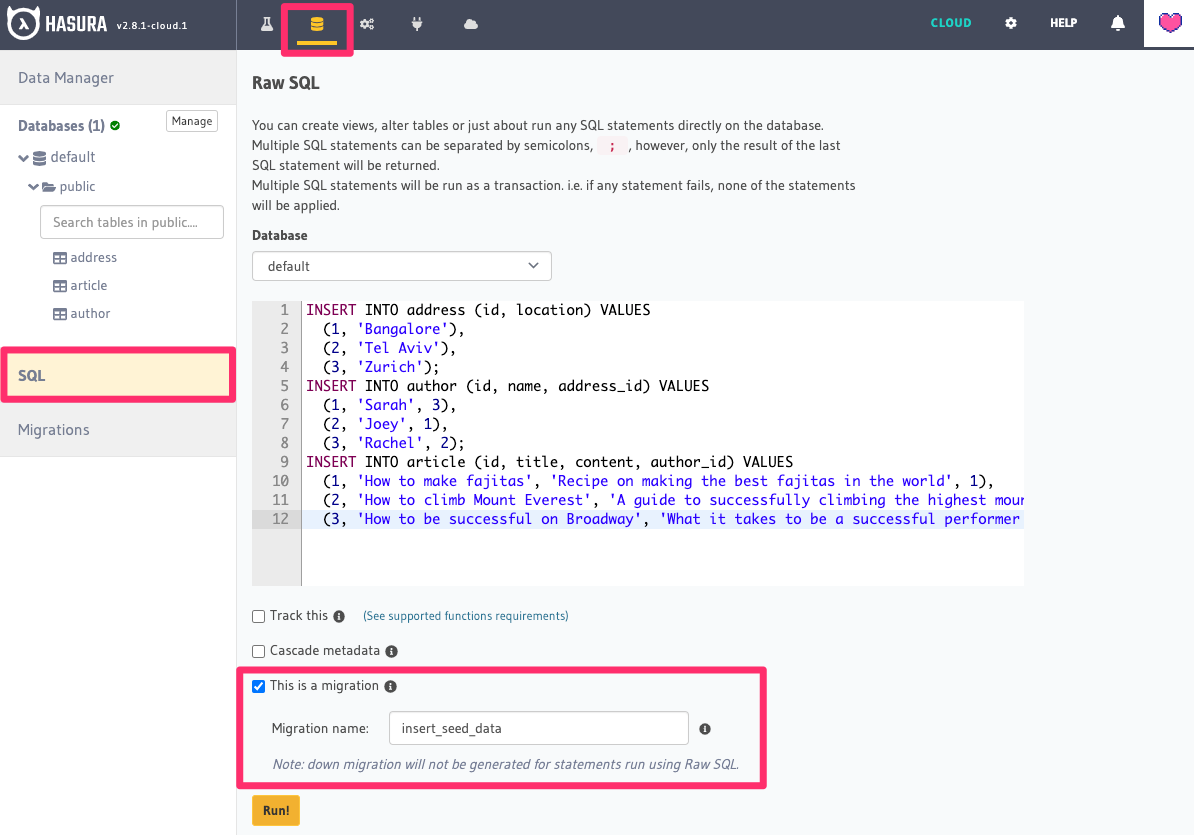
Step 3: Mark the insert as a migration
Check the box ☑️ This is a migration and give the migration a name, e.g. insert_days_of_week_data. If you don't see
this checkbox it's likely because you are not on the Console served by the Hasura CLI and rather the one served by
Hasura Server. You should switch to the Hasura CLI Console in order for this to work.
Step 4: Run the statement
Hit the Run! button.
Step 5: Verify data & migration
If the insert statement was successful, the data is now added to the DB and the Migration is saved with a version number
in the migrations directory on your machine. You can inspect the file in order to see the same SQL statements in the
up.sql file.
Note that for custom SQL statements executed in this way Hasura will not create a corresponding roll-back statements in
the down.sql file in order to roll back the change and if you need these statements you will need to write them by
hand in the down.sql file.
Apply Migrations
In order to apply the Migrations on a different Hasura instance you can use the apply command in the Hasura CLI.
hasura migrate apply --endpoint https://another-hasura-instance.hasura.app
Only use the root URL and don't include the /v1/graphql part of the endpoint URL. /v1/graphql is the location from
which the GraphQL schema is served. You will likely also need to include the --admin-secret flag and value which is
left out of this example for simplicity and also specify which database to apply the migration changes to. However
Hasura CLI will prompt you to confirm this info.
When using the apply command if you would only like to apply one change to the new instance you can specify which one by
using the --version flag and supplying only the timestamp portion of the folder name to it.
Whenever the apply command is used, each Migration that is to be applied is sent to the Hasura Server via a run_sql
API request.
For example:
hasura migrate apply --endpoint https://another-hasura-instance.hasura.app --version 1650879664716
You can also leave out the --endpoint flag if the project has already been initialized in which case the Hasura CLI
will use the endpoint information from the config.yaml file. Note that Hasura Server keeps track of which Migrations
have already been applied and will not reapply a migration if it has already been applied.
Marking Migrations as applied
If the schema already exists on your database or you have already applied a Migration to a database, you can let Hasura Engine know by marking it as applied in the Hasura Metadata. This is in order to make the Migration states consistent.
To do this, use the --skip-execution flag with the migrate apply command in the Hasura CLI, eg:
hasura migrate apply --skip-execution --version 1650879664716 --endpoint https://another-hasura-instance.hasura.app
Rolling back applied Migrations
If there are any issues with changes made to the database schema and Hasura Metadata it is possible to roll back the changes to a previous stable version.
Database schema rollbacks can be achieved via the down.sql Migrations generated every time a schema change is made but
which describe how to remove the particular change.
While we guarantee that up.sql files will be syntactically correct, if you need to roll back changes with down. sql
files it is advisable to first check the down.sql files which will be applied to make sure their syntax is correct for
the changes you want to do.
For example, to roll back a particular Migration version:
hasura migrate apply --version 1550925483858 --type down --database-name <database-name>
This will "undo" each change made to this database schema after and including this version and leave your schema at the state it was before this version change was made.
You can also roll back n number of Migration versions as per the command below:
hasura migrate apply --down 2 --database-name <database-name>
Rollbacks will only work if there are down Migrations defined for a schema change, e.g. the Console will not generate
down Migrations for SQL statements executed from the SQL tab, and therefore they will not be able to be rolled back
using this tool.
Squash Migrations
Hasura CLI contains a tool called squash in order to merge multiple Migrations into one. This is useful in order to
improve maintainability of your Migrations files and to ensure you can go back to a particular version easily. It's most
useful when you are working on a feature and there have been multiple changes made to the database schemas during
development leading to multiple Migration files created. With squash you can merge these into one directory in order
to merge the feature into your main branch with one clean and easily understandable Migration.
The following command will squash all migration files from the given migration to the latest migration into a single migration file.
hasura migrate squash --name "<my-feature-name>" --from <start-migration-version-timestamp-number> --database-name
<database-name>

# note down the version timestamp number
Because all the Migrations included in the squash have already happened on the Server, we need to tell the Server that
this new squashed version has already been applied. When we do this using the hasura migrate apply command but also
tell the Server not to execute the statements in the squash to avoid errors and conflicts. We do that as follows:
# mark the squashed migration as applied on this server
hasura migrate apply --version "<squash-migration-version-timestamp-number>" --skip-execution --database-name <database-name>
Check the Status of Migrations
You can check the status of Migrations, whether they are present and applied in on your local directory and on the database on Hasura server
To check the status of Migrations use:
# in project dir
hasura migrate status
Hasura Migrations work on a per-database basis. So at the prompt, select your database or choose All to select all
databases. You can also add the flag --database-name default with your database name to the command to specify the
database and skip the prompt.
This command will print out each migration version present in the migrations directory along with its name, source
status and database status.
For example,
$ hasura migrate status --database-name default
VERSION        NAME                           SOURCE STATUS  DATABASE STATUS
1654696186008  init                           Present        Present
1654696713921  create_table_public_address    Present        Present
We can see the version timestamp number of the migration, it's name, and whether it's present in the source (our filesystem) and also present on the database via the Hasura Server. Hasura keeps track of which Migrations have been applied to the databases in order to not duplicate applying them and creating errors.
If SOURCE STATUS indicates Not Present, it means that the migration version is present on the server, but not on the
current user's local directory. This typically happens if multiple people are collaborating on a project and one of the
collaborators forgot to pull the latest changes which included the latest migration files, or another collaborator
forgot to push the latest migration files that were applied on the database. Syncing of the files would fix the issue.
If DATABASE STATUS indicates Not Present, it means that there are new migration versions in the local directory
which are not applied on the database yet. To apply them executing hasura migrate apply will resolve this.
Delete Migrations
You can use the delete command to delete the record of the Migrations having been applied on the Hasura Server. This
will not roll back your database schema or change your schema in any way, but merely remove the record of that Migration
version (identified by its timestamp number) having been applied.
For example to delete Migrations on the server only
It's a good idea to always copy or move your Migrations before deleting them in case there is an error or mistake and
you need them again. You can use the command mv migrations migrations_backup to quickly move your Migrations folder to
a backup.
hasura migrate delete --all --server --database-name <database-name>
This example command specifies the --all flag in order to delete all Migrations from the server. You can also use the
--version command in order to specify one single Migration version to delete on the server.
It also uses the --server flag in order to specify that it should only apply to the Hasura Server and not the local
Migrations on your machine.
It also specifies the --database-name flag in order to bypass the Hasura CLI prompt and tell Hasura only to delete
Migrations for a that database.
In order to delete Migrations on the Server and clean up the local project Migration files leave out the --server flag
from the command.
hasura migrate delete --all --database-name <database-name>
Auto-Applying Migrations in CI/CD
If you need an automated way of applying Migrations and Metadata, take a look at the cli-migrations Docker image, which can automatically apply Migrations and Metadata when the Hasura Server starts. Check out more information here.