Create an API
Introduction
To start, we'll walk you through the steps to:
- Create a new Hasura project
- Connect a database
- Execute your first query
- Create lightning-fast production builds all with the new Hasura CLI.
Throughout this guide, you'll be introduced to new Hasura concepts, like builds, our new metadata structure, and more.
If you've landed here from Hasura DDN after creating a project via the Console (our GUI), you can replace the project
name in the hasura.yaml at the root of the local project you're about to create with the name of the project you
created on Hasura DDN. From there, you can follow the rest of the steps below!
We'll create a project on Hasura DDN, which is fully defined in metadata files using a simple directory structure.
We'll use the CLI's create command, which is a convenient way of setting up these files using best practices, to
scaffold out our project.
During this process, we'll add a pair of data connectors to connect to a PostgreSQL data source and to run custom logic. Data connectors can connect to any data source, be it a database, REST API, TypeScript functions, or anything in between. Connectors are available from Hasura and the community on the Connector Hub, or you can write your own.
Once a project is defined, we can use the dev command to continually watch for changes and build the project to make
it available as an API on Hasura DDN.
Step 1: Prerequisites
- Install the new Hasura CLI — to quickly and easily create and manage your Hasura projects and builds.
- Install the Hasura VS Code extension — with support for other editors coming soon!
- Have a PostgreSQL database — for supplying data to your API.
If you don't have a PostgreSQL database and prefer to connect to a cloud provider, check out our friends at Neon.
Additionally, we've provisioned a few read-only databases for you to use for this guide if you'd like. The connection strings are available later in the third step.
For users on Windows, we recommend utilizing Powershell for this tutorial. The tutorial commands are based on Unix/Linux syntax. However, PowerShell on Windows supports these commands through aliases, allowing you to use Unix/Linux-style commands directly on Windows.
Step 2: Login to Hasura
After our prerequisites are taken care of, login to Hasura Cloud with the CLI:
ddn login
This will open up a browser window and initiate an OAuth2 login flow. If the browser window doesn't open automatically, use the link shown in the terminal output to launch the flow.
Yep! If you can't tell already, we've completely rewritten the CLI from the ground up. You can learn more about the new commands by running:
ddn --help
Step 3: Create a new project
We'll use the create project command to create a new project:
ddn create project --dir ./my-first-supergraph
The CLI will respond with information about your new project, including the console URL:
+-------------+-----------------------------------------------------+
| Name        | <NAME>                                              |
+-------------+-----------------------------------------------------+
| ID          | <ID>                                                |
+-------------+-----------------------------------------------------+
| Console URL | https://console.hasura.io/project/<NAME>            |
+-------------+-----------------------------------------------------+
Additionally, it will log some information about the project.
Step 4: Add the Postgres Connector
A connector manifest is the file which contains the details of the connector's configuration. This tells Hasura DDN what capabilities the connector has and how to build that connector for your data source.
Let's move into the project directory:
cd my-first-supergraph
Then, create a connector manifest by passing a name — in this case app_connector — to the add connector-manifest
command:
ddn add connector-manifest app_connector --subgraph app --hub-connector hasura/postgres --type cloud
The CLI will respond with information about our successfully-added connector and alert us to our next steps:
INF connector "hasura/postgres:<VERSION>" with name "app_connector" added successfully to Subgraph "app"
INF Please add your Postgres Connection URI as the value for CONNECTION_URI env var in app/app_connector/connector/app_connector.build.hml file
With connection strings, you have two options for adding them to your metadata. You can either add them as environment
variables in your *.env.yaml files or as raw connection strings in a connector's build manifest. Make your choice
below and add your connection string:
These databases are all located in us-west-1. As such, there may be some performance issues as the data traverses the
network from where it's hosted to your nearest Hasura region. We're using the docs-sample-app's connection string, but
also have other data sets available in this dropdown or, if you wish, you can add your own connection string.
See connection strings »
An e-commerce application.
postgresql://read_only_user:[email protected]:5432/v3-docs-sample-app
A music-platform themed dataset.
postgresql://read_only_user:[email protected]:5432/Chinook
A dataset composed of various functions.
postgresql://read_only_user:[email protected]:5432/AdventureWorks
- Environment Variable
- Raw Connection String
Open your project in VS Code and open the base.env.yaml file in the root of your project. Then, add the
APP_CONNECTOR_CONNECTION_URI environment variable with the connection string under the app subgraph:
supergraph: {}
subgraphs:
  app:
    APP_CONNECTOR_CONNECTION_URI: "postgresql://read_only_user:[email protected]:5432/v3-docs-sample-app"
Next, update your /app/app_connector/connector/app_connector.build.hml file to reference this new environment
variable:
# other configuration above
CONNECTION_URI:
  valueFromEnv: APP_CONNECTOR_CONNECTION_URI
Notice, when we use an environment variable, we must change the key to valueFromEnv instead of value. This tells
Hasura DDN to look for the value in the environment variable we've defined instead of using the value directly.
Open your project in VS Code and open the app_connector.build.hml file in our project. We can then add the
CONNECTION_URI's value:
# other configuration above
CONNECTION_URI:
  value: "postgresql://read_only_user:[email protected]:5432/v3-docs-sample-app"
If you are storing sensitive information, such as connection strings in your .env.yaml files, you should add these
to your gitignore so as to avoid accidentally committing them to version control.
Step 5: Build your GraphQL API
We can use dev mode to watch our project and create new builds as changes are made to our metadata:
ddn dev
We'll see the CLI creates our first build, displays the URL for our project's Console, and continues to watch for changes 🎉
INF Models and commands added to the project successfully
INF Doing a supergraph build...
INF Building SupergraphManifest "base"...
◑+---------------+----------------------------------------------------------------------------------------------------+
| Build Version | 3405408c06                                                                                         |
+---------------+----------------------------------------------------------------------------------------------------+
| Description   | Dev build - Tue, 02 Apr 2024                                                                       |
|               | 13:36:57 CDT                                                                                       |
+---------------+----------------------------------------------------------------------------------------------------+
| API URL       | https://<PROJECT_NAME>-default-3405408c06.ddn.hasura.app/graphql                                   |
+---------------+----------------------------------------------------------------------------------------------------+
| Console URL   | https://console.hasura.io/project/<PROJECT_NAME>/environment/default/build/3405408c06/graphql      |
+---------------+----------------------------------------------------------------------------------------------------+
| Project Name  | <PROJECT_NAME>                                                                                     |
+---------------+----------------------------------------------------------------------------------------------------+
INF Starting ConnectorManifest watcher for connector "app_connector" in subgraphName "app"
INF Starting ConnectorLink watcher for connector "app_connector" in subgraphName "app"
A build in Hasura DDN is an immutable state of your GraphQL API that represents a milestone in your development cycle.
Each project can have multiple builds, but only one can be applied to a the project's endpoint. All builds on a project have a unique URL on Hasura DDN to access their GraphQL API which can be shared with other users.
Builds allow you and your team to quickly iterate and experiment with your project's metadata and allow for easier rollbacks on production and greater collaboration during development.
Under the hood, ddn dev is using two CLI commands:
update connector-manifestupdate connector-link
These commands update a connector's BuildContext and
the schema of its DataConnectorLink
respectively. Running these two allows you to track tables from your data source and can be run independently of
ddn dev in situations such as when your underlying database's schema changes.
Step 6: Run your first query
We're using the Docs Sample App schema for the visuals in this guide, but you can use the GraphiQL Explorer in Console to create your own query or write it manually:
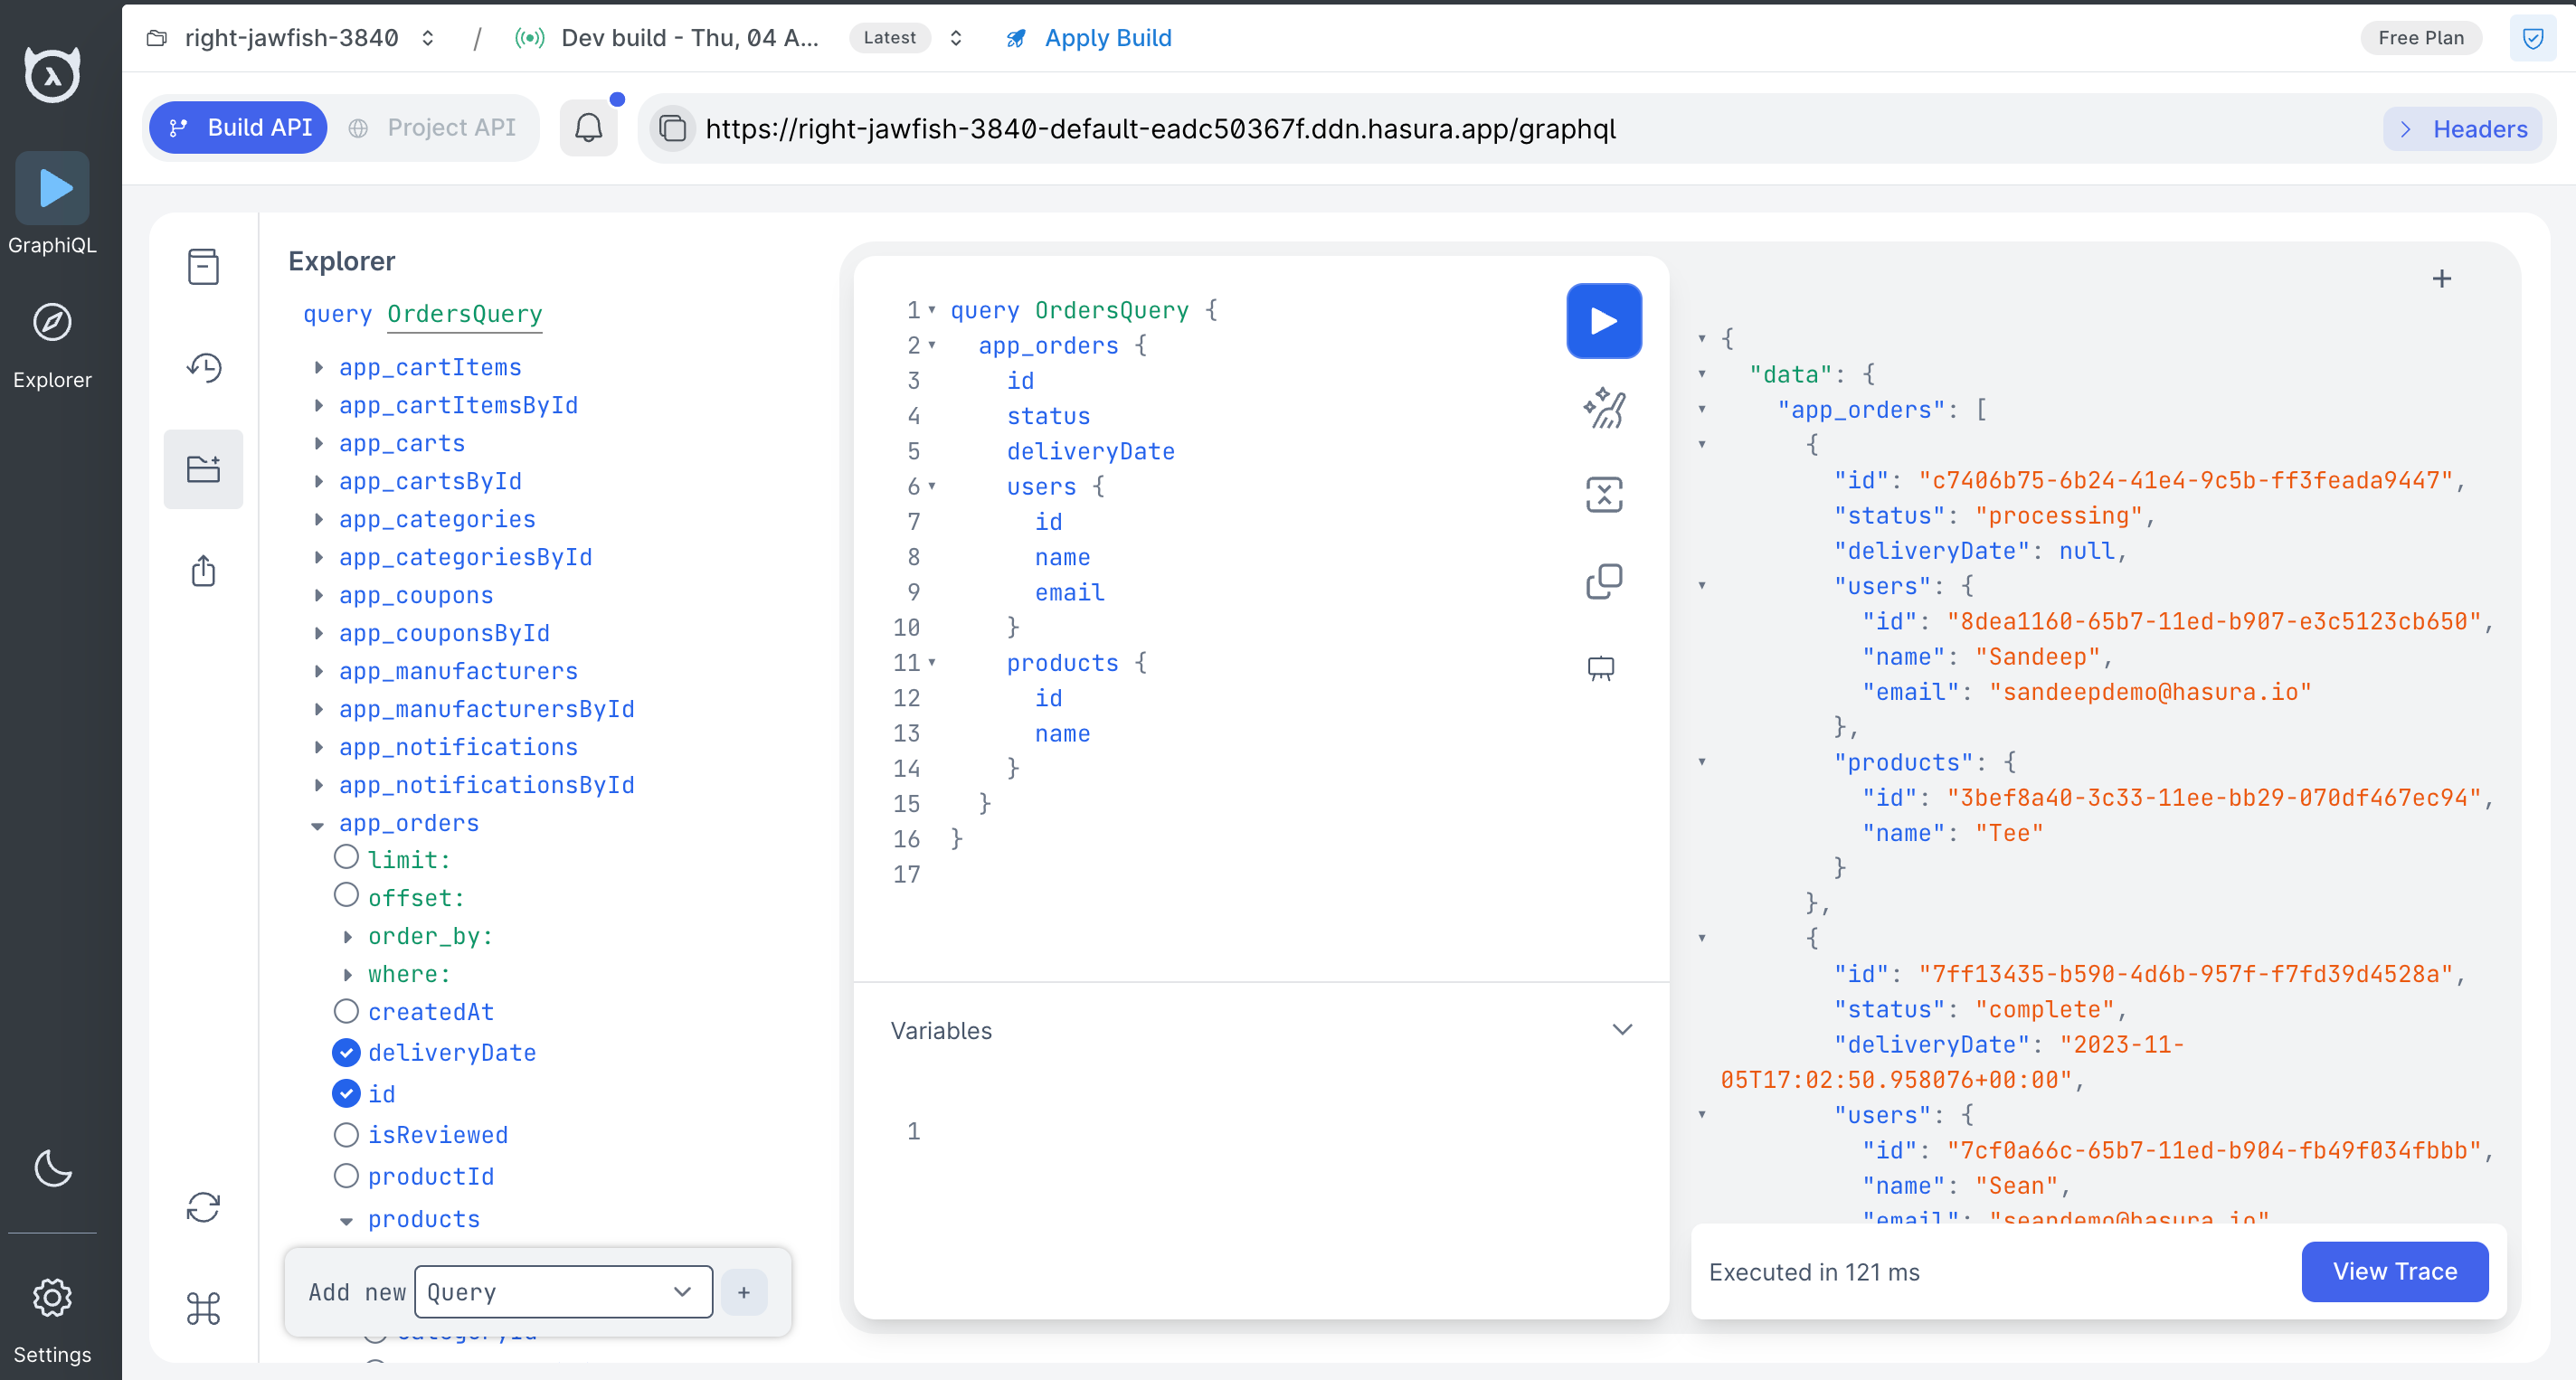
query OrdersQuery {
  app_orders {
    id
    status
    deliveryDate
    users {
      id
      name
      email
    }
    products {
      id
      name
    }
  }
}
If you wish to use Git for version control and want to create a starting point to which you can rewind, run the following at this point in a new tab of your terminal:
git init .
git add .
git commit -m "init supergraph"
What just happened?
Project configuration
When you ran the create project command, the CLI created a new project for you on Hasura DDN. It also scaffolded out
all the necessary configuration and metadata in your project's directory:
├── app
├── base.supergraph.hml
├── hasura.yaml
└── supergraph
You can learn more about project structure by visiting our CI/CD section.
Connector deployment
You created, configured, and deployed a PostgreSQL connector to Hasura DDN! Hasura can host these for you or you can deploy them on your own infrastructure.
Models tracked
When you ran ddn dev, the CLI tracked all the tables in the PostgreSQL database as models.
Models, defined in metadata, tell our GraphQL API how to expose collections from
our data sources.
Relationships
Additionally, Hasura instantly added all foreign-key relationships from our data source to our API. This unlocks the potential for rich, deeply-nested queries that reach across different models in our API.
Next, let's see how easy it is to add authorization to your API!