


Action handlers
Table of contents
Introduction
Actions need to be backed by custom business logic. This business logic can be defined in a handler which is an HTTP webhook.
HTTP handler
When the action is executed i.e. when the query or the mutation is called, Hasura makes a POST request to the
handler with the action arguments and the session variables.
The request payload is of the format:
{
  "action": {
    "name": "<action-name>"
  },
  "input": {
    "arg1": "<value>",
    "arg2": "<value>"
  },
  "session_variables": {
    "x-hasura-user-id": "<session-user-id>",
    "x-hasura-role": "<session-user-role>"
  }
}
Note
All session_variables in the request payload have lowercase keys.
Returning a success response
To return a success response, you must send back a response payload of action’s
response type. The HTTP status code must be 2xx for a successful response.
Returning an error response
To return an error response, you must send back an error object. An error object looks like:
{
  "message": "<mandatory-error-message>",
  "code": "<optional-error-code>"
}
The HTTP status code must be 4xx for an error response.
Example
For example, consider the following mutation.
extend type Mutation {
  UserLogin (username: String!, email: String!): UserInfo
}

type UserInfo {
  accessToken: String!
  userId: Int!
}
Let’s say, the following mutation is executed:
mutation {
  UserLogin (username: "jake", password: "secretpassword") {
    accessToken
    userId
  }
}
Hasura will call the handler with the following payload:
{
  "action": {
    "name": "UserLogin"
  },
  "input": {
    "username": "jake",
    "password": "secretpassword"
  },
  "session_variables": {
    "x-hasura-user-id": "423",
    "x-hasura-role": "user"
  }
}
To return a success response, you must send the response of the action’s output
type (in this case, UserInfo) with a status code 2xx. So a sample
response would be:
{
  "accessToken": "eyJhbGciOiJIUzI1NiIsInR5cCI6IkpXVC",
  "userId": 423
}
To throw an error, you must send a response of the following type while
setting the status code as 4xx.
{
  "message": "invalid credentials"
}
Restrict access to your action handler
You might want to restrict access to your action handler in order to ensure that it can only get called by your Hasura instance and not by third parties.
Adding an action secret
One possible way of restricting access to an action handler is by adding a header to the action that is automatically sent with each request to the webhook, and then adding a check against that in your action handler.
Note
Adding an action secret is a simple way of restricting access to an action handler and will suffice in most use cases. However, if you have more profound security requirements, you might want to choose advanced security solutions tailored to your needs.
Step 1: Configure your Hasura instance
In your Hasura server, add the action secret as an
environment variable, say ACTION_SECRET_ENV.
Step 2: Add a header to your action
For your action, add a header that will act as an action secret.
Head to the Actions -> [action-name] tab in the console and scroll down to Headers.
You can now configure an action secret by adding a header:
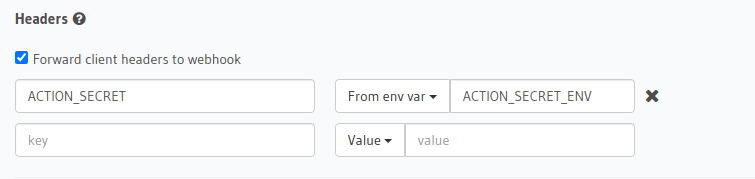
Then hit Save.
Go to metadata/actions.yaml in the Hasura project directory.
Update the definition of your action by adding the action secret as a header:
    - actions
      - name: actionName
        definition:
           kind: synchronous
           handler: http://localhost:3000
           forward_client_headers: true
           headers:
             - name: ACTION_SECRET
               value_from_env: ACTION_SECRET_ENV
Save the changes and run hasura metadata apply to set the
headers.
Headers can be set when creating creating or updating an action via the metadata API.
POST /v1/query HTTP/1.1
Content-Type: application/json
X-Hasura-Role: admin

{
  "type": "create_action",
  "args": {
    "name": "addNumbers",
    "definition": {
      "kind": "synchronous",
      "type": "query",
      "headers": [
        {
          "name": "ACTION_SECRET",
          "value_from_env": "ACTION_SECRET_ENV"
        }
      ],
      "arguments": [
        {
          "name": "numbers",
          "type": "[Int]!"
        }
      ],
      "output_type": "AddResult",
      "handler": "https://hasura-actions-demo.glitch.me/addNumbers"
    }
  }
}
Note
Before creating an action via the create_action metadata API, all custom types need to be defined via the set_custom_types metadata API.
This secret is only known by Hasura and is passed to your endpoint with every call, thus making sure only Hasura can successfully authenticate with the action handler.
Note
The name for the action secret is not defined by Hasura and can be chosen freely.
Step 3: Verify the secret in your action handler
First, load the action secret as an environment variable in your action handler by adding it to your .env file
(this file might be a different one depending on your framework).
Second, you need to write some code in your action handler to check that the action secret passed as a header equals to the one you stored as an environment variable.
The following is an example of a simple authorization middleware with Express:
// use authorization for all routes
app.use(authorizationMiddleware);

// authorize action call
function authorizationMiddleware(req, res, next){
    if (correctSecretProvided(req)) next();
    else res.sendStatus(403);
}

// check if the secret sent in the header equals to the secret stored as an env variable
function correctSecretProvided(req) {
    const requiredSecret = process.env.ACTION_SECRET_ENV;
    const providedSecret = req.headers['ACTION_SECRET'];
    return requiredSecret == providedSecret;
}
 Thank you for subscribing to our newsletter!