


OneGraph’s AuthGuardian JWT Integration with Hasura GraphQL engine
Table of contents
Introduction
In this guide, we will walk through how to set up AuthGuardian JWT to work with the Hasura GraphQL engine.
About AuthGuardian
AuthGuardian is a free service by OneGraph that allows you to both add sign-on with dozens of services like GitHub, Twitch, Stripe, Salesforce, and more, and also to easily visually describe authentication and authorization rules for your app, API, or service.
It will generate JWTs compatible with any service that supports JWTs - like Hasura! And on top of that, AuthGuardian has built-in support for generating Hasura roles to make working with Hasura’s permission system as easy as possible.
Step 1: Create an account
Sign into OneGraph with either GitHub or an email/password.
On the left sidebar, chose “Auth Services” and then “AuthGuardian”, and we’re ready to start!
Step 2: Add an auth rule
AuthGuardian works with two basic concepts: rules and effects.
Effects are useful for modifying the JWT during sign-in. AuthGuardian supports four effects:
- Set the
user_idfor Hasura in the JWT - Set the default Hasura user role in the JWT
- Set the allowed Hasura user roles in the JWT
- Set session variables for Hasura to use in the JWT
These can all be mixed and matched when creating Hasura-compatible JWTs to fully cover your app’s permission settings.
The second concept, rules determines whether the effects are allowed to be added to the JWT. The rules might look like:
- “If this user is logged into Twitch.tv”
- “If this user has an email on Salesforce that belongs to my organization’s domain”
- “If this user is a member of my GitHub organization”
Let’s see how to use these rules and effects in action!
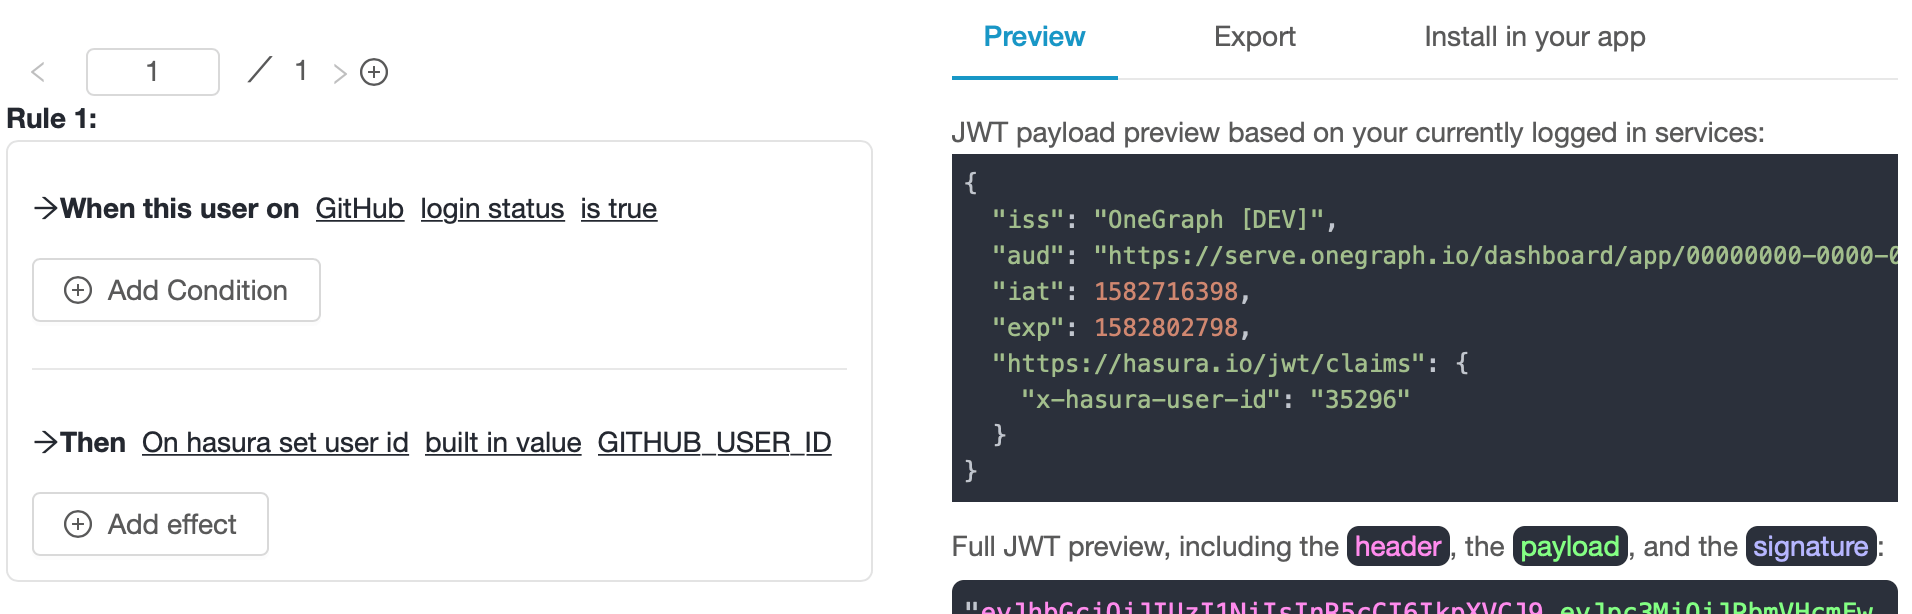
Option 1: Set Hasura user_id
Let’s say you’re using GitHub as the primary login for your Hasura app, and that you want to use their GitHub user_id as a primary key:
- For the section “When the user on”, select
GitHub->login status->is true(“When this user is logged into GitHub”) - For the section “Then”, choose
On hasura set user id. - Add set the user id in the “built-in value” field to
GITHUB_USER_ID - Click the
savebutton on the right hand side.
Option 2: Set the default Hasura role
Next, you want to assign a default role for all users, even those who haven’t logged in with GitHub yet.
Add a new rule (the + button in the top-left), and fill it out:
- For the section “When the user is on”, select
Always(this will always pass, even if the user isn’t logged into any service). - For the section “Then”, choose
On hasura set default role. - Add the default role, e.g.
user. - Click the
savebutton on the right hand side.
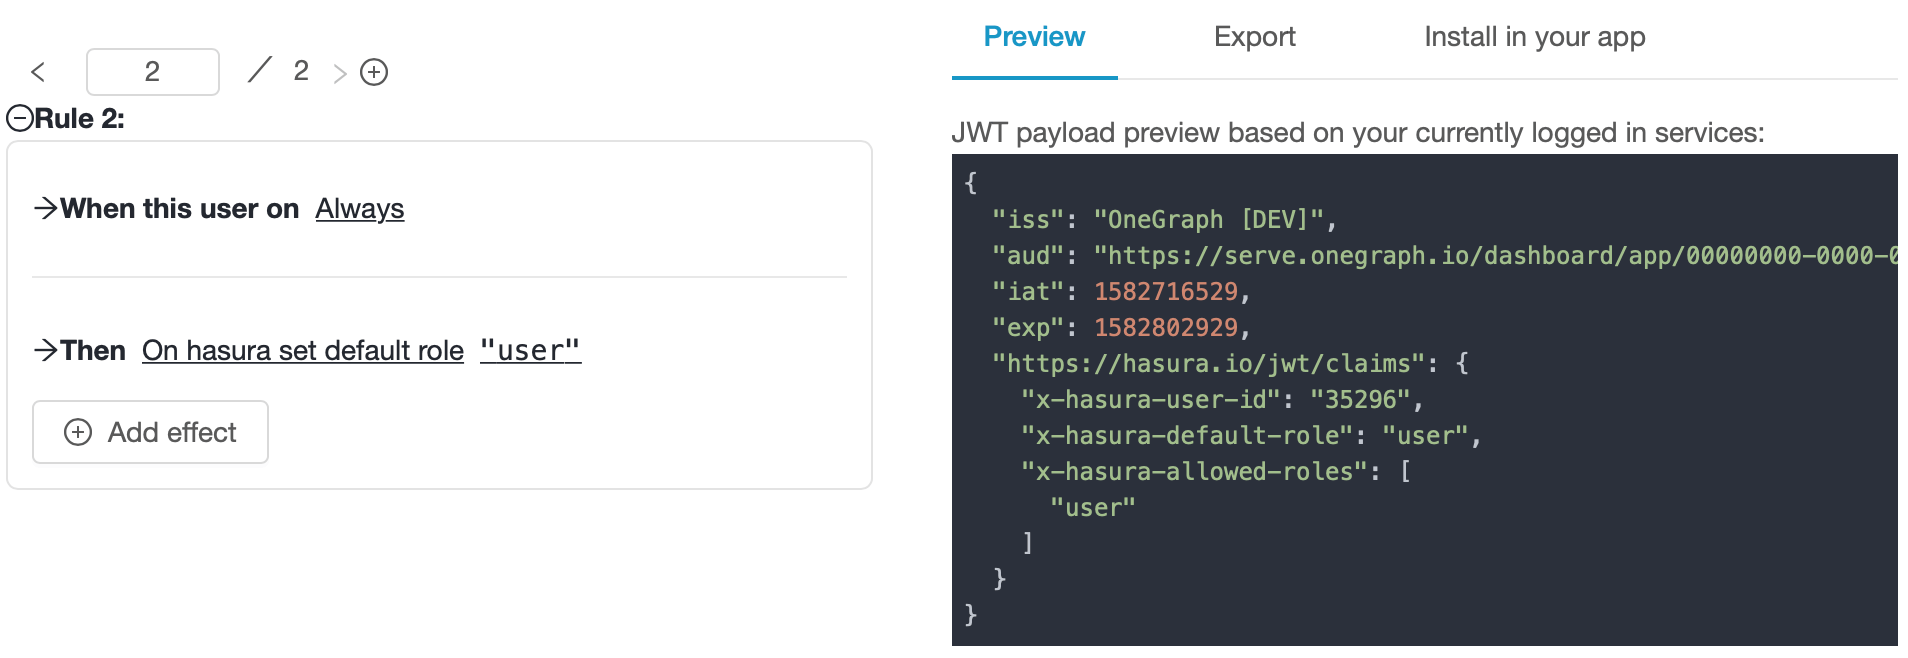
Note
Note that AuthGuardian knows that Hasura requires that the default role also appear in the list of x-hasura-allowed-roles, and added it in both places automatically.
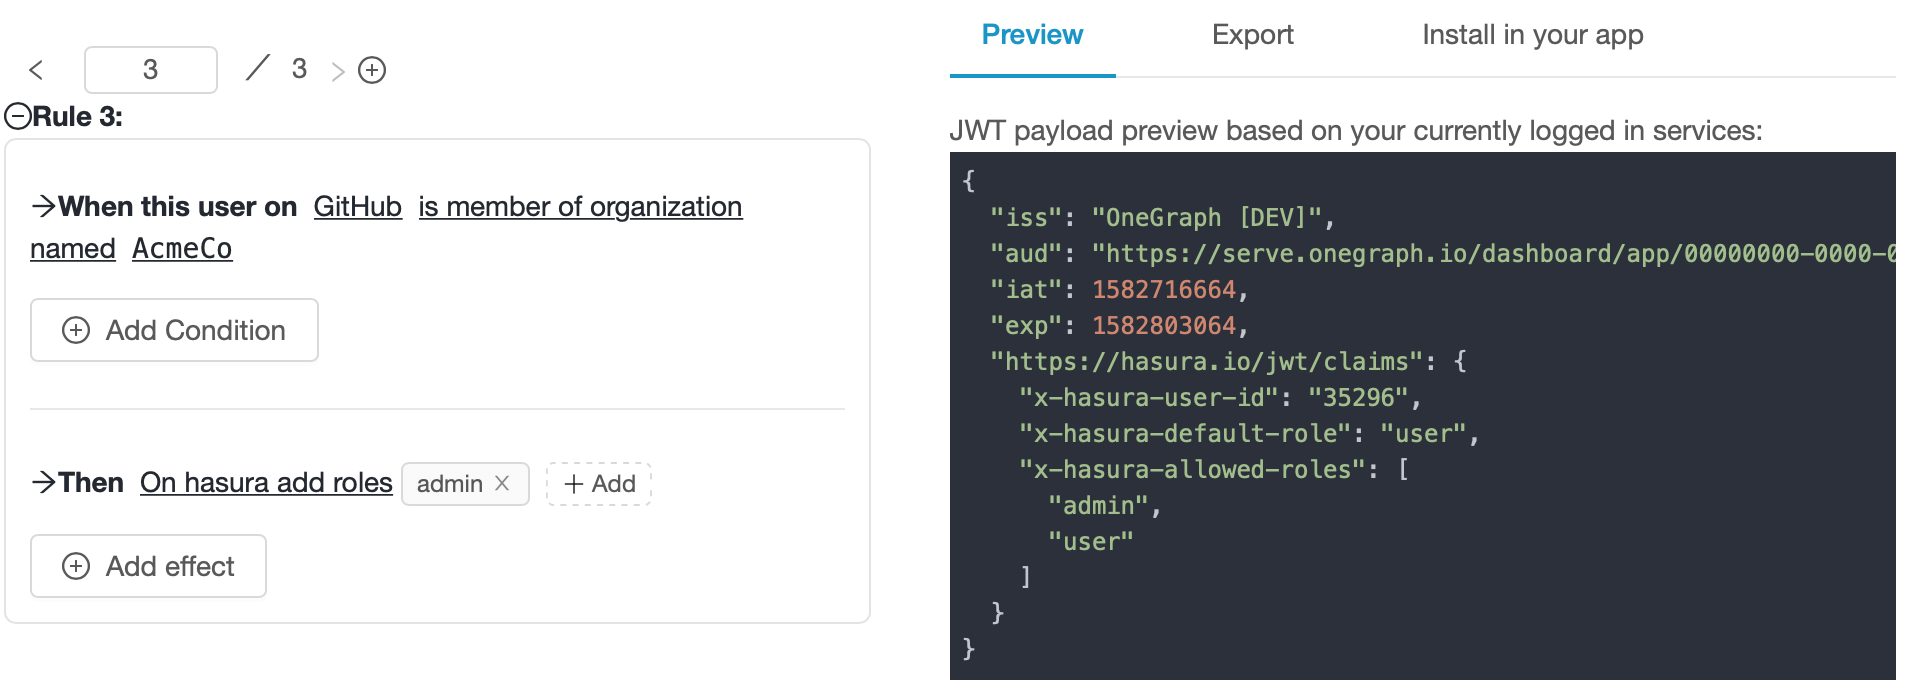
Option 3: Allow additional Hasura roles
Now, you want to restrict access to some data in Hasura so that only you and your teammates can read it. We’ll use Hasura’s permissions to restrict data to those who have an admin role, and use AuthGuardian’s rules to set that role in the JWT to people who belong to your GitHub organization:
- For the section “When the user is on”, select
GitHub->is member of organization named-><your org name, e.g. AcmeCo>(“When this user is a member of AcmeCo on GitHub”) - For the section “Then”, choose
On hasura add roles. - Click on “Add” and add an additional role, e.g.
admin. - Click the
savebutton on the right hand side.
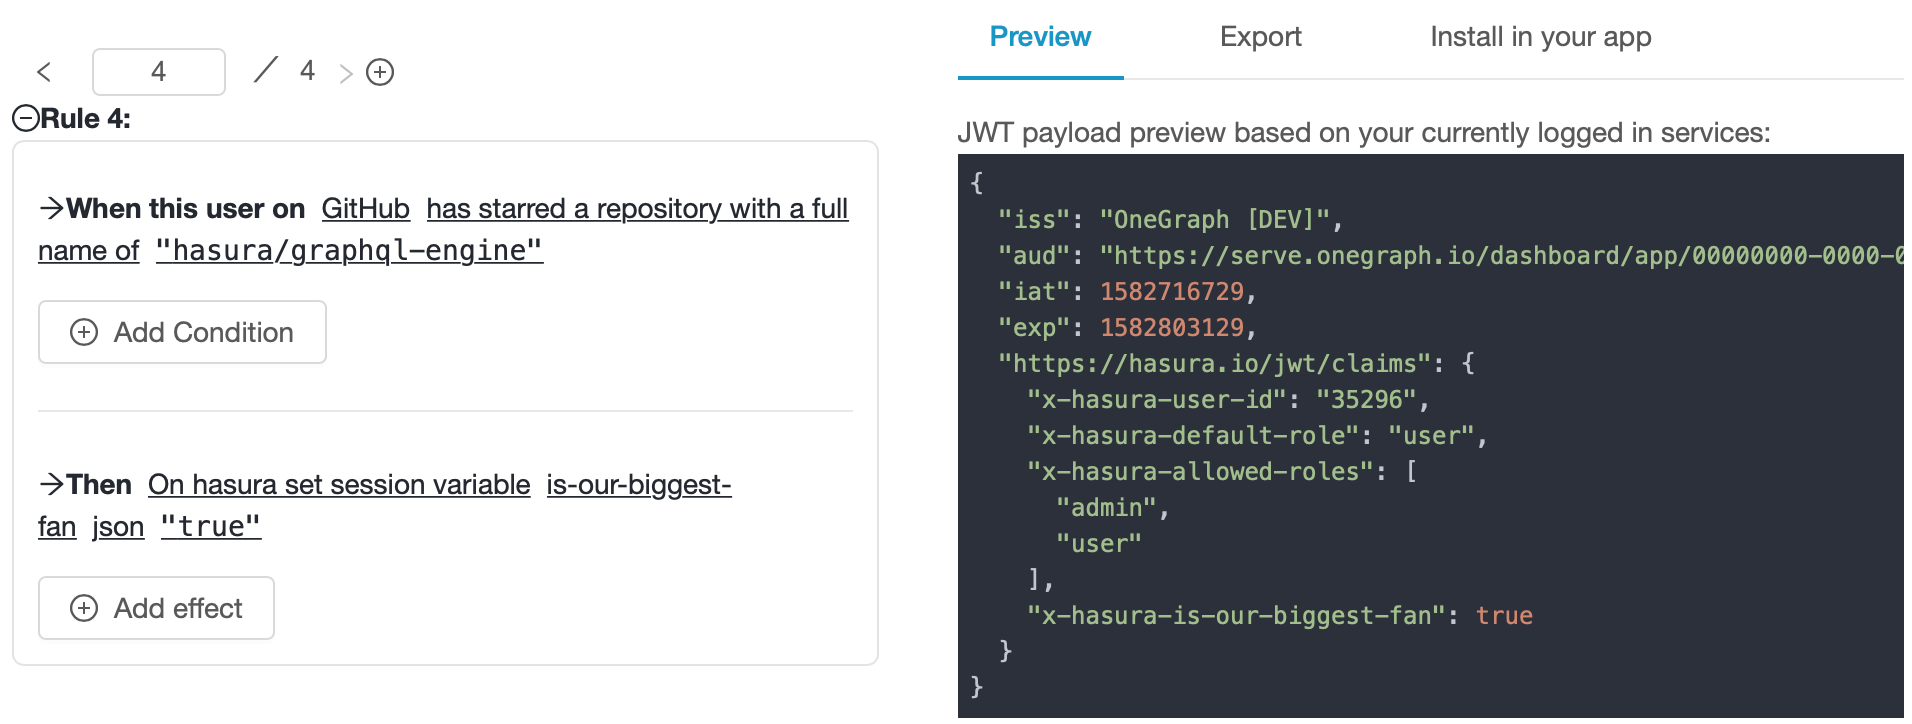
Option 4: Set a session variable
Hasura can use session variables for all sorts of powerful cases. AuthGuardian also supports setting these in your JWT!
Let’s say we want to restrict access to some super-interesting data in our Hasura backend to users who have starred a particular GitHub repository:
- For the section “When the user is on”, select
GitHub->has starred a repository with a full name of->hasura/graphql-engine(“When this user has starred the ‘hasura/graphql-engine’ on GitHub”) - For the section “Then”, choose
On hasura set session variable. - Add your session variable name
is-our-biggest-fanand value to JSONtrue. - Click the
savebutton on the right hand side.
Note
AuthGuardian knows where to place Hasura session variables in the JWT, and also knows to prefix the variables with x-hasura- automatically.
You’re all done! Now whenever a user hits your Hasura API they’ll always have a default role of user, and:
- Their Hasura user-id will match their (permanent) GitHub user id if they’re logged into GitHub.
- They’ll be allowed to use the
adminpermissions if they’re a member of your GitHub organization. - They’ll have a session variable of
x-hasura-is-our-biggest-fan: trueif they’ve starredhasura/graphql-engineon GitHub.
Nice!
Step 3: Generate Hasura’s JWT config to securely verify your new tokens
Next we’ll configure Hasura to verify our new JWTs - don’t worry, AuthGuardian also has built-in support for that!
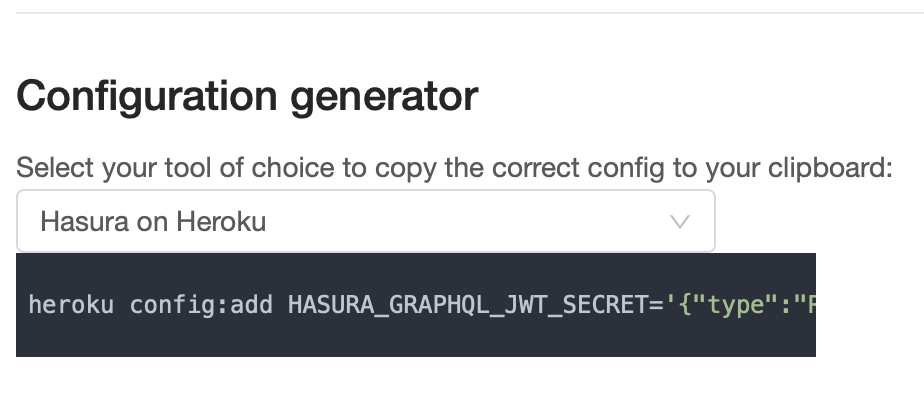
- On the left sidebar, click on “JWT Settings” and scroll down to “Configuration generator”.
- Choose either “Hasura” or “Hasura on Heroku”.
The generated config has the following structure:
{
  "type": "RS256",
  "jwk_url": "https://serve.onegraph.com/app/35bcf98c-1df0-4644-a453-bf06a1349449/.well-known/jwks.json",
  "claims_format": "json"
}
- Add the generated config as a value for the environment variable
HASURA_GRAPHQL_JWT_SECRETor for the--jwt-secretserver flag.
Step 4: Test the config and tokens
When configuring your permissions in Hasura, it’s useful to be able to quickly generate test tokens to make sure everything works as you expect.
- Copy the JWT that you created in step 2.
- On the left sidebar, click on “JWT settings” and scroll down to “Generate signed token”.
- Paste the copied JWT (or optionally write your own JSON if you want to test alternative scenarios).
- Copy the signed token and add it as a header in the Hasura console.
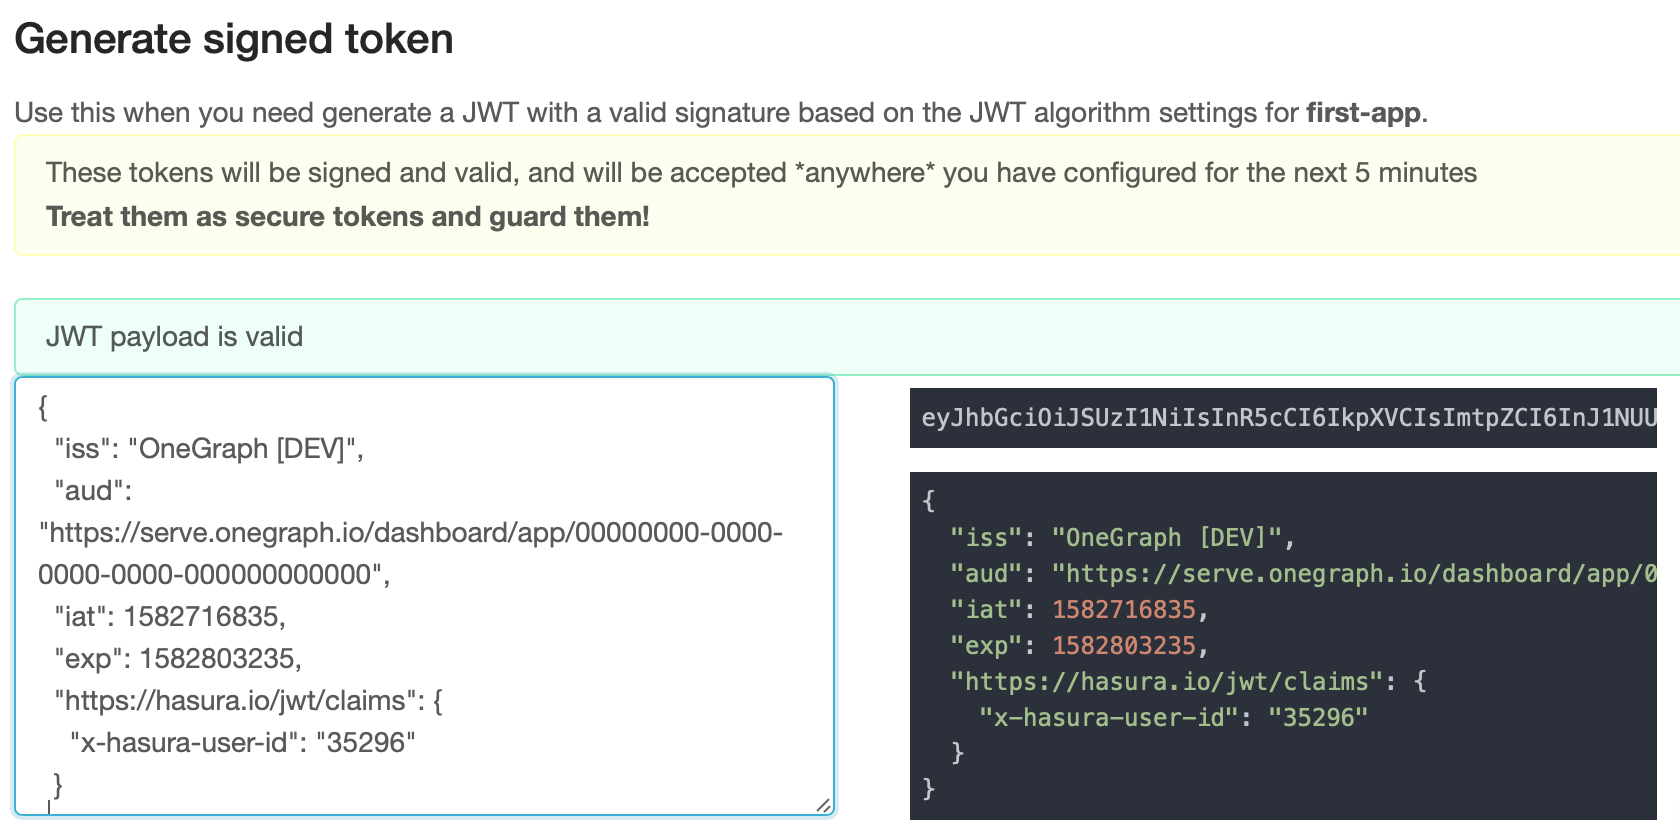
- In GraphiQL, try out queries to test that the integration works as expected by adding an
Authorizationheader, with a value ofBearer <the-copied-JWT-text>. Hasura’s GraphiQL will recognize this header, show you its content, and confirm whether it recognizes the JWT as securely signed.

Next Steps
AuthGuardian supports much more, including the ability to eject your rules as a pair of GraphQL request and JavaScript function so you can customize the auth as necessary. To read more about it, please visit the AuthGuardian docs.
 Thank you for subscribing to our newsletter!