Jupyter Python Notebook & API Server
Introduction
To enable quick prototyping and experimentation with AI apps, we've built a tool where you can write Python code and expose it as an API, which can be used with Hasura Event Triggers and Actions.
This tool includes a Jupyter Notebook where Python code can be written and executed. It also comes with a Jupyter Kernel Gateway, which can be then used to start an API out of the functions defined in the notebook.
You can use this framework to prototype your AI applications while simultaneously using Hasura Connectors to bring together data from any data source easily and securely.
Prerequisites
- Install the Hasura CLI: instructions can be found here.
- Install the
cloudandnotebookplugins using the following command:
hasura plugins install cloud
hasura plugins install notebook
To proceed, you'll need to ensure you're logged into Hasura Cloud via the CLI:
hasura cloud login
Getting started
Step 1: Create a notebook
Once you login to Hasura Cloud, you can create a Jupyter notebook to use the tool. Run the following command by supplying any random password which you will later use to access the notebook and the API:
hasura notebook create -p <password>
This takes a few minutes, you can check the status using the following command:
hasura notebook status
When the notebook is deployed, the CLI will display the access URL. Visit the URL in a browser to see the homepage. You
will be prompted to enter a username and password. The username is hasura and password is the one you set while
creating the notebook:
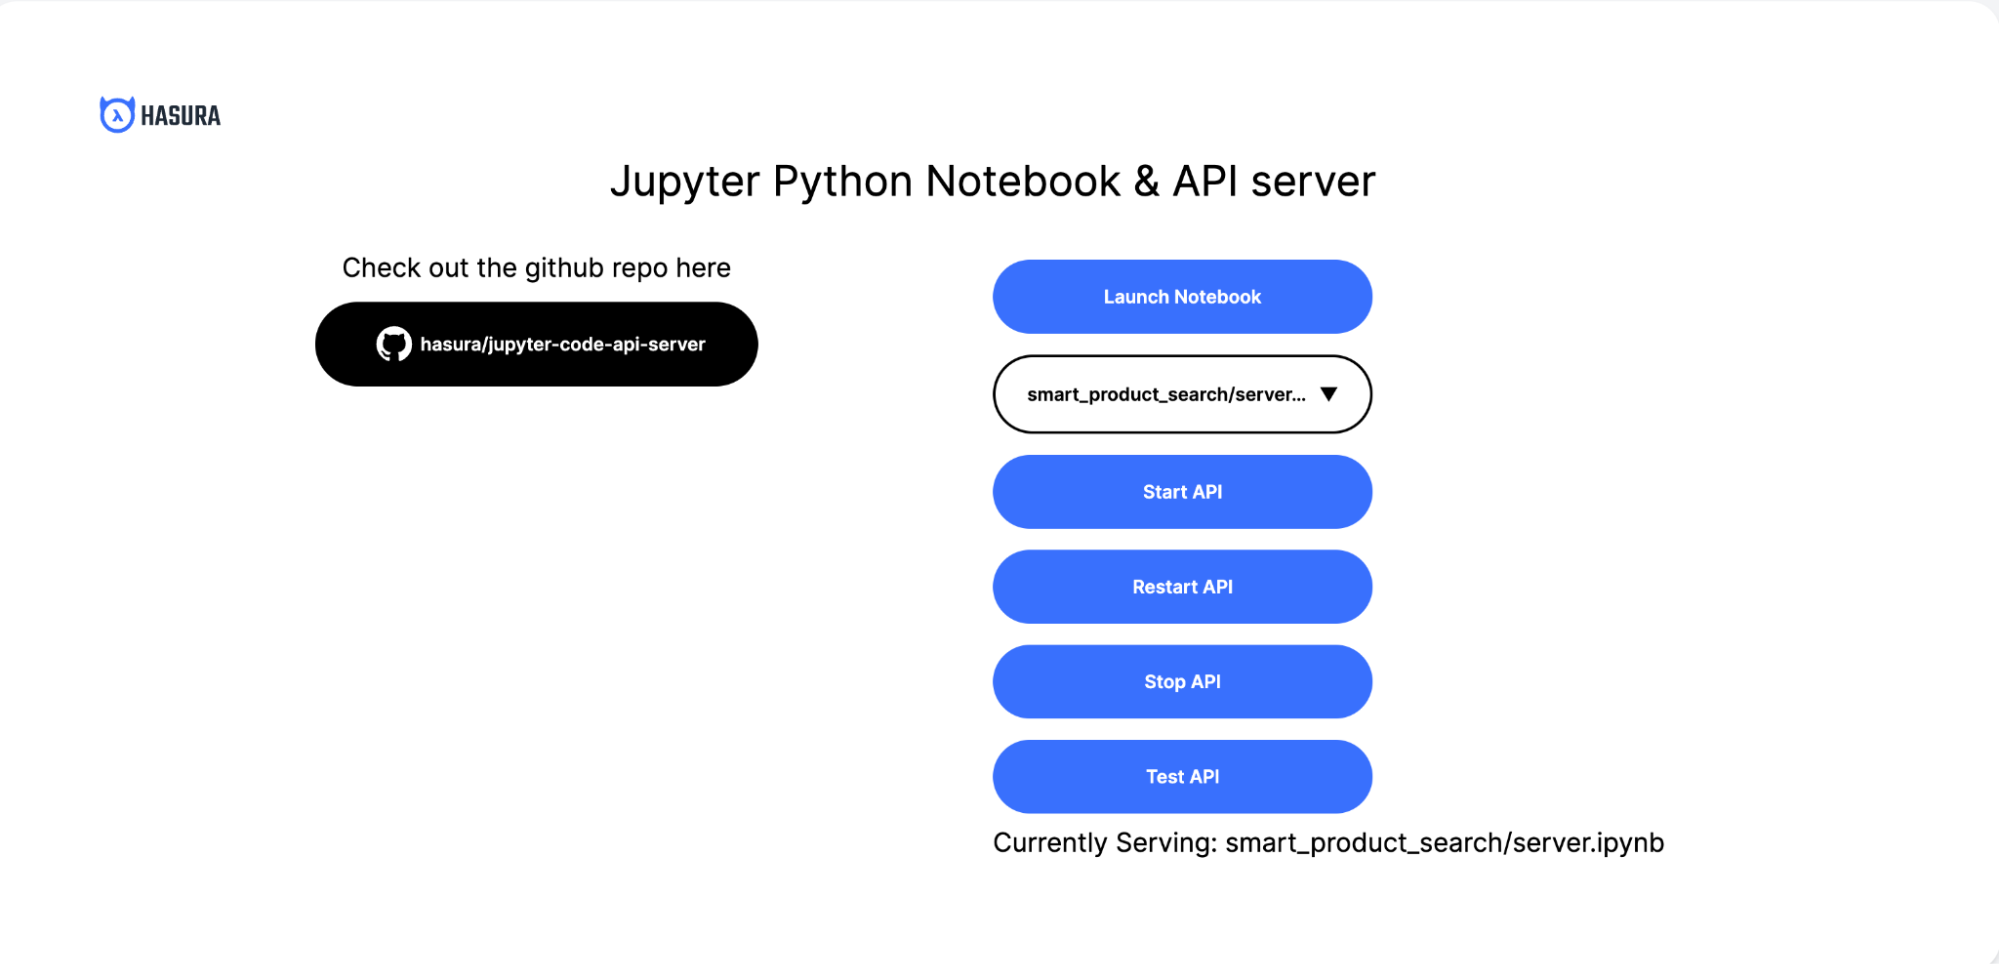
Step 2: Launch the notebook
Click the "Launch Notebook" button to launch the Jupyter Notebook. You should see a screen like this:
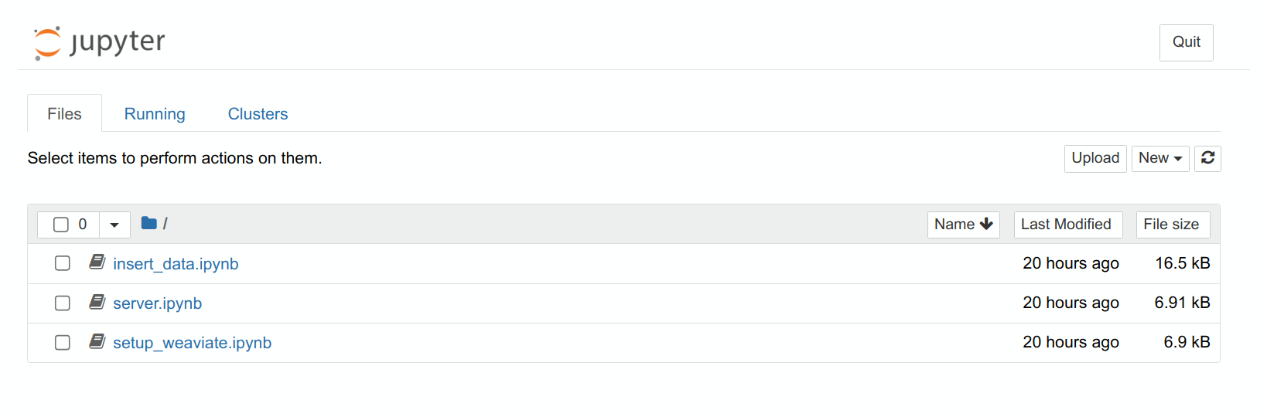
In the notebook, you'll find several project folders. For each, you'll find the handler code in server.py. This
handler is responsible for processing requests and serving responses from the API.
Once you have a block of code in your notebook, you can expose that as an API through the Jupyter Kernel Gateway by
adding a comment of the format # METHOD /url. For example:
# GET /hello_world

import json
print(json.dumps({
  'hello': 'world'
}))
Step 3: Start the API
From the homepage, you can select the server to start from the dropdown. Clicking the "Start API" button will start the selected server from the dropdown option above the button.
This block of code will return {"hello": "world"} when you visit /invoke/hello_world. More details on how to handle
headers and response data can be found at
Jupyter Kernel Gateway notebook-http mode documentation.
The endpoints for any API are served from the server.ipynb notebook. You can add new endpoints by adding a new block
of code in this file with the comment format # METHOD /url.
You can then monitor the logs of the API by running the following command:
hasura notebook logs
Each time changes are made to the notebook, click the "Restart API" button to deploy the latest version.
Templates
You can find templates for events and action handlers in this notebook:
Template for Event Trigger to Extract, Transform, Load (ETL) data
# POST /handle_event

GRAPHQL_ENDPOINT = ""
ADMIN_SECRET = ""

import json
from gql import gql, Client
from gql.transport.requests import RequestsHTTPTransport

def handle_insert(row, client):
    id = int(row['id'])
    name = str(row['name'])
    description = str(row['description'])
    # In reality you would follow the URL from row['url']
    content = "dummy content"
    gql_query = gql("""
            mutation insertItem($id: int!, $name: text!, $description: text!) {
                insert_Product_one(object: { product_id: $id, name: $name, description: $description }) {
                    id
                }
            }
        """)
    print(client.execute(gql_query, variable_values={
        'id': id, 'name': name, 'description': description}))
Template to respond to user's questions by querying Weaviate + OpenAI
# POST /handle_query

GRAPHQL_ENDPOINT = ""
ADMIN_SECRET = ""
OPENAI_API_KEY = ""

import json
from gql import gql, Client
from gql.transport.requests import RequestsHTTPTransport

from langchain.llms import OpenAI
from langchain.chains import LLMChain
from langchain.prompts import PromptTemplate

def handle_query(request):
    user_query = request['body']['input']['user_query']

    gql_headers = dict()
    gql_headers['x-hasura-admin-secret'] = ADMIN_SECRET

    # Create a GraphQL client with the request transport
    transport = RequestsHTTPTransport(
        url=GRAPHQL_ENDPOINT, headers=gql_headers)
    client = Client(transport=transport)
Authentication
The APIs exposed by the notebook require Basic HTTP authentication. When added as an Event Trigger or Action to Hasura,
you'll need to add the Authorization header in basic auth format with user name as hasura and password as the password
you set for the notebook.
The header format is:
Authorization: Basic <token>
The token can be created by base64-encoding a string in username:password format in your terminal:
echo -ne "<username>:<password>" | base64
You can then use the encoded string returned by this command as your token in the authorization header.
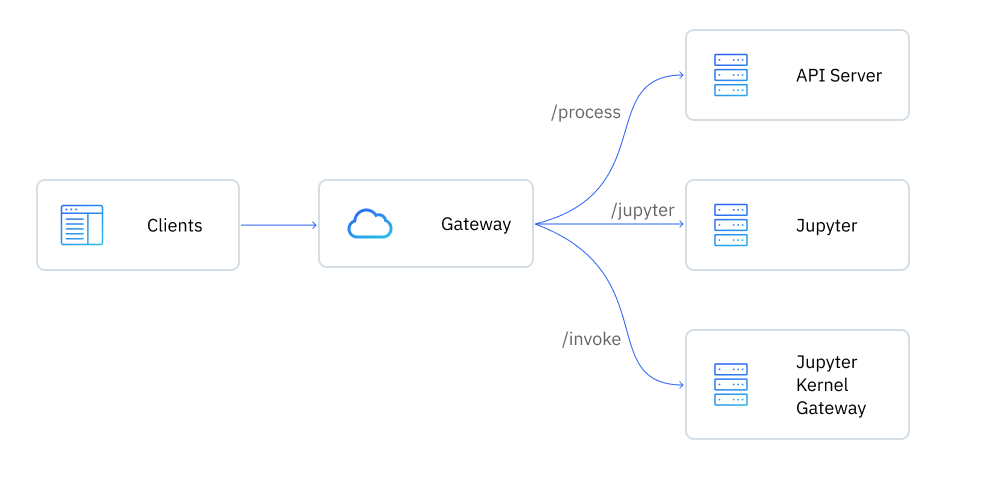
Exposed APIs
The container exposes the following APIs:
| API | Description |
|---|---|
/jupyter | Jupyter notebook entrypoint. |
/invoke/<path> | Invoke APIs exposed via the notebook's server.ipynb. |
/process/start | Start the notebook API server. |
/process/stop | Stop the notebook API server. |
/process/restart | Restart the notebook API server. |
The source code for the container can be found here.
It is not recommended to use this notebook in production. It is intended to be a playground for experimenting and fast iterations to validate your ideas.
In production, we recommend that you migrate your code from a notebook and into a Flask application or equivalent, which you can then deploy in a production-ready environment.
Deleting the notebook
Once you are done, you can keep the notebook around for your next project or delete it using the command:
hasura notebook delete