Vectorize PostgreSQL Data
Introduction
If you're here, you're probably curious about how to vectorize your PostgreSQL data. In this document, we'll cover the basic concepts of vector databases, why you might want to vectorize your data, and how to do it.
If you'd rather not wait, and aren't particularly interested in the details, you can check out this repository that will allow you to connect a PostgreSQL database, vectorize it, and query it using Weaviate.
What are vector databases?
Vector databases are designed to efficiently store, manage, and query high-dimensional vectors. These vectors represent data points in a multi-dimensional space, where each dimension corresponds to a specific feature or attribute of the data. This differs from relational databases which store structured data in tables and rows.
A vector is just a list of numbers which represent data in a way that makes it easy for computers to compare and search through. In vector databases, instead of, or in addition to, storing traditional data like text or numbers, it also stores these vectors. Vectors can represent various things, like images or sounds. So, if you want to find something conceptually similar to a specific vector, a vector database can help you do that easily and quickly, where it would be quite difficult to do with a traditional relational database.
These multi-dimensional spaces that store vectors are called embeddings. Embeddings allow for vectors to be organized in a way that makes it easy to find similar vectors. You can think of these vectors as being organized where similar vectors are close together, and dissimilar vectors are far apart. This allows for fast and efficient querying of similar data points.
Why do we need to vectorize relational data?
There are a number of use cases for vectorizing relational data. However, the most popular use case is to enable integration with Large Language Models (LLMs), like ChatGPT. These models are trained on large amounts of text data, and are able to generate text that is similar to the text they were trained on.
In order for our data to be used by these models, we need to convert it into a vector representation. This is called vectorization. Once our data is vectorized, we can use it with these models to provide more context and generate more accurate results.
These results can improve the user experience of your application. For example, if you're building a recommendation system for podcasts, you can use the vectorized representation of the episode a user is currently listening to, and recommend similar episodes or podcasts.
Guide
In the steps below, we'll look at the technique for vectorizing PostgreSQL data. There are different platform-specific libraries and tools for vectorizing data, but we'll be using Weaviate for this guide. Weaviate is an open-source vector database that allows you to vectorize your data and query it using GraphQL. You can connect Weaviate to Hasura using our Weaviate connector.
- A Weaviate account
- An OpenAI API key
- Either NodeJS or Python installed
- A PostgreSQL database (consider the docs sample app 🎉)
Step 1: Create your local project
- NodeJS
- Python
Create a new NodeJS project:
npm init -y
Modify the package.json to use modules instead of CommonJS:
{
  "type": "module"
}
Install the dependencies:
npm i pg weaviate-ts-client
We'll use the pg library to connect to our PostgreSQL database, and the weaviate-ts-client library to connect to
Weaviate and vectorize our data.
Create a new Python project:
mkdir vectorize-postgresql-data && cd vectorize-postgresql-data && touch index.py
Install the dependencies:
pip install psycopg2 weaviate-client
We'll use the psycopg2 library to connect to our PostgreSQL database, and the weaviate-client library to connect to
Weaviate and vectorize our data.
Step 2: Add your configuration details
- NodeJS
- Python
Create an index.js file in your project directory, and add the following code:
import pkg from 'pg';
const { Pool } = pkg;
import weaviate, { ApiKey } from 'weaviate-ts-client';

// We'll pass the table name as an argument to our script
const table = process.argv[2];

// Create a connection to your PostgreSQL database
const db = new Pool({
  connectionString: '<YOUR_POSTGRES_URL>',
});

// Create a connection to Weaviate
const client = weaviate.client({
  scheme: 'https',
  host: '<YOUR_WEAVIATE_URL_WITHOUT_HTTP_OR_HTTPS>',
  apiKey: new ApiKey('<YOUR_WEAVIATE_API_KEY>'),
  headers: { 'X-OpenAI-Api-Key': '<YOUR_OPENAI_API_KEY>' },
});
In your index.py file, add the following code:
import sys
import psycopg2
from psycopg2 import extras
from datetime import datetime
import weaviate
import weaviate_helper as helper

# Establish a connection
conn = psycopg2.connect('<YOUR_CONNECTION_STRING>')

# Create a cursor
cur = conn.cursor()

# Shape the connection string
connection_string = "<YOU_WEAVIATE_URL_WITH_HTTP_OR_HTTPS>"

# Add the auth config
auth_config = weaviate.AuthApiKey(api_key='<YOUR_WEAVIATE_API_KEY>')

# Create the Weaviate client
client = weaviate.Client(url=connection_string, auth_client_secret=auth_config, additional_headers={
    "X-OpenAI-Api-Key": "YOUR_OPENAI_API_KEY"
})
Step 3: Write the query to fetch your data
Next, we'll need to fetch the actual data we'll be vectorizing. We'll write a function that will fetch the data from our PostgreSQL database, and return it.
- NodeJS
- Python
// configuration above

async function getData(table) {
  const { rows } = await db.query(`SELECT * FROM ${table}`);
  return rows;
}
# using the argument we'll pass when we run the script, we'll identify the table we want to vectorize
table = sys.argv[1]

# Create a cursor
cur = conn.cursor(cursor_factory=extras.RealDictCursor)


# function to get the schema of a table as a dictionary with column names as keys and data types as values
def get_schema(table):
    cur.execute(
        f"SELECT column_name, data_type FROM information_schema.columns WHERE table_name = '{table}'")
    schema = cur.fetchall()
    return schema

# get the schema of the table and shape it
schema = get_schema(table)
schema = {row['column_name']: row['data_type'] for row in schema}
schema[f'{table}_id'] = schema.pop('id')

# function to get the data from a table
cur.execute(f"SELECT * FROM {table}")
data = cur.fetchall()
Step 4: Write a function to batch and add your data to Weaviate
- NodeJS
- Python
We'll create an async function called addDocuments that takes a className - which will be the same as the table's
name - and our table's data. It processes the data by creating objects in batches of 100 that we can then add to
Weaviate.
// function to add our documents to Weaviate
const addDocuments = async (className, data) => {
  let batcher = client.batch.objectsBatcher();
  let counter = 0;
  const batchSize = 100;

  for (const document of data) {
    const obj = {
      class: className,
      properties: { ...document },
    };

    batcher = batcher.withObject(obj);
    if (counter++ == batchSize) {
      await batcher.do();
      counter = 0;
      batcher = client.batch.objectsBatcher();
    }
  }

  const res = await batcher.do();
  return res;
};
# transform the id into <className>_id to avoid conflicts since weaviate reserves the id field
for row in data:
        row[f'{table}_id'] = row.pop('id')

def add_to_weaviate(schema, table, data):
    def create_custom_class(class_name, schema):
        properties = [
            {
                "name": prop_name,
                "dataType": [data_type],
            }
            for prop_name, data_type in schema.items()
        ]

        print(properties)
        helper.convert_data_types(properties)

        class_obj = {
            "class": class_name,
            "properties": properties,
            "vectorizer": "text2vec-openai",
            "moduleConfig": {
                "text2vec-openai": {
                    "vectorizeClassName": False,
                    "model": "ada",
                    "modelVersion": "002",
                    "type": "text"
                }
            }
        }
        return class_obj

    class_obj = create_custom_class(table, schema)
    client.schema.create_class(class_obj)

    with client.batch() as batch:
        for item in data:
            # Check if the item is a dictionary
            if isinstance(item, dict):
                for key, value in item.items():
                    # Check if the value is a datetime object
                    if isinstance(value, datetime):
                        # Convert the datetime object to a string
                        item[key] = value.isoformat()

            batch.add_data_object(
                class_name=table,
                data_object=item
            )

    return f"✅ {len(data)} objects added to Weaviate"

# We'll also need to run our application
def main():
    print(add_to_weaviate(schema, table, data))

if __name__ == "__main__":
    main()
Step 5: Write the vectorization function
- NodeJS
- Python
With our data batched, we can now write a function that will utilize it and vectorize our data.
// function to vectorize our documents
async function vectorize(className, data) {
  let newDocuments;

  try {
    // transform the id into <className>_id to avoid conflicts since weaviate reserves the id field
    data.forEach(document => {
      document[`${className}_id`] = document.id;
      delete document.id;
    });

    const classObj = {
      class: className,
      vectorizer: 'text2vec-openai',
      moduleConfig: {
        'text2vec-openai': {
          model: 'ada',
          modelVersion: '002',
          type: 'text',
        },
      },
    };

    try {
      const schema = await client.schema.classCreator().withClass(classObj).do();
      if (schema) {
        console.log(`✅ Schema created ${schema}`);
      }
    } catch (err) {
      console.error(`❌ schema already exists`);
    }

    console.log(`⏲️ Adding ${data.length} documents to ${className} class`);
    newDocuments = await addDocuments(className, data);

    // Look at those vectors 👀
    console.log(newDocuments);
  } catch (err) {
    console.error(err.message);
  }
  return newDocuments;
}
Click to see the full code
import pkg from 'pg';
const { Pool } = pkg;
import weaviate, { ApiKey } from 'weaviate-ts-client';

// We'll pass the table name as an argument to our script
const table = process.argv[2];

// Create a connection to your PostgreSQL database
const db = new Pool({
  connectionString: '<YOUR_POSTGRES_URL>',
});

// Create a connection to Weaviate
const client = weaviate.client({
  scheme: 'https',
  host: '<YOUR_WEAVIATE_URL_WITHOUT_HTTP_OR_HTTPS>',
  apiKey: new ApiKey('<YOUR_WEAVIATE_API_KEY>'),
  headers: { 'X-OpenAI-Api-Key': '<YOUR_OPENAI_API_KEY>' },
});

// function to retrieve our data
async function getData(table) {
  const { rows } = await db.query(`SELECT * FROM ${table}`);
  return rows;
}

const data = await getData(table);

const addDocuments = async (className, data) => {
  let batcher = client.batch.objectsBatcher();
  let counter = 0;
  const batchSize = 100;

  for (const document of data) {
    const obj = {
      class: className,
      properties: { ...document },
    };

    batcher = batcher.withObject(obj);
    if (counter++ == batchSize) {
      await batcher.do();
      counter = 0;
      batcher = client.batch.objectsBatcher();
    }
  }

  const res = await batcher.do();
  return res;
};

async function vectorize(className, data) {
  let newDocuments;

  try {
    // remove the id column from the data as it angers Weaviate
    data.forEach(document => {
      delete document.id;
    });

    const classObj = {
      class: className,
      vectorizer: 'text2vec-openai',
      moduleConfig: {
        'text2vec-openai': {
          model: 'ada',
          modelVersion: '002',
          type: 'text',
        },
      },
    };

    try {
      const schema = await client.schema.classCreator().withClass(classObj).do();
      if (schema) {
        console.log(`✅ Schema created ${schema}`);
      }
    } catch (err) {
      console.error(`❌ schema already exists`);
    }

    console.log(`⏲️ Adding ${data.length} documents to ${className} class`);
    newDocuments = await addDocuments(className, data);

    // Look at those vectors 👀
    console.log(newDocuments);
  } catch (err) {
    console.error(err.message);
  }
  return newDocuments;
}

// vectorize our data
vectorize(table, data);
You can then run the script by passing the table name as an argument:
node index.js <YOUR_TABLE_NAME>
We'll need to create a second file in the same directory called, weaviate_helper.py. This file will contain a helper
function that will convert the data types of our PostgreSQL data to Weaviate data types:
def convert_data_types(properties):
    print(properties)
    valid_data_type_map = {
        "uuid": "text",
        "string": "text",
        "integer": "int",
        "float": "number",
        "timestamp with time zone": "text",
        "bool": "boolean",
        "datetime": "date",
        "phone_number": "phoneNumber",
    }

    converted_properties = []

    for prop in properties:
        prop_name = prop.get("name")
        data_type = prop.get("dataType")
        data_type = data_type[0]

        if data_type is None:
            raise ValueError(
                f"Property '{prop_name}' is missing the 'dataType' key.")

        converted_data_type = valid_data_type_map.get(data_type.lower())

        if converted_data_type is None:
            prop["dataType"] = [data_type]
        else:
            prop["dataType"] = [converted_data_type]
        converted_properties.append(prop)

    return converted_properties
This function is used in index.py when we call the create_custom_class function.
Click to see the full code
For index.py:
# index.py
import sys
import psycopg2
from psycopg2 import extras
from datetime import datetime
import weaviate
import weaviate_helper as helper

# Establish a connection
conn = psycopg2.connect('<YOUR_CONNECTION_STRING>')

# Create a cursor
cur = conn.cursor()

# Shape the connection string
connection_string = "<YOU_WEAVIATE_URL_WITH_HTTP_OR_HTTPS>"

# Add the auth config
auth_config = weaviate.AuthApiKey(api_key='<YOUR_WEAVIATE_API_KEY>')

# Create the Weaviate client
client = weaviate.Client(url=connection_string, auth_client_secret=auth_config, additional_headers={
    "X-OpenAI-Api-Key": "YOUR_OPENAI_API_KEY"
})

# using the argument we'll pass when we run the script, we'll identify the table we want to vectorize
table = sys.argv[1]

# Create a cursor
cur = conn.cursor(cursor_factory=extras.RealDictCursor)


# function to get the schema of a table as a dictionary with column names as keys and data types as values
def get_schema(table):
    cur.execute(
        f"SELECT column_name, data_type FROM information_schema.columns WHERE table_name = '{table}'")
    schema = cur.fetchall()
    return schema

# get the schema of the table and shape it
schema = get_schema(table)
schema = {row['column_name']: row['data_type'] for row in schema}
schema[f'{table}_id'] = schema.pop('id')

# function to get the data from a table
cur.execute(f"SELECT * FROM {table}")
data = cur.fetchall()

# transform the id into <className>_id to avoid conflicts since weaviate reserves the id field
for row in data:
        row[f'{table}_id'] = row.pop('id')

def add_to_weaviate(schema, table, data):
    def create_custom_class(class_name, schema):
        properties = [
            {
                "name": prop_name,
                "dataType": [data_type],
            }
            for prop_name, data_type in schema.items()
        ]

        print(properties)
        helper.convert_data_types(properties)

        class_obj = {
            "class": class_name,
            "properties": properties,
            "vectorizer": "text2vec-openai",
            "moduleConfig": {
                "text2vec-openai": {
                    "vectorizeClassName": False,
                    "model": "ada",
                    "modelVersion": "002",
                    "type": "text"
                }
            }
        }
        return class_obj

    class_obj = create_custom_class(table, schema)
    client.schema.create_class(class_obj)

    with client.batch() as batch:
        for item in data:
            # Check if the item is a dictionary
            if isinstance(item, dict):
                for key, value in item.items():
                    # Check if the value is a datetime object
                    if isinstance(value, datetime):
                        # Convert the datetime object to a string
                        item[key] = value.isoformat()

            batch.add_data_object(
                class_name=table,
                data_object=item
            )

    return f"✅ {len(data)} objects added to Weaviate"

def main():
    print(add_to_weaviate(schema, table, data))

if __name__ == "__main__":
    main()
For weaviate_helper.py:
# weaviate_helper.py
def convert_data_types(properties):
    print(properties)
    valid_data_type_map = {
        "uuid": "text",
        "string": "text",
        "integer": "int",
        "float": "number",
        "timestamp with time zone": "text",
        "bool": "boolean",
        "datetime": "date",
        "phone_number": "phoneNumber",
    }

    converted_properties = []

    for prop in properties:
        prop_name = prop.get("name")
        data_type = prop.get("dataType")
        data_type = data_type[0]

        if data_type is None:
            raise ValueError(
                f"Property '{prop_name}' is missing the 'dataType' key.")

        converted_data_type = valid_data_type_map.get(data_type.lower())

        if converted_data_type is None:
            prop["dataType"] = [data_type]
        else:
            prop["dataType"] = [converted_data_type]
        converted_properties.append(prop)

    return converted_properties
You can then run the script by passing the table name as an argument:
python index.py <YOUR_TABLE_NAME>
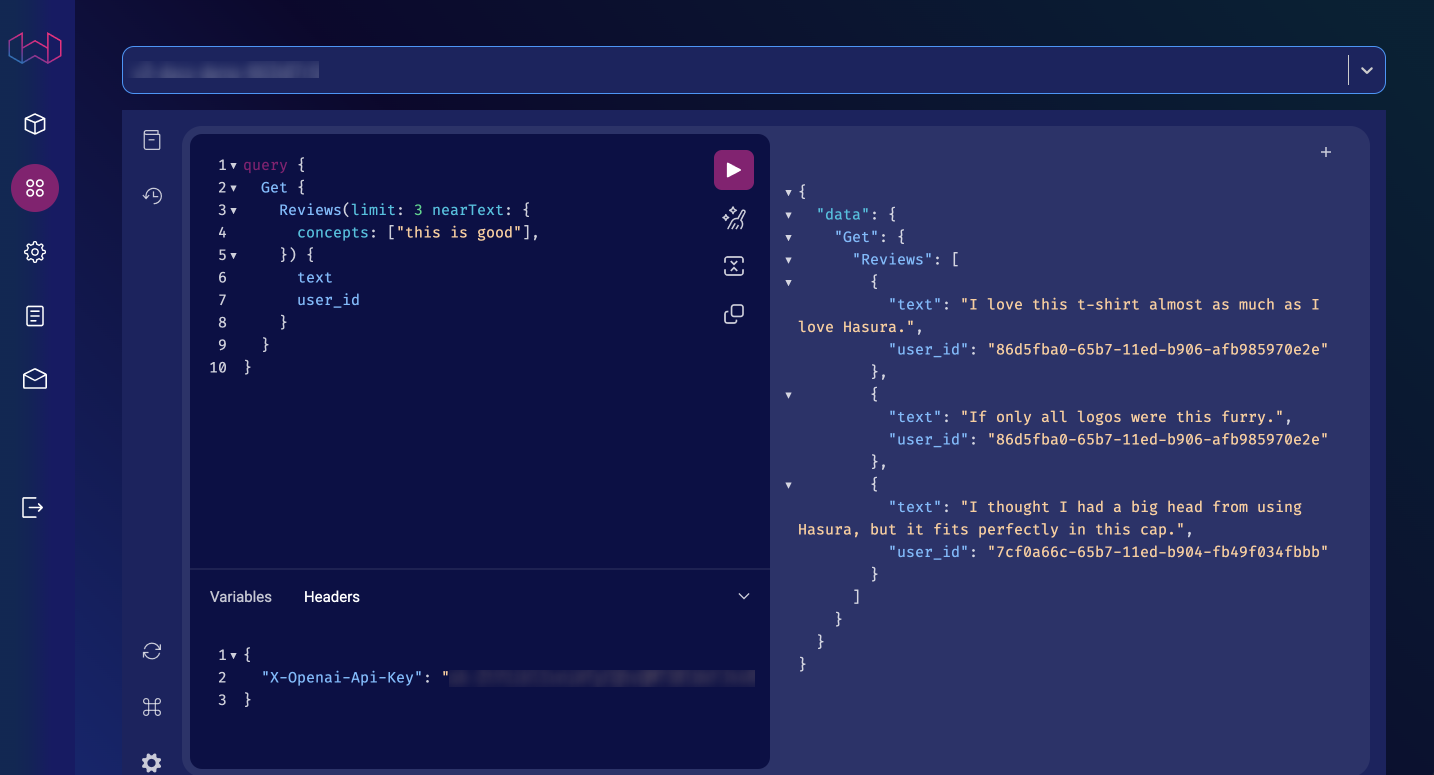
Step 6: Query your vectorized data
On the Weaviate console, you should now be able to query your data using features such as nearText and nearVector:
query {
  Get {
    <CLASS_NAME> (nearText: {
      concepts: ["<TEXT_TO_SEARCH>"]
    }) {
      <FIELDS_TO_SEARCH>
    }
  }
}
nearText vs nearVectornearText is used to search for text that is similar to the text you pass in the concepts argument. This is useful
when you want to search for text that is similar to a specific word or phrase.
nearVector is used to search for vectors that are similar to the vector you pass in the vector argument. This is
useful when you want to search for vectors that are similar to a specific vector.
To utilize these LLM features, you'll need to pass your OpenAI API key in the X-OpenAI-Api-Key header:
{ "X-Openai-Api-Key": "<YOUR_OPENAI_API_KEY>" }
Next steps
That's it! You've successfully vectorized your PostgreSQL data. You can now use it to train your own models, or query it using Weaviate. However, data is constantly changing, and you'll need to keep your data up to date.
Hasura helps you solve this by utilizing Event Triggers to automatically update your vectorized data in Weaviate. Check out our guide to use Hasura Notebook and learn how you can keep your data up to date.
When you combine Hasura with vectorized data, you can build powerful applications that utilize the latest in AI and ML with a secure API layer. Learn more by checking out these resources: