Console SSO with Auth0
Introduction
Auth0 is a rapidly integrable authentication and authorization service. You can use it easily to manage admin users, integrate SSO with Hasura GraphQL Engine or act as middleware to connect non-OAuth compliant identity providers (IdP).
This guide assumes you have a Hasura GraphQL Engine instance running with a valid license key. If you don't have one, you can get a license key via a 30-day free trial or by contacting the Hasura team.
SSO for LDAP is supported from versions v2.25.0 and above.
Get started
You can try the SSO configuration with this demo. The demo uses OpenLDAP to integrate with Dex. You can clone the repository, edit the EE License Key environment variable, and start up Docker Compose services.
git clone https://github.com/hasura/ee-sso-demo.git
cd ee-sso-demo
cp dotenv .env
docker-compose up -d
Finally, browse http://localhost:8080 and try the SSO login.
OAuth 2.0 / OpenID Connect
Step 1: Configure Auth0
After creating an Auth0 application, go to the Settings tab and configure:
- Application URIs:
- Set
Allowed Callback URLsto match the callback URL of the Hasura Console, e.ghttp://localhost:8080/console/oauth2/callback - Set
Allowed Web Originsto match the origin of the Hasura Console, e.ghttp://localhost:8080
- Set
- Cross-Origin Authentication:
- Enable the
Allow Cross-Origin Authenticationsetting. - Set
Allowed Origins (CORS)to match the origin of the Hasura Console, e.g:http://localhost:8080
- Enable the
- Open the
Advanced Settingsaccordion at the bottom:- Switch to the tab
Grant Typesand enable theAuthorization Codecheckbox. - Switch to the
Endpointstab and note down required configuration values for Hasura SSO:authorization_url: OAuth Authorization URLrequest_token_url: OAuth Token URLjwt_secret.jwk_url: JSON Web Key Set
- Switch to the tab
Save changes and note the Client ID in the Basic Information section. We'll need this later.
By default, OAuth0 doesn't include the role value in JWT claims. We need to either:
- Force the
adminrole to thejwt_secret.claims_mapmappings field in theHASURA_GRAPHQL_SSO_PROVIDERSconfiguration:
{
  "jwt_secret": {
    // ...
    "claims_map": {
      "x-hasura-allowed-roles": ["admin"],
      "x-hasura-default-role": "admin"
    }
  }
}
- Or, add an Auth0 action or legacy Auth pipeline to add the role claim into the JWT payload.
For better security, or if your Auth0 application is reused for many different client applications, you should create an admin role for the privileged user and add the role to JWT claims:
- Go to the
User Management -> Rolespage, and create a new role with the nameadmin. - Assign some users with that role to verify later.
- Go to the
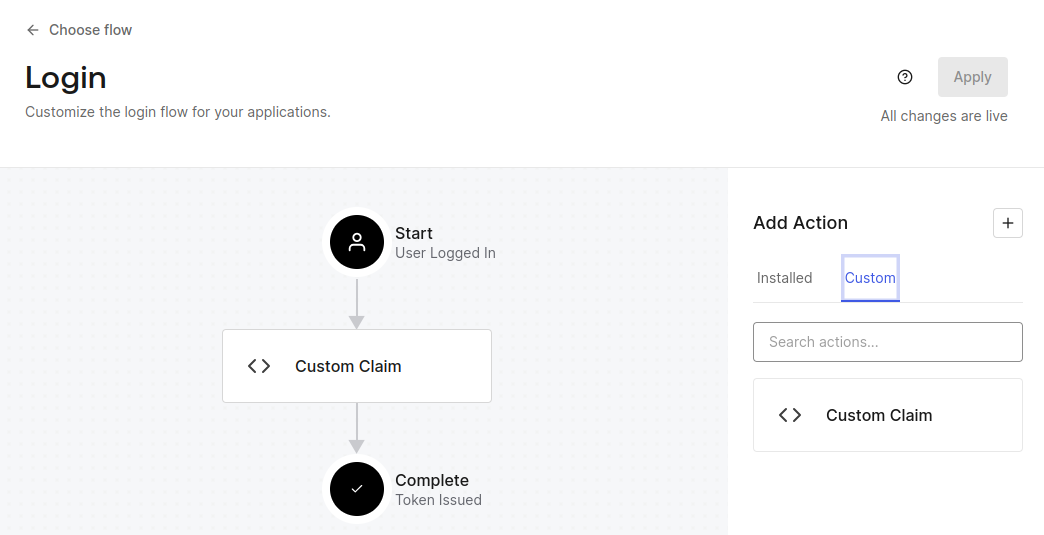
Actions -> Flowspage, choose theLoginflow, and add a custom action to add claims.
/**
 * Handler that will be called during the execution of a PostLogin flow.
 *
 * @param {Event} event - Details about the user and the context in which they are logging in.
 * @param {PostLoginAPI} api - Interface whose methods can be used to change the behavior of the login.
 */
exports.onExecutePostLogin = async (event, api) => {
  const namespace = 'https://hasura.io/jwt/claims';
  if (event.authorization) {
    const claims = {
      'x-hasura-default-role': event.authorization.roles[0],
      'x-hasura-allowed-roles': event.authorization.roles,
      'x-hasura-user-id': event.user.user_id,
    };
    api.idToken.setCustomClaim(namespace, claims);
  }
};
- Deploy the action.
- Head back to the flow and drag the custom action to the center of the flow diagram.
Step 2: Configure Hasura
The table below describes the configuration options for Auth0 SSO. Hasura GraphQL Engine will expect these values to be
set as the value of the
HASURA_GRAPHQL_SSO_PROVIDERS environment
variable:
| Key | Example | Description |
|---|---|---|
client_id | <client-id> | The Client ID of Auth0 application |
admin_roles | ["admin"] | X-hasura-roles that should be given admin access to Console |
name | Auth0 Login | A display name for this login method on the Console |
authorization_url | <OAuth Authorization URL> | Endpoint of Auth0 application for auth request, should be reachable from browser |
request_token_url | <OAuth Token URL> | Endpoint of Auth0 application for token request, should be reachable from browser |
scope | openid | Oauth2 scopes to be used against Auth0 application |
jwt_secret.type | RS256 | Key type Auth0 application is configured with |
jwt_secret.jwk_url | <JSON Web Key Set> | JWK URL that is published by Auth0 application |
jwt_secret.issuer | https://some-auth0-app.us.auth0.com/ | Issuer that is configured with Auth0, this is typically the base OAuth URL of the Auth0 application |
Using the information above as an example, you can configure the HASURA_GRAPHQL_SSO_PROVIDERS environment variable as
follows:
[
  {
    "client_id": "<Auth0 Client ID>",
    "admin_roles": ["admin"],
    "name": "Auth0 Login",
    "authorization_url": "https://some-auth0-app.us.auth0.com/authorize",
    "request_token_url": "https://some-auth0-app.us.auth0.com/oauth/token",
    "scope": "openid",
    "jwt_secret": {
      "type": "RS256",
      "jwk_url": "https://some-auth0-app.us.auth0.com/.well-known/jwks.json",
      "issuer": "https://some-auth0-app.us.auth0.com/"
    }
  }
]
For guidance on setting environment variables or flags for Hasura GraphQL Engine, see server configuration.
Step 3: Deploy and Log in
At this point, you should see a Auth0 Login option on the Hasura Console. Now, you're ready to log in with your Auth0
account 🎉

SAML
The Auth0 application also supports SAML 2.0. Though, the OAuth configuration is simpler to integrate. You can try it to verify with Dex integration.
Step 1: Configure Auth0
The configuration is similar to the OAuth 2.0 / OpenID Connect with some extra configurations:
- Go to
Application -> Addons taband enable theSAML2 WEB APPplugin. - The
Settingsdialog will be opened. You need to add the Dex endpoint intoApplication Callback URLtextbox (e.g.,http://localhost:5556/dex/callback). - After saving, switch to the
Usagetab and note down required values for Dex connector configuration:- The SSO URL (Identity Provider Login URL).
- Issuer:
urn:some-auth0-app.us.auth0.com. - Download Auth0 certificate (Identity Provider Certificate) to the configuration folder of Dex.
Auth0 doesn't include roles in attributes of the XML response either. We need to add the roles field to custom claims.
/**
 * Handler that will be called during the execution of a PostLogin flow.
 *
 * @param {Event} event - Details about the user and the context in which they are logging in.
 * @param {PostLoginAPI} api - Interface whose methods can be used to change the behavior of the login.
 */
exports.onExecutePostLogin = async (event, api) => {
    api.idToken.setCustomClaim('roles', event.authorization.roles);
  }
};
Auth0 automatically serializes custom claims into XML attributes with the http://schemas.auth0.com/ prefix (e.g.,
http://schemas.auth0.com/roles).
Step 2: Configure Hasura
The table below describes the configuration options for Auth0 SAML SSO. Hasura GraphQL Engine will expect these values
to be set as the value of the
HASURA_GRAPHQL_SSO_PROVIDERS environment
variable:
| Key | Example | Description |
|---|---|---|
client_id | dex-login | Any name identifying the Dex client |
admin_roles | ["admin"] | X-hasura-roles that should be given admin access to Console |
name | Dex Login | A display name for this login method on the Console |
authorization_url | http://dex-endpoint-from-browser:port/dex/auth | Endpoint of Dex for auth request, should be reachable from browser |
request_token_url | http://dex-endpoint-from-browser:port/dex/token | Endpoint of Dex for token request, should be reachable from browser |
scope | openid offline_access groups | Oauth2 scopes to be used against Dex |
jwt_secret.type | RS256 | Key type Dex is configured with |
jwt_secret.jwk_url | http://dex-endpoint-from-hasura:port/dex/keys | JWK URL that is published by dex |
jwt_secret.issuer | http://dex-endpoint-from-browser:port/dex | Issuer that is configured with Dex, same as issuer in Dex configuration, this is typically the endpoint at which Dex can be reached at |
jwt_secret.claims_map | {"x-hasura-allowed-roles": {"path": "$.groups"},"x-hasura-default-role": {"path": "$.groups[0]"}} | Mapping groups parsed by Dex to roles on Hasura |
Using the information above as an example, you can configure the HASURA_GRAPHQL_SSO_PROVIDERS environment variable as
follows:
[
  {
    "client_id": "dex-login",
    "admin_roles": ["admin", "admins"],
    "name": "Dex Login",
    "authorization_url": "http://localhost:5556/dex/auth",
    "request_token_url": "http://localhost:5556/dex/token",
    "scope": "openid offline_access groups",
    "jwt_secret": {
      "type": "RS256",
      "jwk_url": "http://dex:5556/dex/keys",
      "issuer": "http://localhost:5556:5556/dex",
      "claims_map": {
        "x-hasura-allowed-roles": {
          "path": "$.groups"
        },
        "x-hasura-default-role": {
          "path": "$.groups[0]"
        }
      }
    }
  }
]
For guidance on setting environment variables or flags for Hasura GraphQL Engine, see server configuration.
Step 3: Configure Dex
Your Dex configuration will need the following fields set to enable SAML SSO. You can find a sample configuration file
below. This file should be saved in the /dex directory of your container.
Issuer
The base path of Dex and the external name of the OpenID Connect service. This is the canonical URL that all clients must use to refer to Dex. If a path is provided, Dex's HTTP service will listen at a non-root URL. This is the public URL at which Dex is available.
Example:
http://dex-domain:5556/dex
Static clients
This contains the id and redirectURIs. The id will reference the client_id in the Hasura configuration. The
redirectURIs will be the oauth callback URL of Hasura Console, which is at
http(s)://<hasura-endpoint>/console/oauth2/callback.
Example:
staticClients:
  - id: dex-login
    redirectURIs:
      - 'http://localhost:8080/console/oauth2/callback'
    name: 'Dex Login'
    public: true
Connectors
The connectors field is an array of objects that define the various connectors being used in the Dex configuration. Each
object in the array contains a type field that specifies the type of connector being used. Here, we'll use
type: saml along with a series of fields that are specific to the SAML connector.
connectors:
  - type: saml
    id: saml-auth0
    name: Auth0 SAML
    config:
      ssoURL: https://some-auth0-app.us.auth0.com/samlp/xxxxxxxx
      ca: /etc/dex/saml-ca.pem
      # insecureSkipSignatureValidation: true
      redirectURI: http://localhost:5556/dex/callback
      usernameAttr: http://schemas.auth0.com/name
      emailAttr: http://schemas.auth0.com/email
      groupsAttr: http://schemas.auth0.com/roles
      entityIssuer: urn:some-auth0-app.us.auth0.com
Sample configuration file for Dex
Click here to see a sample configuration file for Dex.
# The base path of dex and the external name of the OpenID Connect service.
# This is the canonical URL that all clients MUST use to refer to dex. If a
# path is provided, dex's HTTP service will listen at a non-root URL.
# Public URL that dex is available at
issuer: http://localhost:5556/dex

# The storage configuration determines where dex stores its state. Supported
# options include SQL flavors and Kubernetes third party resources.
#
# See the documentation (https://dexidp.io/docs/storage/) for further information.
storage:
  type: sqlite3
  config:
    file: /var/dex/dex.db

# Configuration for the HTTP endpoints.
web:
  http: 0.0.0.0:5556
  allowedOrigins: ['*']
  # Uncomment for HTTPS options.
  # https: 127.0.0.1:5554
  # tlsCert: /etc/dex/tls.crt
  # tlsKey: /etc/dex/tls.key

# Uncomment this block to enable configuration for the expiration time durations.
# Is possible to specify units using only s, m and h suffixes.
# expiry:
#   deviceRequests: "5m"
#   signingKeys: "6h"
#   idTokens: "24h"
#   refreshTokens:
#     reuseInterval: "3s"
#     validIfNotUsedFor: "2160h" # 90 days
#     absoluteLifetime: "3960h" # 165 days

# Options for controlling the logger.
# logger:
#   level: "debug"
#   format: "text" # can also be "json"

oauth2:
  responseTypes: ['code'] # also allowed are "token" and "id_token"
  skipApprovalScreen: true
#
staticClients:
  - id: dex-login
    redirectURIs:
      - 'http://localhost:8080/console/oauth2/callback'
    name: 'Dex Login'
    public: true

connectors:
  - type: saml
    id: saml-auth0
    name: Auth0 SAML
    config:
      ssoURL: https://some-auth0-app.us.auth0.com/samlp/xxxxxxxx
      ca: /etc/dex/saml-ca.pem
      # insecureSkipSignatureValidation: true
      redirectURI: http://localhost:5556/dex/callback
      usernameAttr: http://schemas.auth0.com/name
      emailAttr: http://schemas.auth0.com/email
      groupsAttr: http://schemas.auth0.com/roles
      entityIssuer: urn:some-auth0-app.us.auth0.com
Step 4: Update your deployment
Finally, you'll need to configure your deployment with these changes. Here is a Docker Compose example, with the configuration:
version: '3.8'

services:
  postgres:
    image: postgres:15
    restart: always
    volumes:
      - postgres_data:/var/lib/postgresql/data
    ports:
      - '5432'
    environment:
      POSTGRES_PASSWORD: postgrespassword

  hasura-pro:
    image: hasura/graphql-engine:v2.25.0
    ports:
      - '8080:8080'
    depends_on:
      - postgres
    restart: always
    environment:
      HASURA_GRAPHQL_EE_LICENSE_KEY: <YOUR_EE_LICENSE_KEY>
      HASURA_GRAPHQL_ADMIN_SECRET: <YOUR_ADMIN_SECRET>
      HASURA_METADATA_DATABASE_URL: postgres://postgres:postgrespassword@postgres:5432/postgres?sslmode=disable
      PG_DATABASE_URL: postgres://postgres:postgrespassword@postgres:5432/postgres?sslmode=disable
      HASURA_GRAPHQL_ENABLE_CONSOLE: 'true'
      HASURA_GRAPHQL_DEV_MODE: 'true'
      HASURA_GRAPHQL_ENABLED_LOG_TYPES: startup,http-log,webhook-log,websocket-log,query-log
      HASURA_GRAPHQL_ENABLED_APIS: metadata,graphql,config,metrics
      HASURA_GRAPHQL_METRICS_SECRET: <YOUR_METRICS_SECRET>
      HASURA_GRAPHQL_CONSOLE_ASSETS_DIR: /srv/console-assets
      HASURA_GRAPHQL_SSO_PROVIDERS:
        '[{"client_id": "dex-login","admin_roles": ["admin", "authors"], "name": "Dex Login","authorization_url":
        "http://127.0.0.1:5556/dex/auth","request_token_url": "http://127.0.0.1:5556/dex/token","scope": "openid
        offline_access groups","jwt_secret": {"type": "RS256","jwk_url": "http://dex:5556/dex/keys","issuer":
        "http://127.0.0.1:5556/dex","claims_map": {"x-hasura-allowed-roles": { "path": "$.groups"
        },"x-hasura-default-role": { "path": "$.groups[0]" }}}}]'

  dex:
    image: dexidp/dex
    restart: always
    volumes:
      - ./dex/config.docker.yaml:/etc/dex/config.docker.yaml
    ports:
      - '5556:5556'

volumes:
  postgres_data:
Step 5: Log in
At this point, you should see a Dex Login option on the Hasura Console. Now, you're ready to log in with your LDAP
account 🎉