


Data validations
Table of contents
Overview
Many times, we need to perform validations of input data before inserting or updating objects.
The best solution to implement a validation depends on the complexity of the validation logic and the layer where you would like to add it.
- If you would like the validation logic to be a part of your database schema, Postgres check constraints or triggers would be ideal solutions to add your validation.
- If you would like the validation logic to be at the GraphQL API layer, Hasura permissions can be used to add your validation.
- If the validation logic requires complex business logic and/or needs information from external sources, you can use Hasura Actions to perform your validation.
These solutions are explained in some more detail below.
Using Postgres check constraints
If the validation logic can be expressed by using only static values and the columns of the table, you can use Postgres check constraints.
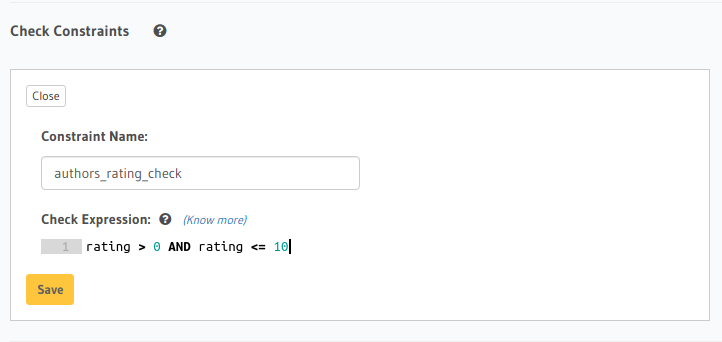
Example: Check that the rating for an author is between 1 and 10 only.
Let’s say we have the following table in our schema:
author (id uuid, name text, rating integer)
We can now add a check constraint to limit the rating values as follows:
Head to the Modify tab in the table page and add a check
constraint in the Check Constraints section:
Create a migration manually and add the following SQL statement to the up.sql file:
ALTER TABLE author
ADD CONSTRAINT authors_rating_check CHECK (rating > 0 AND rating <= 10);
Add the following statement to the down.sql file in case you need to roll back the above statement:
ALTER TABLE author DROP CONSTRAINT authors_rating_check;
Apply the migration by running:
hasura migrate apply
You can add a check constraint by using the run_sql metadata API:
POST /v1/query HTTP/1.1
Content-Type: application/json
X-Hasura-Role: admin

{
  "type": "run_sql",
  "args": {
    "sql": "ALTER TABLE author ADD CONSTRAINT authors_rating_check CHECK (rating > 0 AND rating <= 10);"
  }
}
If someone now tries to add an author with a rating of 11, the following
error is thrown:
mutation {
  insert_author(
    objects: {
      name: "Enid Blyton",
      rating: 11
    }) {
      affected_rows
    }
}
Learn more about Postgres check constraints.
Using Postgres triggers
If the validation logic is more complex and requires the use of data from other tables and/or functions, then you can use Postgres triggers.
Example: Validate that an article’s content does not exceed a certain number of words.
Suppose we have the following table in our schema:
article (id uuid, title text, content text)
We can now create a Postgres function that checks if an article’s content exceeds a certain number of words, and then add a Postgres trigger that will call this function every time before an article is inserted or updated.
- Head to the
Data -> SQLsection of the Hasura console - Enter the SQL statement below to create a Postgres function and trigger
- Hit the
Runbutton
Create a migration manually and add the SQL statement below to create a Postgres function and trigger to
the up.sql file. Also, add an SQL statement to the down.sql to revert the previous statement in case you need to
roll back the migration.
Apply the migration by running:
hasura migrate apply
You can add a Postgres function and trigger by using the run_sql metadata API:
POST /v1/query HTTP/1.1
Content-Type: application/json
X-Hasura-Role: admin

{
  "type": "run_sql",
  "args": {
    "sql": "<SQL statement below>"
  }
}
CREATE FUNCTION check_content_length()
RETURNS trigger AS $$
DECLARE content_length INTEGER;
BEGIN
  -- split article content into words and get count
  select array_length(regexp_split_to_array(NEW.content, '\s'),1) INTO content_length;

  -- throw an error if article content is too long
  IF content_length > 100 THEN
      RAISE EXCEPTION 'Content can not have more than 100 words';
  END IF;

  -- return the article row if no error
  RETURN NEW;
END;
$$ LANGUAGE plpgsql;

CREATE TRIGGER check_content_length_trigger
  BEFORE INSERT OR UPDATE ON "article"
  FOR EACH ROW
  EXECUTE PROCEDURE check_content_length();
Now, if we try to insert an article whose content has more than 100 words, we’ll receive the following error:
mutation {
  insert_article(
    objects: {
      title: "lorem ipsum"
      content: "Lorem ipsum dolor sit amet, consectetur adipiscing elit. Aenean et nisl dolor. Nulla eleifend odio et velit aliquet, sed convallis quam bibendum. Cras consequat elit quis est vehicula, nec dignissim dolor cursus. Phasellus suscipit magna ac turpis pulvinar ultricies. Nulla sed lacus sed metus egestas scelerisque nec sed urna. Fusce lorem velit, efficitur sed luctus in, fringilla ac urna. Maecenas fermentum augue sit amet malesuada imperdiet. Suspendisse mattis dignissim quam, at tempor dui tincidunt sed. Maecenas placerat erat nec erat aliquet rutrum. Mauris congue velit nec ultrices dapibus. Duis aliquam, est ac ultricies viverra, ante augue dignissim massa, quis iaculis ex dui in ex. Curabitur pharetra neque ac nisl fringilla, vel pellentesque orci molestie.",
    }
  ) {
    affected_rows
  }
}
Learn more about Postgres triggers.
Using Hasura permissions
If the validation logic can be expressed declaratively using static values and data from the database, then you can use row level permissions to perform the validations. (Read more about Authorization).
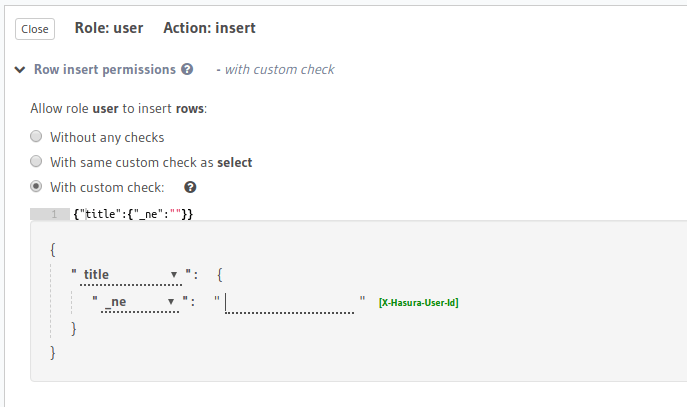
Example 1: Validate that an article can be inserted only if title is not empty.
Suppose, we have the following table in our schema:
article (id uuid, title text, content text, author_id uuid)
Now, we can create a role user and add an insert validation rule as follows:
You can add roles and permissions in the tables.yaml file inside the metadata directory:
  - table:
      schema: public
      name: article
    insert_permissions:
    - role: user
      permission:
        check:
          title:
            _ne: ''
Apply the metadata by running:
hasura metadata apply
You can add an insert permission rule by using the create_insert_permission metadata API:
POST /v1/query HTTP/1.1
Content-Type: application/json
X-Hasura-Role: admin

{
  "type": "create_insert_permission",
  "args": {
    "table": "article",
    "role": "user",
    "permission": {
      "check": {
        "title": {
          "_ne": ""
        }
      }
    }
  }
}
If we try to insert an article with title = "", we will get a permission-error:
mutation {
  insert_article(
    objects: {
      title: ""
      content: "Lorem ipsum dolor sit amet",
    }
  ) {
    affected_rows
  }
}
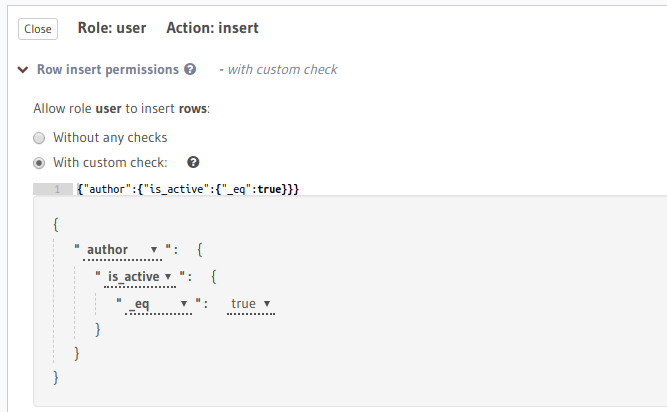
Example 2: Validate that an article can be inserted only if its author is active.
Suppose, we have 2 tables:
author (id uuid, name text, is_active boolean)
article (id uuid, author_id uuid, content text)
Also, suppose there is an object relationship article.author defined as:
article.author_id -> author.id
Now, we can create a role user and add an insert validation rule as follows:
You can add roles and permissions in the tables.yaml file inside the metadata directory:
  - table:
      schema: public
      name: article
    insert_permissions:
    - role: user
      permission:
        check:
          author:
            is_active:
              _eq: true
Apply the metadata by running:
hasura metadata apply
You can add an insert permission rule by using the create_insert_permission metadata API:
POST /v1/query HTTP/1.1
Content-Type: application/json
X-Hasura-Role: admin

{
  "type": "create_insert_permission",
  "args": {
    "table": "article",
    "role": "user",
    "permission": {
      "check": {
        "author": {
          "is_active": true
        }
      }
    }
  }
}
If we try to insert an article for an author for whom is_active = false, we
will receive a permission-error :
mutation {
  insert_article(
    objects: {
      title: "lorem ipsum"
      content: "Lorem ipsum dolor sit amet, consectetur adipiscing elit.",
      author_id: 2
    }
  ) {
    affected_rows
  }
}
Note
Permissions are scoped to a user’s role. So, if a validation check needs to be global then you will have to define it for all roles which have insert/update permissions.
A few features on the roadmap should simplify this experience in the future.
Using Hasura Actions
If the validation requires complex custom business logic and/or needs information from external sources, you can use Actions to perform your validation.
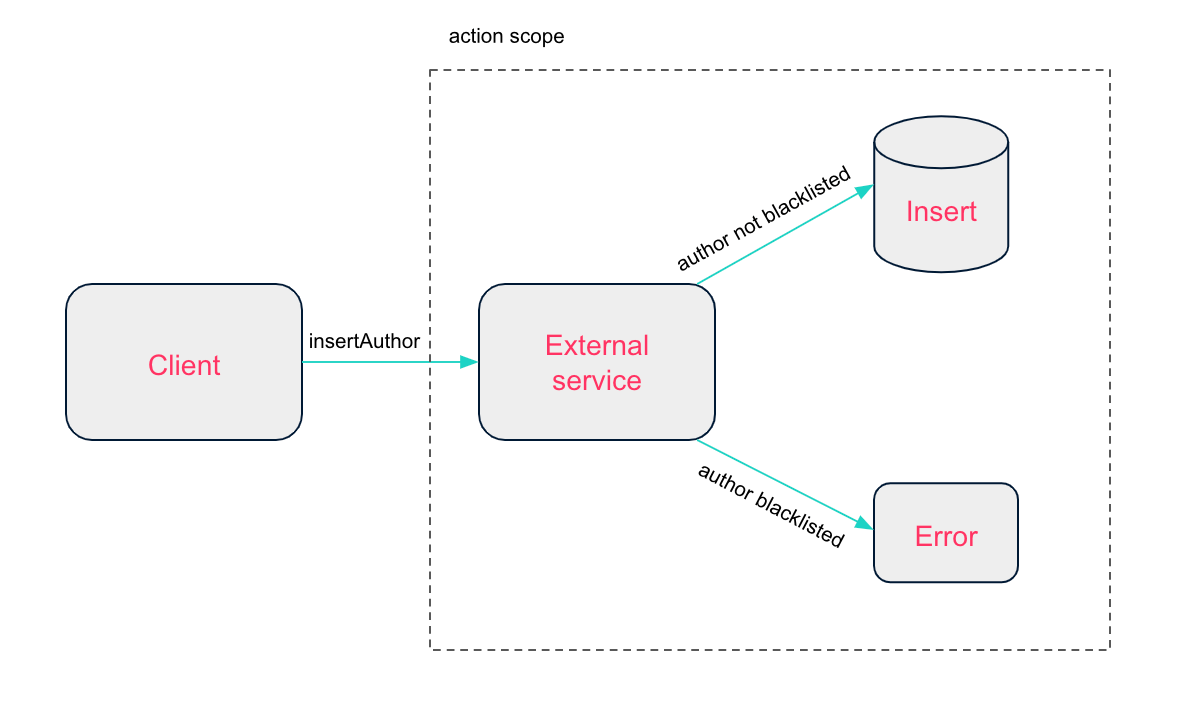
Example: Check with an external service that an author’s name is not deny-listed before inserting them.
Let’s assume we have an external service that stores and manages deny-listed authors. Before inserting an author we need to check with this service if they are deny-listed or not.
The validation process looks as follows:
Actions allow us to define custom types in our GraphQL schema.
We can create a new action called InsertAuthor that takes an author
object with type AuthorInput as input and returns an object of type AuthorOutput.
type Mutation {
  InsertAuthor (author: AuthorInput!): AuthorOutput
}

input AuthorInput {
  name: String!
  rating: Int!
  is_active: Boolean!
}

type AuthorOutput {
  id: Int!
}
The business logic of an action - in our case the author validation - happens in the action handler which is an HTTP webhook which contains the code to call the external service.
The following is a sample code that could be added to the event handler to implement the data validation:
function getDenylistedAuthorsFromApi() {
  // make external api call & return deny-listed authors list
}

function insertAuthorViaHasura() {
  // run insert_author mutation & return response
}

const denylistedAuthors = getDenylistedAuthorsFromApi();

if (denylistedAuthors.includes(author.name)) {
  return res.status(400).json({ message: "Author is deny-listed" });
} else {
  const insertAuthorResponse = insertAuthorViaHasura();

  return res.json(insertAuthorResponse);
}
When we now insert an author, our action handler will be called and it will check if the author is deny-listed.
If it’s not, the author will be inserted and the id will be returned. If the author is deny-listed,
we get the following error message:
mutation insertArticle {
  InsertAuthor(author: { name: "Thanos" }) {
    id
  }
}
Note
For actual examples of data validations with actions, refer to the actions examples repo.
 Thank you for subscribing to our newsletter!