NestJS and Hasura
Acknowledgements
As we tend to forget at times -- a human being wrote this article.
And that human being has other human beings he would like to thank as a first order of business.
Without them this article (and following workshop) would not have been possible.
I owe a great deal of gratitude to:
- Jesse Carter,
@WonderPandaDev, for explaining many of the concepts and fundamentals relayed in this article to me oh-so-many moons ago. Incidentally also the author of the @golevelup/nestjs-hasura modules, and one of the most talented TypeScript developers I've ever met.
- Jay McDoniel,
@jmcdo29, core member of the NestJS team and also fielder of many, many of my questions early on. Quite possibly one of the most knowledgeable people about Nest on Earth, and also un-endingly helpful.
An Invitation
Join us on 2nd September at 9AM PST for a live, hands-on workshop on how to build a fullstack using NestJS, Hasura & GraphQL
Introduction
NestJS is a TypeScript application framework that has been rapidly gaining popularity in recent years. It's garnered quite a reputation, particularly in Enterprise circles -- as much of it's architecture and design patterns are modeled after another well-known Enterprise framework: Java's own Spring Boot.
Under the "Who's using Nest?" section, adoption is seen by the likes of:
- Roche Pharmaceuticals
- Adidas
- Societe Generale
- Autodesk
- Neo4j
- Bytedance (TikTok)
- Many, many others
In their own words, Nest is:
... a framework for building efficient, scalable Node.js server-side applications. It uses progressive JavaScript, is built with and fully supports TypeScript (yet still enables developers to code in pure JavaScript) and combines elements of OOP (Object Oriented Programming), FP (Functional Programming), and FRP (Functional Reactive Programming).
Under the hood, Nest makes use of robust HTTP Server frameworks like Express (the default) and optionally can be configured to use Fastify as well!
Nest provides a level of abstraction above these common Node.js frameworks (Express/Fastify), but also exposes their APIs directly to the developer. This gives developers the freedom to use the myriad of third-party modules which are available for the underlying platform.
In this post, we'll give a general overview to NestJS and it's concepts for those unfamiliar, and then turn towards what practical usage looks like in the context of a Hasura application.
Specifically, we'll look at how to consume a set of modules @golevelup/nestjs-hasura tailor-made for this!
10,000ft View
NestJS is not the easiest platform to onboard to.
Unlike many other JS/TS frameworks, it requires more specialized knowledge than just general understanding of the language.
There are two major concepts that have to be addressed before you can reasonably dive into the code side of things:
- Dependency Injection (commonly abbreviated to "DI")
- Nest's application conventions & request/response lifecycle
So we'll make our passes over these concepts and attempt to explain them as succinctly as possible.
If you're already familiar with both of these things, please feel free to skip ahead to the hands-on section below.
Dependency Injection (DI)
There are a lot of ways to attempt to explain Dependency Injection.
The easiest way probably is through code.
For example's sake, let's look at this contrived bit below:
class Car {
  constructor(wheels: Wheels) {}
}

class Wheels {
  constructor(tires: Tires) {}
}

class Tires {
  constructor(rims: Rims, treads: Treads)
}

class Rims {
  constructor() {}
}

class Treads {
  constructor() {}
}
If we want a Car, the way we'd ask for one is like:
const car = new Car(new Wheels(new Tires(new Rims(), new Treads())))
Now, I don't know about you, but I don't think that's particularly pretty -- or maintainable!
- What happens if we want to swap out what instance of a
Tires class is provided everywhere, or for a particular scope?
- How fragile and prone to refactoring errors is this sort of code?
- Is this code flexible and easily testable? Are we able to provide alternative/mocked implementations during our tests?
The answers are not looking so hot 😬
BUT! Dependency Injection is here to save the day!
DI says:
"Hey, well uhh, I know that Car needs a Wheels. And that Wheels needs Tires. And that Tires, need Rims and Treads. So if all you're concerned about is being handed a working Car, how about I take care of the in-between stuff for you?"
And you go: "Wow -- yeah DI, that sounds pretty sweet! You'd really do that for me? D'awww, you're the best!"
The fancy-pants term for this sort of thing I believe has to do with "Directed Acyclic Graphs", but: who cares, am I right?
Dependency Injection doing you this solid usually looks something along the lines of:
class NeedsACar {
constructor(@Inject private car: Car) {}
}
class NeedsACar {
@Inject
private car: Car
}
class NeedsACar {
@Inject
public setCar(car: Car) {
this.car = car;
}
}
The exact syntax varies from language to language, but in general it's something very close or nearly identical.
In fact, Java's JSR 330: Dependency Injection for Java standard @Inject would be a near verbatim translation of this.
There are a lot of benefits (and some arguable drawbacks) to Dependency Injection, but for the sake of this article we won't be able to cover a comprehensive tutorial.
What we need to know to conclude our mini-DI series is that:
- NestJS uses
Constructor Injection by convention and allows for Field/Property Injection (though discourages it, for good reason)
- Dependency Injection provides (among other things):
- Abstracting away of implementation details from the consumer of an end-class or interface
- Allowing for looser coupling, which provides more flexibility to do things like swap implementations
- Dependency Injection really shines when it comes to tests, in particular
Nest's Module Structure
Nest is more of a "convention over configuration" framework. Not necessarily to the point of say, Rails, which literally won't work unless laid out exactly as prescribed.
But there are a set of idioms that the community attempts to follow in regards to structure of files.
Note: Credit for this diagram goes to https://blog.mimacom.com/a-quick-dive-into-nestjs
A rough outline for what a single Nest.js module looks like, may be something like the below:

Nest's Request -> Response Lifecycle
Note: Credit for this diagram goes to Dmitri Moore (@demisx1)
This is for a slightly older version of Nest, but fundamentally the request flow hasn't changed, and the diagram is fantastically made to use as a discussion point.
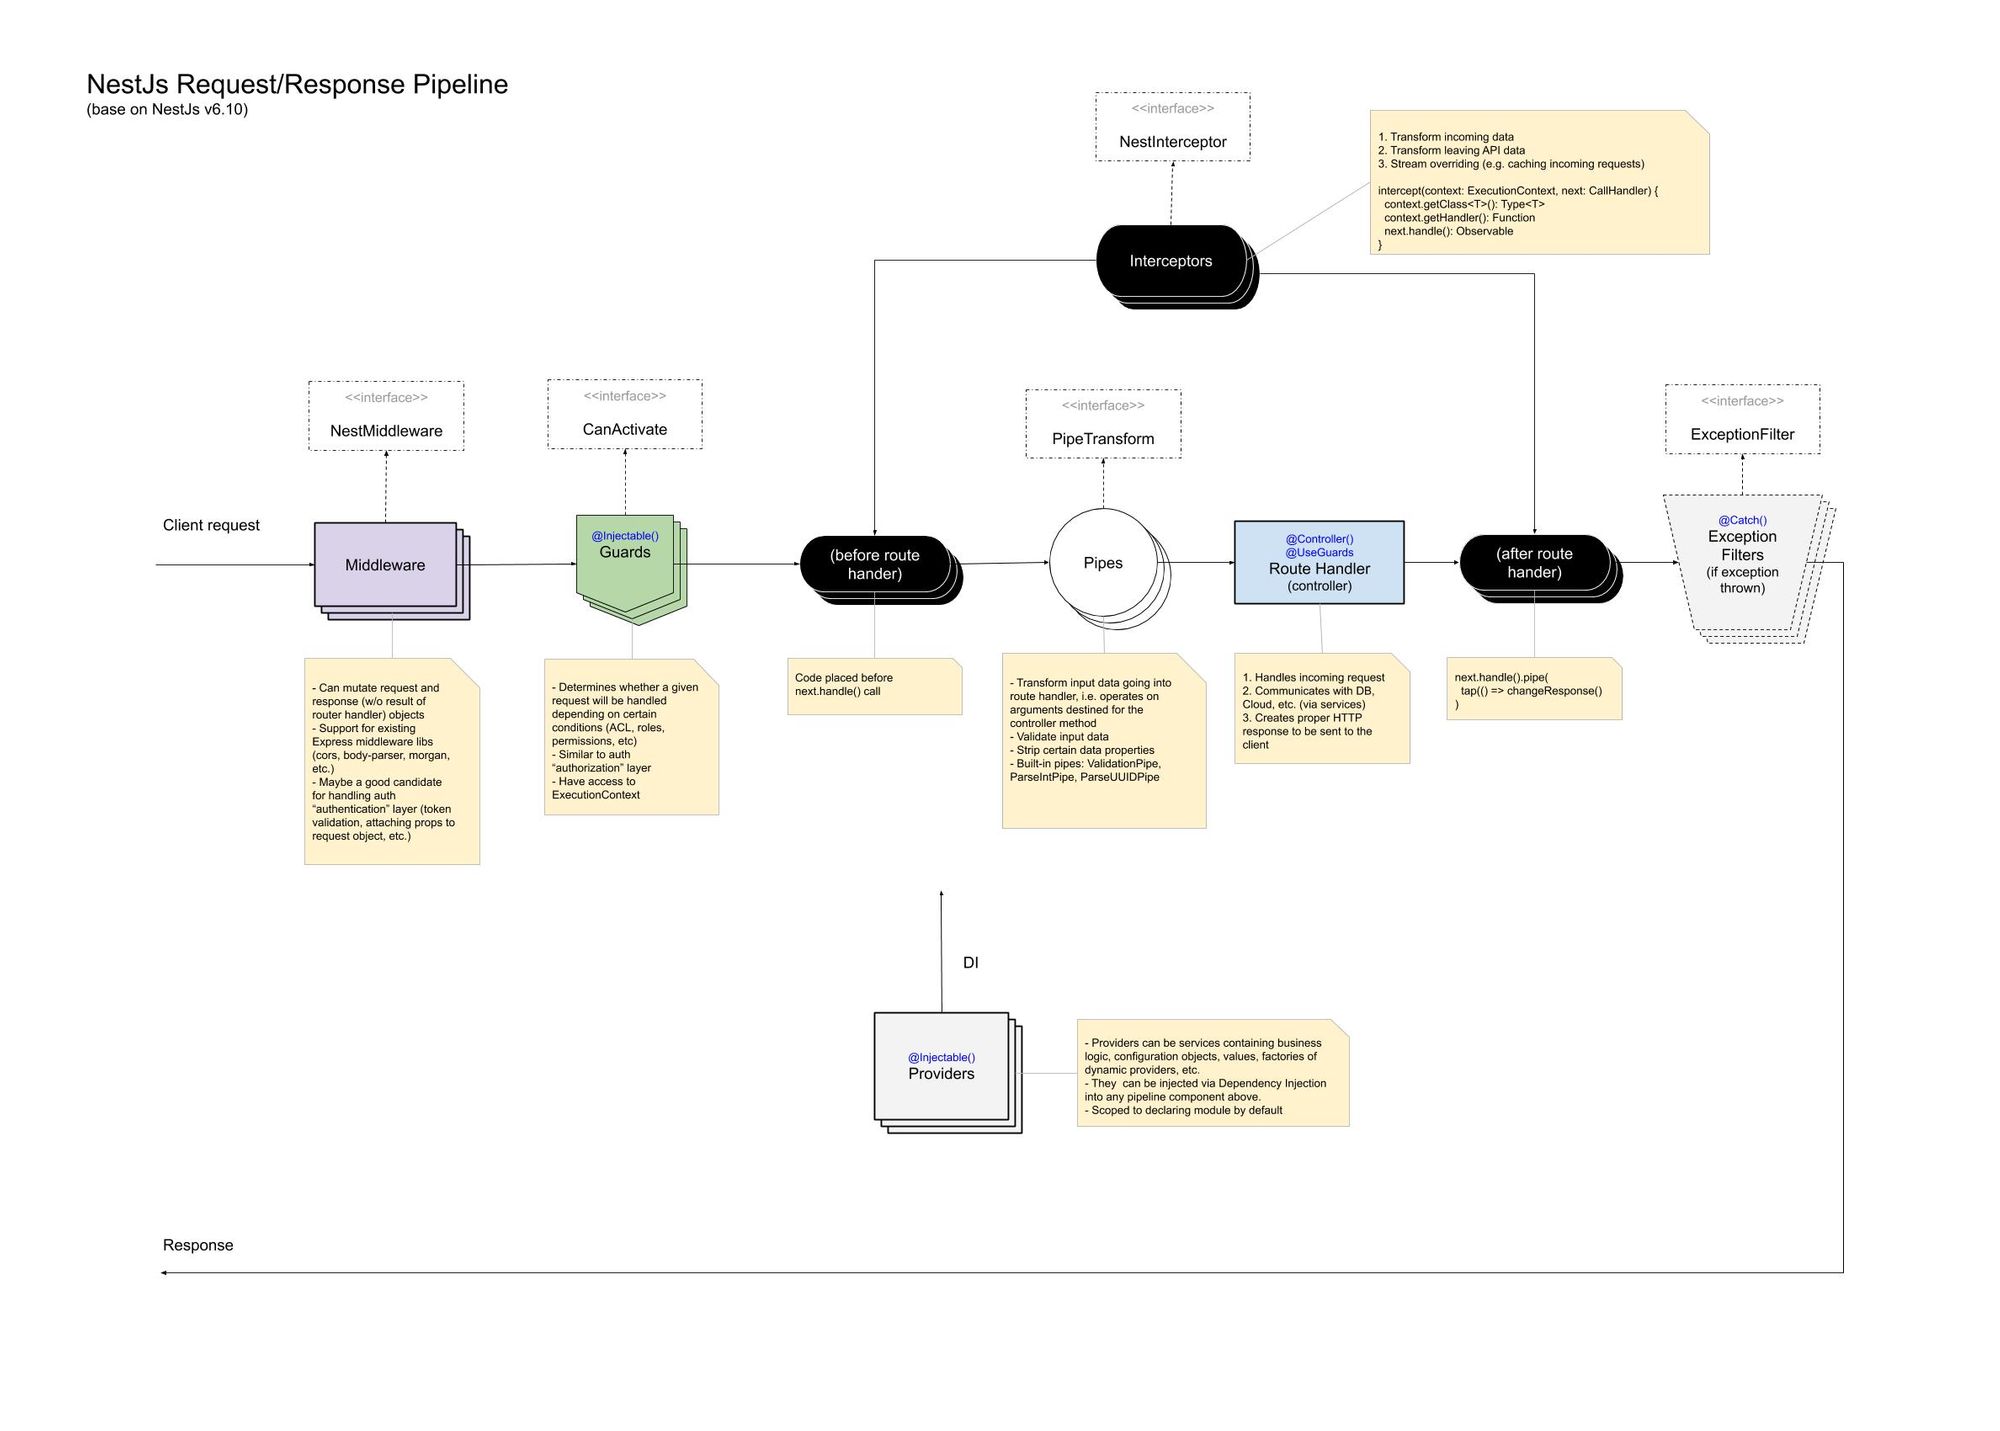
The lifecycle of a single client request looks like:
- Client Request is made
- Any class which implements the
NestMiddleware interface and has been registered will process the request.
- These middleware, much like Express middleware, CAN alter the request/response objects, or set contextual values
- NestJS even has support for Express middleware libraries
- This is the layer at which you'd typically handle something like reading a JWT token from a header and setting user data on the request
- After middleware, any class which implements the
CanActivate interface is called.
- These are "guard" interfaces, and they determine whether a request will be accepted/rejected.
- With the JWT Auth example, this is the point at which you would read from the previously set user data that the middleware had put into the
ExecutionContext, and check to see if it matched what you ought to allow for that particular endpoint.
- If not, you can deny the request. Otherwise, it may be permitted through.
- Next, classes which implement the
NestInterceptor interface fire.
- These have callbacks that are run both before and after the handler response
- Usually, interceptors are a good place to put things like loggers/metrics that need both the before + after context of a request, or if you need to transform the input/output shape.
- The last step before the actual request handler is called are classes which implement
PipeTransform
- As the name suggests, these are transforms on arguments into the requests.
- Builtin Pipes are
ValidationPipe, ParseIntPipe, etc.
- These are generally used to format/validate arguments that are going to be given to the controller route handler
- Finally, the
@Controller route handler is called.
- This is your typical API endpoint handler
- Likely going to call DB/persistence methods, or communicate with other service API's
- The response is sent back to the client (not forgetting it'll be handled by any
NestInterceptors "after" handlers, if they've been registered)
Phew! Okay, on to actually making something we go.
Setting up our Application
Scaffolding with the Nest CLI
The NestJS CLI is a central tool when developing apps with it.
We'll begin by scaffolding the app.
Later we'll see how to use the CLI to generate resources that integrate entities + services with REST and GraphQL handlers.
$ npm install -g @nestjs/cli
$ nest new my-nest-project
Now, that'll prompt you a few questions, and should generate a directory structure which looks like this:
.
├── README.md
├── nest-cli.json
├── package.json
├── src
│   ├── app.controller.spec.ts
│   ├── app.controller.ts
│   ├── app.module.ts
│   ├── app.service.ts
│   └── main.ts
├── test
│   ├── app.e2e-spec.ts
│   └── jest-e2e.json
├── tsconfig.build.json
├── tsconfig.json
└── yarn.lock
A few educational alterations
For the sake of explanation, we're going to make one alteration to the generated sources, so that things are perhaps more understandable.
In src/app.controller.ts, you'll see the content is:
@Controller()
export class AppController {
  constructor(private readonly appService: AppService) {}

  @Get()
  getHello(): string {
    return this.appService.getHello();
  }
}
We're going to change that to:
@Controller()
export class AppController {
  constructor(@Inject('AppService') private readonly appService: AppService) {}

  @Get()
  getHello(): string {
    return this.appService.getHello();
  }
}
And then change the contents of app.module.ts from:
@Module({
  imports: [],
  controllers: [AppController],
  providers: [AppService],
})
export class AppModule {}
To:
@Module({
imports: [],
controllers: [AppController],
providers: [
{
provide: 'AppService',
useClass: AppService,
},
],
})
export class AppModule {}
The reasoning here is that there is a lot of "magic" that Nest does under the hood for us.
With these changes, hopefully you can see that:
- In the
AppModule, we are providing the AppService class when any @Inject()ion asks for the string: "AppService"
- In the
AppController constructor, we say @Inject("AppService") private readonly appService, which will look in the module's provider hierarchy for a provider that is resolved by the string "AppService", and then provide it's value (in this case -- an instance of the AppService class itself)
Now, hopefully that's understandable.
You won't see this syntax used in Nest and you're free to change it back if you like.
The reasoning is that, if the TYPE of a constructor parameter matches the TYPE of a provider, Nest will auto-magically wire up the @Inject() for you.
IE:
@Module({
  providers: [AppService],
})
@Controller()
export class AppController {
constructor(private readonly appService: AppService) {}
Running the app
Now, if we run yarn start:dev, we should see:
[2:18:06 PM] Starting compilation in watch mode...
[2:18:09 PM] Found 0 errors. Watching for file changes.

[Nest] 9804  - 08/24/2021, 2:18:17 PM     LOG [NestFactory] Starting Nest application...
[Nest] 9804  - 08/24/2021, 2:18:17 PM     LOG [InstanceLoader] AppModule dependencies initialized +24ms
[Nest] 9804  - 08/24/2021, 2:18:17 PM     LOG [RoutesResolver] AppController {/}: +5ms
[Nest] 9804  - 08/24/2021, 2:18:17 PM     LOG [RouterExplorer] Mapped {/, GET} route +2ms
[Nest] 9804  - 08/24/2021, 2:18:17 PM     LOG [NestApplication] Nest application successfully started +2ms
And in main.ts, we can see that it's being bootstrapped on port 3000:
async function bootstrap() {
const app = await NestFactory.create(AppModule);
await app.listen(3000);
}
So if we visit http://localhost:3000 then we should see our AppController's getHello() method fired, and returned as a web result:
@Get()
getHello(): string {
return this.appService.getHello();
}

Alright, now we're cookin'!!
We finally know enough to do something useless.
That's better than nothing =)
Now we can dive into how to integrate Nest with Hasura.
Building our Application
The outline of what we'll be building is:
- A single Hasura table,
user, which we can use to link information to
- A REST module for
payments, integrated into Hasura via Actions
- A GraphQL module for
houses, integrated into Hasura with Remote Schemas
- Webhooks for subscribing to changes, integrated into Hasura with
Event Triggers via @golevelup/nestjs-hasura
- Scheduled/recurring jobs, integrated into Hasura with
Scheduled Triggers via @golevelup/nestjs-hasura
REST
Using the Nest CLI, we can use it's "generate" function to create the boilerplate for what we need. It will even install the new resources we create into the top-level app module for us.
We want to create a:
- Payment Module
- Payment Controller (HTTP request handler for Hasura Actions)
- Payment Service (holds the business logic, to keep the controller code slim)
To do this, we can run:
$ nest generate module payment
CREATE src/payment/payment.module.ts (84 bytes)
UPDATE src/app.module.ts (441 bytes)

$ nest generate controller payment
CREATE src/payment/payment.controller.spec.ts (499 bytes)
CREATE src/payment/payment.controller.ts (103 bytes)
UPDATE src/payment/payment.module.ts (178 bytes)

$ nest generate service payment
CREATE src/payment/payment.service.spec.ts (467 bytes)
CREATE src/payment/payment.service.ts (91 bytes)
UPDATE src/payment/payment.module.ts (261 bytes)
What we should have at this point is:
src/payment/
├── payment.controller.spec.ts
├── payment.controller.ts
├── payment.module.ts
├── payment.service.spec.ts
└── payment.service.ts
Now, what we're going to do is set up a fake payment handler that takes a user_id, product_id, and quantity, and then pretends to process a payment as a Hasura Action.
To do that, first, lets edit the payment.service.ts to have the methods we need:
import { Injectable } from '@nestjs/common';

@Injectable()
export class PaymentService {
  private static products = [
    { id: 1, name: 'Milk', price: 2.5 },
    { id: 2, name: 'Apples', price: 1.25 },
    { id: 3, name: 'Eggs', price: 0.99 },
  ];

  public calculateTotal(params: { product_id: number; quantity: number }): number {
    return PaymentService.products.find((it) => it.id == params.product_id).price * params.quantity;
  }

  public processPayment(params: { total: number }): boolean {
    console.log("This is where you'd call a payment processor, and charge the customer for " + params.total);
    return true;
  }
}
And then set up payment.controller.ts to take a payload from a Hasura Action and call this service, returning total, paymentResult, and a fake receiptNumber:
import { Body, Controller, Post } from '@nestjs/common';
import { PaymentService } from './payment.service';

interface HasuraActionsPayload<Input extends {} = {}, Session extends {} = {}> {
  action: {
    name: string;
  };
  input: Input;
  session_variables: Session;
}

interface CreatePaymentForUserArgs {
  user_id: number;
  product_id: number;
  quantity: number;
}

@Controller('payment')
export class PaymentController {
  constructor(private readonly paymentService: PaymentService) {}

  @Post('/createPaymentForUser')
  createPaymentForUser(@Body() payload: HasuraActionsPayload<{ params: CreatePaymentForUserArgs }>) {
    const total = this.paymentService.calculateTotal(payload.input.params);
    const paymentResult = this.paymentService.processPayment({ total });
    return {
      total,
      paymentResult,
      receiptNumber: 1234567,
    };
  }
}
Now if we boot up our app again, with yarn start:dev again, we should see in the output:
[Nest] 21396 - 08/24/2021, 3:30:42 PM LOG [RouterExplorer] Mapped {/payment/createPaymentForUser, POST} route +1ms
And if we try to make a request to that endpoint giving it the same payload it would receive if it were called by Hasura, as a Hasura Action, like this:
POST http://localhost:3000/payment/createPaymentForUser HTTP/1.1
content-type: application/json

{
  "action": {
    "name": "createPaymentForUser"
  },
  "input": {
    "params": {
      "user_id": 1,
      "product_id": 2,
      "quantity": 10
    }
  },
  "session_variables": {}
}
Then you should see output like this:
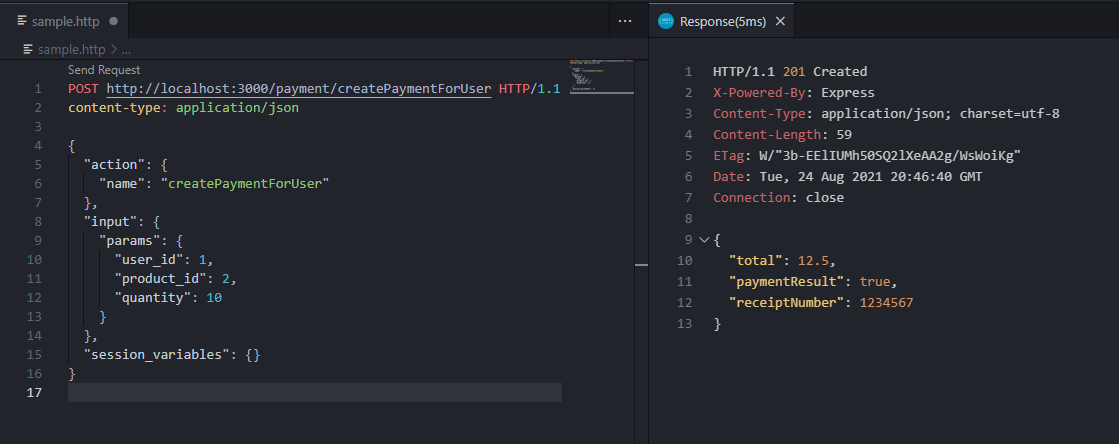
This means everything is good for us to hook into our Hasura app as an Action!
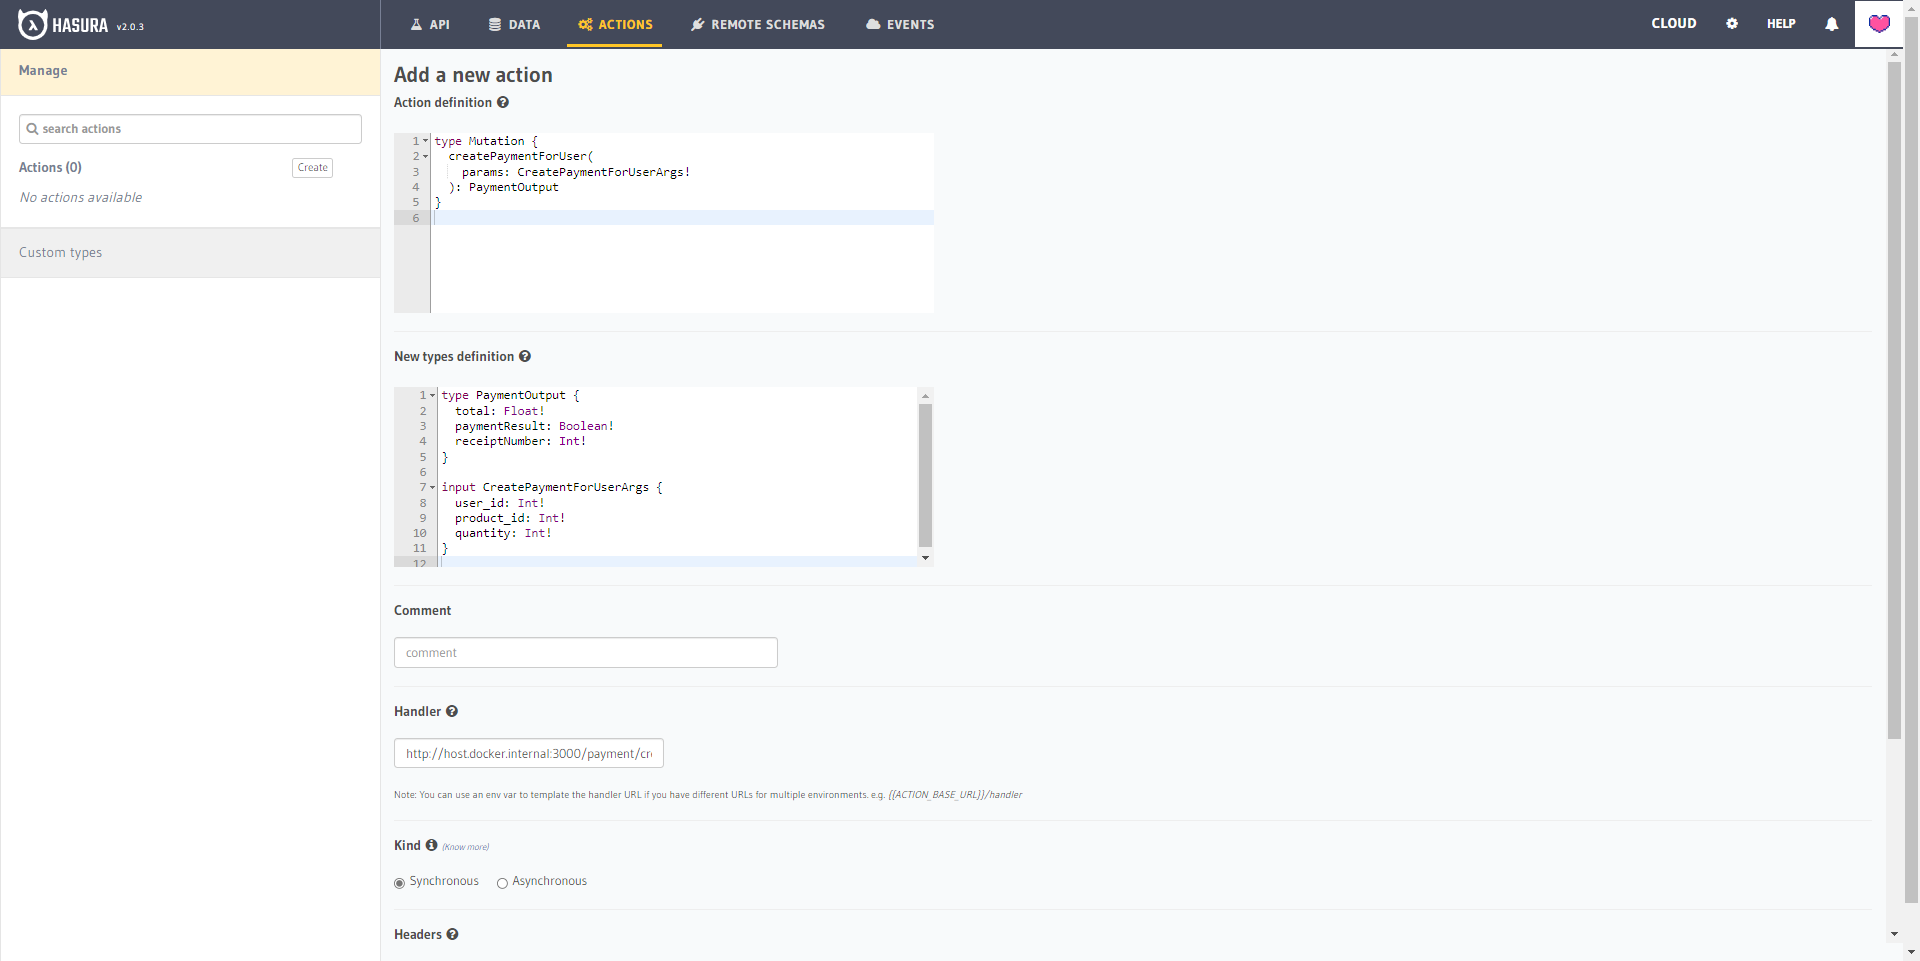
To do this, what we need to do is open our Hasura console at:
http://localhost:8080/console/actions/manage/add- Or Cloud, if running on a Cloud app
Now, add the following Action definition:
From the GraphiQL tab on the console, we now should be able to make the following mutation:
mutation {
  createPaymentForUser(params: {
    user_id: 1,
    product_id: 2,
    quantity: 10
  }) {
    total
    paymentResult
    receiptNumber
  }
}
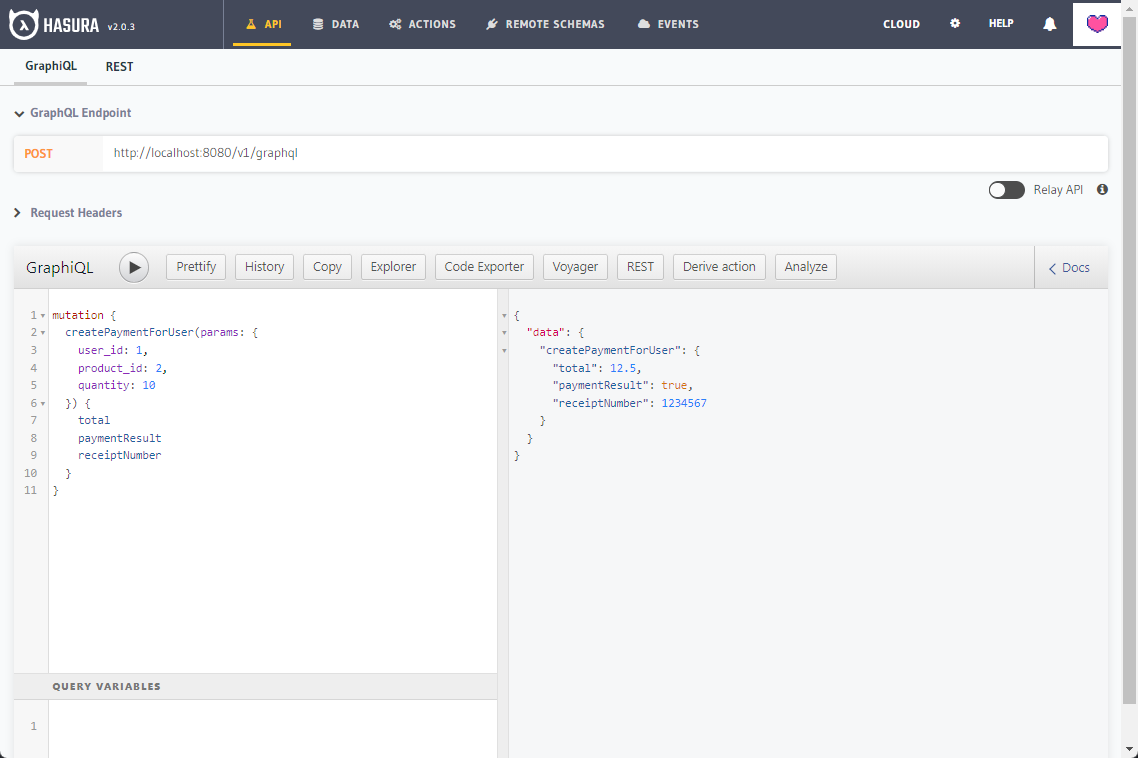
Ta-da! We've integrated a Nest.js REST API into Hasura as an Action. If we wanted, we could do a Remote Relationship between payment.user_id to user.id in our table to connect the data back to our graph.
GraphQL
In a similar vein to the way we started above, we can begin by using Nest's CLI to scaffold our resources.
We'll do:
$ nest generate resource house
? What transport layer do you use?
  REST API
> GraphQL (code first)
  GraphQL (schema first)
  Microservice (non-HTTP)
  WebSockets

$ nest generate resource house
? What transport layer do you use? GraphQL (code first)
? Would you like to generate CRUD entry points? (Y/n) y

$ nest generate resource house
? What transport layer do you use? GraphQL (code first)
? Would you like to generate CRUD entry points? Yes
CREATE src/house/house.module.ts (224 bytes)
CREATE src/house/house.resolver.spec.ts (525 bytes)
CREATE src/house/house.resolver.ts (1134 bytes)
CREATE src/house/house.service.spec.ts (453 bytes)
CREATE src/house/house.service.ts (637 bytes)
CREATE src/house/dto/create-house.input.ts (197 bytes)
CREATE src/house/dto/update-house.input.ts (247 bytes)
CREATE src/house/entities/house.entity.ts (188 bytes)
UPDATE src/app.module.ts (448 bytes)
And now, we should have:
src/house
├── dto
│   ├── create-house.input.ts
│   └── update-house.input.ts
├── entities
│   └── house.entity.ts
├── house.module.ts
├── house.resolver.spec.ts
├── house.resolver.ts
├── house.service.spec.ts
└── house.service.ts
We'll immediately encounter errors, due to lacking the @nestjs/graphql module and a few others, so we'll yarn add graphql @nestjs/graphql [email protected] to fix that.
Finally, we need to actually set up the GraphQL server and schema to be served.
To do this, modify src/app.module.ts with the changes you see below -- namely just importing GraphQLModule and adding GraphQLModule.forRoot({ autoSchemaFile: true }) to the @Module imports:
import { Module } from '@nestjs/common';
import { AppController } from './app.controller';
import { AppService } from './app.service';
import { HouseModule } from './house/house.module';
import { PaymentModule } from './payment/payment.module';+
+ import { GraphQLModule } from '@nestjs/graphql';

@Module({
-  imports: [PaymentModule, HouseModule],
+  imports: [PaymentModule, HouseModule, GraphQLModule.forRoot({ autoSchemaFile: true })],
  controllers: [AppController],
  providers: [
    {
      provide: 'AppService',
      useClass: AppService,
    },
  ],
})
export class AppModule {}
Start the server again with yarn start:dev and ensure that on http://localhost:3000/graphql you have a GraphQL playground instance that holds the schema to your House entity and resolver methods:

After this, we should be ready to proceed.
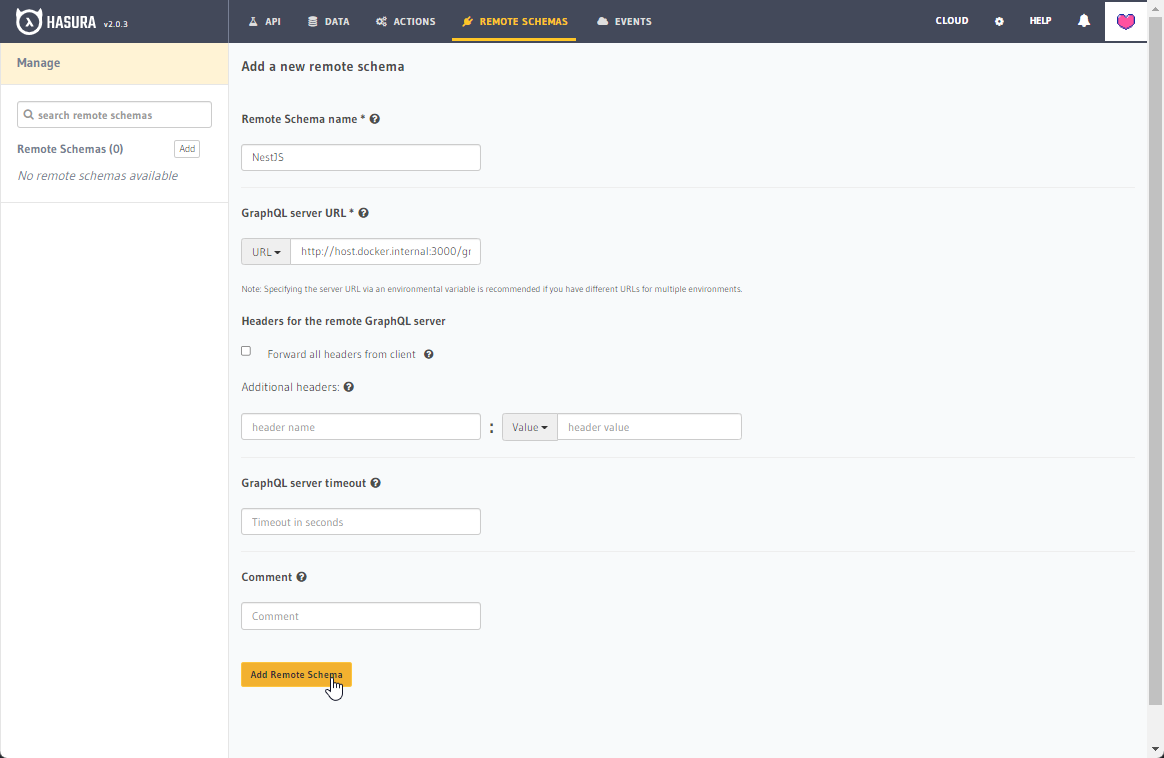
In Hasura, go to create a new Remote Schema at:
http://localhost:8080/console/remote-schemas/manage/add
And add http://host.docker.internal:3000/graphql, as below:
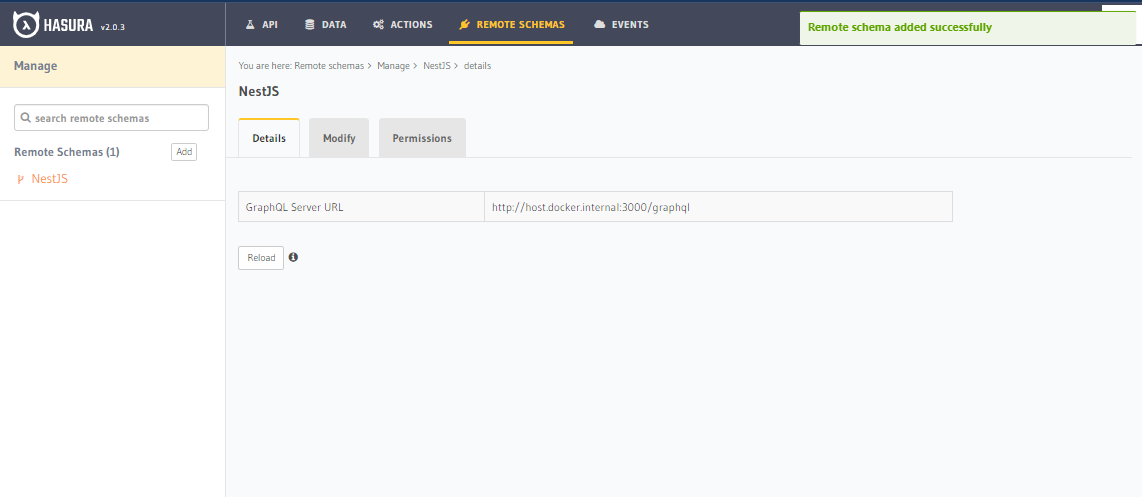
You should see this, Remote Schema Added Successfully:
Now, because in the house resolver, the HouseService call doesn't actually return the proper object that the schema requires, any calls to it will fail at the moment:
@ObjectType()
export class House {
@Field(() => Int, { description: 'Example field (placeholder)' })
exampleField: number;
}
@Resolver(() => House)
export class HouseResolver {
  constructor(private readonly houseService: HouseService) {}

  @Query(() => House, { name: 'house' })
  findOne(@Args('id', { type: () => Int }) id: number) {
    return this.houseService.findOne(id);
  }
}

@Injectable()
export class HouseService {
  findOne(id: number) {
    return `This action returns a #${id} house`;
  }
}
We can see that we are able to call it and see it from Hasura's schema, and if we modified return 'This action returns a #${id} house'; to be return { exampleField: 1 } for instance, it would work:

@golevelup/nestjs-hasura
The final piece of today's tutorial is perhaps the most exciting.
The @golevelup/nestjs set of modules are a multi-functional toolset that span several domains.
Hasura is one area the tools cover. Another offers integration with Stripe. A third with RabbitMQ. Other modules offer much more general application functionality than a single targeted usecase. There's likely to be something useful in those modules for just about everyone.
Today we'll only be discussing the @golevelup/nestjs-hasura module though.
This module allows you to annotate functions, which should act as Event Triggers or Scheduled Trigger handlers in Hasura.
Even more impressively, it optionally allows you to export the metadata.json to automatically configure Hasura so that these are integrated for you.
To install it, we'll need to:
yarn add @golevelup/nestjs-hasura
And then to configure it, we need to do two things:
- Add it into our
app.module.ts
- Actually set up some Event Triggers or Scheduled Trigger handlers
To add it to our app, in the module file.
At this point, our app.module.ts should look like:
import { HasuraModule } from '@golevelup/nestjs-hasura';
import { Module } from '@nestjs/common';
import { GraphQLModule } from '@nestjs/graphql';
import { AppController } from './app.controller';
import { AppService } from './app.service';
import { HouseModule } from './house/house.module';
import { PaymentModule } from './payment/payment.module';
import { UserService } from './user/user.service';
const path = require('path');
@Module({
imports: [
PaymentModule,
HouseModule,
GraphQLModule.forRoot({ autoSchemaFile: true }),
HasuraModule.forRoot(HasuraModule, {
webhookConfig: {
secretFactory: 'secret',
secretHeader: 'secret-header',
},
managedMetaDataConfig: {
metadataVersion: 'v3',
dirPath: path.join(process.cwd(), 'hasura/metadata'),
secretHeaderEnvName: 'HASURA_NESTJS_WEBHOOK_SECRET_HEADER_VALUE',
nestEndpointEnvName: 'NESTJS_EVENT_WEBHOOK_ENDPOINT',
defaultEventRetryConfig: {
intervalInSeconds: 15,
numRetries: 3,
timeoutInSeconds: 100,
toleranceSeconds: 21600,
},
},
}),
],
controllers: [AppController],
providers: [AppService, UserService],
})
export class AppModule {}
Now, let's generate the UserService to put our Event Trigger and Scheduled Trigger handlers on:
$ nest generate service user
CREATE src/user/user.service.spec.ts (446 bytes)
CREATE src/user/user.service.ts (88 bytes)
UPDATE src/app.module.ts (1543 bytes)
And inside of the src/user/user.service.ts, let's put:
import { HasuraInsertEvent, HasuraUpdateEvent, TrackedHasuraEventHandler } from '@golevelup/nestjs-hasura';
import { Injectable } from '@nestjs/common';

interface User {
  id: number;
  email: string;
}

@Injectable()
export class UserService {
  @TrackedHasuraEventHandler({
    triggerName: 'user-created',
    tableName: 'user',
    definition: { type: 'insert' },
  })
  handleUserCreated(evt: HasuraInsertEvent<User>) {
    console.log('A new user was created!');
    console.log('User info:', evt.event.data.new);
  }

  @TrackedHasuraEventHandler({
    triggerName: 'user-updated',
    tableName: 'user',
    definition: { type: 'update', columns: ['email'] },
  })
  handleUserUpdated(evt: HasuraUpdateEvent<User>) {
    console.log('handleUserUpdated was called, due to user.email changing and Hasura sending us a webhook!');
    console.log('email was changed from', evt.event.data.old.email, 'to', evt.event.data.new.email);
  }
}
This should log out user info when a user is created, and also log when a user's email is updated.
If we run yarn start:dev again, we should see the HasuraModule detect this in the logs:
[Nest] 30244  - 08/24/2021, 5:49:11 PM     LOG [RoutesResolver] EventHandlerController {/hasura}: +1ms
[Nest] 30244  - 08/24/2021, 5:49:11 PM     LOG [RouterExplorer] Mapped {/hasura/events, POST} route +1ms
[Nest] 30244  - 08/24/2021, 5:49:11 PM     LOG [HasuraModule] Initializing Hasura Module
[Nest] 30244  - 08/24/2021, 5:49:11 PM     LOG [HasuraModule] Discovered 2 hasura event handlers
[Nest] 30244  - 08/24/2021, 5:49:11 PM     LOG [HasuraModule] Automatically syncing hasura metadata based on discovered event handlers. Remember to apply any changes to your Hasura instance using the CLI
[Nest] 30244  - 08/24/2021, 5:49:11 PM     LOG [HasuraModule] Registering hasura event handlers from UserService
Now if we look inside of nest-hasura-example\hasura\metadata\databases\default\tables\public_user.yaml, we should see the automatically created Hasura metadata matching these TypeScript NestJS handlers:
table:
  name: user
  schema: public
event_triggers:
  - name: user-created
    definition:
      enable_manual: false
      insert:
        columns: '*'
    retry_conf:
      num_retries: 3
      interval_sec: 15
      timeout_sec: 100
    webhook_from_env: NESTJS_EVENT_WEBHOOK_ENDPOINT
    headers:
      - name: secret-header
        value_from_env: HASURA_NESTJS_WEBHOOK_SECRET_HEADER_VALUE
  - name: user-updated
    definition:
      enable_manual: false
      update:
        columns:
          - email
    retry_conf:
      num_retries: 3
      interval_sec: 15
      timeout_sec: 100
    webhook_from_env: NESTJS_EVENT_WEBHOOK_ENDPOINT
    headers:
      - name: secret-header
        value_from_env: HASURA_NESTJS_WEBHOOK_SECRET_HEADER_VALUE
Amazing! Now we just need to run hasura metadata apply so the configuration is applied.
cd hasura to change into the Hasura console directory, and run the above command:
$ hasura metadata apply
INFO Metadata applied
And finally, to test it, we just need to create and then edit some users, while we watch our Nest app's logs =)
First, let's create a user, giving it the email [email protected].
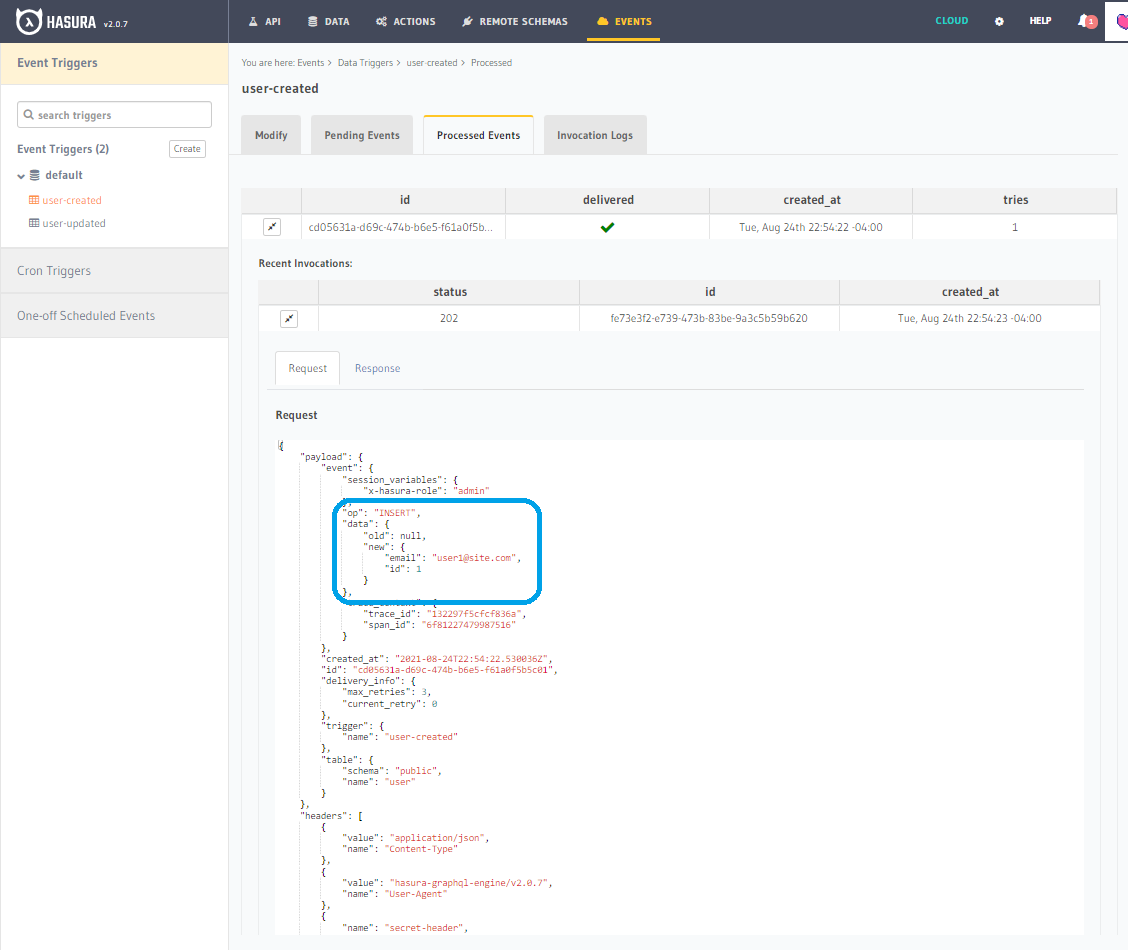
Then, checking our Event Trigger invocations for the user-created trigger:
http://localhost:8081/console/events/data/user-created/processed
We can see we have a webhook that went out! Was it successful?
It was! Let's check our NestJS console output and see if our handler logged what we expected...
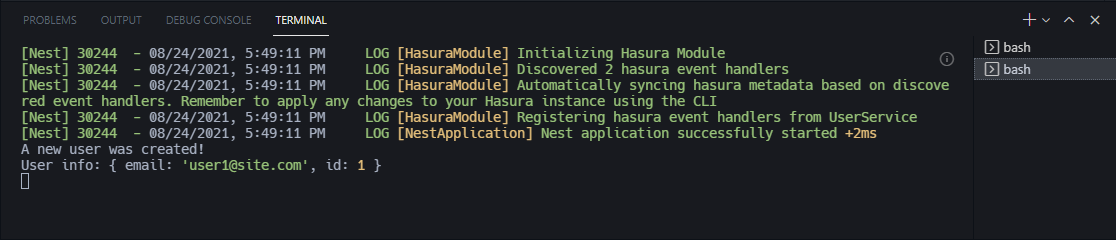
Wow, awesome, everything is working as intended. That's the easiest way to set up secure Event Triggers I've ever seen!
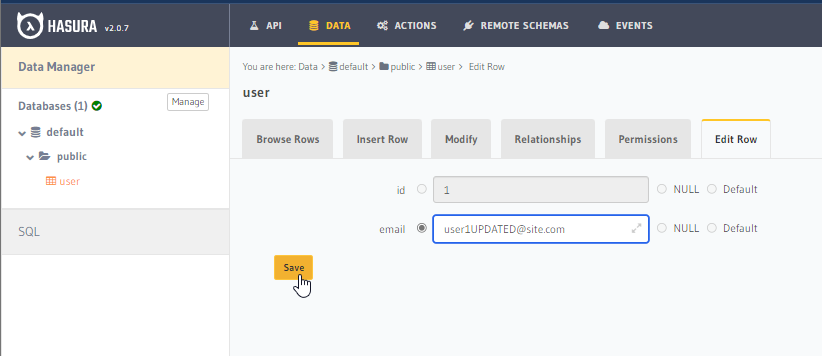
To conclude this saga, let's go ahead and update our users email, it can be anything you want:
And now check the processed events for the user-updated Event Trigger:
http://localhost:8081/console/events/data/user-updated/processed
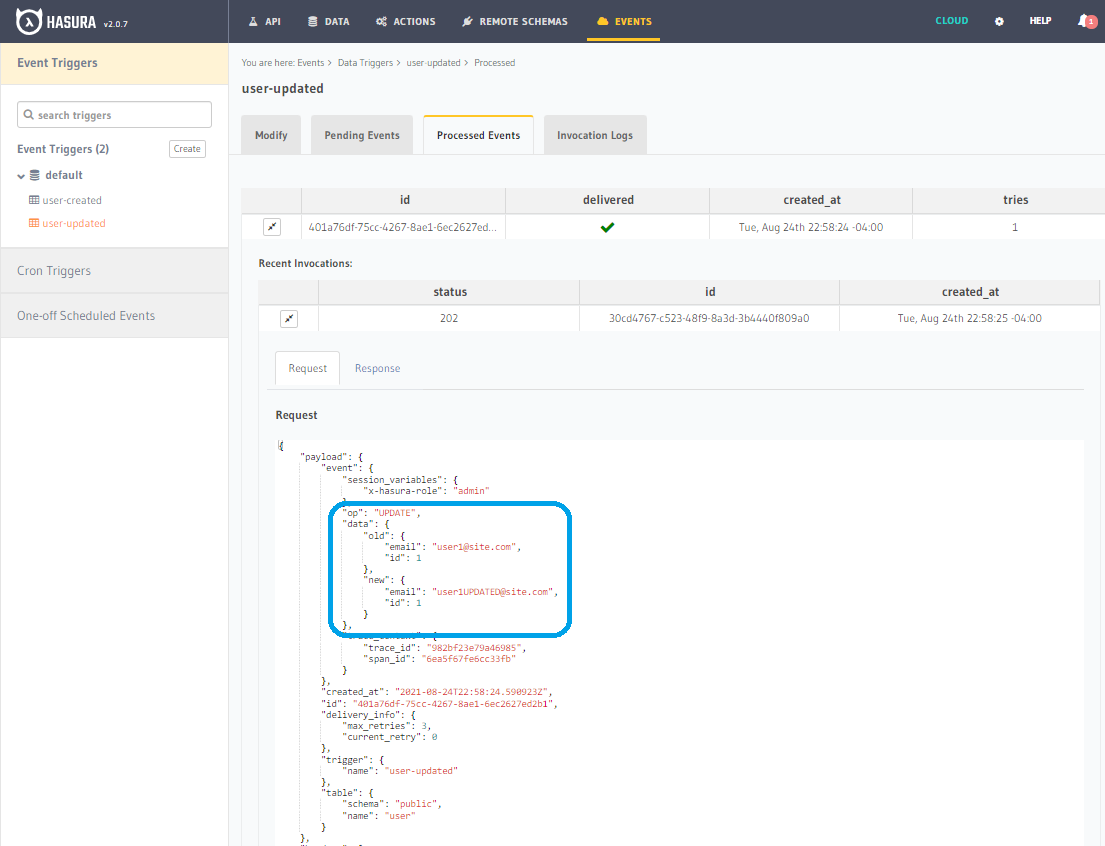
Stellar, looks like it fired off successfully here too!
And lastly, just checking our NestJS console one final time:
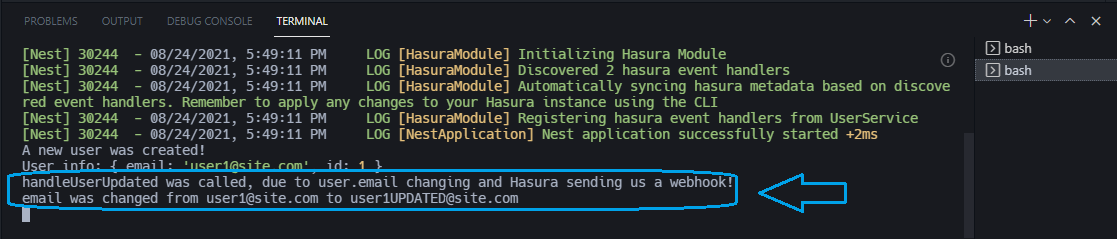
Ta-da!
Let us know if you have any questions while trying these out! You can hit us up on github discussions / discord if you need any help!


