How to Setup Authentication with Django Graphene and Hasura GraphQL
Hasura has a great feature of being able to merge in external GraphQL schemas, allowing us to do things like stitch together a mesh of services powered by GraphQL.
In this walkthrough, we're going to go through creating a simple GraphQL authentication service using Django Graphene, meshing it into your Hasura service, and creating a few sample requests.
Getting Started
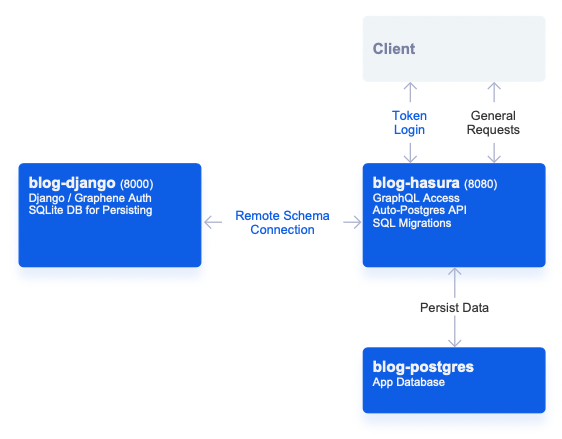
Similar to the Food Network, we can start this off by taking a look at what the final project looks like.
on the directory, you'll receive a setup like the following:
Project Container Layout
Pro Tip: If you look in the docker-compose.yml you'll notice we're using the image hasura/graphql-engine:latest.cli-migrations-v2.
This migrations image will automatically apply our Hasura metadata (connected remote schema, tracked tables, permissions) as well as our SQL migrations (to generate our schema) from the ./hasura folders which are mounted as volumes in our docker-compose file.
If we take a look at the ./django/dockerfile you'll see that we're running a standard Python 3 container with:
pip install django-graphql-jwt django
initiated (django-graphql-jwt is the package we'll be using as a helper with this project and it comes with graphene-django and PyJWT as dependencies - your can read more about this package here: https://github.com/flavors/django-graphql-jwt).
We've also pinned PyJWT to < 2 as there's a compatibility issue with the current django-graphql-jwt and the latest major version of PyJWT.
If you look at the project structure in the ./django folder you'll notice it's the same as if we had run:
django-admin startproject app
and then:
python manage.py startapp api
from within our project.
We're going to be putting our global settings in app and then our API specific functions in api.
We've also automatically run make and run migrations in the ./django/entrypoint.sh on each container startup.
Project Setup
Let's take a look at what we've added to our ./django/app/settings.py file:
./django/app/settings.py
...
# Lets us load our secret from our docker-compose env variables
SECRET_KEY = os.environ['DJANGO_SECRET']
...
# Make sure our Django instance is accessible locally
ALLOWED_HOSTS = ['localhost', 'host.docker.internal']
...
INSTALLED_APPS = [
    'django.contrib.admin',
    'django.contrib.auth',
    'django.contrib.contenttypes',
    'django.contrib.sessions',
    'django.contrib.messages',
    'django.contrib.staticfiles',
# We're going to load:
# - Graphene
# - Optional refresh_token to use a token / refresh scheme in our API
# - Our api app (which contains our API functions)
    'graphene_django',
    'graphql_jwt.refresh_token.apps.RefreshTokenConfig',
    'api',
]
...
# We're going to use an external SQLite DB for this demo, but if you wanted to use the same Postgres as your app DB, you would use similar to the below and this DB would be accessible in Hasura:
DATABASES = {
    'default': {
        'ENGINE': 'django.db.backends.sqlite3',
        'NAME': BASE_DIR / 'db.sqlite3',
    },
    # 'default': {
    #     'ENGINE': 'django.db.backends.postgresql',
    #     'NAME': 'postgres',
    #     'USER': 'postgres',
    #     'PASSWORD': 'password',
    #     'HOST': 'blog-postgres',
    #     'PORT': '5432',
    # }
}
...
# Defines what Graphene settings and JWT middleware
# You'll notice we've defined the app.schema - we'll walk through a review of this below.
GRAPHENE = {
    'SCHEMA': 'app.schema.schema',
    'MIDDLEWARE': [
        'graphql_jwt.middleware.JSONWebTokenMiddleware',
    ],
}
...
# Defines JWT settings and auth backends
# You'll notice we've defined app.utils.jwt_payload - we'll be reviewing it below as well.
GRAPHQL_JWT = {
    'JWT_PAYLOAD_HANDLER': 'app.utils.jwt_payload',
    'JWT_AUTH_HEADER_PREFIX': 'Bearer',
    'JWT_VERIFY_EXPIRATION': True,
    'JWT_LONG_RUNNING_REFRESH_TOKEN': True,
    'JWT_EXPIRATION_DELTA': timedelta(minutes=5),
    'JWT_REFRESH_EXPIRATION_DELTA': timedelta(days=7),
    'JWT_SECRET_KEY': os.environ['DJANGO_SECRET'],
    'JWT_ALGORITHM': 'HS256',
}
AUTHENTICATION_BACKENDS = [
    'graphql_jwt.backends.JSONWebTokenBackend',
    'django.contrib.auth.backends.ModelBackend',
]
In terms of setting up our JWT - we've gone with a short expiration time (5 minutes for our access token) and a longer time for our refresh token (7 days).
In general, this setup works well in that we'll only use our refresh token for updating the expiration time on our access token, and our access token (which gives us access to our application) will frequently be refreshed in case of compromise.
You saw from the above that we've mentioned 2 other files, app.utils and app.schema - let's walk through those and look at what they're doing.
You'll notice we make reference to api.models and user.profile.role - that's a little different.
Down below we're going to go over how to extend our user model - once you know how to do that you'll be able to extend your JWT payload further with any other x-hasura... claims your application requires.
./django/app/schema.py
import graphene
import graphql_jwt
import api.schema

## Mutation:
# - token_auth - for Login
# - refresh_token - for Token refresh
# + schema from api.schema.Mutation
class Mutation(api.schema.Mutation, graphene.ObjectType):
    token_auth = graphql_jwt.ObtainJSONWebToken.Field()
    refresh_token = graphql_jwt.Refresh.Field()
    verify_token = graphql_jwt.Verify.Field()
    pass

## Query:
# + schema from api.schema.Query
class Query(api.schema.Query, graphene.ObjectType):
    pass

# Create schema
schema = graphene.Schema(query=Query, mutation=Mutation)
This sets up our root GraphQL schema file.
You'll notice we're declaring token_auth, refresh_token, and verify_token nodes which will be our default methods of logging in, refreshing our token's expiration, and verifying our token.
The will create mutations for those actions.
We also mention api.schema which contains the logic for our other query and mutation nodes which we'll be reviewing below.
Extending the User Model
Before we get to setting up our GraphQL logic, a little housekeeping.
We want to define the role of our user. It's a really common paradigm in Django and there are a lot of ways to tackle adding more fields to your Django user.
The easiest way is to extend your user model with a one-to-one model.
This creates a new table which has a relationship to Django's default user model.
./django/api/models.py
from django.db import models
from django.db import models
from django.contrib.auth.models import User
from django.db.models.signals import post_save
from django.dispatch import receiver

# Create your models here.
active_roles=(
    ("user", "user"),
    ("manager", "manager")
)

class profile(models.Model):
    user = models.OneToOneField(User, on_delete=models.CASCADE)
    role = models.CharField(max_length=120, choices=active_roles, default="user")

@receiver(post_save, sender=User)
def create_user_profile(sender, instance, created, **kwargs):
    if created:
        profile.objects.create(user=instance)

@receiver(post_save, sender=User)
def save_user_profile(sender, instance, **kwargs):
    instance.profile.save()
What we're doing here is basically saying, each user has an associated profile row. Roles can be either user or manager (based on active_roles)- defaulting to user.
On creation of a new user - make sure they have a profile entry.
Just to make it nice, we can also add this relationship to our admin section - this will make this profile model available in our Django Admin (http://localhost:8000/admin/), under our default user model:
./django/api/admin.py
from django.contrib import admin
from django.contrib.auth.admin import UserAdmin as BaseUserAdmin
from django.contrib.auth.models import User
from api.models import profile

# Register your models here.
# Inline + descriptor
class AdminProfileInline(admin.StackedInline):
    model = profile
    can_delete = False
    verbose_name_plural = 'profiles'

# Define new admin with inline
class ProfileUserAdmin(BaseUserAdmin):
    inlines = (AdminProfileInline,)

# Re-register UserAdmin
admin.site.unregister(User)
admin.site.register(User, ProfileUserAdmin)
Setting Up Our Schema Functions
We've so far created our mutations for logging in, refreshing, and verifying our token using our root schema file.
You'll remember that we referenced api.schema.Query and api.schema.Mutation inside that root schema file.
Inside this schema file we'll be defining:
A mutation for creating a new user,
A query for retrieving my own user profile
Another query for retrieving all users
with authentication restrictions for role and if the user is authenticated.
./django/api/schema.py
from django.contrib.auth import get_user_model
from graphene_django import DjangoObjectType
from api.models import profile
from graphql_jwt.shortcuts import create_refresh_token, get_token
import graphene
import graphql_jwt

## Mutation: Create User
# We want to return:
# - The new `user` entry
# - The new associated `profile` entry - from our extended model
# - The access_token (so that we're automatically logged in)
# - The refresh_token (so that we can refresh my access token)

# Make models available to graphene.Field
class UserType(DjangoObjectType):
    class Meta:
        model = get_user_model()

class UserProfile(DjangoObjectType):
    class Meta:
        model = profile

# CreateUser
class CreateUser(graphene.Mutation):
    user = graphene.Field(UserType)
    profile = graphene.Field(UserProfile)
    token = graphene.String()
    refresh_token = graphene.String()

    class Arguments:
        username = graphene.String(required=True)
        password = graphene.String(required=True)
        email = graphene.String(required=True)

    def mutate(self, info, username, password, email):
        user = get_user_model()(
            username=username,
            email=email,
        )
        user.set_password(password)
        user.save()

        profile_obj = profile.objects.get(user=user.id)
        token = get_token(user)
        refresh_token = create_refresh_token(user)

        return CreateUser(user=user, profile=profile_obj, token=token, refresh_token=refresh_token)

# Finalize creating mutation for schema
class Mutation(graphene.ObjectType):
    create_user = CreateUser.Field()

## Query: Find users / my own profile
# Demonstrates auth block on seeing all user - only if I'm a manager
# Demonstrates auth block on seeing myself - only if I'm logged in
class Query(graphene.ObjectType):
    whoami = graphene.Field(UserType)
    users = graphene.List(UserType)

    def resolve_whoami(self, info):
        user = info.context.user
        # Check to to ensure you're signed-in to see yourself
        if user.is_anonymous:
            raise Exception('Authentication Failure: Your must be signed in')
        return user

    def resolve_users(self, info):
        user = info.context.user
        print(user)
        # Check to ensure user is a 'manager' to see all users
        if user.is_anonymous:
            raise Exception('Authentication Failure: Your must be signed in')
        if user.profile.role != 'manager':
            raise Exception('Authentication Failure: Must be Manager')
        return get_user_model().objects.all()
Tying It All Together
By visiting urls.py, we can ensure that our routes are setup to make our GraphQL API accessible to our Hasura instance.
./django/app/urls.py
from django.contrib import admin
from django.urls import path
from django.views.decorators.csrf import csrf_exempt
from graphene_django.views import GraphQLView

urlpatterns = [
    path('admin/', admin.site.urls), # Exposes your django admin at http://localhost:8000/admin/
    path("graphql", csrf_exempt(GraphQLView.as_view(graphiql=False))),  # Exposes your django admin at http://localhost:8000/graphql
]
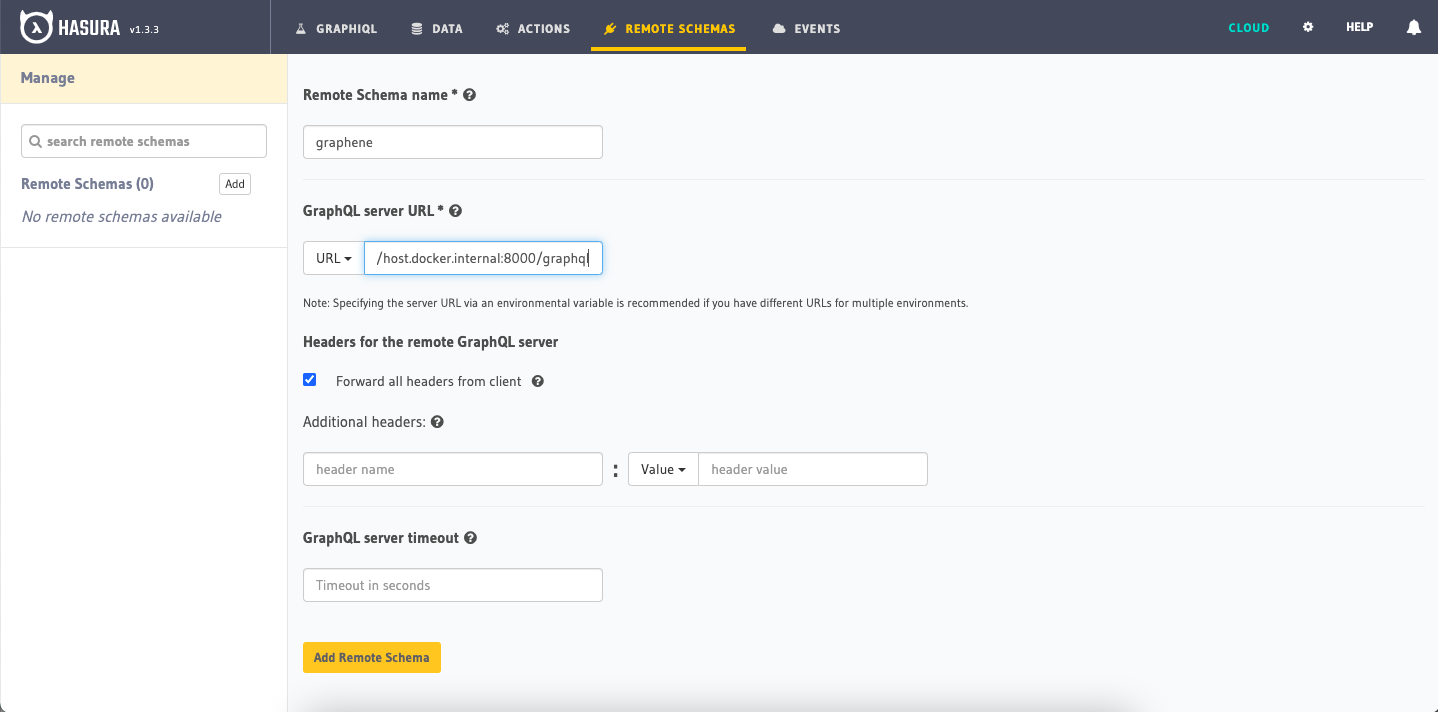
Now, if you're using the docker-compose starter you should already be setup with docker being connected to Hasura - but if not, you can make sure all your containers are running and visit: http://localhost:8080/console/remote-schemas/manage/schemas
From here, you'll be able to mesh your Graphene GraphQL API to Hasura by entering http://host.docker.internal:8000/graphql as your GraphQL Server URL:
Connecting Graphene and Hasura
Testing Our Requests
Hasura has a great GraphiQL request tester which can be found here to run through some sample requests and responses - http://localhost:8080/console/api-explorer
Creating a User
Let's get started with creating a user - we can see some of the nested relationship structures which are possible within GraphQL.
We've returned a token here - this token will be available as our access token for the next 5 minutes.
If our token expires, we're able to refresh the token using refreshToken - this will result in a response with a token with an updated expiry time (+ 5 minutes in this case).
But what else can we do once we have an external Django auth service?
We can create more remote schema nodes similar to users and whoami above to to extend our API's logic.
We can link up our Django service to work with Actions and Events.
We can use our JWT implementation to authenticate with our Hasura service and configure row-level permissions using our x-hasura-... JWT claims which were set in the JWT encoder.
If you'd like to talk to us about this article or just connect with the team, you should join our community!
Check out the Python backend course. In this course, you will learn how to integrate Python in a GraphQL backend server stack with Hasura.