This article was written by Migsar Navarro as part of the Hasura Technical Writer Program. If you would like to publish an article about Hasura or GraphQL on our blog, apply here.
Hasura can be a really cool tool to get an immediate GraphQL API for an existing database, one thing I hear less often is that it is a great tool for early prototyping that allows you to create a nice Back-end as a Service(BaaS) for a site in minutes locally. Finally, you can be rest assured that it will be easy to migrate to a robust infrastructure like Hasura Cloud with minimal changes.
This post assumes you already have:
Docker and docker-compose installed and running
Node.js and Nuxt.js command-line tool
We will use Fastify as our server but you can use Express, Nest or any serverless functions’ provider. It will run inside Docker, same as Hasura, so you don’t need to install any additional software. The ideas here are intended to give you a quick introduction to Hasura and to show you how it is flexible enough to be used for front-end development out of the box with almost no learning curve. We will focus on the core concepts and architectural decisions, nevertheless we will end up with a simple but fully functional application.
Table of Contents
Local Hasura setup with Docker Compose
Nuxt.js app setup
Authentication with Hasura
Hasura’s actions
The whole code for the sample project is available on Gitlab.
How do I get started?
You can always use Hasura Cloud to get an instant backend, but in this tutorial I will show you how to use it locally.
Let's start by taking a look at the install manifests provided by Hasura, here, in the install-manifest folder of the graphql-engine repository. We can see they have all common options covered, we will use docker-compose/docker-compose.yaml . Run the following commands in the terminal.
mkdir hasura-test
cd hasura-test
wget -O server/docker-compose.yaml https://raw.githubusercontent.com/hasura/graphql-engine/master/install-manifests/docker-compose/docker-compose.yaml
docker-compose up
That's it, we have our instance running, we can see the admin panel at http://localhost:8080 and we can start hitting the GraphQL API at http://localhost:8080/v1/graphql, of course, we still don't have any model. Don’t worry, this was just a quick start to get a glimpse of how easy it is, but actually we will try to get this inside a Nuxt project. As you just saw, Hasura set up is just a docker-compose file, so let’s create a clean Nuxt.js application and move this file to it.
Press Ctrl-C to stop the project and then install Nuxt.js:
# yarn create-nuxt-app <project-name>
npx create-nuxt-app hasura-as-baas

# This is not the full output, just some config options
# create-nuxt-app v3.4.0
# ? Programming language: JavaScript
# ? Rendering mode: Universal (SSR / SSG)
# ? Deployment target: Static (Static/JAMStack hosting)
# 🎉  Successfully created project hasura-as-baas
#  To get started:
#        cd hasura-as-baas
#       yarn dev
Before start developing let's create a server directory and put our docker-compose.yaml file there:
mkdir server
wget -O server/docker-compose.yaml https://raw.githubusercontent.com/hasura/graphql-engine/master/install-manifests/docker-compose/docker-compose.yaml
Now that we have both the front-end and the back-end installed let's help them start talking.
Data Models for the application
We will create a very basic shopping list with user authentication, that means, some lists will be public and displayed to all users but users will be able to have their own private lists. We will focus on authentication, user experience will lack some basic features but this will allow us to take out a lot of the complexity by removing all front-end talk and, as a consequence, having clear principles that are easier to adapt to your own projects . First, we will use a webhook to get user authentication working.
Roles
Registered
Anonymous
Models(tables)
Roles(Needed to implement roles in Hasura)
Users
Products
Lists
Creating roles
Hasura has enum tables that are a more suited version than Postgres enums because they allow more flexibility. We can turn any table into an enum if it follows some rules, it can have two fields, value and description of type Text and must have at least one row, that is why the order for the following tasks is important. You can find more details in the enum docs.
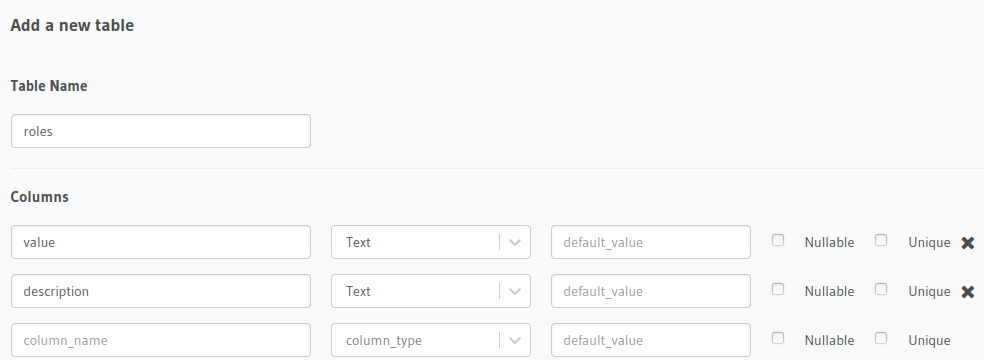
Create roles table
Create the table
Open the GraphQL console at http://localhost:8080.
Click the Data tab on the top.
Click the Create table button that is next to Schema title.
Write roles as the name.
Add a two columns of type Text and click Create table
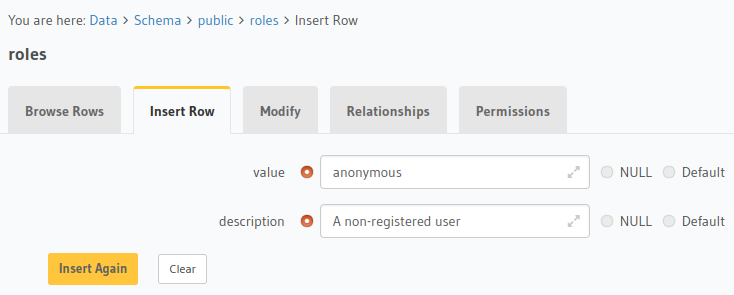
Interactively add roles
Add values
Add ‘registered’, ‘A registered user’ as first row.
Add ‘anonymous’, ‘A non-registered user’ as second row.
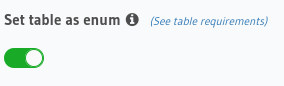
Use table as enum
Set table as enum
Go back to Modify tab and almost at the end of the options there is a toggle Set table as enum, activate it.
Creating users
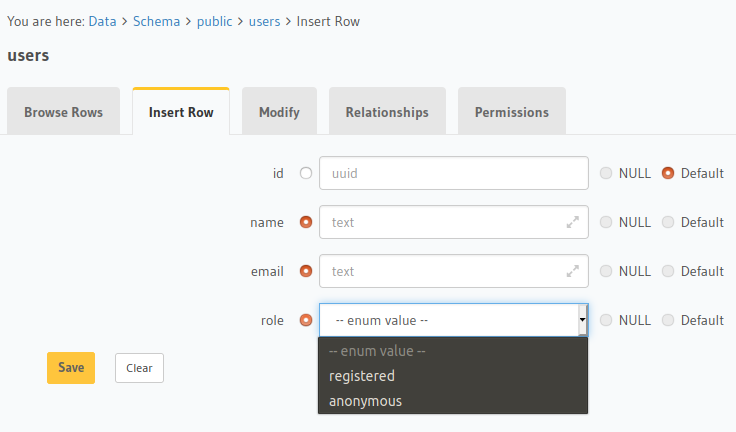
Now we can create the users table, we could have created it before the roles table and then get back to modify it, it is a matter of personal preference but there is no constraint imposed by Hasura, it is as easy to modify it after creation as it is to customize on creation. One really nice thing is that after creating this table in the Insert row tab you will be able to choose role with a dropdown.
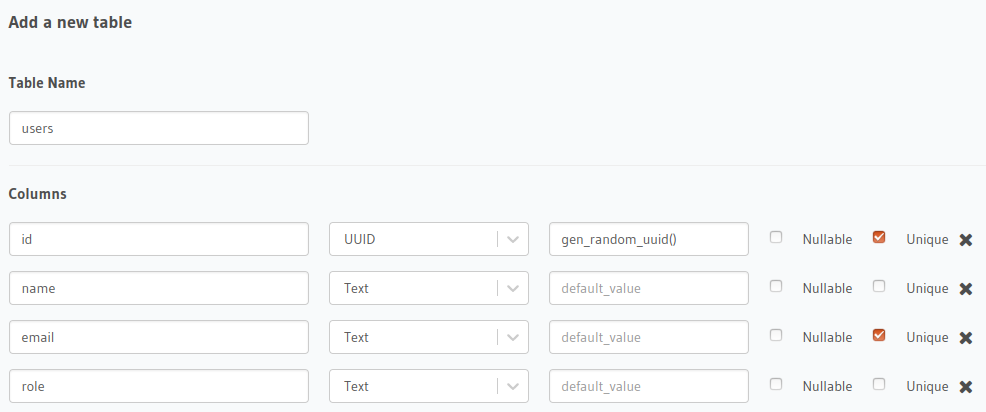
Create users table
Create the table
Use users as the name.
Add id of type UUID with gen_random_uuid() as default value.
Add name, email and role of type Text.
Set id and email as unique.
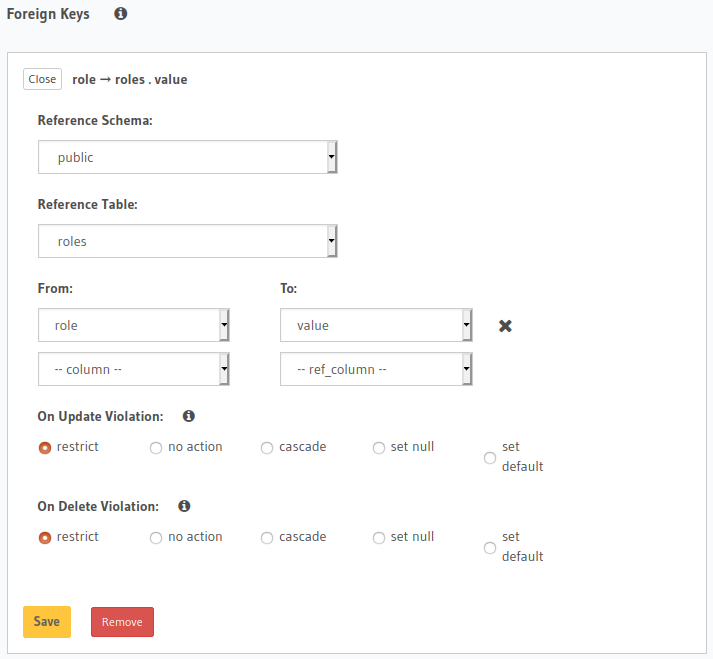
Add a foreign key, reference the table roles from role to value.
Adding roles as foreign keyEnums are displayed as dropdown
Relationships: Products and lists
The creation of this tables is similar, we will need in id, name and description for both of them. For list we will additionally need userId that references users. Then, since we have a many-to-many relationship between lists and products we will need a pivot table list_products that has list_id and product_id and references each table respectively.
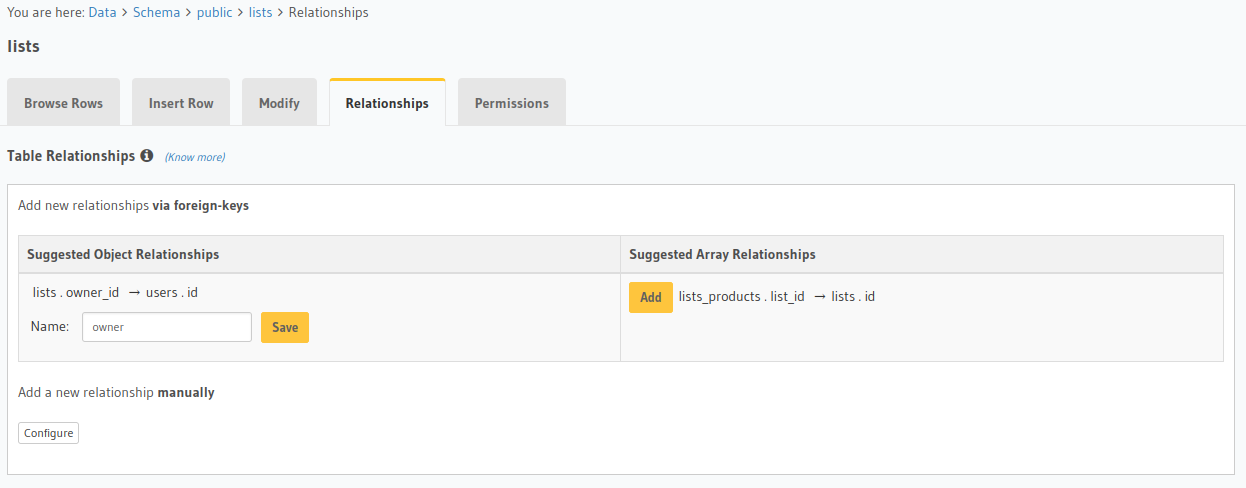
Creating relationships
One last thing is to create the relationships between tables, this is done in the Relationships tab of each table and it will allow us to create nested object requests, that is, GraphQL queries and mutations that modify more than one table at once, that will prove very handy in the next sections. There are six relationships that we can create, all of them detected automatically by Hasura and only four of them needed, the last one is created on the pivot table which we won’t usually use by itself.
Users’ lists. Allow us to retrieve full list objects for a given user.
Lists’ owner and products.
Products’ lists.
ListProducts’ list and product
There is a catch, when you create this kind of relationships GraphQL schema will wrap the nested object inside of another object, it is not a big deal but you have to keep it in mind when writing your queries. We will talk about this on the next section.
Creating sample data
Now that we have our schema in place we can insert some sample data to be able to test our authentication and authorization policies and also to test the service we will add with an action. All code here is meant to be used inside the Graphiql console provided by Hasura. You can use the Explorer to help you write the queries, I’ll make a note here because I found this behavior a bit tricky, to create mutations or subscriptions clear the GraphQL text box and then go select the desired option on the dropdown at the bottom of the panel and click the + button, the content of the panel will change and you’ll be able to start using it.
We have hard-coded all the information, we could use variables but let’s keep it simple, one thing to note is how nested objects are a bit convoluted, products is an object with a data prop that contains an array of products, but since it refers only to the pivot table and not the products table itself what we are declaring is an array of references to products from the pivot table, so we need to use a wrapper again.
Business Logic Functions
Once you’ve decided you can have your full API in Hasura you still need to choose which language and framework you want to use for these business logic functions. It is a really flexible solution since the interface is a regular HTTP service, the implementation is completely up to you. Here we are going to use Node.js Fastify. The overall structure of the function is very similar but there will be some differences in the shape of the payload and in the expected response. Our servers will have a single route, the root path. To get started with this I’ve put together a fastify-docker-starter repository on Github, you can clone it and then remove the git files:
cd server
git clone https://github.com/migsar/fastify-docker-starter my-function
rm -rf my-function/.git
These functions could be executed locally, since Hasura is already using containers it is a better approach to start packing these functions there as well, keeping these things together will help you migrate quickly to a cloud infrastructure provider. We will limit the number of Docker commands we will need and all of them are included in the package.json for the sake of convenience. As a convention we will name the images hasura-baas-* where the * is replaced by the name of the service.
You can easily start building your own API in a single container using routes. I prefer to have single route very specific containers because those are usually completely decoupled and easy reused among different projects. It is all about finding the sweet spot for the project at hand.
Authentication
So far all request are unauthenticated, or put it another way, everyone has admin permissions on the database. This is not the best option for obvious reasons. We will need to enable some form of authentication.
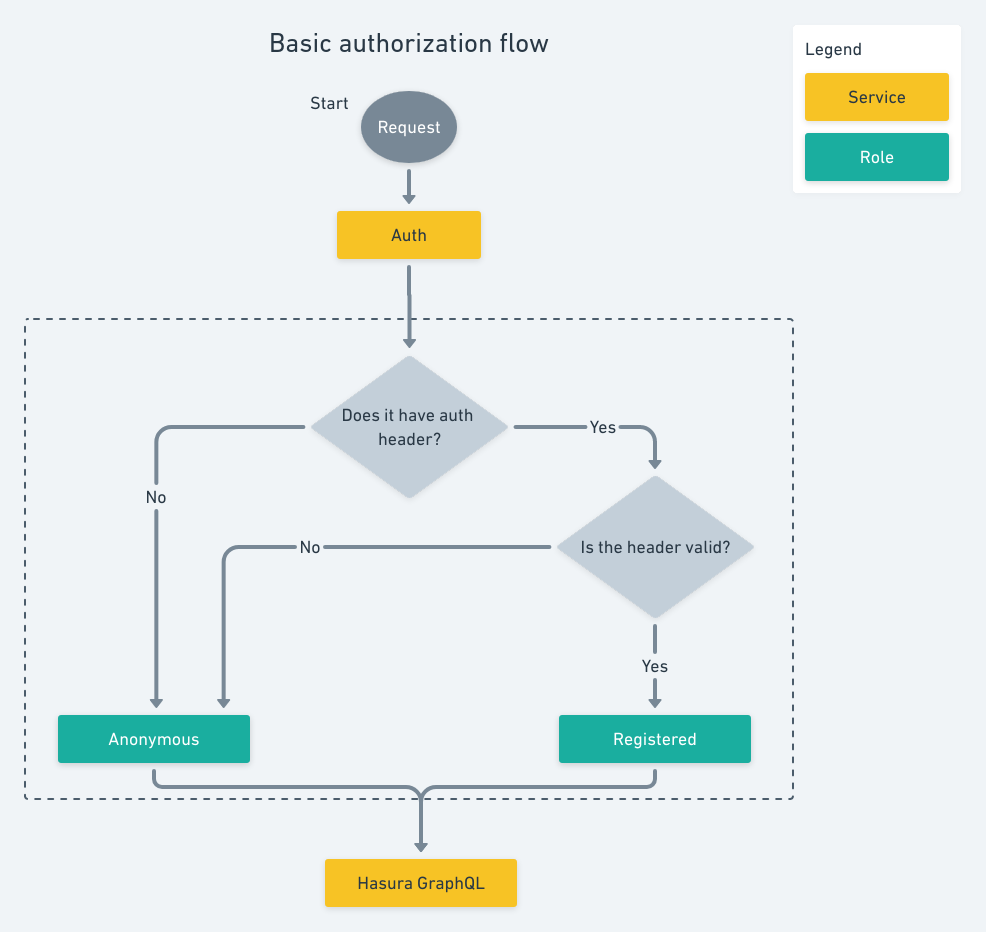
Basic authentication flow
Hasura allows for webhooks and JWT authentication, we will cover only the first in this post. It is important to emphasize that Hasura instance will communicate with our service, not the front-end. Authentication can be very specific to some projects and there are some complex topics as caching and storing tokens that are not covered in this article.
Out of the box, Hasura’s installation is open, however Hasura provides a way to skip authentication, it is an environment variable called HASURA_GRAPHQL_ADMIN_SECRET that is set in the docker-compose.yaml, it is already included but commented out, once enabled if it is present it won’t check anything else and allow you to do anything. If it is not it will deny access or look for alternative methods.
Webhooks is one of these alternative methods; to configure it we will need to setup two env vars:
HASURA_GRAPHQL_AUTH_HOOK: the webhook’s endpoint.
HASURA_GRAPHQL_AUTH_HOOK_MODE: the request’s method, GET or POST.
We will add all three variables to docker-compose.yaml and configure the admin secret for development and the hook for production. If we want to go a step further we can create a .env file in out root directory, move the environment variables there and reference it from our docker-compose.yaml, be sure to change : to = and remove the " around true’s. I really like this to be sure envvars never made their way into the repository, since .env is in common .gitignore configurations. If you want to learn a bit more check Docker Compose’s documentation.
Our authentication service will be very basic, but keep in mind that it is a regular HTTP endpoint, that has two important implications. The first is that you are not limited at all to use Node.js, the second is that you can just plug something already battle tested, like passport and any of the strategies it has. We won’t do that here. We will add a header x-email to our requests, if it is present and if the mail is already in our database then it is a registered user, otherwise it is anonymous.
/server/docker-compose.yaml
# Not all the code is displayed
services:
  auth:
    image: hasura-auth:v1
    restart: always
    env_file:
      - ../.env
/server/auth/src/index.mjs
/ Not all the code is displayed
import pg from 'pg';
const { Pool } = pg;

const {
  AUTH_SERVER_HEADER_KEY: headerKey,
  HASURA_GRAPHQL_DATABASE_URL: connectionString,
} = process.env;

// Read-only SQL
const getRoleQuery = ({ email }) =>
  `SELECT role FROM users WHERE email='${email}'`

const pool = new Pool({ connectionString });

server.post('/', async (req, reply) => {
  const { headers } = req.body;
  if (!headers) {
    return reply.code(400).send(new Error(Errors.NO_DATA));
  }

  if (!headers[headerKey]) {
    // Here we can return any other session variable
    // Just add another key with the form X-Hasura-*
    reply.code(200).send({ 'X-Hasura-Role': Roles.ANONYMOUS })
  }

  try {
    const { rows } = await pool.query(getRoleQuery({ email: headers[headerKey] }));
    const role = rows.length > 0 ? rows[0].role :  Roles.ANONYMOUS;
    reply.code(200).send({ 'X-Hasura-Role': role })
    reply.code(200).send();
  } catch (error) {
    return reply.code(400).send(error)
  }
})
One final step, we need to create the image with the name we referenced in the docker-compose.yaml file docker build -t hasura-auth:v1 . On /server/auth. Next time we bring Docker Compose up we will have our authentication service. At this point you might ask, “We have a user, but how will new users sign up?”. It is a fair question, the answer for now is, they won’t someone will have to add them, either a registered user or someone connected with the admin secret header. There are different strategies and the truth is that this is highly implementation dependent, so it is hard to come up with a solution that fits all cases, two possible strategies are:
Configure the anonymous role to have read-only permission to most assets but write permissions to users table, this could work in internal applications since your users are trusted to some extent.
Use a mix of actions and backend-only permission in the write roles to add an additional verification layer.
You can always just skip this and create a service that directly writes the user into the database but I think that is the least elegant solution.
Authorization / Access Control
We now have roles in place, the sad thing is that we have not set any clear policy, the only role used in Hasura so far is admin, so when we try to access any thing with our brand new auth service in place we will get an error about things not being found in query root. A feature of Hasura is to have authorization built-in, and it is really nice to don’t have to worry about that, we have a very flexible way of defining the rules and Hasura will enforce them.
Let’s assume the admin key will only be used by developers, so we only have the two roles defined above: registered and anonymous.
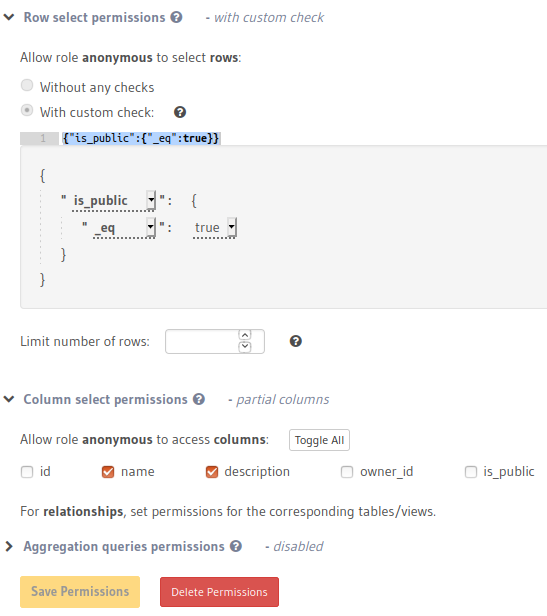
Anonymous is easier to define, it must be able to see public lists (we will need to add a boolean is_public column to the lists table to define a list is public), that is easy to accomplish, we have to go to the Permissions tab for the lists table in Data, and add a role anonymous, with the same case as it was defined in the roles table, then click the cross that appears in the select column of the permissions table, then add the following condition and select to share only the name and description columns.
Visual editor for permissions
{"is_public":{"_eq":true}}
As it is mentioned on the bottom, we must define permissions for the relationships in their own tables, it means we must allow select for lists_products and products table since we want to retrieve all information in a single request. For list_products we will allow access only to public lists:
{"list":{"is_public":{"_eq":true}}}
For products we will allow access to all of them but hide the id and only show name and description.
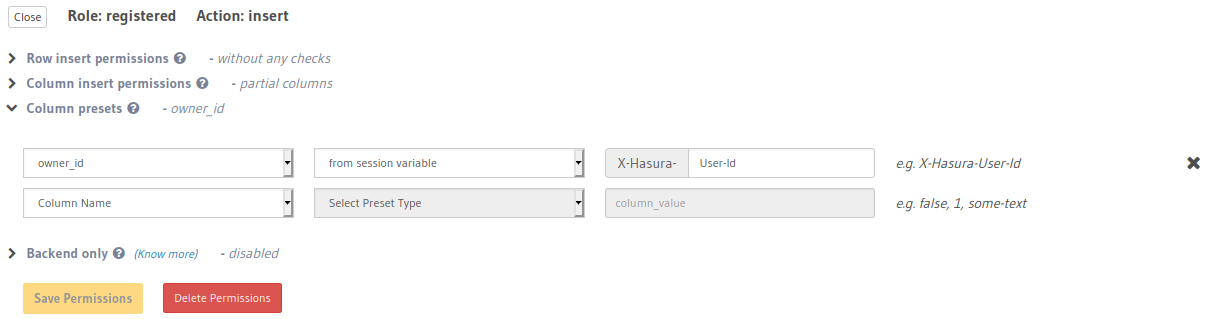
Registered user’s are a bit more complex, we must add the user owned products to select, add insert, update and delete permissions for them. Here is a summary:
Registered users will be able to insert without any check, we have to be careful about having permissions to insert in all related tables, in this case list_products and products otherwise the list will be created but the user will lack the ability to add products to it, there is no easy way to warn you about this because of the flexibility of the tool and the fact of this being related to your business rules. One last thing we can do to make sure our user only creates lists for himself is to use a column preset for the owner_id column.
Column preset for owner_id
Hasura Actions
Actions allow Hasura to provide third party functionality inside of the same GraphQL API, it is a great feature because it gives you the ability to use other services in a seamlessly and complaint way. One important thing to consider is that it has some cost, both in terms of infrastructure and abstraction, so it is important to find the sweet spot and if you use a lot of external functionality consider other options like remote schemas or even consuming two unconnected APIs only related through client state.
There are some benefits in using actions:
Keep the same models. You can use the same entities for a new but related service. Users don’t need to learn new abstractions or convert from one representation to another, it all happens with the same well-know GraphQL syntax and existing resources.
Security. The service won’t be accessed from public internet but from your Hasura server, that means infrastructure won’t be exposed even if it is secure
Speed. The call is done at the server, which can be located at a production grade server and optimized to talk with other services. It also mean one less request in the server which could be important to some users
Management. This one is tricky, I believe in job specialization, as such I think performant teams don’t need to know the whole stack or what it’s happening in other places of the application, that’s why you hire experts on each fields, if you can afford it and the project size worth it. By using actions you keep front-end users focused on front-end and not services.
We could use actions for sign up users, email verification or just sending them emails but that is a topic for another post. Just to say that actions are webhooks as well and share a lot of things with the function we just created for authentication.
GraphQL Integration with Nuxt.js
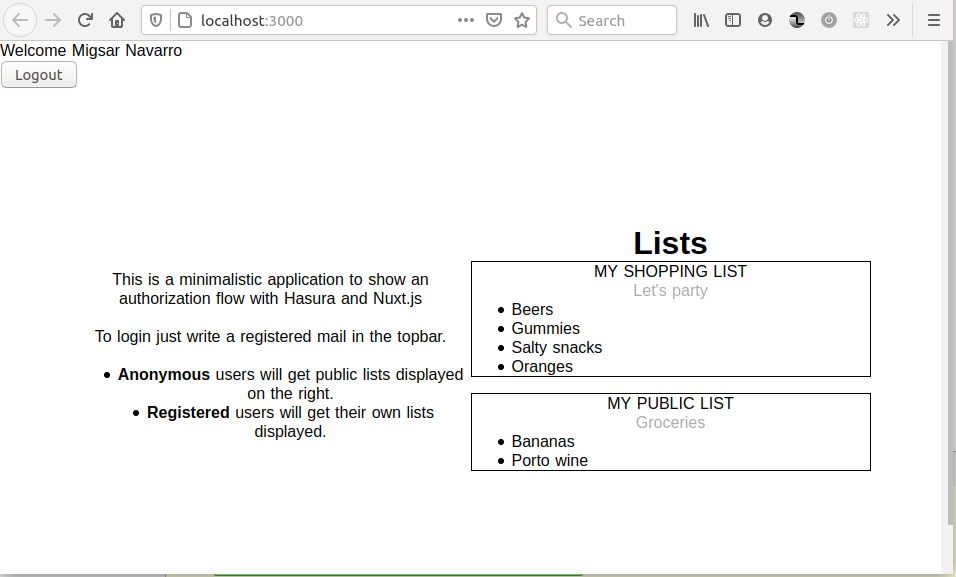
We finally have everything setup with Hasura so let’s head up to configuring Nuxt.js. Our approach here will be to have some setup in which we can have some granularity on permissions, you can switch easily from the admin with access to all queries, that can be useful as a developer, to a user with any of the allowed roles, without sharing the admin key. Our goal is to be able to see public lists listed in the landing page if we are not logged in and to be able to create a new list if logged in. We will set up a very simple application, we won’t use the router ourselves, just the internal one used by Nuxt.
Registered user view
First we need to add some dependencies, here they are as commands, I’ve group them just to give an idea of the thing they are used for but they can all be installed in a single line.
Most of these variables are self descriptive, _email is a variable used to hold the unauthenticated user for the authentication request, it could be done setting the role on the user instead, it is a personal preference, error can hold a string or null, if it holds a string that will be the error displayed to the user.
Not so human readable error message
App’s overview
This application is really simple, it consist in a general Vuex store, a single index view and the following components:
Layout - Common code to all views, we include topbar component here
Topbar - A bar with a login/logout area and an error area
ShoppingList - A component to display our shopping list
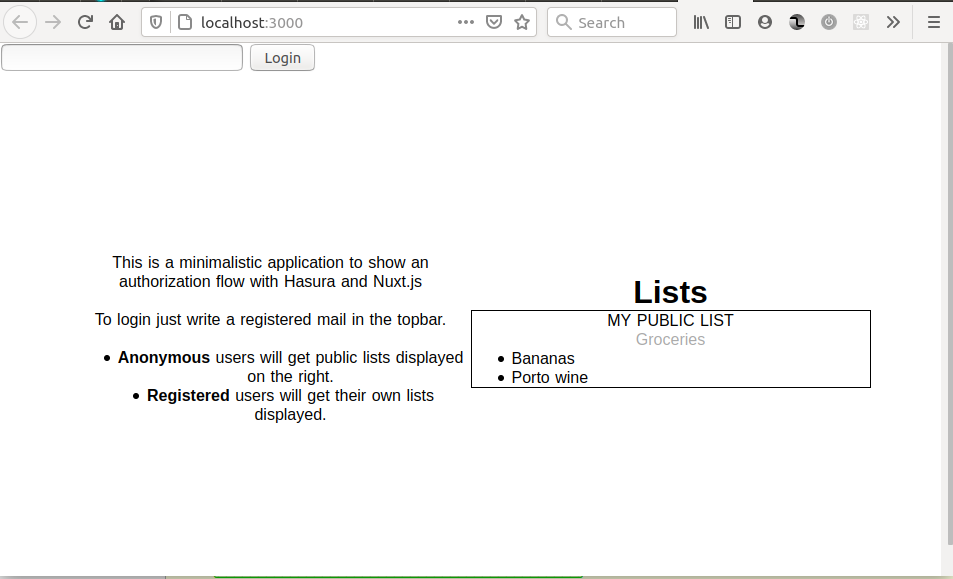
The user can login by typing an email that already exists in the database, if that’s the case it will be able to access private lists, otherwise only public lists will be displayed.
Anonymous user view
Configuration
First we need to add @nuxtjs/apollo to our modules key in nuxt.config.js and add a new apollo key configuring it:
/ If it is dev we will use Hasura's admin key
const ApolloClientConfigDevelopment = {
  httpEndpoint: process.env.APP_GRAPHQL_ENDPOINT,
  httpLinkOptions: {
    headers: {
      [process.env.AUTH_SERVER_ADMIN_HEADER]: process.env.HASURA_GRAPHQL_ADMIN_SECRET,
    },
  },
};

// It is not the whole config, just the relevant keys
export default {
  // Modules (https://go.nuxtjs.dev/config-modules)
  modules: ['@nuxtjs/dotenv', '@nuxtjs/apollo'],

  // @nuxtjs/apollo configuration (https://github.com/nuxt-community/apollo-module)
  apollo: {
    clientConfigs: {
      default: isProd
        ? '~/graphql/apollo-client-config.js'
        : { ...ApolloClientConfigDevelopment },
    },
  },
}
As you can see, we have two different configurations, one for production and one for development, the referenced file for production is here:
The important thing to notice here is that in one strategy the token is set at build time and in the other at runtime, I associated that with production and development because Hasura provides an admin key and my opinion is that it should not be used in production, EVER, even if it is a back-end only service. As mentioned you can tweak a bit this configuration depending on your needs and personal preference, this configuration is needed because of the way Nuxt.js is structured for be used with server-side rendering and static sites, but the whole fetch process can be delegated to a vanilla script GraphQL service or library if needed.
Queries and mutations with Apollo
If you have configured Nuxt.js to universal mode it will try to resolve request at build time, we need authentication to happen at run time, in the user’s browser. For this we will use fetchPolicy: no-cache in our queries.
We have two options to make our requests to the GraphQL API:
Inside of components
Inside of stores
One of the things I like about Vue is that it is very flexible, even if it is opinionated it is often more flexible than React in terms of the recommended way to do things, Vue’s state management allow easy access to all parts of the store by some convenient mappings, state, getters, actions and mutations. I prefer to have as much of the logic as possible in the store and have really clean and dumb components whenever it is possible, but here we will cover both ways of fetching GraphQL data.
In components you can simply add an Apollo key to your component, it has some loading information, that we won’t use here and at the end it will be available in the scope of the component with no further configuration:
<template>
  <div class="container">
    <shopping-list v-for="list in lists" :list="list" />
  </div>
</template>
<script>
// This is a js file that uses graphql-tag
import { GetAllLists } from '../graphql/lists';

// Not the whole componet, you must import shopping-list, etc.
export default {
  apollo: {
    lists: {
      query: GetAllLists,
      fetchPolicy: 'no-cache',
    },
  },
}
</script>
If you prefer to do it in the store the client is the same but the access is a bit different:
We need to use this.app.apolloProvider.defaultClient and manually take care of the result.
The source code for the working application is here.
Afterthoughts
Hasura can be a great addition for managing existing databases, it is great for creating databases and easily iterating on them for early prototyping as well. It can be used to set some common grounds between the back-end and front-end team by allowing both teams to comfortably work on the database. It can be used as a gentle introduction to back-end for front-end developers, it is possible to gradually transition from Hasura’s GUI to code and all database information is there accessible with any other tool. Finally, it can be used by developers and entrepreneurs to iterate quickly on back-end ideas and rest assured the work won’t be wasted once you need a more robust solution, in fact, it can be just a step away from production, particularly if you use IaaS.
Authentication is a tricky topic, not only from the point of view of security and auditability but from implementation and architecture as well, there is no solution that fits all cases and even using third party identity providers it can be cumbersome to integrate with your code base. I hope this article can work as a very light introduction and solve some technical common problems on the way. There are several strategies and ways around it, I think Hasura’s approach is very clean and elegant, authorization is already built-in and handled for you, and it left the authentication out but provides a well defined interface for it.
About the Author
Migsar Navarro is a full-stack javascript developer living in Porto, Portugal, with his girl and their baby daughter. He enjoys creating useful, performant and beautiful web applications, He cares as much about developer experience as he does about user interaction/experience. His mantra is: Code is meant to be read by humans but programs are meant to be used without knowledge of the code. He is interested in software architecture, design patterns, algorithms, documentation and communication. His background is in computer and civil engineering. Life for he is about balance. He enjoys running, cycling, swimming, landscape photography, reading and learning languages.