

A Tutorial using Hasura with Draftbit, a low-code tool for building mobile apps
In this tutorial we will integrate Hasura with the low-code mobile app development tool Draftbit. We will scaffold a basic application with Draftbit, map the required data to a couple of GraphQL queries, and save those queries behind idiomatic REST endpoints in the Hasura console. As mobile-first development continues to lead many of today’s go-to-market strategies for new initiatives, tools like Draftbit allow teams to iterate on layouts visually, with native code running in the background.
The Hasura features we’ll use
We will be using Hasura’s ability to generate instant REST endpoints to integrate with the UI components that Draftbit makes available to us. The primary glue to integrate Hasura with Draftbit is creating idiomatic REST endpoints for GraphQL queries in the Hasura console. This will allow us to define a query for Draftbit (which doesn’t support GraphQL), on the Hasura side and save that behind a RESTful endpoint. More on that later.
Our data model
We’ll be re-using an existing API for our project from an auto-tagging image service. If you’d like to follow along you can find the original tutorial here. The concepts involved are universal, so you can feel free to simply adapt the use-case for your individual project.
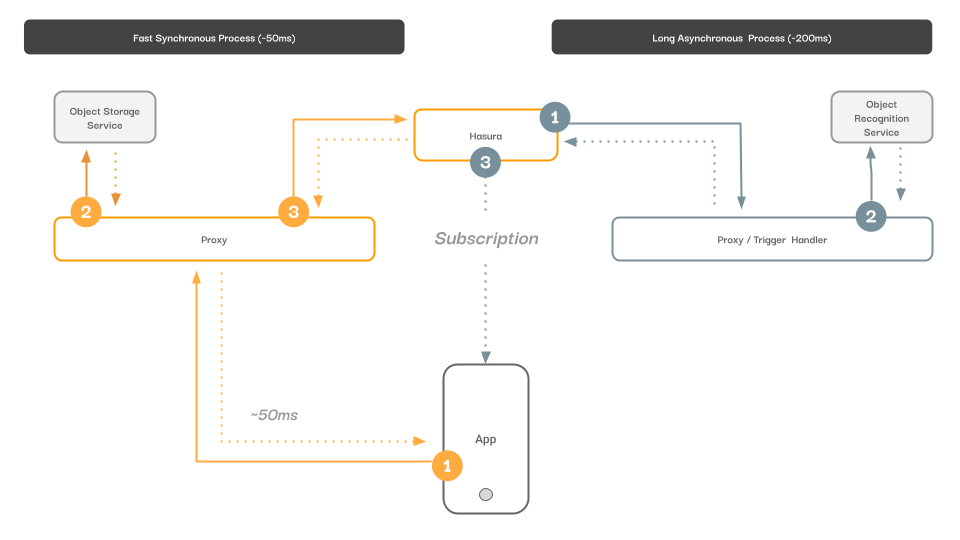
As a point of reference, our model reflects the following pattern.

The exact models vary, and include an upload join table with both photo and tags associated with a user.
The interface
For the purposes of learning we won’t be creating anything detailed with the interface. We’ll be using stock components from Draftbit and create an interface that let us view all the photos in a list, then view the details (tags) for an individual photo.
The Tutorial
Prerequisites:
- A working, accessible Hasura project (not running on localhost) with existing data. See the diagram below for reference.
- A Draftbit account.
From Draftbit
Create a new project from the Dashboard view.

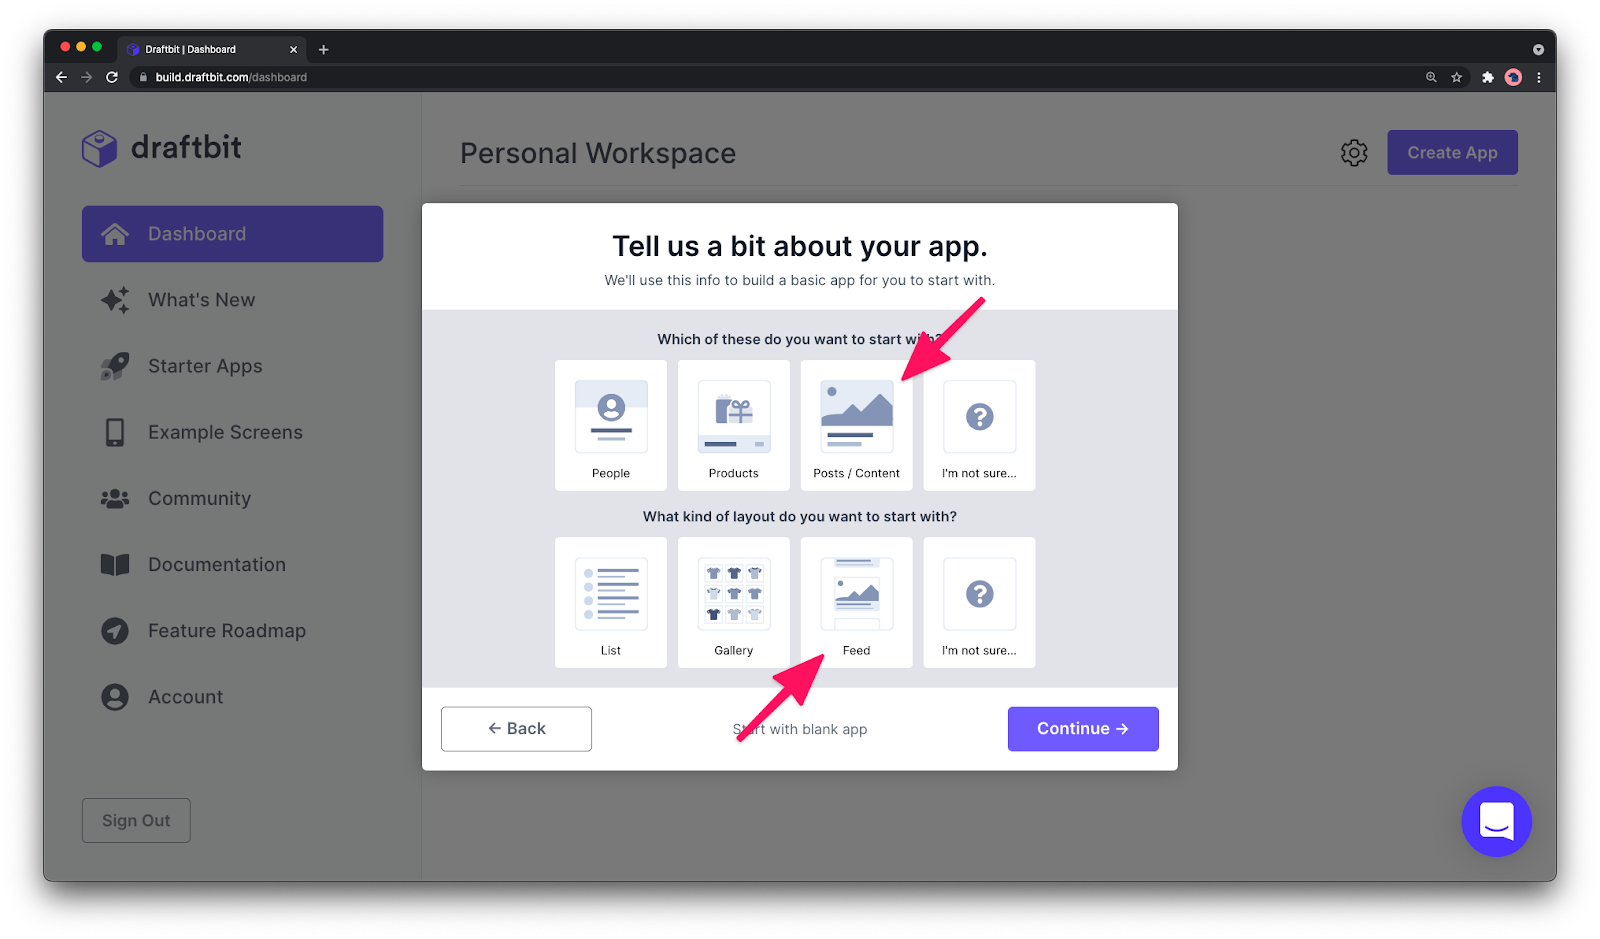
Provide some details about your application.

And for our demo we’ll be choosing “Posts / Content” and “Feed” as our template starters. Allow the project to finish initializing, then click “Start Building”.
The interface is quite intuitive with standard looking design and preview functionalities. You should be seeing an initial screen with a pre-filled feed of some data.

Let’s see how far we can get with these default settings by simply replacing the source content with our API. To do that, we need to select the data tab from the right-hand menu, and choose a custom API for “REST”.
Many tools including low-code tooling are optimized for REST consumption. This is exactly why Hasura has support for creating REST endpoints – for handling the widest range of use-cases possible.
And the best part is you still get to leverage your GraphQL experience!

We will be creating a base resource here that we can use throughout the application. In this case, I will simply name my resource “Hasura” – and for simplicity, I will provide my Hasura Admin Secret to authenticate the requests. You could use a user context for requests later on. If you would like to see user authentication with low-code, let us know!
Side note: You can create Global variables under the settings tab for the project to avoid pasting string values into the configuration here. These are loaded into the environment during runtime.

Returning to our REST API dashboard, we need to configure three critical parts of the resource definition.

We need to provide the base API path for REST requests to Hasura. This is the part of your API before the “v1/graphql” path segment. Then add “api/rest” at the end.
Secondly, we need to define the Hasura admin secret header (x-hasura-admin-secret) and the value - which I have defined in a global variable called “HAS”.

Once you have saved the resource, you need to define some endpoints which will be available to the application. But before we do that, we need to now turn to the Hasura console to define what those will be. Open your Hasura project in a new Tab so we can hop back-and-forth as needed.
The default UI from Draftbit’s feed component included a date, image URL, and title. Let’s fetch the equivalent data from our API. We won’t worry about pagination in this tutorial. I’ll create a named query operation that will request this data. It’s important for the next step that this be a named operation. It’s also a good best practice to name operations in general for tracking down performance leaks in our application.

With our query working, we’ll now navigate to the power feature available to us in Hasura which enables this entire integration.

From the REST interface, we can name our operation, choose our protocol, and create our endpoint. See the image below as a reference.

We’ll return to Draftbit and add an endpoint.


Skip step three.

Save that endpoint and click done on the API resource window. We’ve got our first resource from Hasura fetching data!
Now to iterate over our content, we need to tell our UI to use this new data source. Click on the “Fetch” component in our Layout tree on the left side of the screen.

From the data properties pane on the right side of the window, we’ll need to configure our new data source as the feed provider.

The blank screen means that it is working! Almost…
Now we need to choose the List component in the Layout tree on the left and ensure we’re still viewing the Data properties pane on the right. For “Data” we need to choose the response from our API that is of an Array type - in our case, it will be the first key in the response called “upload”.

You’ll see the list component update now to look as though it’s iterating over “items” - though they are all invisible at the moment. Now we’ll update which pieces of data will be fed into the UI and at which point.
Select the “image background” component in the Layout tree. From Data, we’ll choose the Source dropdown of the Setup section. We’ll look for “image.url” from the dropdown.

We have live art on the page!

Let’s move on to the date and title.
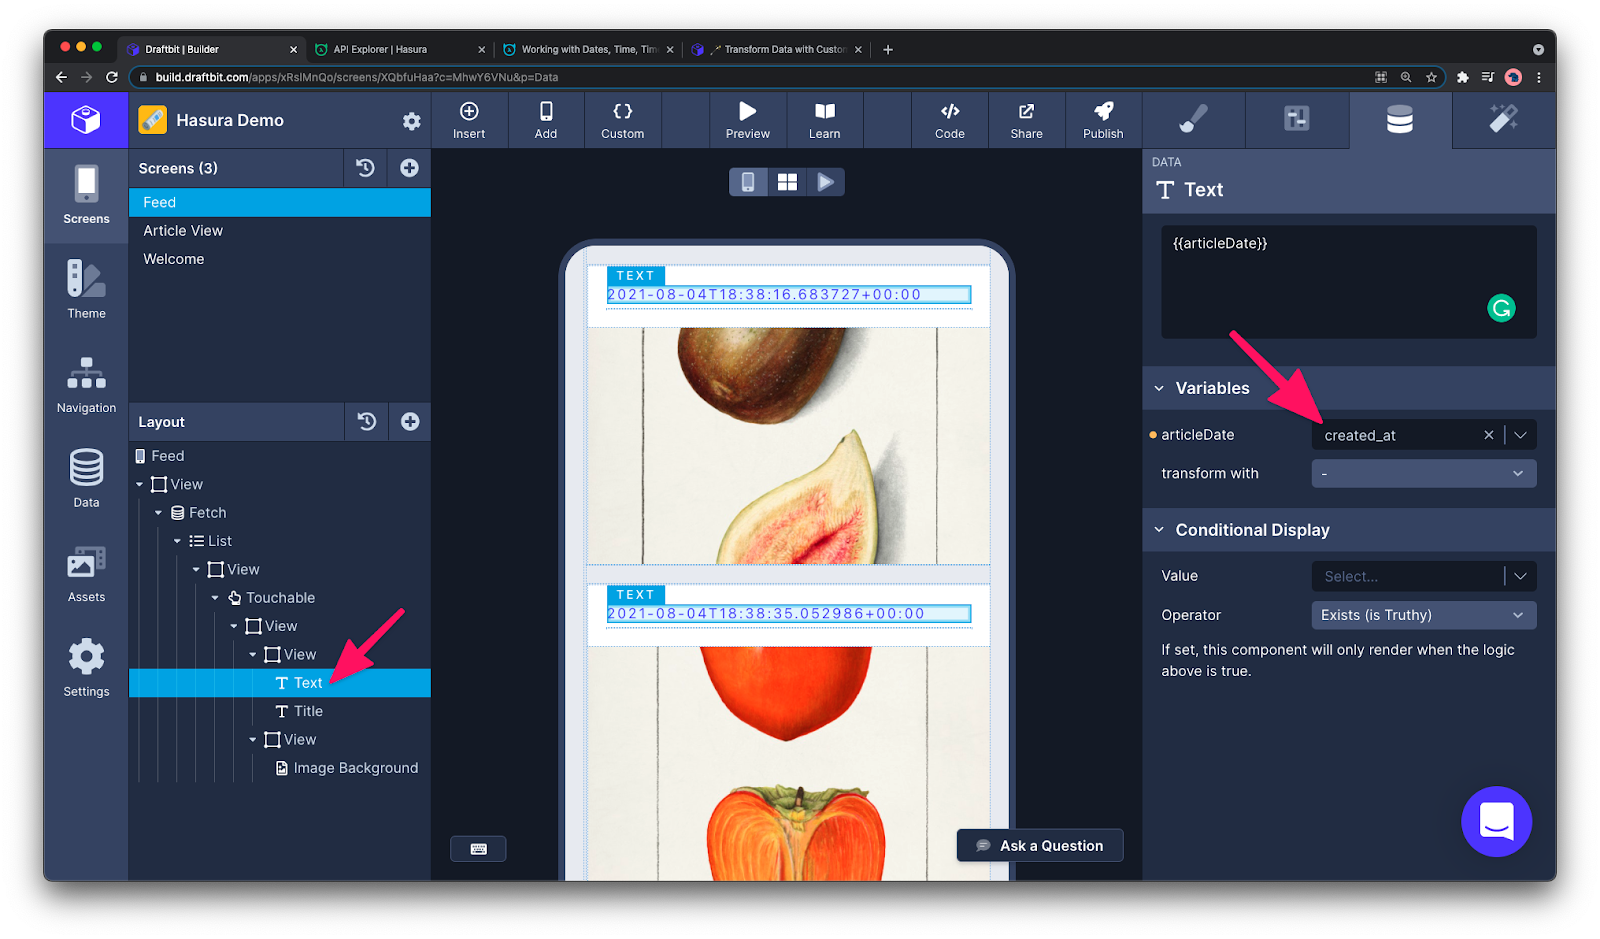
It seems that our date is coming back in an undesired format, let’s create a custom transformer to handle that.
Click on “custom” in the toolbar across the top. We’ll write a “low-code” transformer that runs on this bit of text.
Under the “Functions” menu item, click “+ Add” to create a new function.

Under the information for the function, provide a name and input parameters. For my date, I’ll do a simple Locale String parse. You can run any native Javascript and access some libraries if needed.

Select the new transformer and now we have nicely formatted date and time.

Let’s repeat these steps for our filename.

The code for the second transformer simply replaces some repetitive text in the titles.
function niceFormat(text) {
    return text
        .replace("image-from-rawpixel-","")
        .replace("-jpeg.jpg","");
}
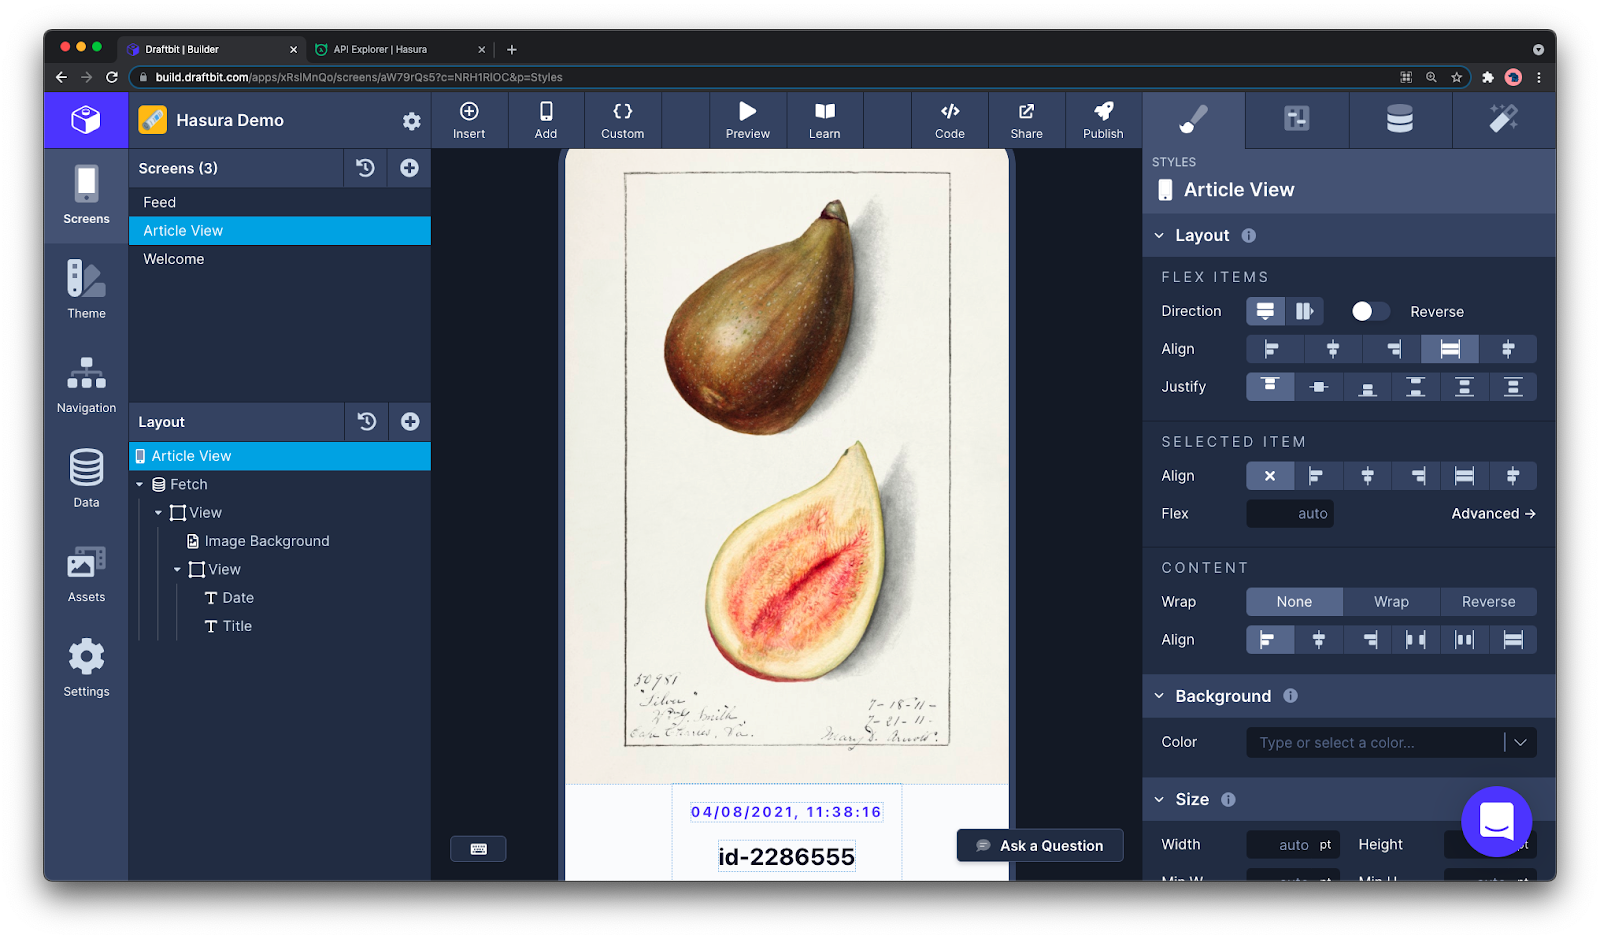
Play around with some of the formatting options for the different components. In my case, I wanted the posters to be full-size. The end effect looks like this.

Now it’s time to handle individual details. We’ll tell our “Touchable” component to pass the id of this box to the detail view screen.

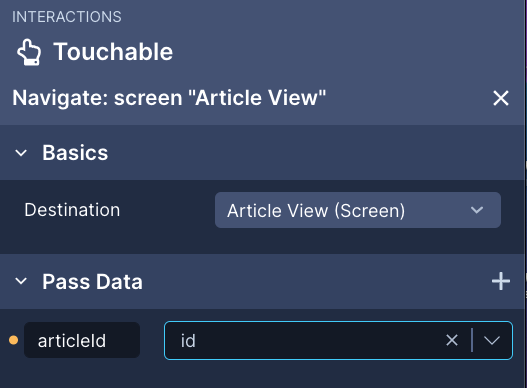
With that configured, we can now navigate to the Article View screen.

Looking at the top-level fetch for this view, under the Data panel, we can see that it passes “articleId” as a parameter to the URL structure of the request.
What this means is we will pass a variable with the value of the ID of an individual upload to a specified REST endpoint. Let’s create that endpoint in Draftbit now.
Note, we can provide a test variable that will be run in the case of a non-existing URL parameter, as is the case in development mode.

If we test that now, however, it will fail, since we have not defined the endpoint in Hasura. Let’s do that now. First, we test the query we’d like to persist to an endpoint.

Second, we need to save that as we did with our listing API call. Using the syntax :variable lets us define where we’ll accept inputs in the REST API parameters.

Back to Drafitbit, we can save that endpoint now that we have a successful Test case run.
Returning to our detailed view, we can select our top-level Fetch in the Layout browser, choose our saved Hasura service under the data tab, select the Get Single endpoint, and choose the articleId we passed in from our list-view (also defined in our test case).

We can see by the partial UI loading, that we are at least receiving some form of data. Let’s connect our pieces of data as we did in the previous screen.
With a little bit of cleanup on the components we need to display our data, re-applying some text transforms, and adjusting the styles, we end up with a rough shape of the following:
However, we’ve done nothing with our tags! Let’s add a way to loop over tag elements. Based on what we’ve seen so far, we can assume we’ll need some combination of another “View” box - typically as a container primitive, some form of a “List” component to iterate over an array of data, and the final form of our tag element.
Implementation details will vary, but with these primitives we were able to loop over our tags, and output them on the screen.

But we’ll notice that’s a lot of tags! And tags like “meat” don’t seem relevant to our pictures of fruit! Fortunately, our auto-tagging API includes the confidence level of these tags. Let’s adjust the response data from Hasura.
Here, we are limiting our tags to only those with a confidence greater than 50.

Once we save that data, we can fetch again from Draftbit to see what we get.

That’s a considerable improvement! It’s time to preview this app in context, and play with the different pages.
Pressing the play button gives us a scannable QR code to preview the app directly on our phones, you’ll need to download the Expo app, first.

With just a few functions, some powerful features from both Draftbit and Hasura, we’ve been able to create a native app from our API with very low coding, indeed.
Publishing this app is out of scope for this tutorial, but you can follow the guides at Draftbit and use the built-in UI to deliver your app to users around the world. To interact with this demo, use this link.

Build something with your API today and let us know what you made!

