

Hasura Actions using Netlify Functions for Custom Logic
What are Hasura actions?
What are Netlify functions?
How to write your own Hasura Actions using Netlify functions?
- Part I: Create a Function in an app
- Part II: Define the functions with logic
- Part III: Add the function to Hasura using Actions
Part I: Create a Function in an app
npm install -g netlify-clinetlify linknetlify functions:createPart II: Define the functions with logic
const axios = require("axios");

const hgeEndpoint = "https://example.hasura.app/v1/graphql";
const adminSecret = "adminSecret";

const handler = async (event) => {
  let request;
  try {
    request = JSON.parse(event.body);
  } catch (error) {
    // Make sure you add code and message to errors. These will be shown in the hasura console errors.
    let response = {
      status: false,
      code: "api/parse-error",
      message: "error",
      error: { message: "cannot parse input" },
    };
    return { statusCode: 400, body: JSON.stringify(response) };
  }

  if (!request.input.email) {
    // Make sure you add code and message to errors. These will be shown in the hasura console errors.
    let response = {
      status: false,
      message: "Please send email",
      code: "input/undefined",
      error: { message: "Please send email" },
    };
    return { statusCode: 400, body: JSON.stringify(response) };
  }

  let query = {
    query: `
      query check_user($email: String) {
        users(where: {email: {_eq: $email}}) {
          id
          email_id
        }
      }
    `,
    variables: { email: request.input.email },
  };

  try {
    let result = await axios.post(hgeEndpoint, query, {
      headers: { "x-hasura-admin-secret": adminSecret },
    });
    if (result.data.users.length > 0) {
      let response = {
        status: true,
        message: "success",
        user: data.data.users,
      };
      return { statusCode: 200, body: JSON.stringify(response) };
    } else {
      // Make sure you add code and message to errors. These will be shown in the hasura console errors.
      let response = {
        status: false,
        code: "user/not-found",
        message: "No user found",
        error: { message: "No user found" },
      };
      return { statusCode: 400, body: JSON.stringify(response) };
    }
  } catch (error) {
    let response = {
      status: false,
      code: "api/fetch-error",
      message: error.message,
      error: { message: error.message, detail: error.toString() },
    };
    return { statusCode: 500, body: JSON.stringify(response) };
  }
};

module.exports = { handler };
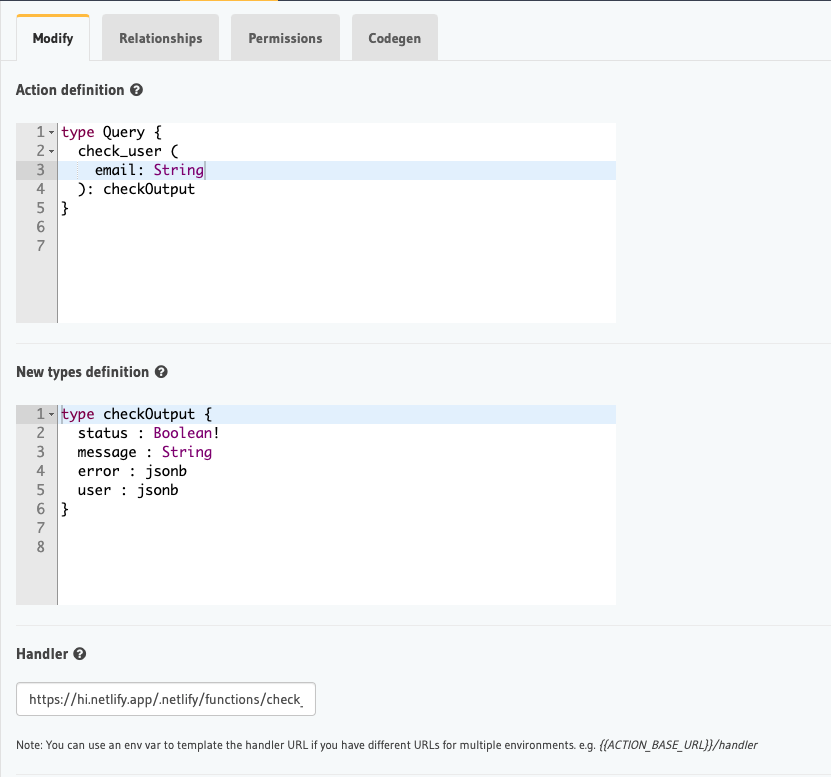
- Login to your Hasura console and go to the “Actions” tab
- Click on the “Create” button
- Define the inputs and outputs of your API as shown below. (Learn more about the GraphQL inputs & outputs on Hasura)
- Add the endpoint of your Netlify function under the Handler.
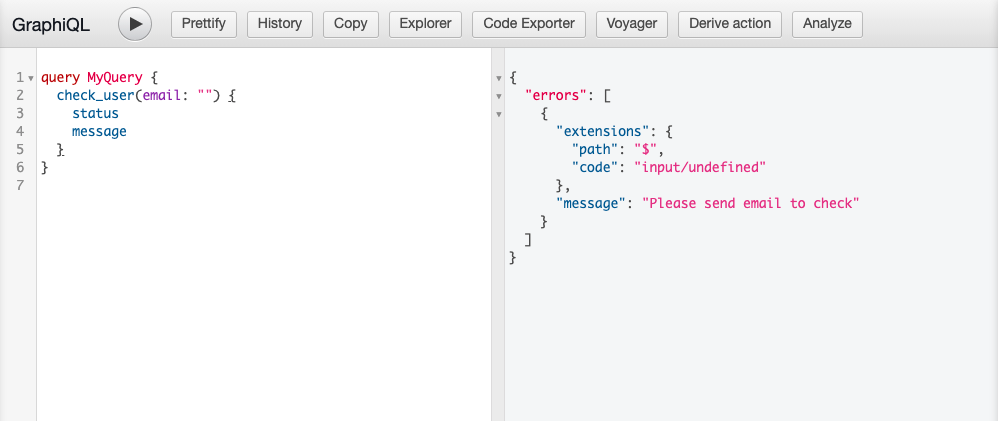
Try out the Actions using Hasura’s GraphQL API Explorer

- When the user is not found with the requested email, you’ll see the following (User not found in DB error)

- When the email is not sent along with the request, you’ll see the following (Validation Error)
About the Author
Related reading

