Announcing Hasura Notebook: Prototype fast on your GenAI apps [updated]
Hasura empowers you to rapidly create high-quality data APIs for production purposes. As data sources continue to evolve, Hasura evolves as well, providing you with the capability to construct secure data APIs over versatile data stores, including vectorized data.
As part of Hasura’s evolution, today we’re introducing Hasura Notebooks, a tool designed to facilitate the swift prototyping of cutting-edge GenAI applications.
In this blog, we’ll take you through this new tool to gain a comprehensive understanding of how it works and why you need it.🙂
GenAI revolution
Large Language Models (LLMs) are very large, deep neural networks trained on vast amounts of text data mostly scraped from the internet.
LLMs have taken the world by storm because these generalized language models are so good at understanding context, retrieving information, and generating content that can help us with numerous applications. And why not? Automation is the key to efficient applications.
At its core, LLMs learn the word probabilities to predict the next most suitable word given in a sentence. If the sentence is from a domain which the LLM hasn’t been exposed in the training period, then the LLM will make low-confidence predictions, which are known as hallucinations. We can deal with this problem by providing LLM context in prompts and instructing it to use the context to complete the task. This process is called grounding.
In order to maximize the potential of LLMs across a wide range of applications, it's essential to expand the scope of secure data sources. Given the fast-paced environment, it's equally important to avoid dedicating excessive time to constructing data APIs (a crucial yet somewhat mundane task 🤷♀️) when you could be focused on creating exciting and lucrative applications.
Hasura to the rescue!
Let’s now go through how you can quickly build secure data APIs and prototypes with a product search demo.
What is Hasura Notebook
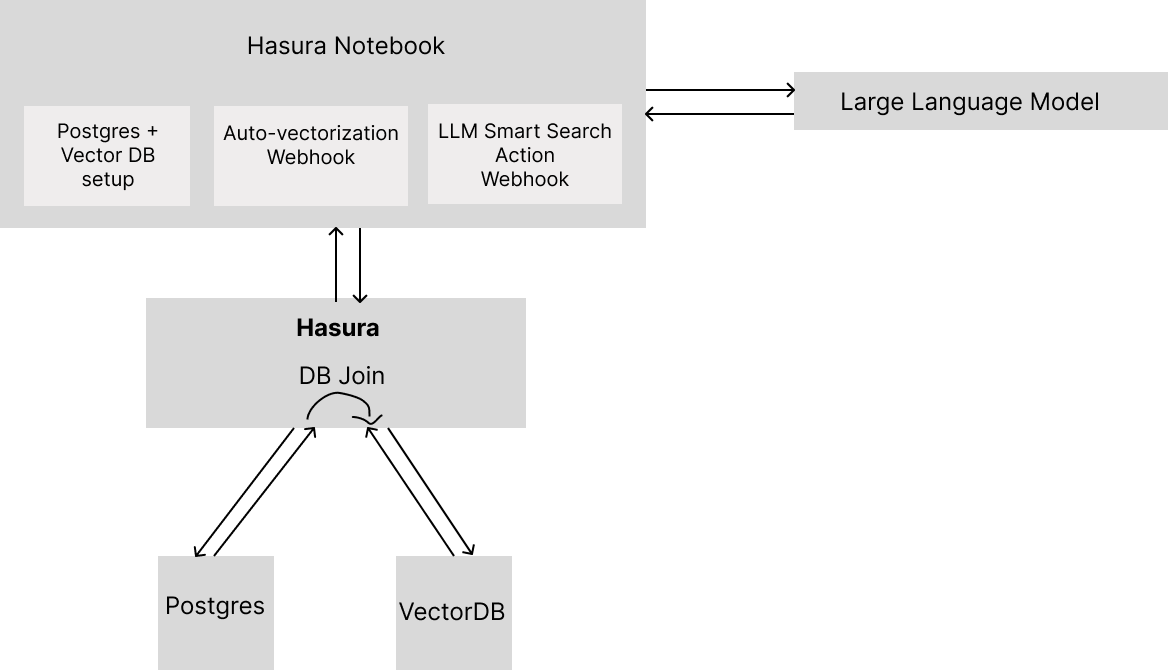
Hasura Notebook is a remote Jupyter Notebook with ready-to-run examples and Jupyter Kernel Gateway baked-in to turn your code cells into endpoints.
Hasura Notebooks are great if you want to quickly prototype GenAI applications with Hasura or learn GenAI from our existing templated projects.
Use case: Get a contextual product search powered by OpenAI in under 10 minutes 🚀
As you might have experienced yourself, searches on most e-commerce websites are keyword-oriented. This results in a lot of false positives or irrelevant results and can lead to dissatisfied users.
Contextual search is an answer to this problem. Contextual search matches the user query with the product description.
Prerequisites
1. Hasura CLI If this is your first time using Hasura CLI, you will need to install it. Follow the installation instructions on this doc.
2. Hasura Notebook Follow the steps in the documentation below to create your Hasura Notebook.
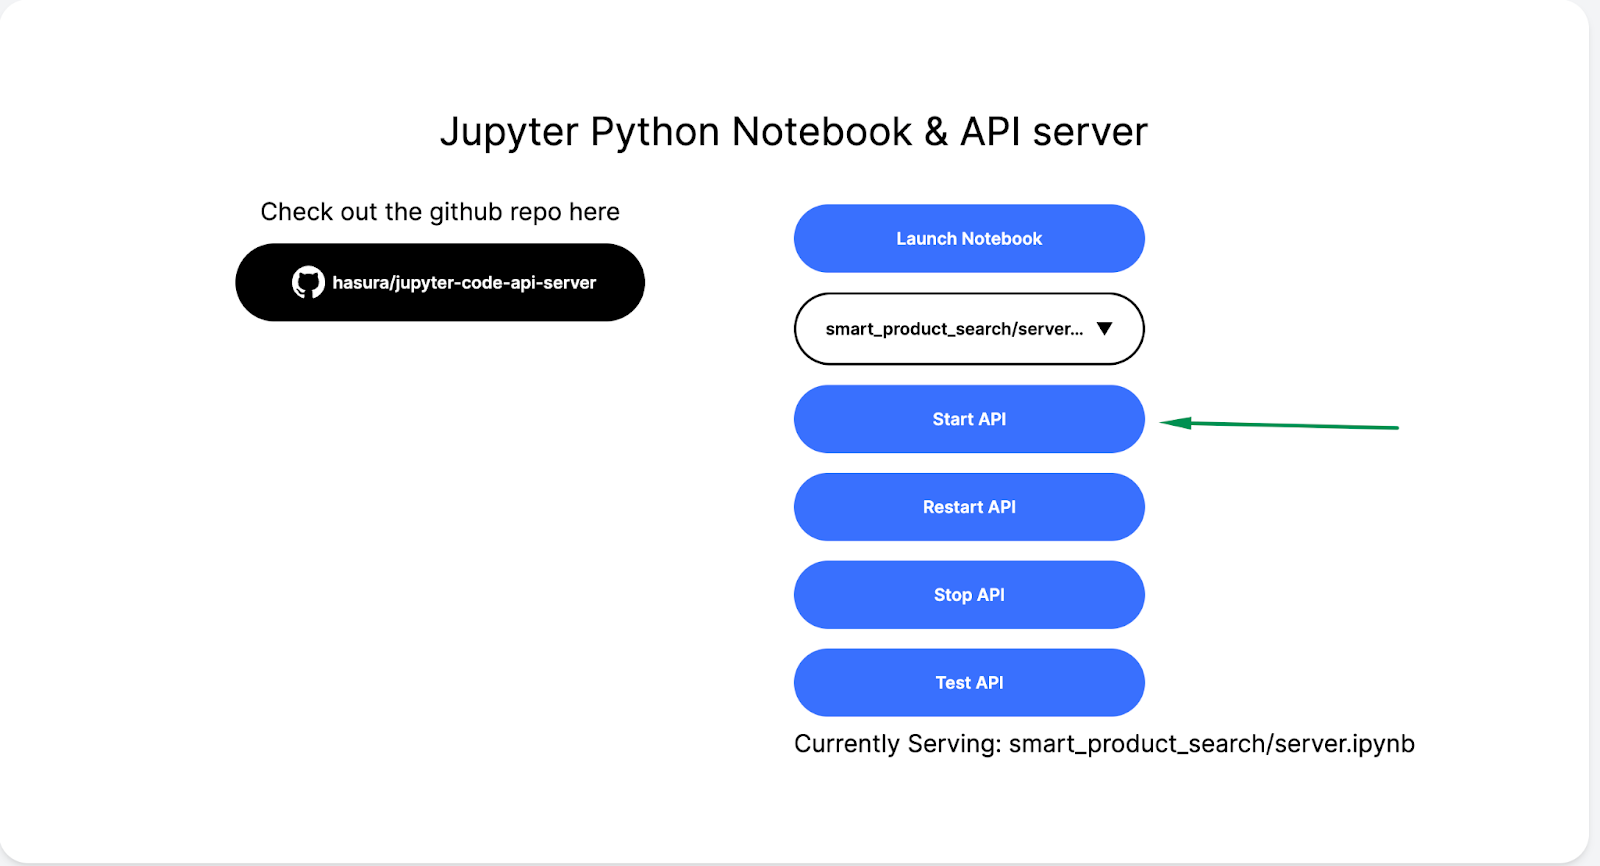
You will know you are ready when you are able to access the Hasura Notebook with a landing page that looks like this on your Hasura Notebook URL. Let’s get building! 🚀
Set up your PostgreSQL database
Step 1: Start a new Neon Cloud PostgreSQL DB or link your existing DB. More details on Neon Cloud PostgreSQL DB here.
Step 2: Create a new table called `base_products` and track it from the data tab.
Table name - base_products Columns id - integer (auto-increment) name - Text Description - Text
Tracking enables the table to be accessible through GraphQL query.
Set up your vector database
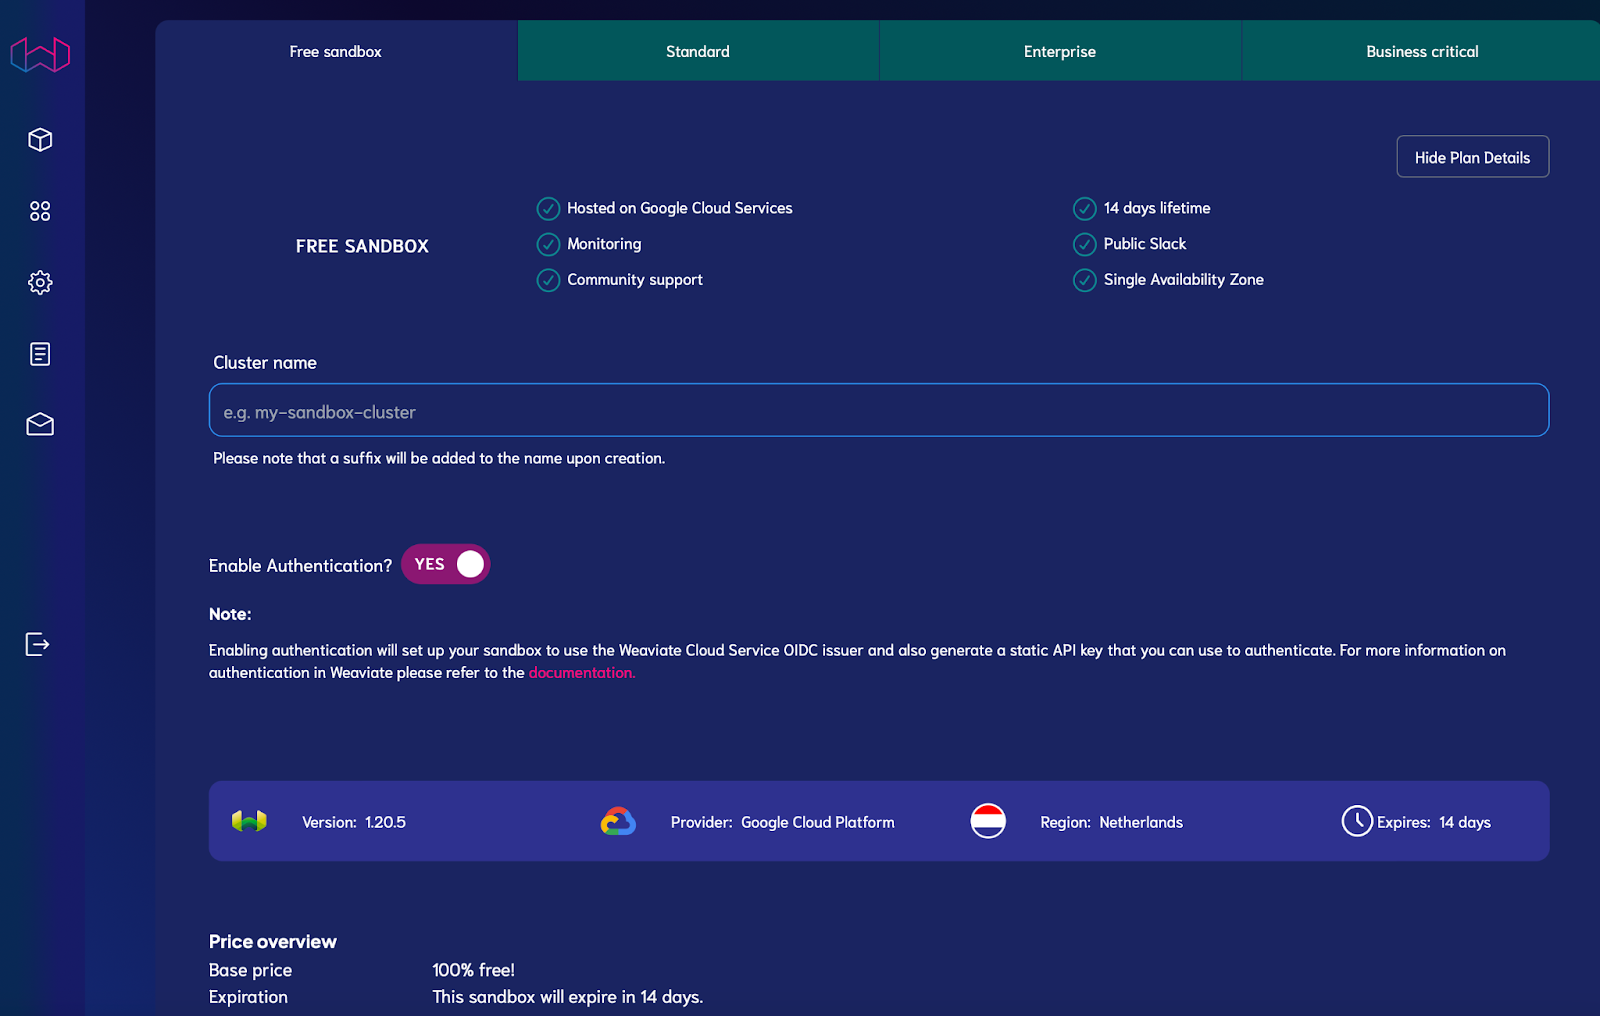
Step 1: Create a free 14-day cluster on Weaviate.
Head to https://console.weaviate.cloud/ and register for an account. After confirming via email, click + Create cluster and fill in a name before clicking Create. Once Weaviate has provisioned your sandbox cluster, proceed to the next step.
Step 2: Create the Product schema called Product_vectors. Product schema ID, Product Name, and Product Description. To execute this, run smart_product_search/setup_weaviate.ipynb
Step 3: Add the Weaviate table to Hasura.
Currently, the Weaviate connector is not natively available in Hasura. You can add it to Hasura in two simple steps using the Hasura CLI:
Deploy the Weaviate connector using Hasura CLI.
# create connector using our weaviate repo
hasura connector create my_weaviate_connector:v1 --github-repo-url https://github.com/hasura/weaviate_gdc/tree/main/

# check deployment status to get the endpoint
hasura connector status my_weaviate_connector:v1
# you can also use list command
hasura connector list

# view logs at any point of time
hasura connector logs my_weaviate_connector:v1

# for more commands explore help section
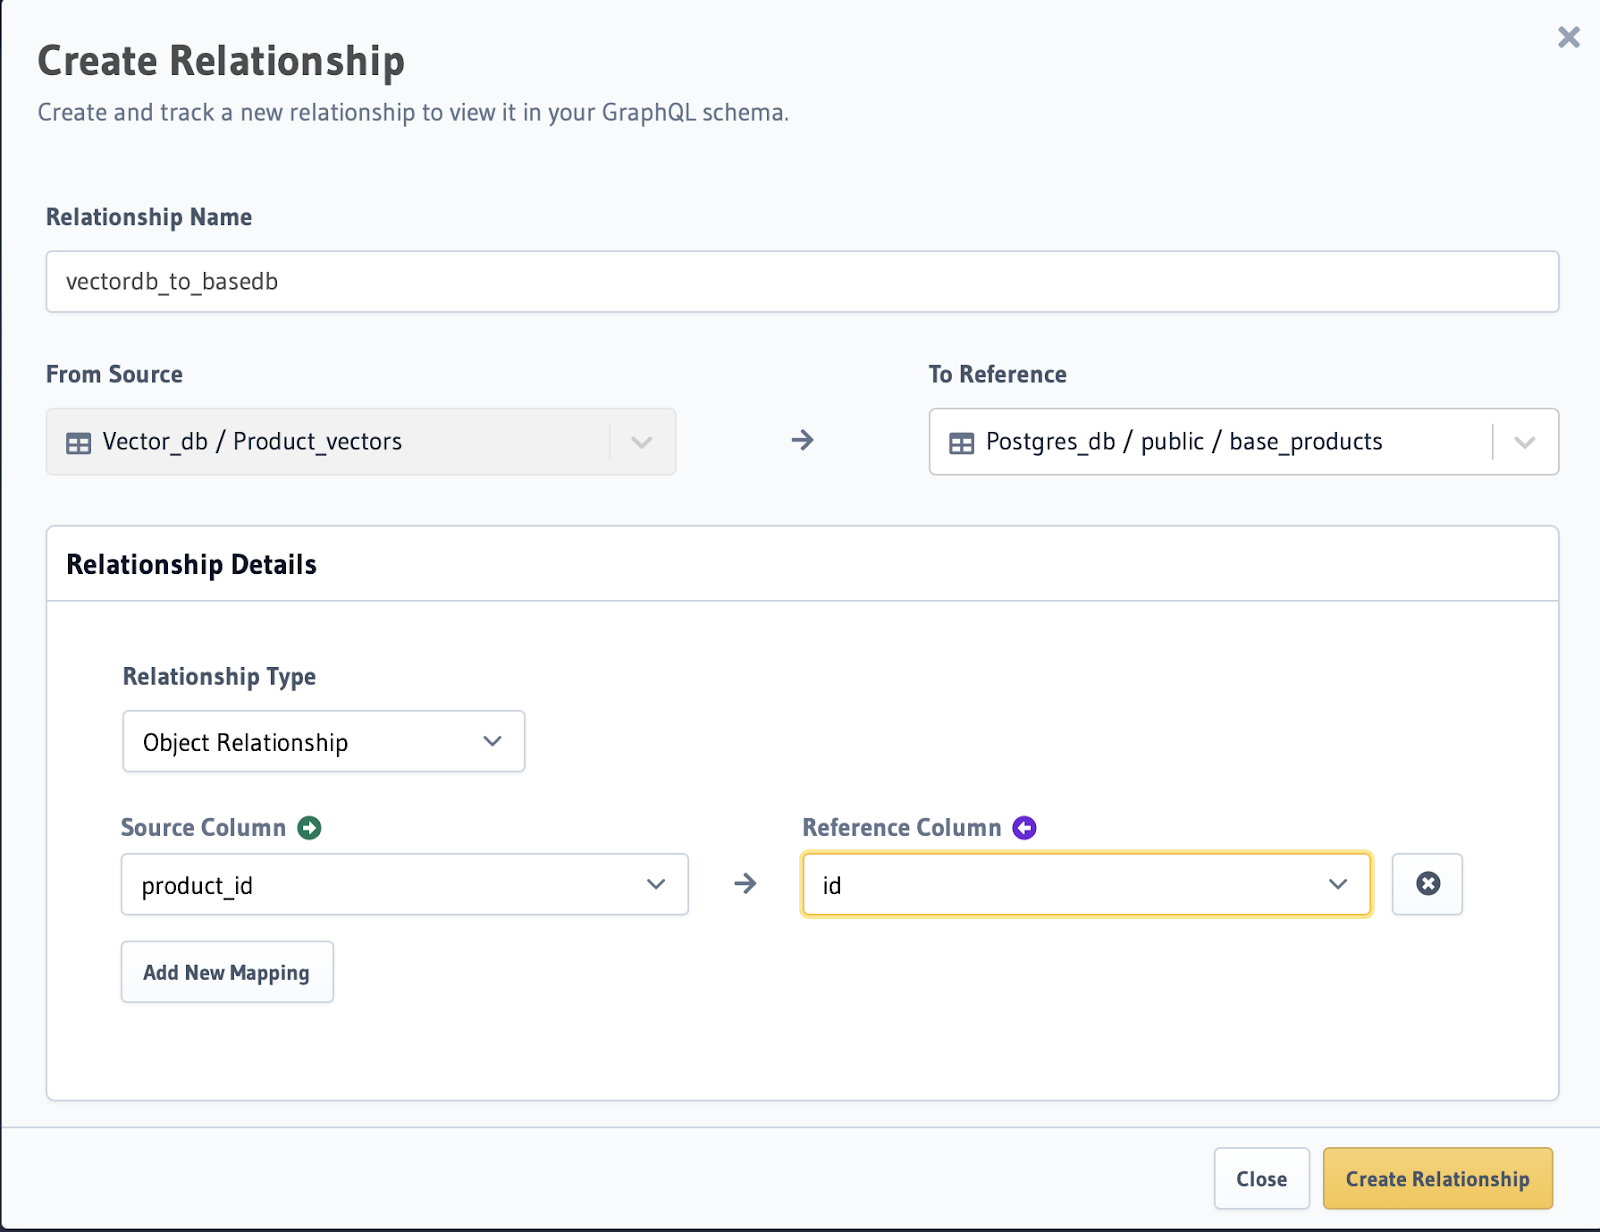
Add a remote relationship between PostgreSQL and Weaviate tables
Go to the Product_vectors table and add a relationship with the PostgreSQL database as shown below.
Set up an Event Trigger on a PostgreSQL table
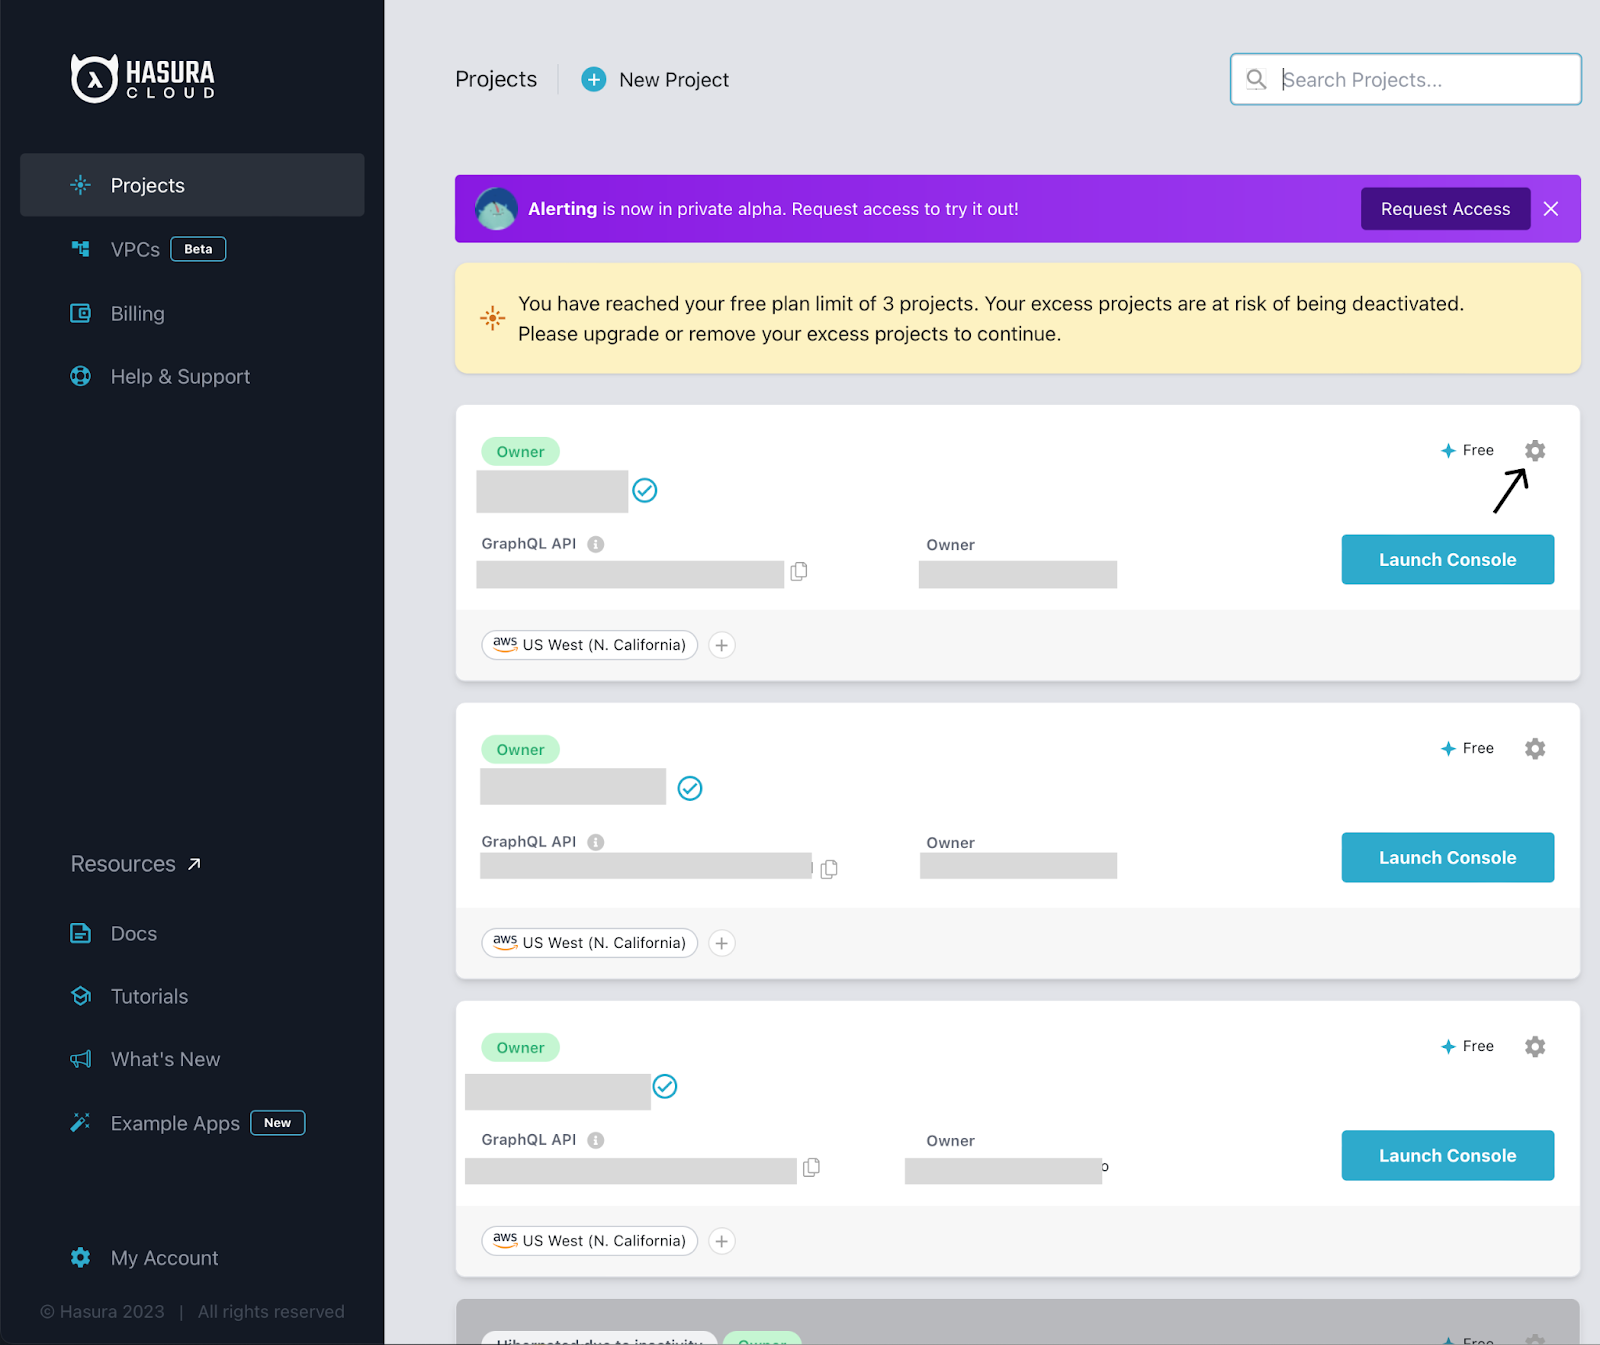
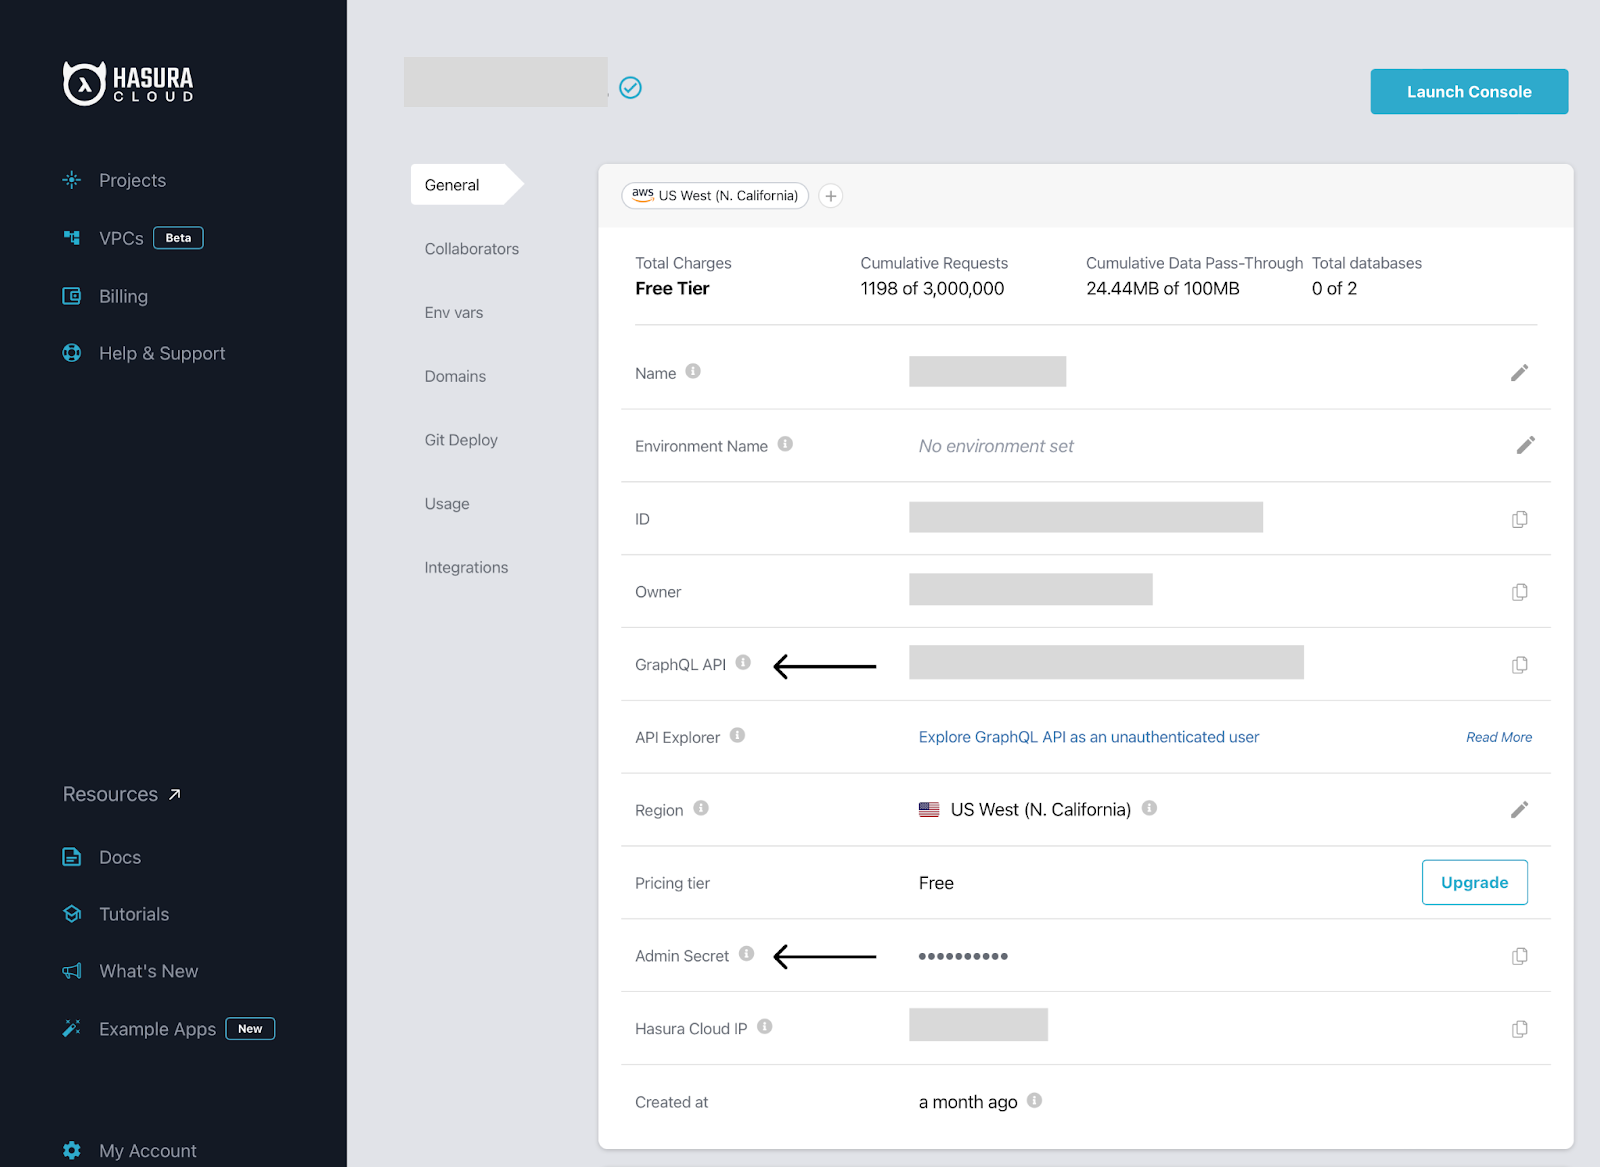
Step 1: Fetch your Hasura GraphQL API endpoint and Admin secret.
Move over to cloud.hasura.io and click Projects. Click on the Settings icon from your project to access Project details.
Step 2: Configure event handler API.
Open smart_product_search/server.ipynb. Head to the section Template for event trigger to ETL data, and you will see there are multiple functions with cells commented with # POST /handle_event. These are the functions that are available on the endpoint /handle_event.
Update the details in the cell.
On the Hasura Notebook home page select smart_product_search/server.ipynb and press Start API.
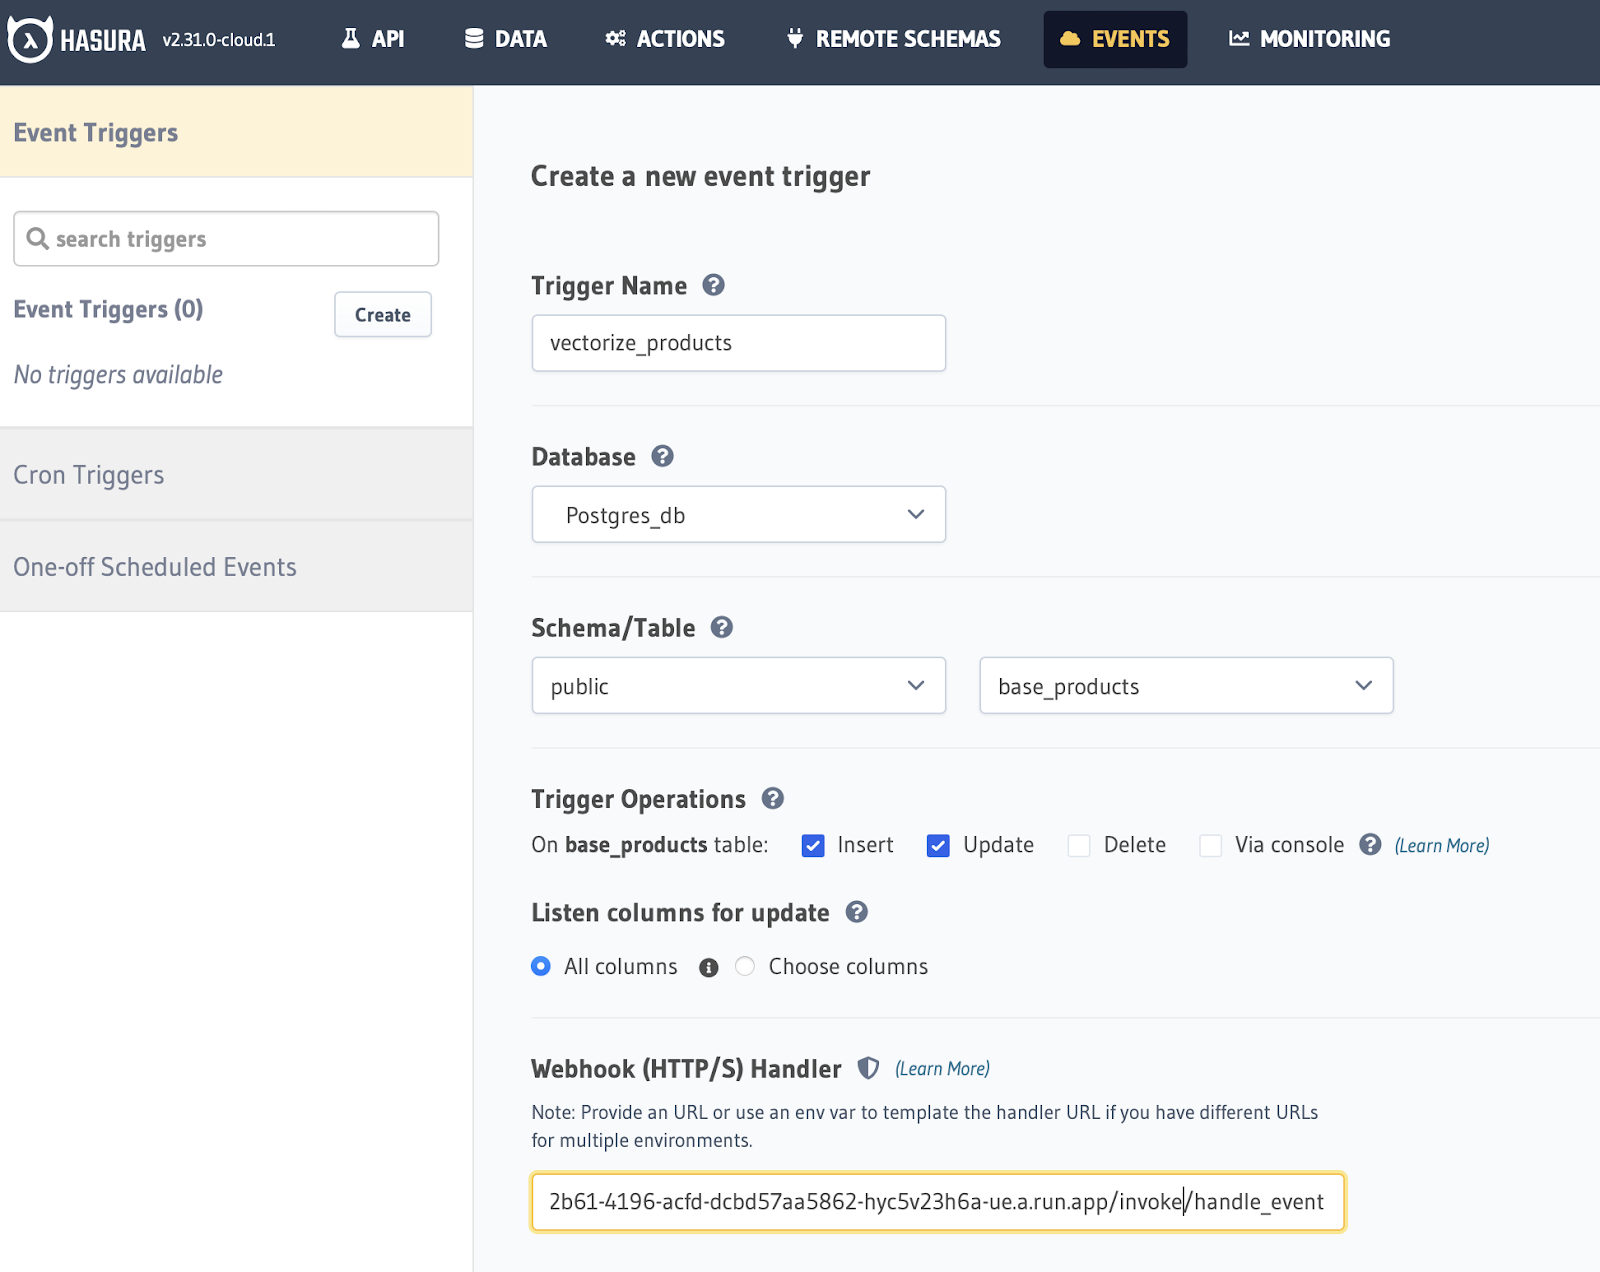
Step 3: Add the event trigger in Hasura. Head back to the Hasura Console and click on the Event tab to create a new Event. Fill in the required details.
Trigger Name - vectorize_products Database - Postgres_db Schema - Public - base_products Trigger operations - Insert and update
Your webhook URL is your notebook URL (ends with .app) + invoke/handle_event. You can also fetch your webhook URL by running this CLI command again hasura notebook status.
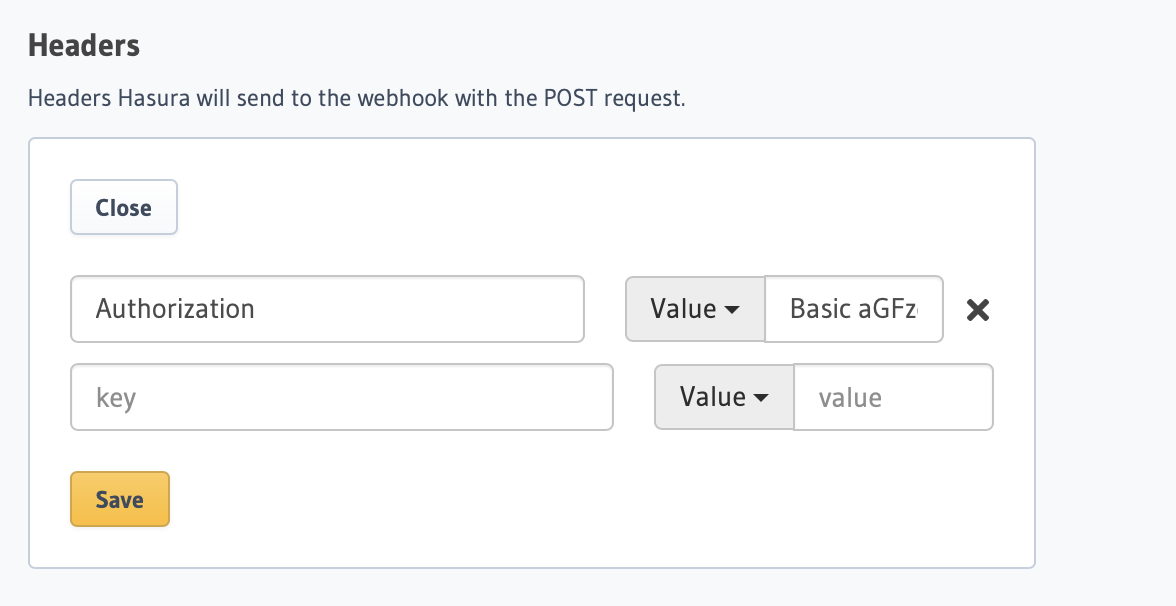
Add the Authorization header required to reach the endpoint from the Hasura notebook.
You’ll need to generate a base64-encoded value. You will need to execute this on the terminal of your choice.
echo -n "<username>:<password>" | base64
You can fetch the username and password by executing the following command:
hasura notebook status
Key = Authorization
Value = Basic <base64-encoded value here>
Insert data into PostgreSQL and watch Vector DB update automatically
Now that we have integrated Weaviate with Hasura, we can use a mutation in Hasura to insert data into our PostgreSQL table and auto-vectorize and update our vector DB! You can do this by executing smart_product_search/insert_data.ipynb.
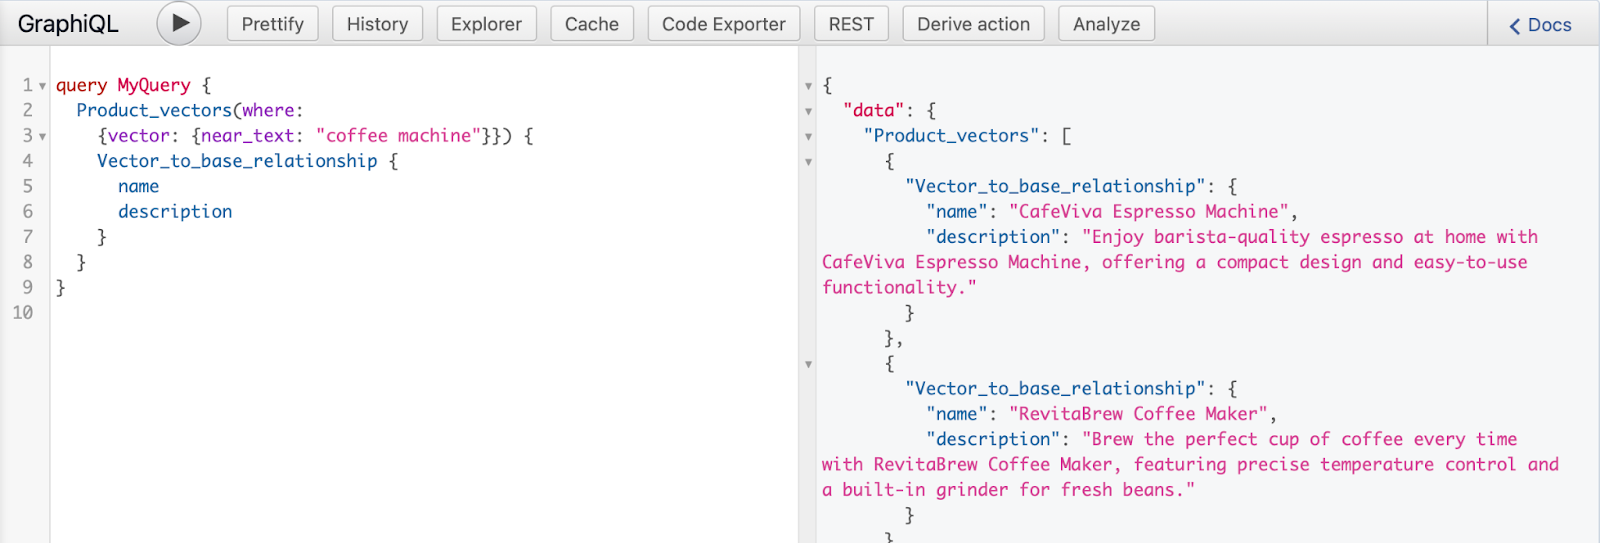
Voila! We have vectors with product name and description fields.
Let us now go one step further with a complex query powered by our LLM.
LLM-powered product search
Step 1: Update Hasura GraphQL and OpenAI details in the notebook under Template for event trigger to ETL data in smart_product_search/insert_data.ipynb.
After updating these values, it’s important to restart your notebook. You can do this from the gateway generated earlier using the CLI.
type Query {
	"""
	quert_product
	"""
	queryProduct(user_query: String!): String
}
Like before, you will need to add authorization headers.
Step 4: You just created a secure API on your LLM query. Integrate the API with your app, or just play around on the Hasura Console. You now have the power of the Hasura by your side.
Conclusion
By seamlessly deploying a Jupyter Notebook through the Hasura CLI, you've unlocked a world of possibilities. The ability to automatically vectorize relational data has not only accelerated your data manipulation processes but has also paved the way for more efficient and effective analyses.
Moreover, the integration of robust security measures into your LLM queries ensures that your data remains protected at all times. This remarkable journey, powered by Hasura, empowers you to harness the true potential of your data, all while simplifying the intricate processes involved!