

Tutorial: Fullstack React Native with GraphQL
A tutorial to build a React Native to-do app with Apollo’s new Query and Mutation components
Overview
- React Native
- Apollo Client (for client-side GraphQL)
- Hasura GraphQL Engine (for GraphQL backend)
- Auth0 (for auth)
Part 1: Deploying a GraphQL backend
- Deploy Hasura GraphQL Engine by simply clicking on the button below.
- Note the URL of the deployed app. It should be of the form:
<auto-generated-string>.hasura.app. This is your GraphQL Engine URL.
users
+--------------+------------------------------+
|  column      |       type                   |
+--------------+------------------------------+
| id           | serial NOT NULL primary key  |
| name         | text NOT NULL primary key    |
+--------------+------------------------------+- id: This is a unique integer that will identify each entry in the
userstable. It is also the primary key of the table. - name: This is the name of the user
todos
+--------------+---------------------------------------------------+
|  column      |       type                                        |
+--------------+---------------------------------------------------+
| id           | serial NOT NULL primary key                       |
| task         | text NOT NULL                                     |
| is_completed | boolean NOT NULL                                  |
| user_id      | integer NOT NULL FOREIGN KEY REFERENCES users(id) |
+--------------+---------------------------------------------------+- id: This is a unique integer that will identify each todo. It is also the primary key of the table.
- text: This is the to-do task.
- is_completed: This is a boolean flag that marks the task as completed and pending.
- user_id: This is a foreign key referencing
idof theuserstable. It relates the todo to its author.
- Go to your GraphQL Engine URL in your browser (
https://<auto-generated-string>.hasura.app). It opens up an admin UI where you can manage your backend. - Go to the
Datasection on top and click on “Create Table” and add the aforementioned column names and types.

todos table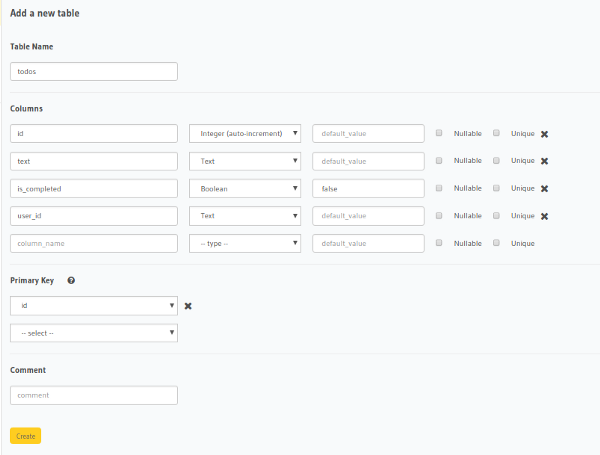
todos table
Part 2: Setup React Native Project
npm install -g expo-cli
expo init Todo
cd Todo
npm startPart 3: Setup Auth
npm install --save jwt-decode- Render a button called login pressing which, Auth0 login is performed using Expo’s AuthSession.
- After the authentication is complete, the session variables are stored in
AsyncStorageandisLoggedInof the parent component is set to true so that the app is navigated to the app.
Configuring Apollo Client
$ npm install apollo-boost react-apollo graphql-tag graphql --saveimport { ApolloClient } from 'apollo-client';
import { HttpLink } from 'apollo-link-http';
import { InMemoryCache } from 'apollo-cache-inmemory';
const GRAPHQL_ENDPOINT = `https://<auto-generated-string>.hasura.app/v1/graphql`;
const createApolloClient = (token) => {
const link = new HttpLink({
uri: GRAPHQL_ENDPOINT,
headers: {
'Authorization': `Bearer ${token}`
}
});
return new ApolloClient({
link,
cache: new InMemoryCache()
})
}
export default createApolloClient;client.mutate({
mutation: gql`
mutation ($username: String, $userid: String){
insert_users (
objects: [{ name: $username, id: $userid}]
) {
affected_rows
}
}
`,
variables: {
username: this.props.username,
userid: this.props.userid
}
});render() {
const { isLoggedIn, userId, username, loading, jwt } = this.state;
if (loading) {
return <View><Text>Loading...</Text></View>
}
if (isLoggedIn) {
return (
<Main
userId={userId}
username={username}
token={jwt}
logout={this.logout}
/>
)
} else {
return (<Auth login={this.login}/>)
}
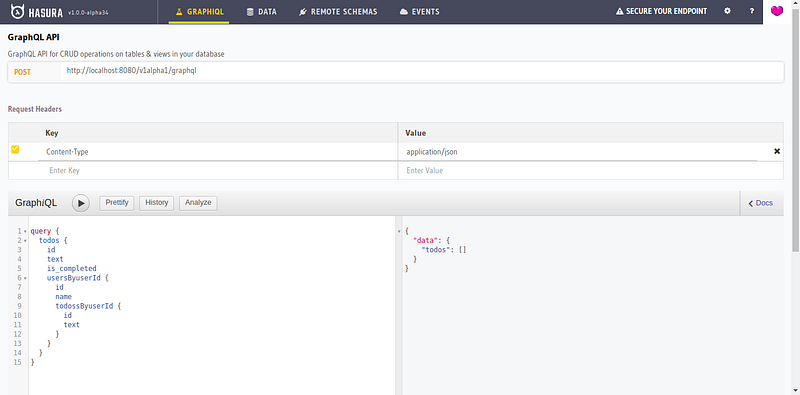
}Creating our first Query component
import {Query} from 'react-apollo';import gql from 'graphql-tag';graphql-tag is just like a parser that parses a GraphQL query into- Pass the GraphQL query string as prop to the
Querycomponent.
<Query query={gql`
  query {
    todos {
      id
      text
      is_completed
    }
  }
`}
>- Wrap your custom component inside the
Querycomponent.
<Query query={gql`GRAPHQL_QUERY`}>
  {(data, error, loading) => {
   return (<MyComp data={data} error={error}, loading={loading} />)
  }}
</Query>MyCompin the above component receives the state and response of the GraphQL query.
Writing our first Mutation component
render () {
    if (!this.state.client) {
      return <View><Text>Loading...</Text></View>;
    }
    return (
      <ApolloProvider client={this.state.client}>
        <Textbox
          userId={this.props.userId}
          username={this.props.username}
          logout={this.props.logout}
        />
        <TodoList
          userId={this.props.userId}
          username={this.props.username}
          logout={this.props.logout}
        />
      </ApolloProvider>
    );
}render() {
return (
<Query
query={FETCH_TODOS}
>
{
({data, error, loading}) => {
if (error || loading) {
return <View> <Text> Loading ... </Text> </View>
}
return (
<ScrollView style={styles.container} contentContainerStyle={styles.container}>
<FlatList
data={data.todos}
renderItem={({item}) => <TodoItem todo={item}}
keyExtractor={(item) => item.id.toString()}
/>
</ScrollView>
)
}
}
</Query>
)
}Wrapping up
- Deployed a GraphQL server in the form of Hasura GraphQL Engine
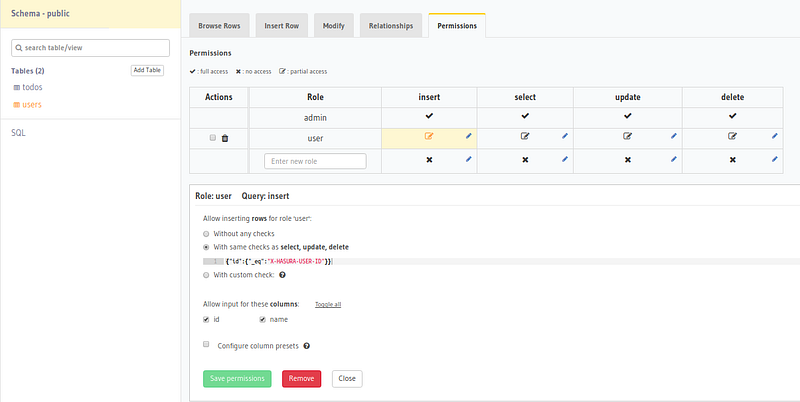
- Set up tables and permissions
- Set up a React Native project and performed auth using Auth0.
- Set up Apollo client with a GraphQL endpoint and JWT
- Use Apollo’s Query components to fetch todos
- Use Apollo’s Mutation components
- Use Hasura’s GraphQL Subscriptions
- Implement a logout button
- Go into styles of React Native. All code snippets are more like pseudo code code snippets.

Related reading

