This course is no longer maintained and may be out-of-date. While it remains available for reference, its content may not reflect the latest updates, best practices, or supported features.
Unity Integration
We've set up authentication on our Hasura backend and even set up a nice jwt provider on Glitch.
Now we need to integrate these with our Unity project.
User Query and Mutation
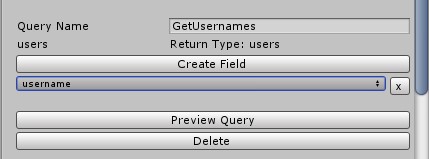
Firstly, we'll create a query to get all the usernames that exist in our database. We'd used this to confirm the new user isn't picking a username that is already in use.
Create new query GetUsernames

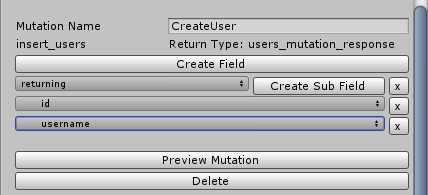
Next, we'll create a mutation to create a new user.

Those are the only new queries and mutations we need.
More Api Calls
Go to GameData.cs in Assets/_Game/Scripts/Data/GameData.cs
We're declare some new variables.
[NonSerialized]public string jwt;public GraphApi jwtApi;
jwt: we'll store whatever token we get in this variable.jwtApi: this is the variable to house our JWTApi Reference
Now on to the functions.
Copy and paste the code below into your GameData.cs script
#region User Callspublic async Task GetJwt(){try{jwtApi.SetAuthToken("CLIENT_TOKEN");GraphApi.Query getJwt = jwtApi.GetQueryByName("GetJwt", GraphApi.Query.Type.Query);getJwt.SetArgs(new{id = user.Id, username = user.Username, password = user.Password});UnityWebRequest request = await jwtApi.Post(getJwt);string result = request.downloadHandler.text;jwt = JsonConvert.DeserializeObject<string>(RemoveData(result,getJwt.queryString));shooterApi.SetAuthToken(jwt);}catch{jwt = "";await new WaitForSeconds(1);await GetJwt();}}public async void GetUsernames(){try{GraphApi.Query usernames = shooterApi.GetQueryByName("GetUsernames", GraphApi.Query.Type.Query);UnityWebRequest request = await shooterApi.Post(usernames);string result = request.downloadHandler.text;takenUsernames = JsonConvert.DeserializeObject<List<User.Users>>(RemoveData(result,usernames.queryString));}catch{takenUsernames = new List<User.Users>();await new WaitForSeconds(1);GetUsernames();}}string GenerateRandomPassword(){byte[] bytes = new byte[16];using (RNGCryptoServiceProvider rng = new RNGCryptoServiceProvider()){rng.GetBytes(bytes);}return BitConverter.ToString(bytes);}public async Task<User.Users> CreateUser(string namer){GraphApi.Query usernames = shooterApi.GetQueryByName("CreateUser", GraphApi.Query.Type.Mutation);user.Password = GenerateRandomPassword();usernames.SetArgs(new{objects = new{username = namer, password = user.Password}});UnityWebRequest request = await shooterApi.Post(usernames);string result = request.downloadHandler.text;return JsonConvert.DeserializeObject<User.Users>(RemoveData(result,usernames.queryString));}#endregion
Task GetJwt
This function sets the input of our GetJwt query to user.Id, user.Username and user.Password
user.Id, user.Username and user.Password contain the values stored in PlayerPrefs. They're default values are test, to match that of our mock user.
void GetUsernames
This functions simply stores all the usernames of all our users in a variable, takenUsernames.
takenUsernames is used by our Ui to check if the new username the user is inputting is taken.
string GenerateRandomPassword
This generates a random string for the password of the user.
Task User Users CreateUser
This calls our CreateUser mutation and sets the arguments to the username the user desires and the generated random password.
Cleanup
In the TaskGetJwt() function, change CLIENT_TOKEN in jwtApi.SetAuthToken("CLIENT_TOKEN"); to the token you set in your Glitch env.
Since our users have their own identities, we don't need to use the mock users we created earlier on.
In the function CreateBattle() change
createBattle.SetArgs(new{objects = new{shooter_id = 1, seed = seeds}});
To
createBattle.SetArgs(new{objects = new{shooter_id = user.Id, seed = seeds}});
In the function UpdateBattle() change
updateBattle.SetArgs(new{where = new{id = new{_eq = id}}, _set = new{defender_id = 2, defenderReady = true}});
To
updateBattle.SetArgs(new{where = new{id = new{_eq = id}}, _set = new{defender_id = user.Id, defenderReady = true}});
That's it for GameData.cs
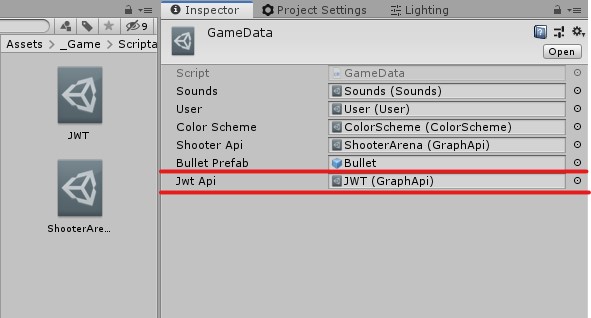
Remember to assign your JWT Api Reference to the jwtApi variable in GameData which can be found in Assets/_Game/ScriptableObjects/GameData

Lastly, for clean up, head over to User.cs in Assets/_Game/Scripts/Data/User.cs
Update the default Id to the id of your mock test user.
public int Id{//Change 3 to the id of your mock test user in Hasura.get => PlayerPrefs.GetInt("Id", 3);set{id = value;PlayerPrefs.SetInt("Id", id);}}
Menu Manager
We need to instruct our Ui to check if the user is signed in before allowing them play online.
Go to MenuManager.cs in Assets/_Game/Scripts/Managers/MenuManagers.cs
Add to Awake()
quickPlay.Inactive = true;leaderboard.Inactive = true;await gameData.GetJwt();if (gameData.user.Username == "test")gameData.GetUsernames();quickPlay.Inactive = false;leaderboard.Inactive = false;
To become
private async void Awake(){audioSource = GetComponents<AudioSource>()[1];gameData.menuManager = this;gameData.sfxPlayer = audioSource;loadingText = loading.GetComponentInChildren<TextMeshProUGUI>();currentScreen = titleScreen;sensitivity.value = PlayerPrefs.GetFloat("Sensitivity", 0.1f) * 100;sensitivityText.text = $"{sensitivity.value}";leftHanded.isOn = PlayerPrefs.GetInt("LeftHandedness", 0) != 0;quickPlay.Inactive = true;leaderboard.Inactive = true;await gameData.GetJwt();if (gameData.user.Username == "test")gameData.GetUsernames();quickPlay.Inactive = false;leaderboard.Inactive = false;}
Next we update our StartBattle() to take us to the create user screen if it is a new user.
Add to StartBattle()
if (gameData.user.Username == "test"){SwitchScreen(userScreen);return;}
To become
public async void StartBattle(){if (gameData.user.Username == "test"){SwitchScreen(userScreen);return;}ActivateLoading("Searching for worthy opponents");previousScreen = titleScreen;RemoveScreen();await gameData.DeleteOldBattles();List<GameData.Battles> online = await gameData.GetOnlineBattles();MatchMake(online);}
Lastly we create a function we can assign to a button when the user wants to create a new user
Add this function to MenuManager.cs
public async void CreateUser(){ActivateLoading("Creating User");Data.User.Users users = await gameData.CreateUser(username.text);gameData.user.UserClassToUser(users.returning[0]);stageName.text = gameData.user.Username;await gameData.GetJwt();loading.Disappear();SwitchScreen(onlineScreen);}
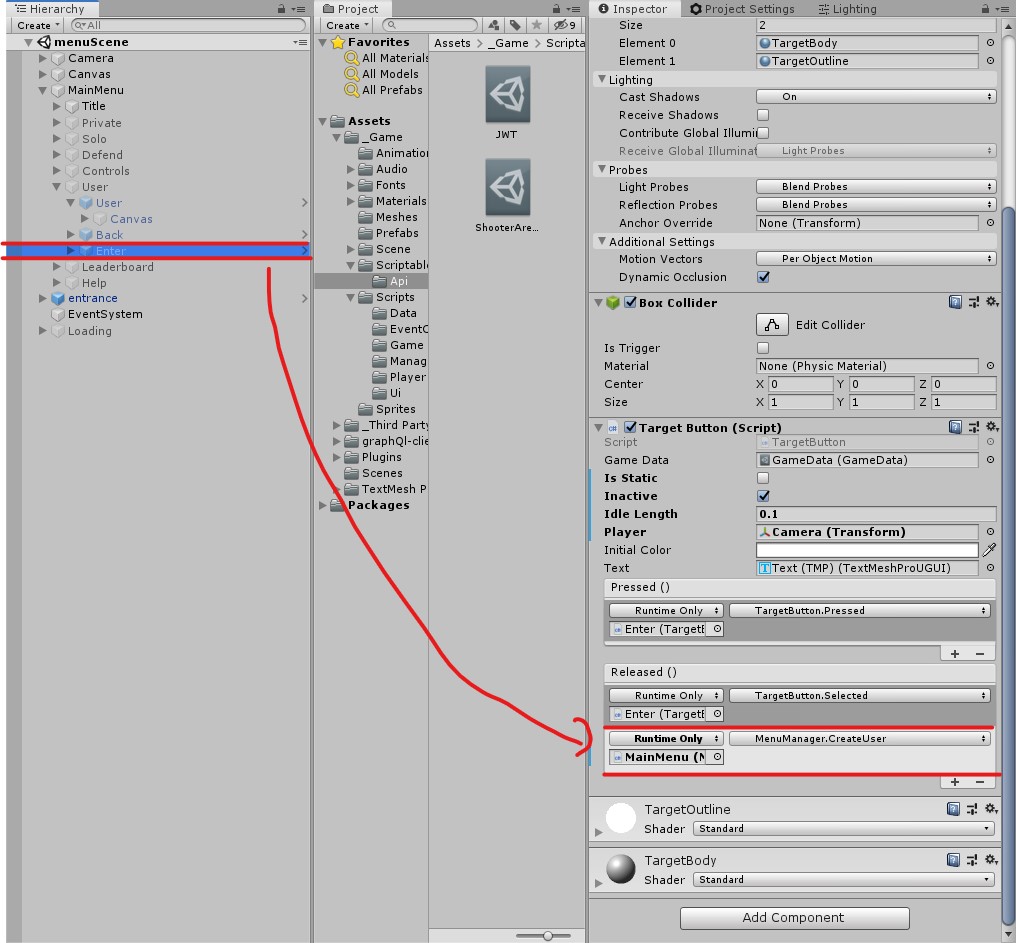
Ensure this function is assigned to the Enter button in the User screen in the Hierarchy.

And that's it! Our users can now create a profile.
This would be used when we implement the leaderboard and keep track of their scores.
Build apps and APIs 10x faster
Built-in authorization and caching
8x more performant than hand-rolled APIs


