Aurora is the new kid in the block. It leverages AWS’s infrastructure to deliver a 1-click enterprise-grade database system. You’ll have in this post the ins-and-outs of Aurora, whether it works with Hasura (hint: it does), and how to set it up with Hasura Cloud.
Aurora is a SQL database-as-a-service offering from Amazon AWS. You can think of it as a fully managed relational database engine that is compatible with MySQL and Postgres. It leverages AWS’s infrastructure to deliver higher performance, scalability, and reliability. You might know AWS RDS already, so how is Aurora different? In two big ways, its storage subsystem and its serverless capabilities.
Aurora Storage Subsystem
The Aurora storage subsystem is a distributed storage architecture. It really does leverage all of AWS’s infrastructure to squeeze out every bit of availability and performance.
No need to provision storage space ahead of time—storage space scales automatically
Automatic six-way replication of the data across multiple Availability Zones
Continuous backup to Amazon S3
Greater than 99.99% availability
Transparent recoveries from storage failures
Instance failover in less than 30 seconds
Ability to restore to a point-in-time
Serverless
Aurora has two engines. Provisioned and serverless.
The provisioned engine works similar to what you’d expect from a managed SQL database. You specify the instance class size (e.g. db.r5.large) and if you need to increase read throughput, you can create read replicas.
The serverless engine is different. It doesn’t require you to specify an instance class size. You just create a database endpoint and AWS will automatically scale it up and down according to the workload. It’s recommended for intermittent or unpredictable workloads. Whenever we say “serverless,” you might think of scaling-to-zero. Meaning the service would pause itself automatically after receiving no requests for some time. And while you can indeed set up Aurora Serverless to scale to zero, you probably don’t want to do it in production. The warm up time for a paused database takes almost a minute, and I’m going to assume your users aren’t willing to wait that long for a request to resolve. That being said, it’s easy to disable the feature, which will have your cluster running a minimum of 1 Aurora Capacity Unit (ACU) at all times.
How much does it cost?
Aurora is priced per DB instance-hour consumed. Then if you want to save some cash—and who doesn’t—you can look into purchasing a Reserved Instance, in a contract of 1 or 3 years. But that’s besides the point. The real question is, how much money does it save? In order to set up a globally distributed database system like Aurora does, it would take you hundreds of engineering hours to development and maintenance.
It’s a good deal from a pure costs point of view. And even though Aurora is not open-source, there isn’t really a lock-in problem. You can always take out your data, move it to a Postgres database, and host anywhere.
What are its limitations?
Aurora Postgres is just Postgres. As you would expect. It works with any Postgres-compatible software. In terms of scalability, its storage constraints (e.g. tables up to 32 terabytes) and network constraints are so generous you’ll probably never hit any of those limits.
The provisioned engine works out-of-the-box. All you’ll need to do is create a public Aurora Provisioned cluster. You’ll find the step-by-step instructions below.
The serverless engine works with Hasura but unfortunately does not work with Hasura Cloud at this moment. The problem is that an Aurora Serverless DB cluster can’t have a public IP address, which means you can’t point Hasura Cloud to it. Hosting your own Hasura service still works though. Just deploy Hasura to EC2 on the same VPC as your Aurora cluster—but you’ll lose all the benefits below. VPC Peering support in Hasura Cloud would, of course, address this issue. Keep your eyes open as more will be coming on that front soon.
What is Hasura Cloud?
Hasura Cloud is a fully managed Hasura service. As you’d expect, Hasura Cloud scales automatically, guarantees high availability, and offers global distribution. But having a managed infrastructure is just half.
In addition to all the features of the open-source Hasura software, the Cloud version offers:
Hasura Cloud has a free-forever tier. I myself have one instance online at all times for personal use. It’s super useful. You can use it to learn about Hasura, to experiment with new features, and to create prototypes for new applications. It’s as easy as it gets.
For production, the Pay-as-you-go tier starts at $99/mo. It’s an auto-scaling, high availability offering—and includes all the free features. The starting price includes 20GiB of data ingress/egress, after which costs $2 per gigabyte.
Select: “Standard create” — For the purpose of this post, we’ll pick the “Standard create” option as it offers some customization we’re going to be needing. For example, we’ll need to set the database to public, so that Hasura Cloud can access it.
Engine options:
Engine type: Amazon Aurora — Otherwise what are we even doing here!? Edition: PostgreSQL — Although you could try out MySQL as well. Capacity type: Provisioned — As I’ve mentioned above, as of today it’s impossible to give a Serverless cluster a public IP address—which we’d need in order to allow Hasura Cloud to connect to it. Engine version: Aurora PostgreSQL (Compatible with PostgreSQL 11.18) — Hasura works with Postgres versions 9.5 and above.
Templates:
Templates: “Dev/Test” —We won’t need high availability or any of the other super cool Aurora features for our present goal of testing Aurora and Hasura.
Settings:
DC cluster name: aurora-hasura-experiment — You’re welcome to choose a different name. Master username: postgres — In production environments you’ll want to use a randomly generated username for increased security. Auto generate a password: Yes — This tells AWS to generate a password for us (d’oh). Alternatively, use your own password generator.
DB instance size:
DB instance class: db.t3.medium — I’ve picked the smallest class available, which will set you back roughly $60/mo.
Availability & durability:
Multi-AZ deployment: Don’t create an Aurora Replica — Unless you’re setting up a production environment, you won’t need an Aurora Replica.
Connectivity:
Virtual private cloud (VPC): Default VPC — I’ve picked my default VPC but you might already be using that one, in which case go ahead and select your desired VPC. Subnet group: Default — Same rationale as above. Public access: Yes — We’re going to need the database cluster to be publicly accessible, so that Hasura Cloud is able to reach it. Security group: Default — I’ve picked the default security group here. Further down in this post we’ll add our rules to it. Database port: 5432 — I’m going with the default Postgres port to keep things simple.
Database authentication:
Database authentication options: Password authentication — Password authentication is enough as Hasura Cloud uses password to connect to the Postgres engine.
Additional configuration:
Initial database name: mydatabase — You’ll need to remember the name for later. If you don’t create a database now you’ll have to connect to your newly created Aurora cluster and create a database manually. Better to just create one here and get on with it.
Click: “Create database”
Connection details:
After clicking “Create database” above the AWS Console should’ve taken you to the RDS dashboard. On the top, you should see the confirmation message. Click: “View credential details”
Copy: Master username Copy: Master password Copy: Endpoint — We’re going to use this information later, to point Hasura Cloud to Aurora.
Click: “Close”
VPC configuration:
Next, you’ll need to allow Hasura Cloud to connect to our database cluster. A few things need to be in place for this. The default VPC has, by default, an internet gateway attached to it—so you won’t need to do that. And if you followed the instructions so far, you created the Aurora cluster with the option Engine set to Provisioned, and Public Access set to Yes. Now all that’s left for you to do is to create a Security Group, which will allow your DB cluster to be connected from Hasura Cloud’s IP.
The quickest way to that from the RDS dashboard screen is as follows: Click: On the DB instance (i.e. second row) Click: On the VPC security group that is active (i.e. default, probably)
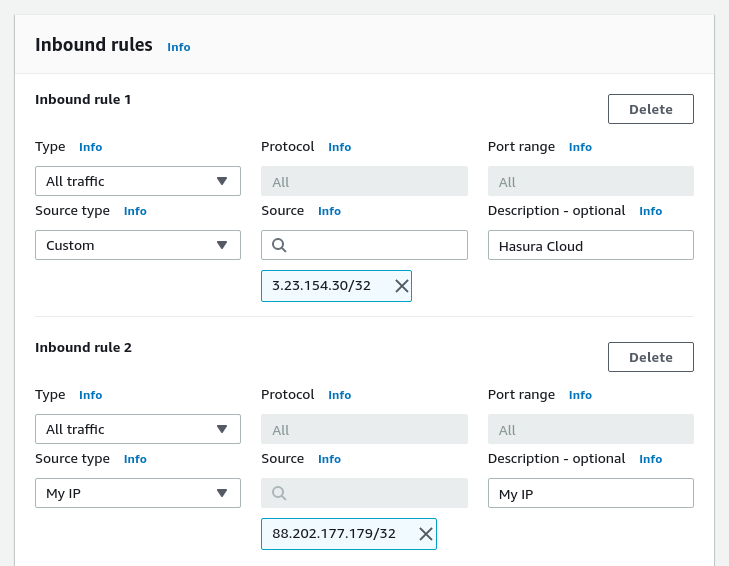
Now you’ll create the Inbound rules. See the image below.
The first rule allows Hasura Cloud to connect to our DB cluster. Hasura Cloud’s IP is 3.23.154.30. The interface will automatically append “/32” to it, which makes it a valid CIDR notation—basically saying “this IP and no other.”
The second rule will allow traffic coming from my machine. This is not necessary for Hasura Cloud to work but it's nice to have in case you want to check things out locally.
Type: As above Click: “Save rules”
You’re done!
Great! The AWS part of our work here is done.
Before moving forward, I’d recommend you go back to the AWS Console and make sure the cluster’s status changed from Creating to Available. It might take a few minutes and you’ll have to remember to refresh the page.
If you’d like to test the cluster locally—and if you’ve added the “My IP” rule as above—you can now use a tool like psql to test the connection to the new database.
Now onto Hasura Cloud.
2. Set up a Hasura Cloud account
Create an account: Go to cloud.hasura.io — It’s free to create an account and also to use the free tier of the Cloud offerings.
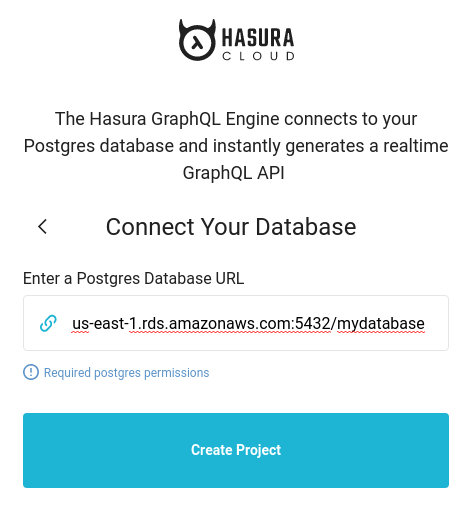
Connect Your Database:
Once you’re signed in: Click: “I have an existing Postgres database”
In the next screen, you’re going to insert the Postgres Database URL. A Postgres Database URL has the following format postgres://<username>:<password>@<hostname>:<port>/<database name>. Here’s what mine looks like: postgres://postgres:FFNMI3SpmeTV20sU4hSS@aurora-hasura-experiment.cluster-cgaopxl80gyv.us-east-1.rds.amazonaws.com:5432/mydatabase.
Fill in: Postgres Database URL Click: Create Project
Wait: Until the button on the top-right hand changes from “Initializing…” to “Launch Console” — It only takes a few seconds
If for some reason you get a red button with an error message, here’s what you could do:
Double-check your Postgres Database URL. Make sure there were no copy and paste mistakes
Double-check your Inbound rules in the Security group — For example, if you have allowed connections from your “My IP”, you could run `psql postgres://…` just to confirm the cluster is accessible.
Click: Launch Console
3. Accessing the Hasura Console
If everything worked, you should find yourself on the Hasura Console. You’re done!
4. Cleaning up
If this cluster you’ve set up was for experimentation only, you’ll want to shut it all down before clocking out. Otherwise AWS will charge you upwards of $60/mo. I’m going to show you now how to turn it all off.
Did you know that Heroku Postgres has a free plan and it’s integrated with Hasura Cloud?
Cleaning up AWS:
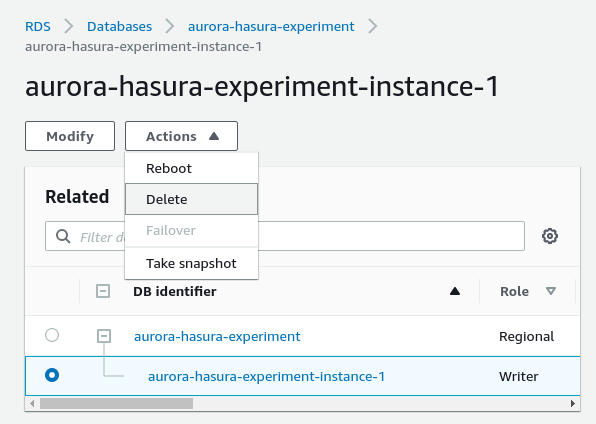
Go to: The RDS Dashboard Select: Your cluster instance — By deleting the instance we’ll be deleting the whole cluster as well Click: Actions > Delete
Disable: Create final snapshot — By the way, snapshots are paid Click: I acknowledge Type: “delete me”
Cleaning up Hasura Cloud:
Hasura Cloud is free. So you could keep this project running for zero costs. But if you’ve deleted your Aurora cluster you might want to delete your Hasura Cloud project as well, in order to keep things tidy.
Aurora is fantastic. I’m astounded with its storage subsystem. It's so simple. With just a few clicks, you get enterprise-level performance, durability, and availability. Combine Aurora and Hasura Cloud and you get a globally distributed stack—both the database and the API layers geographically close to your end users—for an unprecedented price. That's impressive. This setup would normally cost hundreds of engineering hours to set up and countless more for maintenance. If you need a distributed database system, look no further.
Let us know on twitter or in the comments if you have any questions, suggestions, or feedback!
About the author
This blog post was written by Gunar Gessner - a seasoned Software Engineer and Product Manager based in London, under the Hasura Technical Writer Program.