Hasura allows you to integrate your vector database with your application database and access it securely to build production-ready applications quickly. Want to see how? Let us build a demo together 👇
Use case
Imagine you own an HR management app that lets candidates apply for jobs. This platform allows HR managers to assign candidates to hiring managers and interviewers while tracking progress from a single dashboard.
For the sake of simplicity, we'll assume the app has 2 tables:
Candidates table - contains information about the candidate
Applications table - contains information about the application
Each time an application is filed, the HR manager selects candidates by screening resumes and interviewers review resumes to understand the profile. What if we could leverage the capability of large language models (LLMs) to help us with these tasks?
Leveraging LLMs
LLMs are fundamental models which are trained on huge public datasets. As such, they've gained a very good understanding of general concepts, but this capability can’t be applied to our specific use case as the LLM hasn’t seen our application 's data before.
To solve this problem we would either need to fine-tune or provide context which LLMs can use to answer the queries.
Passing context seems like a reasonable solution, unlike fine-tuning, which can be cost prohibitive.
However, passing context has a limitation too: LLMs have a limitation on input size, which means we can’t pass all of available data. We will need to carefully select data and share only what we deem necessary with an LLM.
VectorDBs
VectorDBs to the rescue! Vector databases store lots of...vectors. Vectors are simply mathematical representations of the input text from a model. This model can be different from the LLM used to answer the question.
We also need to be mindful about how we store this information using VectorDB. If we store the whole artifact, we wouldn’t be able to use it in our LLM queries because of limited input size. Hence, we resort to "chunking".
Chunking is the process of breaking down large text into smaller chunks. These chunks are then vectorized and stored in VectorDB so that we can leverage the power of vector similarity searches. With Chunked vectors stored in VectorDB, we will be able to retrieve more relevant pieces of information.
Some of the popular VectorDBs are Weaviate, Pinecone, Milvus, PgVector, etc.
For this demonstration, we are going to use Weaviate. You can read more about Weaviate here.
You need to ensure you have Git's Large File Storage extension installed before cloning the repository.
If you don't have git-lfs setup. Please follow these steps after cloning
# one time setup
brew install git-lfs
git lfs install# pull the docker images after cloning git lfs pull
Once you've cloned it, fire up the Hasura Console:
# Set the right ARCH environment variable for your systemexportARCH={arm64|amd64}docker load < hasura-image-${ARCH}.tar.gz
docker load < weaviate-gdc-image-${ARCH}.tar.gz
docker compose up
Postgres set-up
In this demo we are going to assume that this app has its application data in a Postgres database.
As a first step we need to create the tables which represent our app's data model. To do so we go to scripts/ folder in the repo and open 1_postgres_setup.ipynb where we can see the table definition under the Data Prep section.
We'll begin by creating these tables using the Hasura Console.
Step 1. Connect your Postgres database
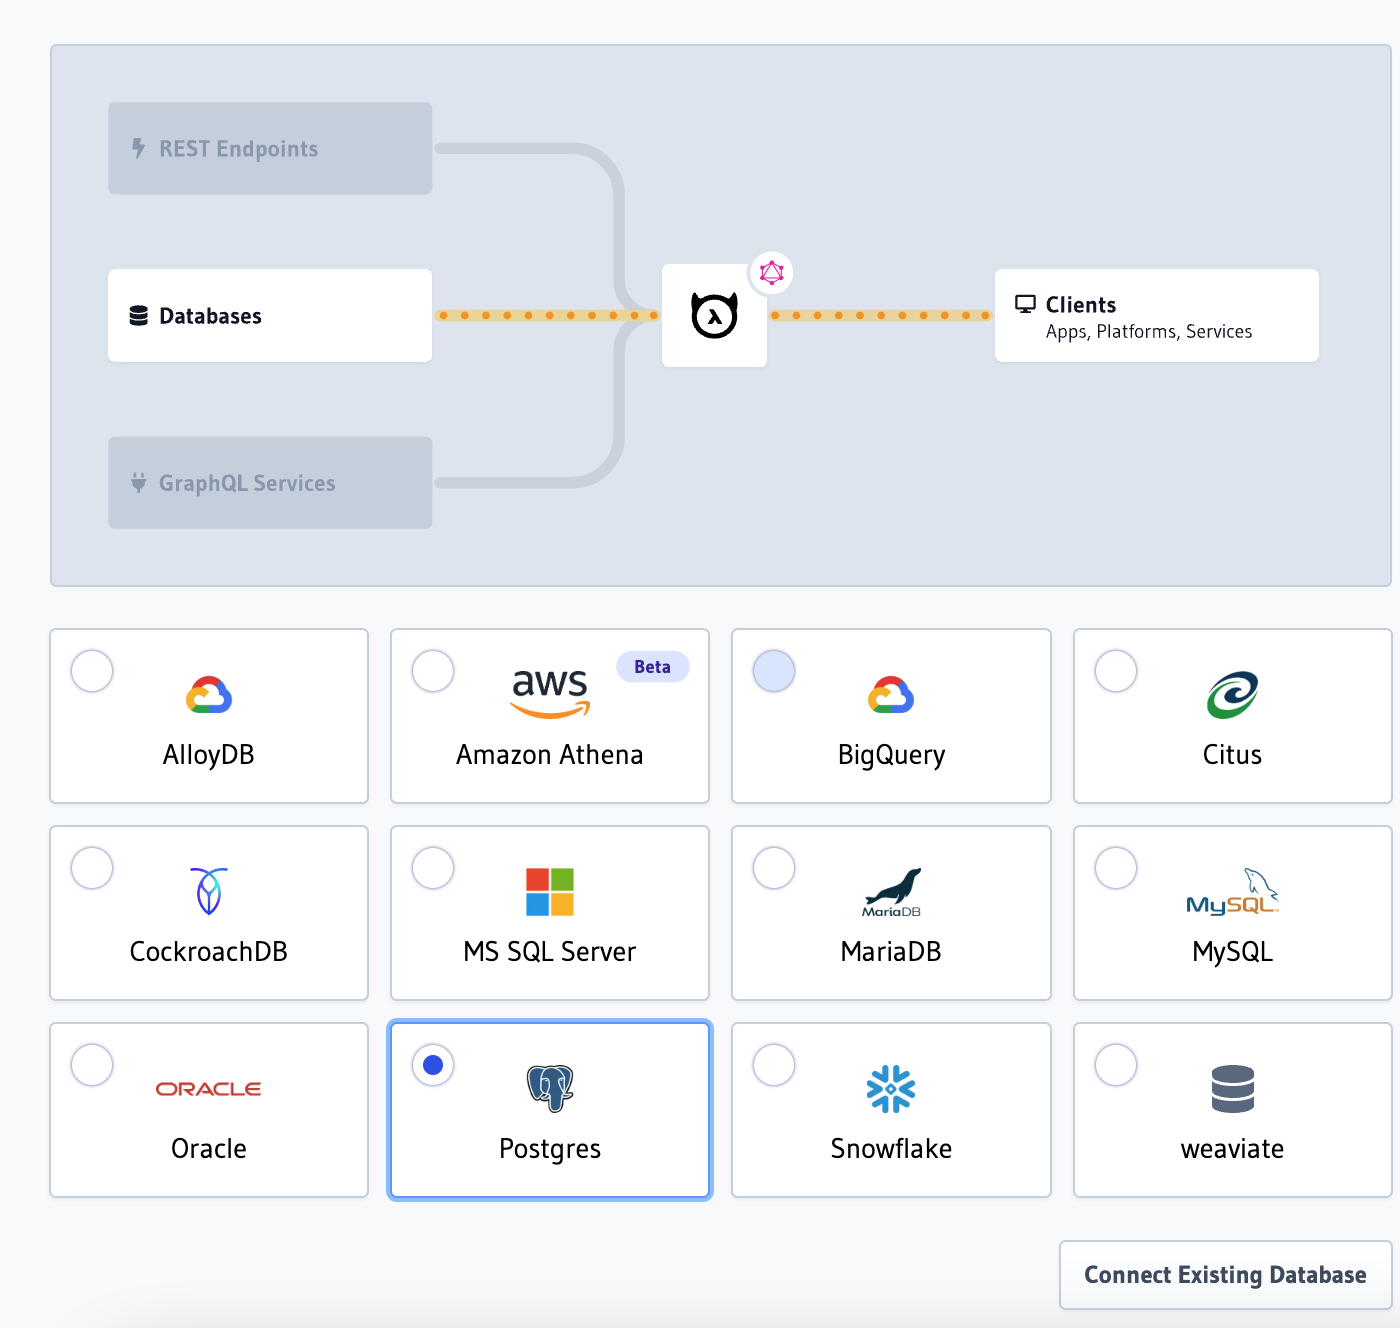
In your browser, open http://localhost:8080/console and navigate to Data before clicking Connect Database:
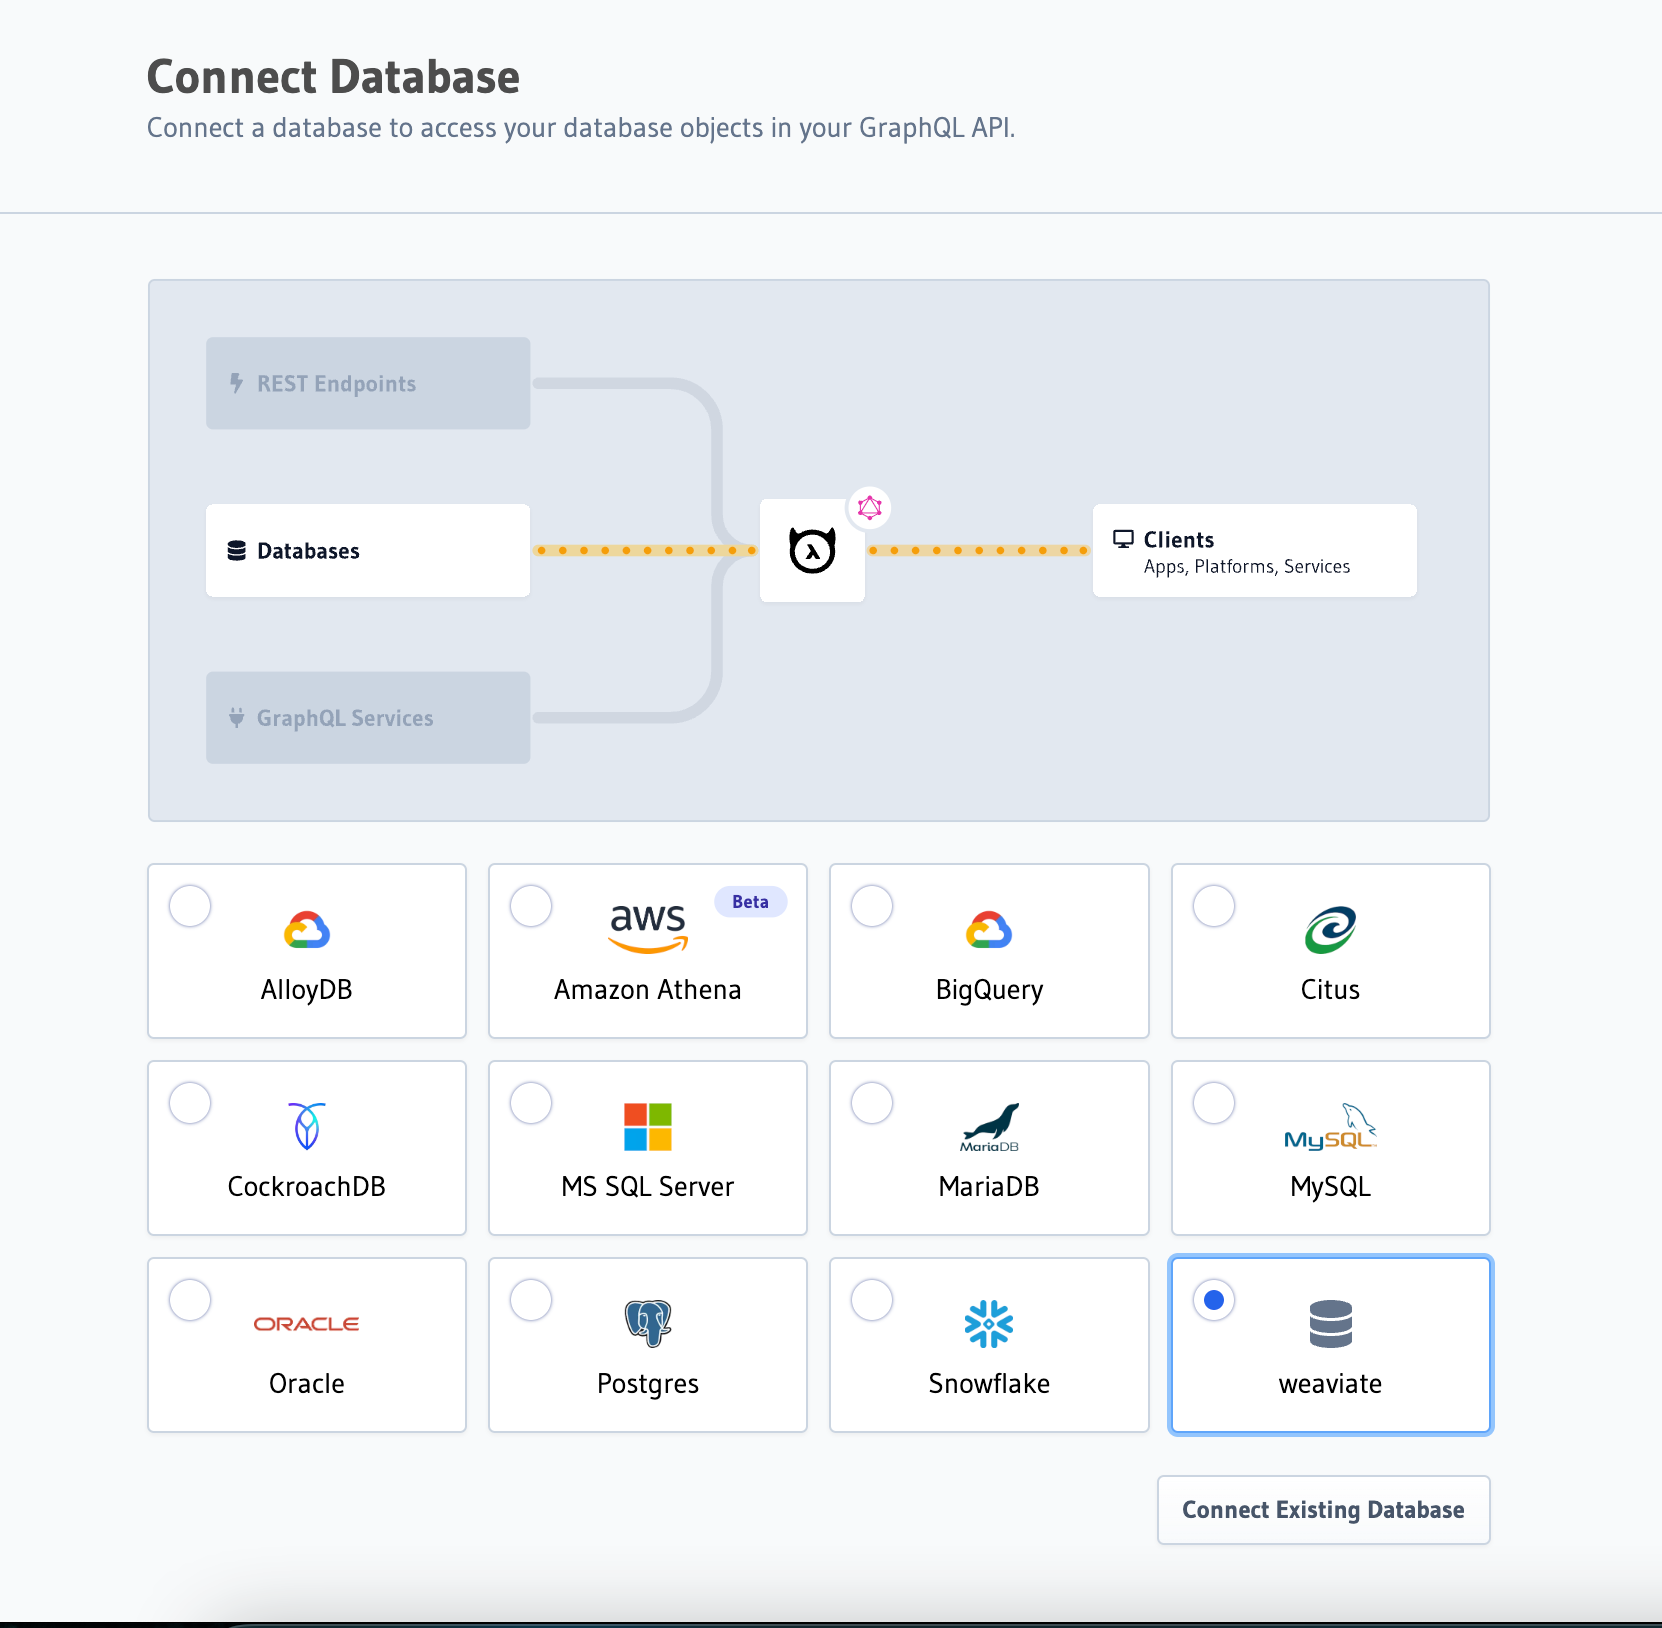
Once there, choose Postgres and click Connect Existing Database:
Finally, enter the give the database a name of HRTool. Ensure you've selected the Environment variable option and connect your database using the HASURA_GRAPHQL_METADATA_DATABASE_URL environment variable, which is part of your docker-compose file.
Finish by clicking Connect Database.
Step 2: Create tables
We'll use the Hasura Console to create our tables. Head to the Data tab and create a new table named candidate. Add the following columns:
id, which be of type integer (auto-increment)
name, which is of type text
email, which is also text
Set the id as the primary key and click Add Table.
Repeat the process for the application table using these columns:
id, of type text
candidate, of type integer
candidate_id, of type integer
resume_url, of type text
hiring_manager of type text
Step 3: Add data to the tables
Execute all the cells in 1_postgres_setup.ipynb. This will update the tables with all the data we need. This is quickly achievable using Jupyter.
Vector DB set-up
With Hasura and our data sorted, we need to vectorize things! We're going to use a service called Weaviate.
Step 1: Create a free 14-day cluster on Weaviate
Head to https://console.weaviate.cloud/ and register for an account. After confirming via email, click + Create cluster and fill in a name before clicking Create. Once Weaviate has provisioned your sandbox cluster, proceed to the next step.
Step 2: Explore the resume data and create the Resume schema
In the repository, follow notebook 2_vectordb_setup.ipynb to explore resume data and create the Resume schema.
Step 3: Update the data via batch
Follow along the notebook to update the data in Weaviate using the batch capability.
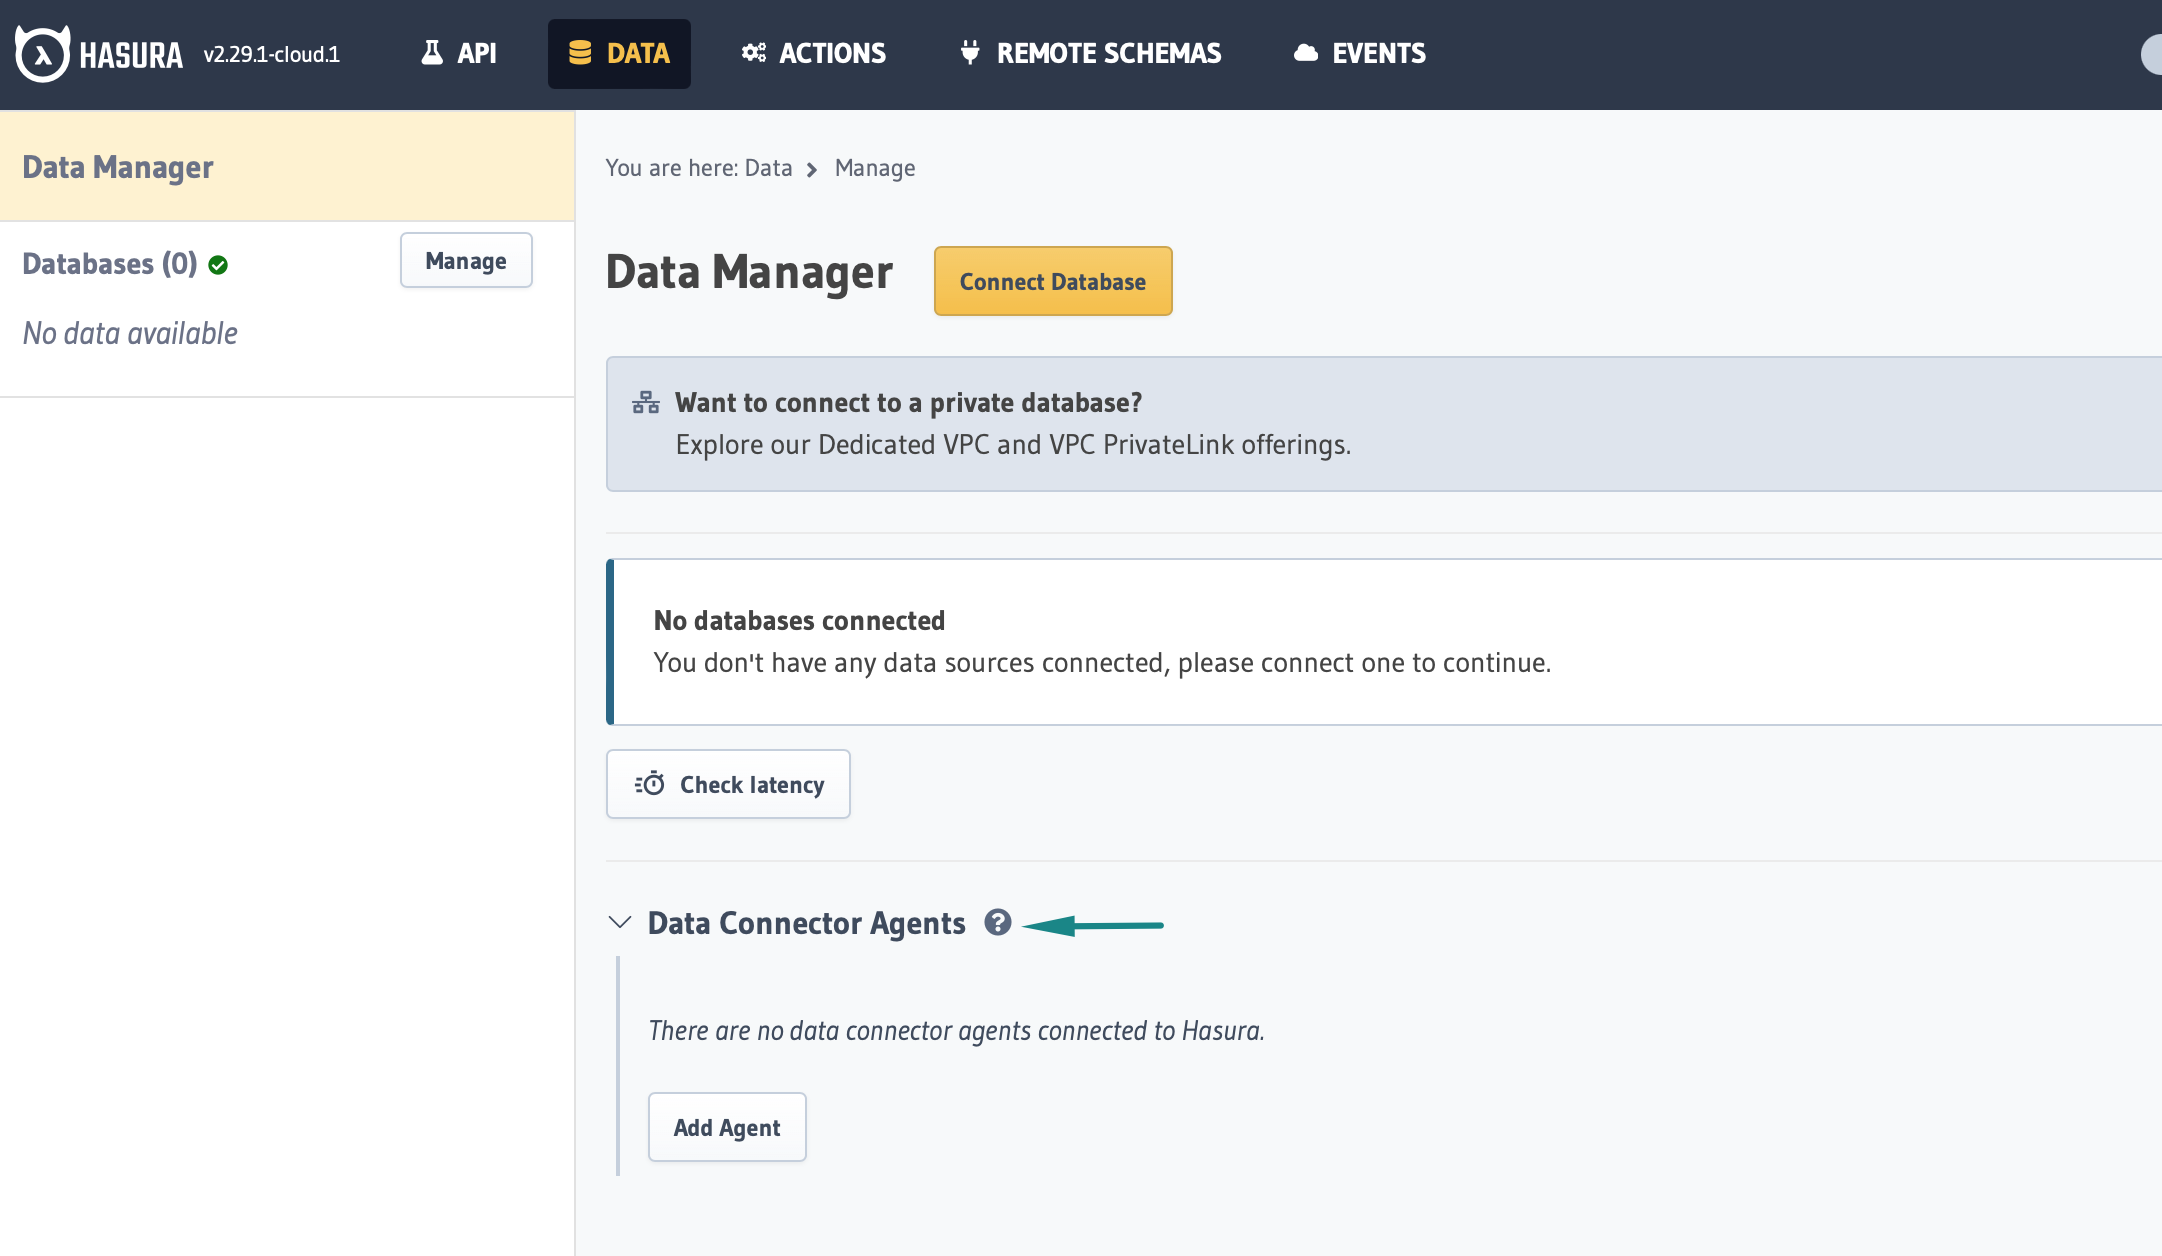
Step 4: Add the Weaviate connector to Hasura
Step 4a: Build your data connector
You can find the Weaviate connector repo on this link and to build connector for any of the other vector database you can follow these reference links
You can choose to run the connector in your infra or you can use Hasura CLI to host the connector and get the endpoint. Let us review the steps, assuming this is your first time with Hasura CLI.
# install hasura-cli# if you are on mac
brew install hasura-cli
# Otherwise follow instructions at https://hasura.io/docs/latest/hasura-cli/install-hasura-cli/# check if you see connector plugin
hasura plugins list
# if you can't you can update your cli
hasura update-cli
# install connector
hasura plugins install connector
# help section for connector
hasura connector -h# you can also get help section for specific commands
hasura connector create -h# create connector using our weaviate repo
hasura connector create my_weaviate_connector:v1 --github-repo-url https://github.com/hasura/weaviate_gdc/tree/main/
# check deployment status to get the endpoint
hasura connector status my_weaviate_connector:v1
# you can also use list command
hasura connector list
# view logs at any point of time
hasura connector logs my_weaviate_connector:v1
# for more commands explore help section
Step 4c: Add connector to Hasura console
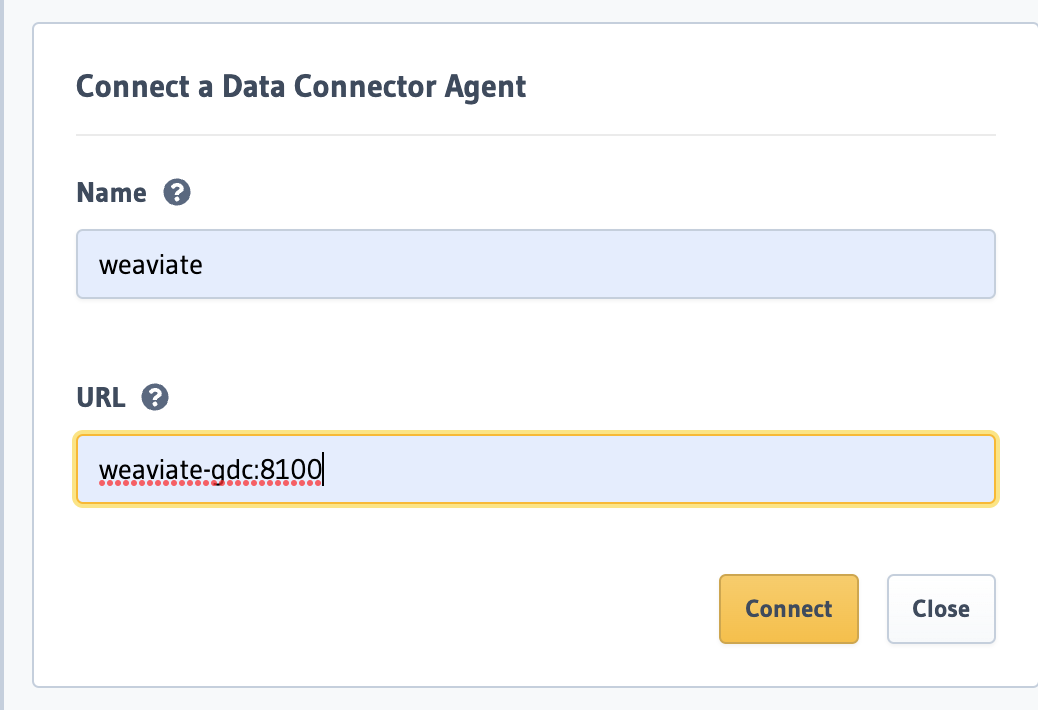
Back in the Hasura Console, head to Data and add the Weaviate agent:
Step 5: Connect tables (schemas) from Weaviate
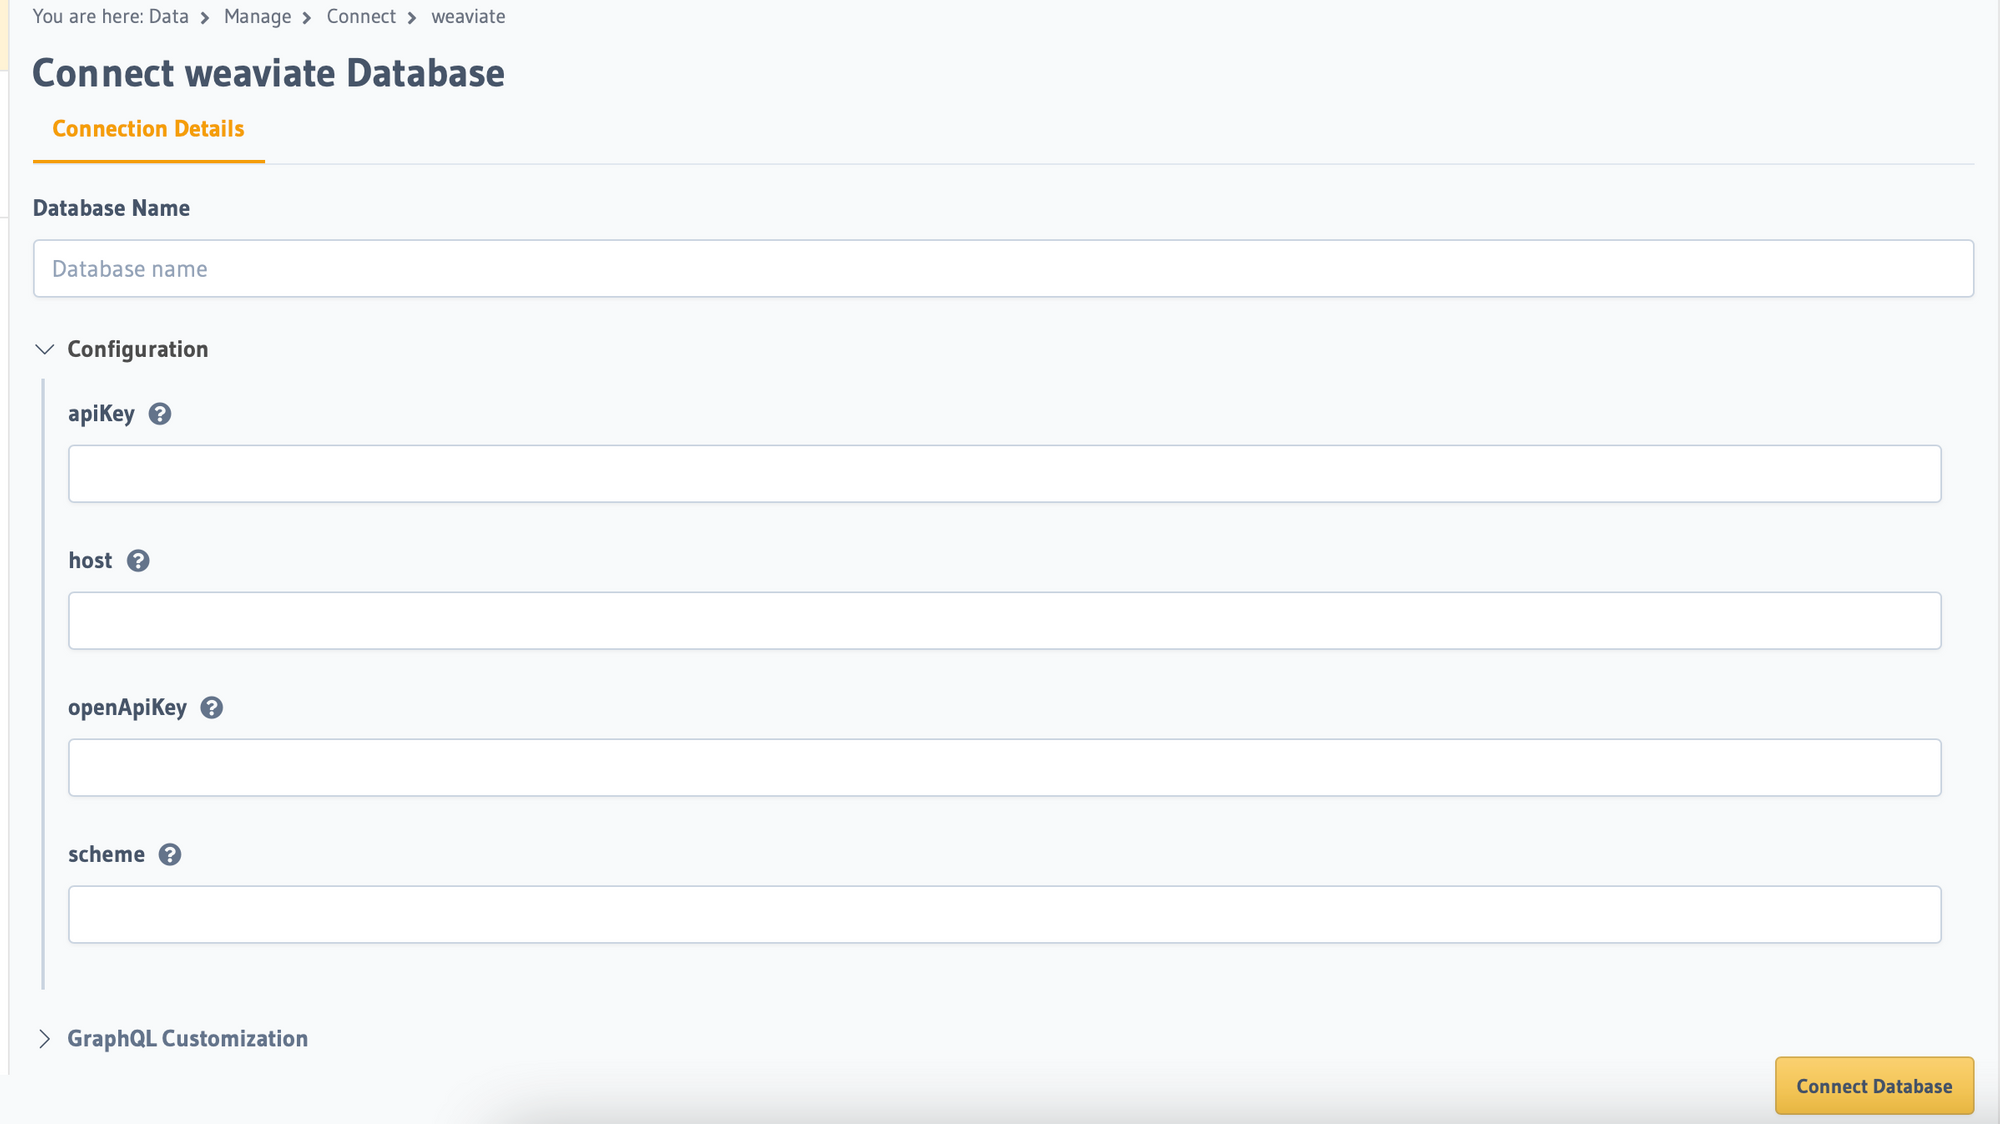
Step 5a: Connect database
Fill in the details of your database. These fields are part of the connector repo which is required for integration. You don't necessarily need openAI key (openAPI is a typo). apiKey is the key for weaviate and host is your cluster ip without protocol (http/https)
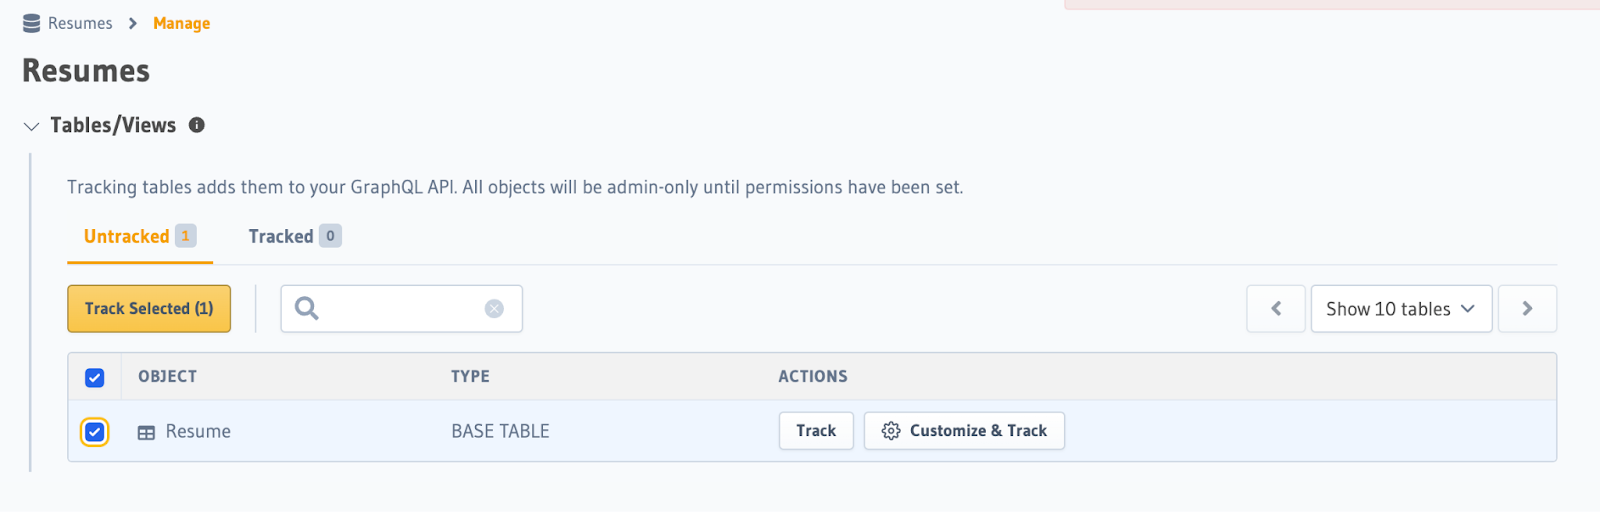
Step 5b: Track your tables
Under Data > Resumes, track the Resume table:
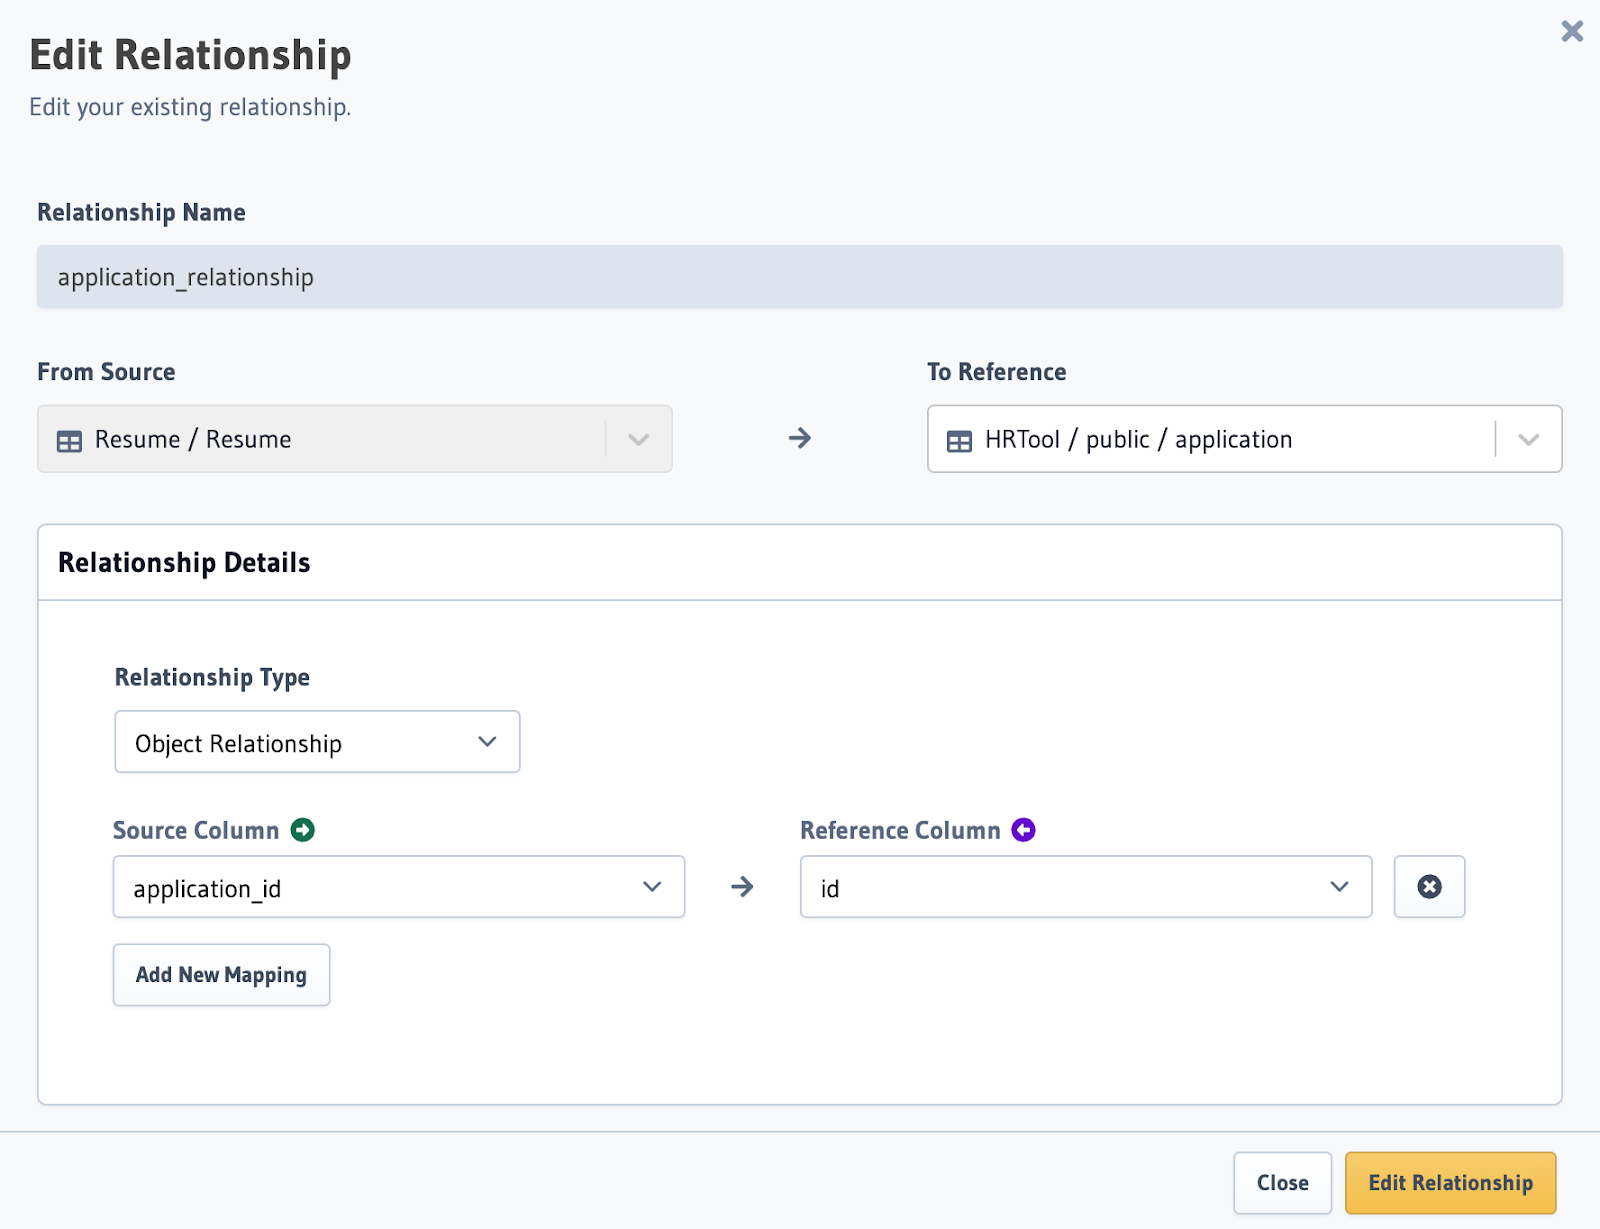
Step 6: Define a remote relationship
Finally, define a remote relationship from your vector db to your relational database:
All in all, if your Console looks like this — you should be set 🎉
Querying
Hello Hasura!
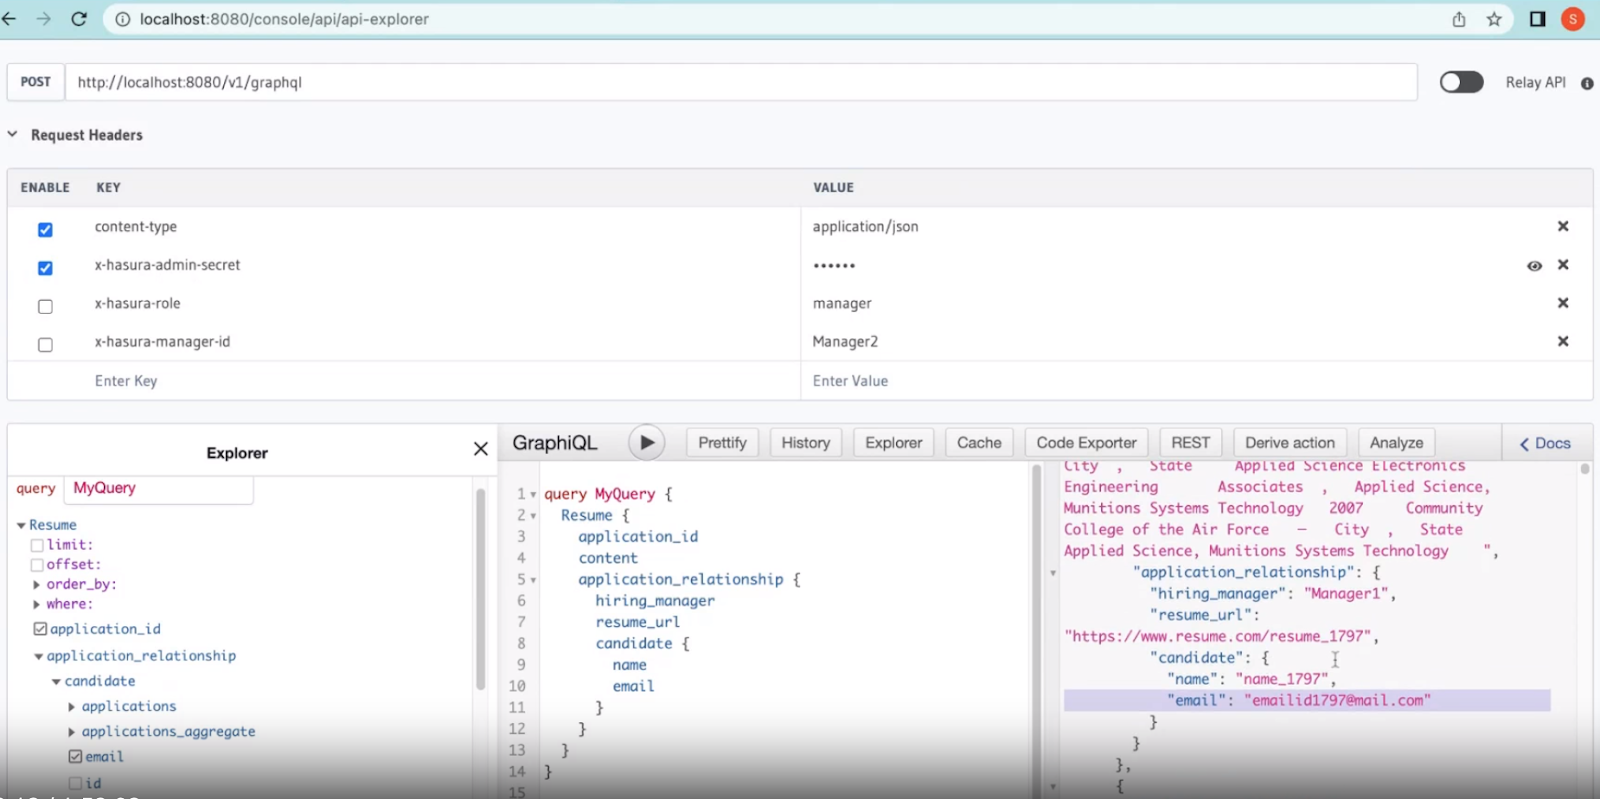
In our first query use case, we'll select a number of properties from across datastores. Hasura makes querying across data stores seamless; this would have been a lot of effort otherwise with a pipeline duplicating all of this data into VectorDB. Run the following query:
Executing this query should return information similar to what's below:
Query with access control
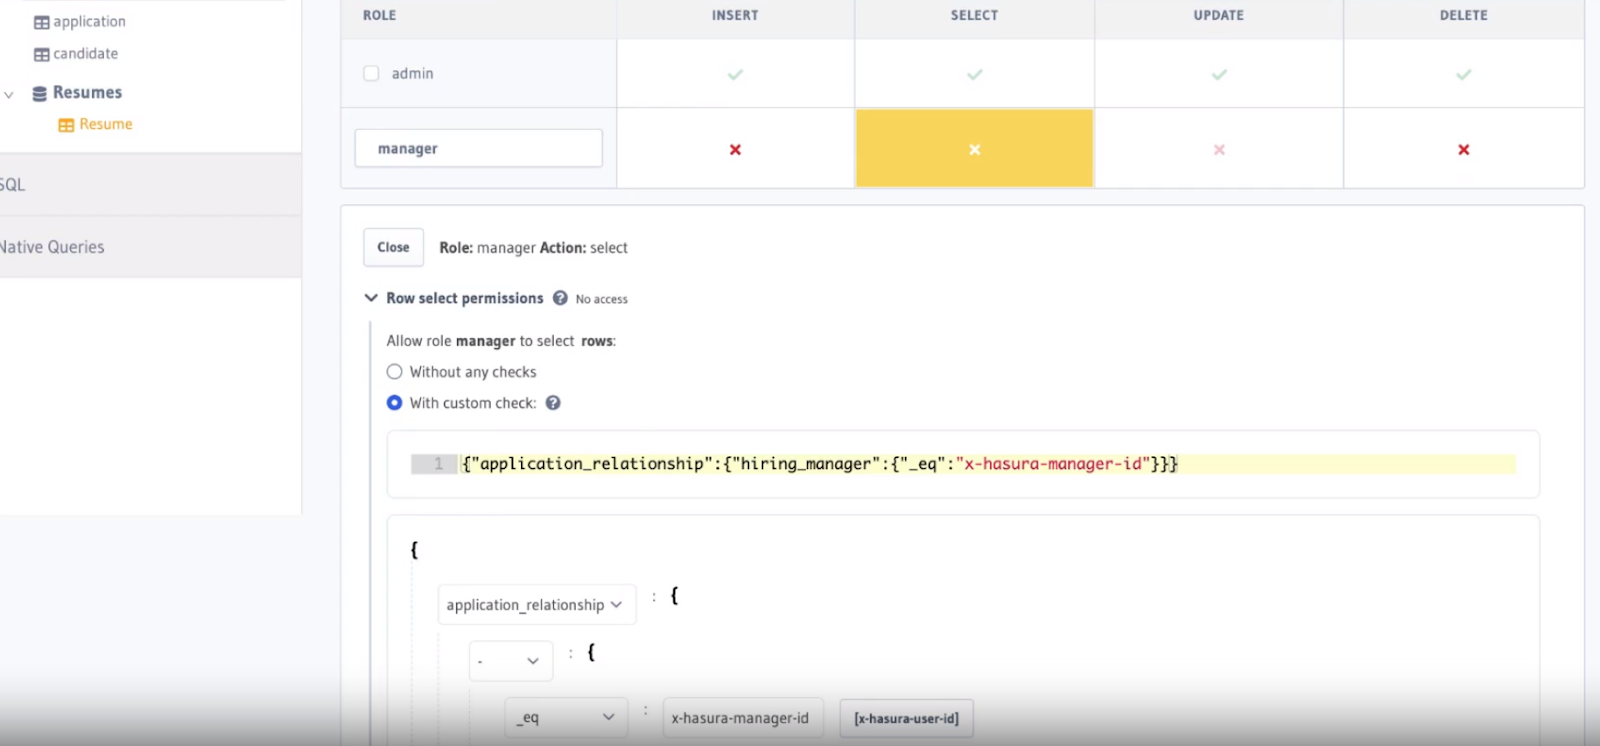
As we can see from the earlier screenshot, we have x-hasura-manager-id set as Manager2. This simulates the logged-in user having the identity of Manager2, but in the previous example, Manager2 can also see Manager1.
We can quickly fix this with Hasura's access control: permissions. Head to Data > Resume and configure permissions for a new role called manager. We'll choose the SELECT column and enter the following rule with a custom check: {"application_relationship":{"hiring_manager":{"_eq":"x-hasura-manager-id"}}}. You can copy and paste this rule into the first line of the editor, or configure it using the dropdown GUI.
Adding this rule does the magic! We'll now only see the applications belonging to the manager id in x-hasura-manager-id 🎉
Don’t forget to send x-hasura-role as manager and x-hasura-manager-id as your id of choice:
Find for me all marketing resumes
To find records by semantic (contextual) search, use the near text capability on your text data. Near text will fire a semantic search query on your VectorDB:
Automatically ingest new resume / update in resume
Let's say we want to automatically ingest and update resumes. You can set up an Event Trigger on your Postgres table, such that whenever there is a new record or change in a record, we automatically fetch the data and store the vectorized data in out VectorDB.
You can have one for insert, delete, update - this is totally your call on the use case!
As an example, we could handle inserts and deletes like this:
def handle_insert(row, client):
    id = row['id']
    # In reality you would follow the URL from row['url']
    content = "dummy content"
    gql_query = gql("""
            mutation insertItem($id: String!, $content: text!) {
                insert_Resume_one(object: { application_id: $id, content: $content }) {
                    id
                }
            }
        """)
    print(client.execute(gql_query, variable_values={
        'id': id, 'content': content}))

def handle_delete(row, client):
    id = row['id']
    gql_query = gql("""
            mutation deleteItem($id: String!) {
                delete_Resume(where: {application_id: { _eq: $id } }) {
                    affected_rows
                }
            }
        """)
    print(client.execute(gql_query, variable_values={
        'id': id}))
Step 2: Define an overall handler
After defining each event handler we'll need, we need an overall event handler defined that will execute the appropriate handler when an event occurs:
def handle_event(event):
    gql_headers = {'x-hasura-admin-secret': 'secret'}
    # Create a GraphQL client with the request transport
    transport = RequestsHTTPTransport(
        url=GRAPHQL_ENDPOINT, headers=gql_headers)
    client = Client(transport=transport)

    event = event['event']
    op = event['op']
    if op == 'INSERT':
        row = event['data']['new']
        handle_insert(row, client)
    elif op == 'UPDATE':
        old_row = event['data']['old']
        new_row = event['data']['new']
        # TODO: Do something
    elif op == 'DELETE':
        old_row = event['data']['old']
        handle_delete(old_row, client)
    else:
        print(str(event))
    return "Success"
Step 3: Create an API for Hasura to call
Event Triggers in Hasura need an API to call. As we're using Python, we'll implement a simple, lightweight Flask API. From the repository's directory, you can run python server.py to start the server.
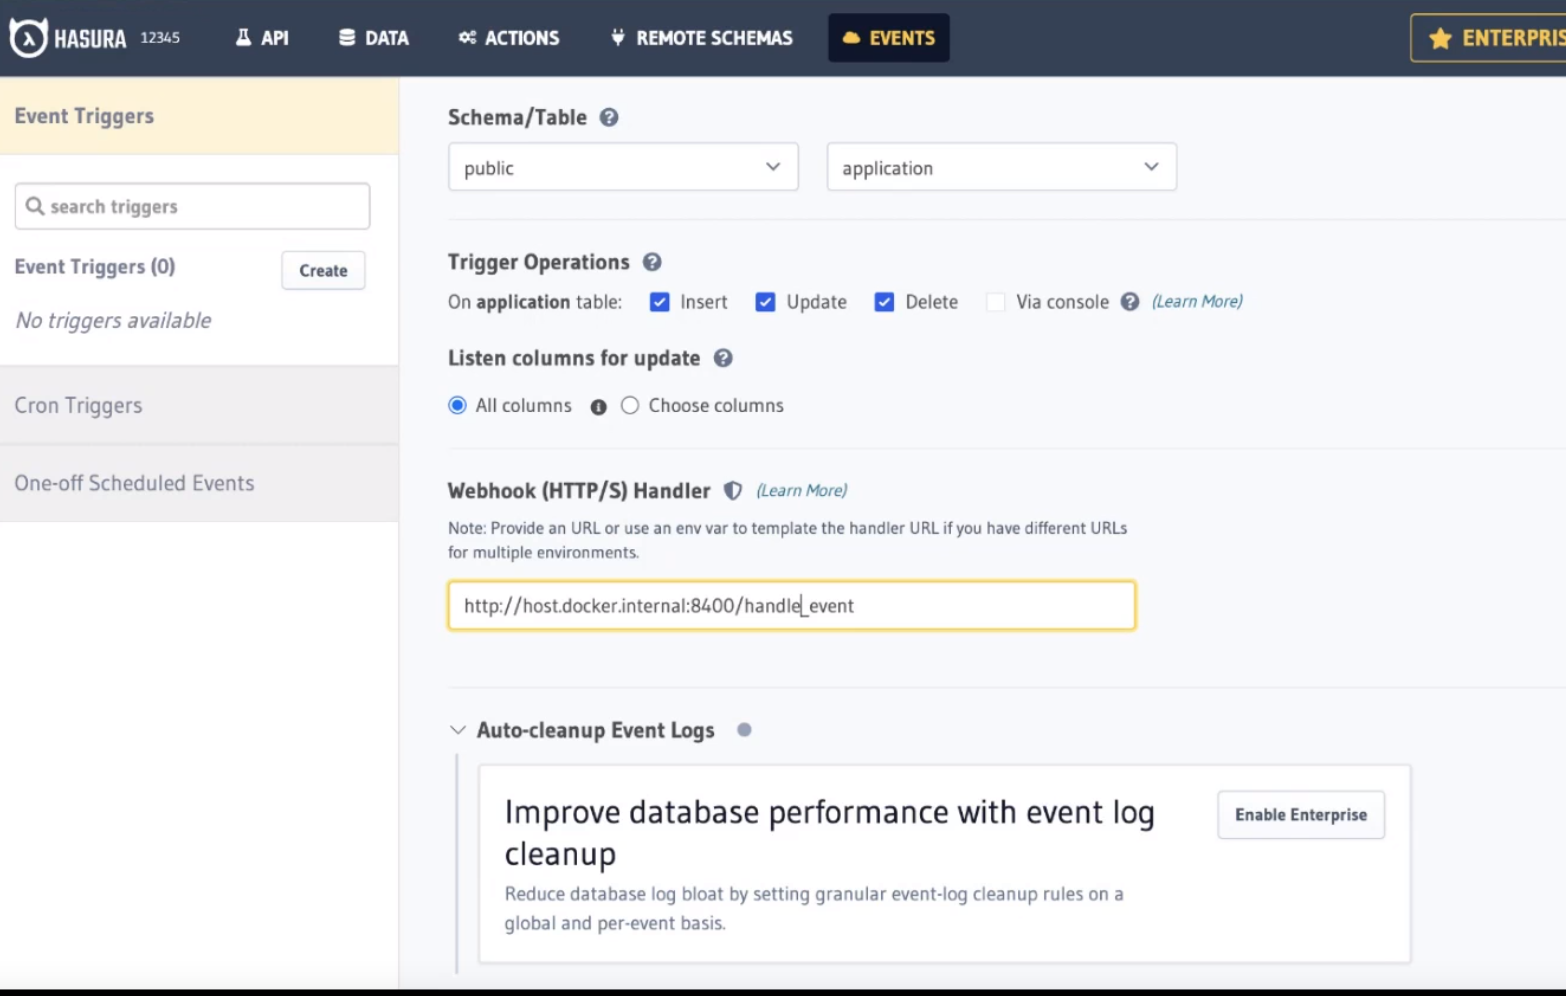
Step 4: Configure the Event Trigger in Hasura
Head to Events and click Create to configure a new Event Trigger. We'll reference the public shema and application table. Ensure all CRUD operations are checked as triggers and enter the following URL for our Flask API:
http://host.docker.internal:8400/handle_event
The configuration should look like this before clicking, Create Event Trigger:
Finally, we can test this by entering a new application:
Find for me resumes with most experience
You can also set up LLM queries as an Action on a remote source. This is great because we can define access control for Actions as well, and any data that we query will pass through our data access control we set up earlier.
Step 1: Write the LLM query
We'll need the code to query for resumes. This can be found in handlers/query_llm.py. You'll need the get_prompt() function from this file.
Please note: You'll need the OPENAI_APIKEY environment variable set when starting server.py for this to work!
Step 2: Define the API
Create a function called query_llm() as detailed here. Then, include a route in your Flask server to handle rqeuests to the /query_llm endpoint as detailed in handlers/server.py.
Step 3: Create an Action on the Hasura Console
On the Actions page, click Create and enter the following Action Definition:
type Query {
  QueryLLM (user_query: string!): string
}
Then, clear out the Type Configuration. Finally, provide the handler via this URL:
http://host:docker.internal:8400/query_llm
Step 4: Execute the Action
Now you can use QueryLLM as a type in your GraphQL API 🎉