Local Dev to Staging to getting Production-Ready with Hasura! 🚀
In this post, we will look at how to approach various stages of development with Hasura, from localhost to staging -> going live to production and finally performing maintenance updates.
Local Development
Let's begin with local development. We will look at different aspects of local development like running the server/database, managing migrations, testing out Actions and Events with Hasura.
Running Hasura via docker-compose
The simplest setup to run Hasura locally is to use the docker-compose setup to run both graphql-engine and postgres as docker containers.
In case you have an existing Postgres setup running locally through a different environment, like the native Postgres Mac app or the Postgres binary installed on Linux, you can configure the HASURA_GRAPHQL_METADATA_DATABASE_URL to point to the right postgres connection string and remove the Postgres container from the docker-compose setup.
Note: Hasura can connect to other databases like SQL Server, BigQuery etc, but still requires a PostgreSQL database for managing metadata.
Managing schema migrations
Hasura needs the Postgres schema and the metadata to create the GraphQL API. We will see how to manage migrations for both.
Database migration files
The state of your PG database is managed via incremental SQL migration files. These migration files can be applied one after the other to achieve the final DB schema.
DB migration files can be generated incrementally and can by applied in parts to reach particular checkpoints. They can be used to roll-back the DB schema as well, provided the right down migration files are created.
Hasura metadata files
The state of Hasura metadata is managed via snapshots of the metadata. These snapshots can be applied as a whole to configure Hasura to a state represented in the snapshot.
Hasura metadata can be exported and imported as a whole.
Once you have the containers (graphql-engine and postgres) running, you have an option to manage the database schema migrations, depending on your current database state.
Start using Hasura Console via CLI to enable database migrations
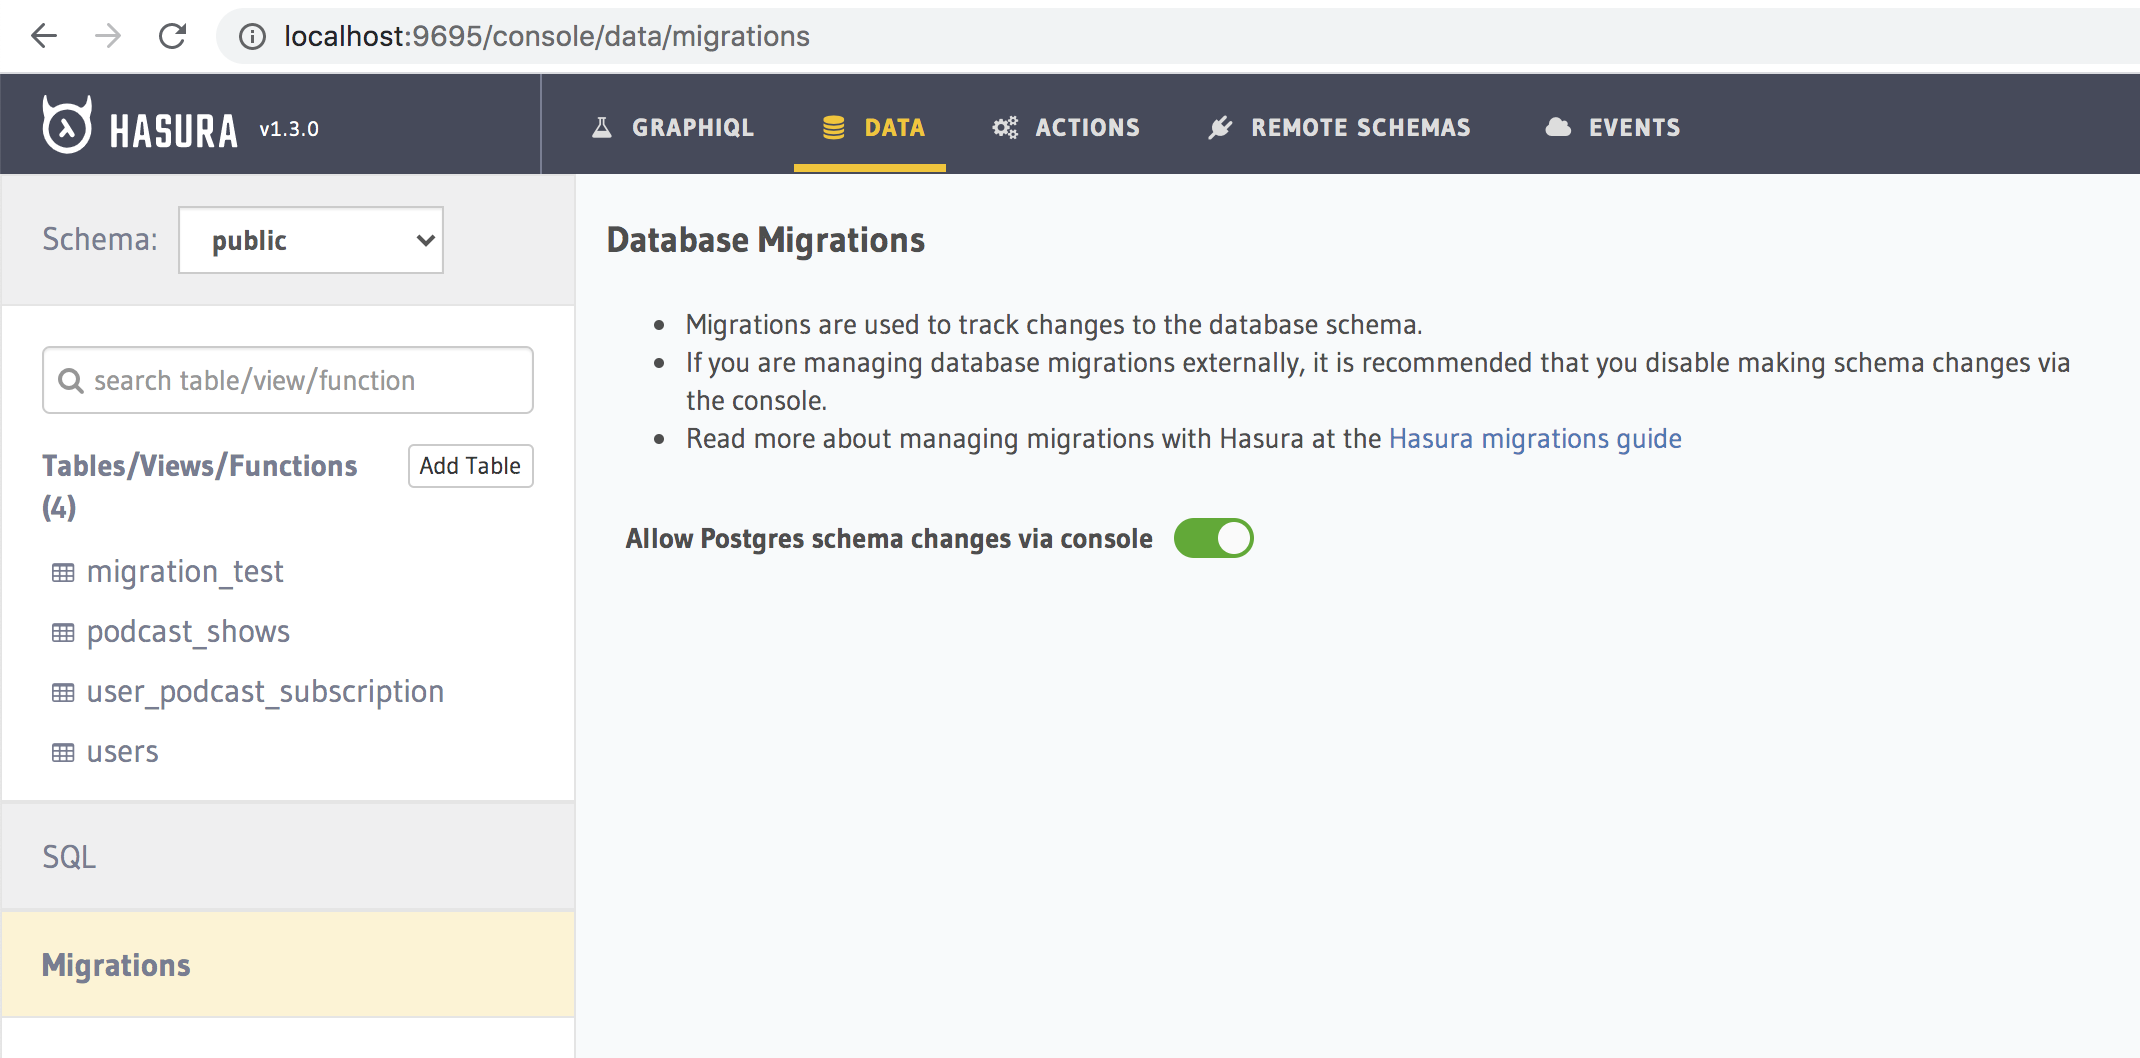
Database Migrations tab on Hasura Console
In case you missed doing the above, you can create a one-off migration file through CLI once the initial schema is ready.
Install Hasura CLI
For doing the above, you need the Hasura CLI installed. You can check out docs for installing the Hasura CLI. Once installed, initialise a hasura project with hasura init and this will scaffold a project directory with migrations, metadata and config.
New database: If your database is clean without any existing schema, you can start using the console via CLI ( hasura console ) , connect to a database, modify the database schema and the CLI will take care of creating the up and down migration files.
Existing database + Hasura setup: In case you have an existing database schema and metadata from a Hasura Cloud project, you can use the CLI to initialise the migration for that schema using the following command:
Now head to the migrations directory to check the version of the migration generated.
cd migrations/default
Note down the directory name, which would look something like this 1627564572630_init. Just copy the version number without the _init parts of the name.
It is important to add the skip-execution flag since that marks the migration as applied. This is to ensure that the schema that is already created on Hasura Cloud project is not getting applied again, which would result in a conflict.
Additionally to pull metadata from the existing Hasura server, execute the following:
Now head back to Hasura Console and add a database source with the pre-configured env PG_DATABASE_URL. Finally, sync these project changes to your actual local Hasura project by running.
Once you set this up, you can continue to use Hasura Console served via CLI and make any schema changes and migration files will be automatically created as you work along.
Squashing Migrations
During local dev, we typically modify schema iterating it over multiple times. This leads to a large number of migration files being created over time. If you are building a schema for a specific feature and you really don't want to rollback or manage the smaller iterations in between, you can squash the migration files into a single file for easier organisation.
hasura migrate squash --from<version>
Migrations are also versioned with timestamps. At any point of time, using the migrations, you should be able to (re)create the schema and apply metadata to replicate the project quickly.
Note: Using Hasura's migration system is optional. In case you are comfortable or familiar using other database migration tooling, you can continue to use that to manage your database schema. To disable Hasura's migration, you can do so via the Console served by the CLI. Head to to the Data -> Migrations tab and switch off the toggle Allow Postgres schema changes via console.
You can also create a project on Hasura Cloud for development. All the steps required to sync between dev and staging would remain the same. Typically, the webhook URL handlers need to be exposed to a public endpoint that Hasura Cloud can access and hence they cannot be localhost urls. We recommend using something like ngrok to expose a local server running for Actions/Remote Schemas/Events to a publicly accessible endpoint
Metadata
Hasura stores some metadata to create the GraphQL API over databases and provide other functionalities like Remote Schemas, Events etc. All the actions performed on the console, like tracking tables/views/functions, creating relationships, configuring permissions, creating event triggers and remote schemas, etc. can be exported as a JSON/yaml metadata file.
You can use hasura metadata export anytime to export the current state of Hasura.
The metadata directory of your Hasura project should be put in your version control system like git, so that you can rollback corresponding changes later, if required.
Alright, so far we have taken care of managing migrations and metadata for our local dev. Now let's move on to business logic.
How do I develop and test business logic?
Hasura lets you write business logic in a flexible way. If you are comfortable writing your own GraphQL server from scratch for the business logic parts, you can add them as a Remote Schema. If you are interested in (re)using REST API endpoints, you can map GraphQL types with Actions.
Adding either a Remote Schema or Action will become part of Hasura's metadata. It's configuration after all. When you are adding either of them, you will have to give the HTTP handler / URL so that Hasura can communicate with that endpoint.
Assuming that handler is also running on your local machine, you will need to give an endpoint that is accessible from inside the docker container of Hasura.
Typically for Mac, this will be host.docker.internal and for linux where the containers are running in host mode, it will be localhost.
Configuring Handlers via Environment Variables
The recommended way to configure these handler URLs is via environment variables, irrespective of the environment (local/staging/prod).
Actions
Actions can have a base url through ENVs, something like {{ACTION_BASE_URL}}. So for example if all your REST API endpoints are running in a single server, you can configure the env with the host name.
{{ACTION_BASE_URL}}/createUser
where the {{ACTION_BASE_URL}} will typically have values like http://myserver.com or when running in localhost, it will look something like http://localhost:3000. All of this will be passed to the graphql-engine server as ENVs.
Forwarding Headers can be configured using ENV. This will be applicable when you are sharing a common secret between your Action handler or passing in some Authorization tokens etc.
Remote Schemas / Events
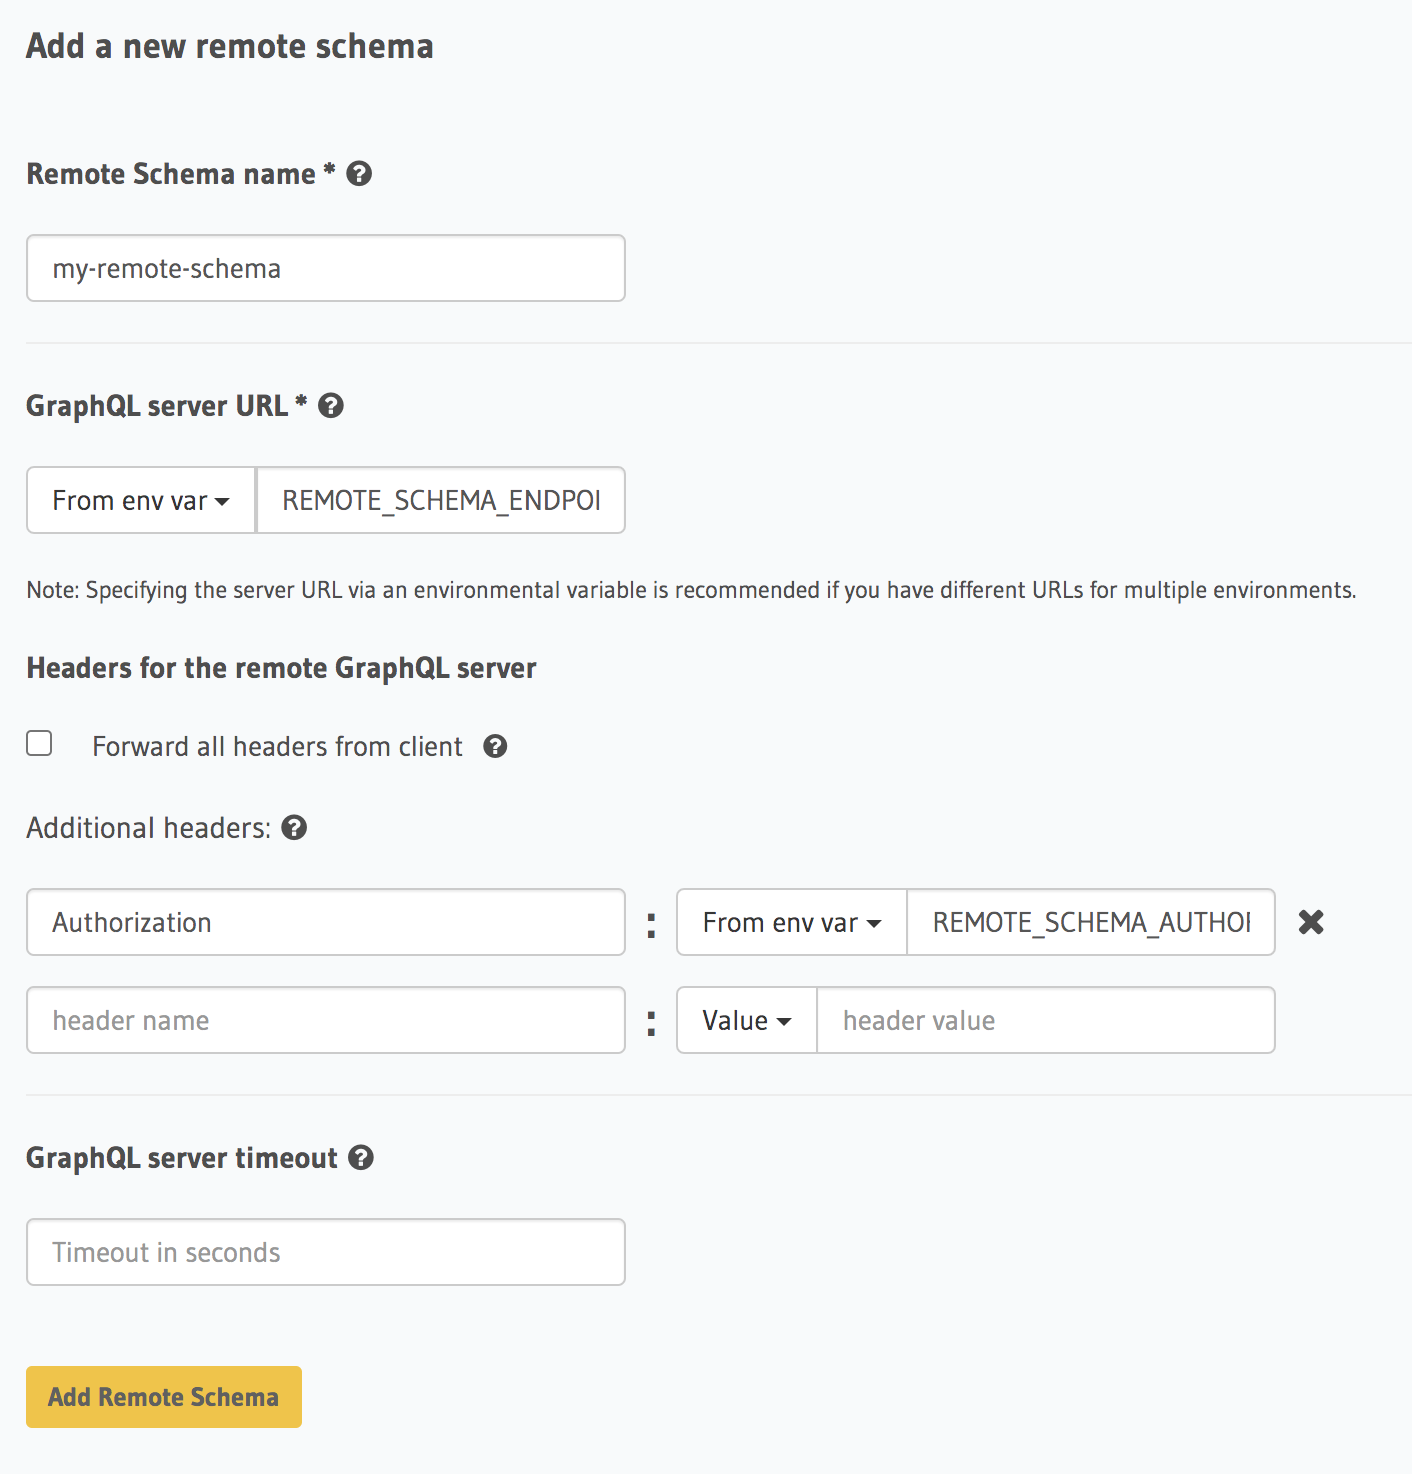
The GraphQL server URL can come from an env var. Similarly any additional headers can be configured that can have values from env.
Configure Remote Schema URLs and Headers with Env
Similarly while creating Events, you can specify the URL for event handler via Env.
Debugging in local dev
During local dev, you may want to look at errors in detail so that you can fix the underlying issue. For a GraphQL request that results in an error, Hasura may provide additional information for each object in the extensions key of errors. The internal key contains error information including the generated SQL statement and exception information from Postgres. This can be highly useful, especially in the case of debugging errors in action requests.
Once you are done with local dev, moving to a different environment (staging/production) will primarily revolve around
Setting up CI/CD
Configuring Environment variables
Applying migrations and metadata
Running tests
Setting up CI/CD
Generally, when you are done developing your app locally, you would push it to your upstream version control system like Github or Gitlab. You can trigger CI/CD workflows when a push is made to your upstream repository. When you want to deploy your changes to staging, you may push your latest code to a special branch or push a new tag which updates your staging environment.
The process for CI/CD with Hasura instances is essentially a mirror of the manual local workflow you would use. The CI/CD instance should download or be given the CLI as an artifact, and then run the series of commands you’d like to integrate. This generally means “hasura migrate apply” and “hasura metadata apply”, and could also mean “hasura pro regression-tests run”.
You can make use of hasura/graphql-engine:vX.X-cli-migrations images to do this manually for yourself in your self hosted setup. You can auto-apply migrations/metadata when the graphql-engine server starts.
GitHub Deployment
If you would like to automate the migration and metadata updates and you are using GitHub to version control your migrations/metadata and Hasura Cloud to host your GraphQL API, then you can make use of our GitHub integration. Once you connect your repo and configure a branch, you can simply do a git push to your branch and trigger a deployment of migrations/metadata to your Hasura Cloud project.
Configuring Environment Variables
There are various components of Hasura metadata which are dependent on environment variables. This allows environment specific runtime without changing the metadata definition.If an environment variable is being used by some part of metadata and isn't available in an environment, the metadata application won't succeed. Before applying migrations/metadata, we need to ensure that the configuration is correct. Additionally you can check for the following:
The GraphQL Endpoint needs to be secured. You will need to add an HASURA_GRAPHQL_ADMIN_SECRET env. This is added by default on Hasura Cloud, but on local development using docker, you will have to ensure it gets added for security.
Environment variables for various entities like Actions/Remote Schemas/Events are configured.
Applying Migrations and Metadata Manually
Migrations can be manually applied to any Hasura instance through:
A good development workflow would require that tests be run 1) early in the dev process, and 2) automatically with changes, to ensure changes to the schema don’t break functionality.
As you keep making schema changes, running regression tests on Hasura Cloud will ensure you are not making unwanted breaking changes.
Hasura Cloud is the recommended hosting solution for Hasura as it takes care of Infrastructure management automatically (like auto-scaling), apart from providing analytics/rate limiting and other advanced features.
Like staging, the migrations/metadata workflow needs to be repeated. The docs cover a Production Checklist for going live.. But broadly they are
Secure endpoint with admin secret
Disable Console - so that nobody will be able to modify schema/data directly.
Disable APIs - Except the GraphQL API, you don't need access to other APIs like pg_dump, config and metadata etc.
Disable dev mode - You don't want expanded detailed internal error messages in production.
Restrict CORS domains - Allow only specific domains to make requests.
Allow lists - If you know the exact GraphQL queries that would be made in the app, enable allow lists to deny any other request.
Maintenance / updates
After going live, you can continue to use the same migrations/metadata workflow via CLI as part of incremental app building.
Updating Hasura Version
This depends on where your Hasura container is hosted. But broadly what we need to update is the docker image hasura/graphql-engine:<version> where the <version> will be replaced with the latest version. (v2.0.7 for example).
There are update guides for popular vendors and tools like Heroku / Docker / Kubernetes / DigitalOcean. If you are using Hasura Cloud, this is taken care automatically.
Updating ENV via API
Hasura Cloud exposes GraphQL APIs to update environment variables or even create projects from scratch. For example, to update a few environment variables, you can make a mutation like via the API. Read more in the API reference.