Edit on GitHub
Firebase
What is Firebase
Firebase enables you to add authentication to your applications. It provides sign-in methods such as:
- email and password
- identity providers such as Google
- phone
and more.
This section will show how to integrate Firebase with your Hasura applications.
Configure Firebase
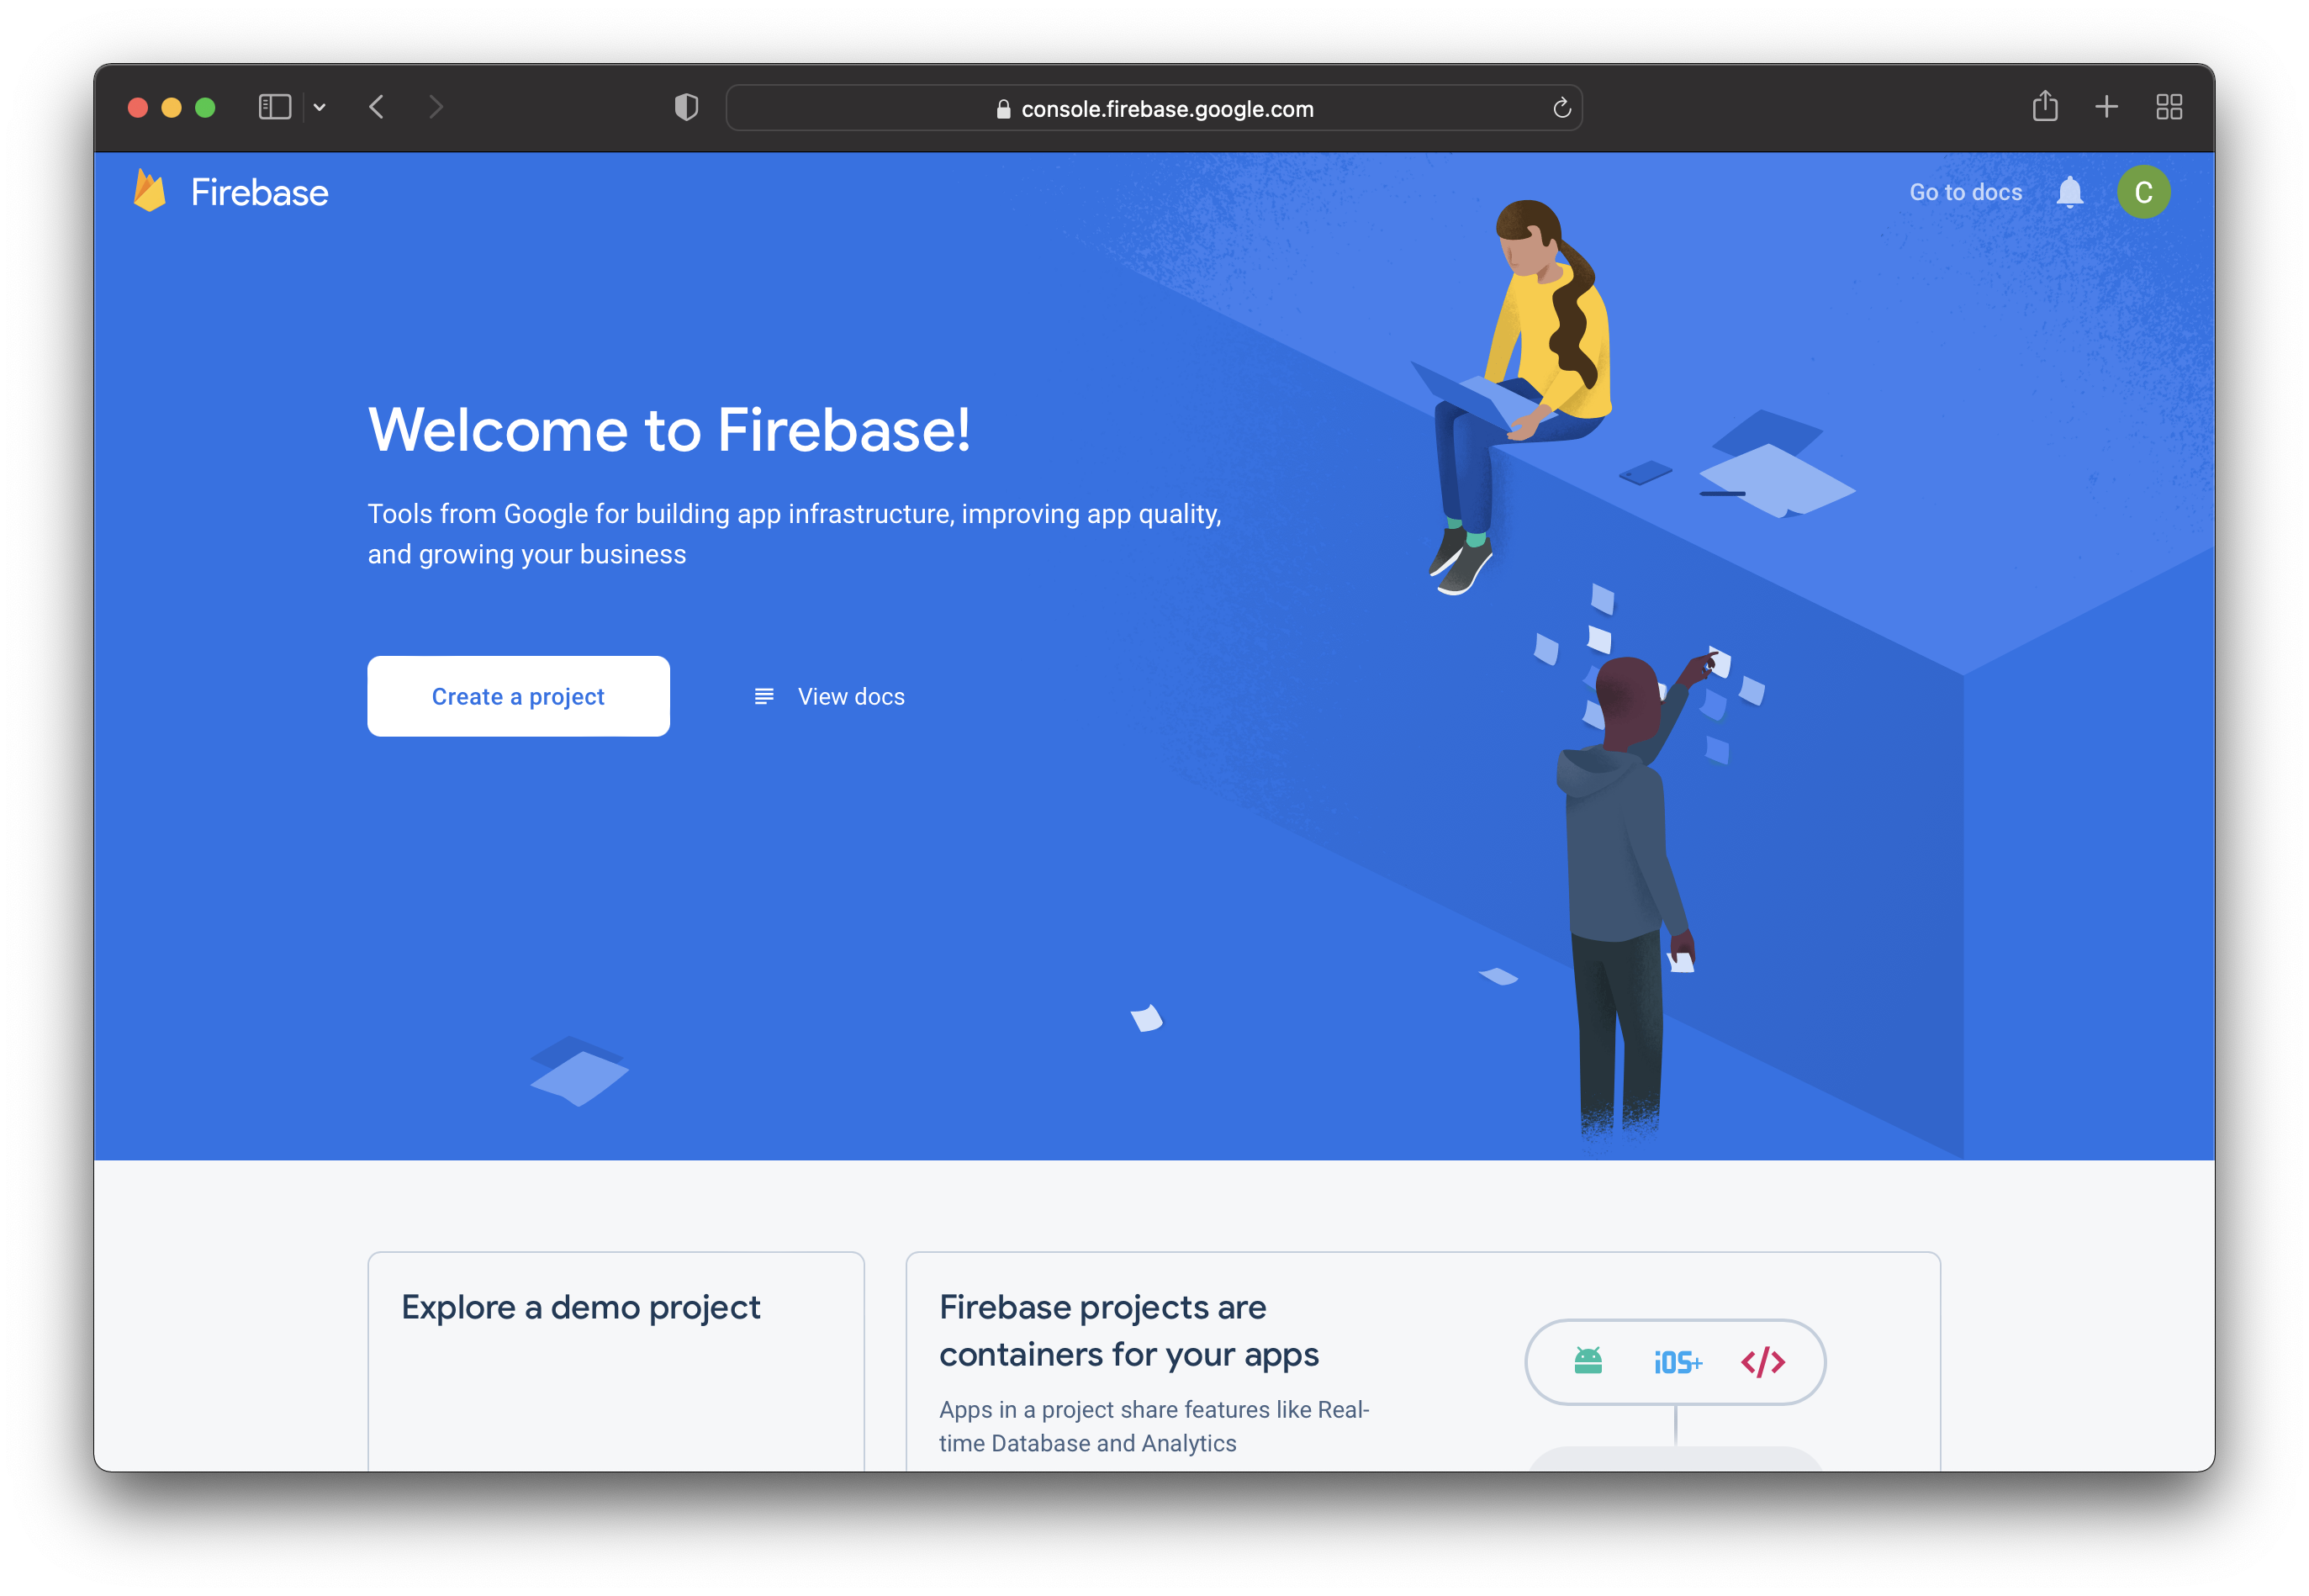
The first step is to log into your Firebase console. Once there, click on the Create a project button.
That takes you to another page where you configure your Firebase project. You’ll need to:
- choose a name for your project
- enable/disable Google Analytics for your project
Note: In this example, Google Analytics is disabled.
Once your project is initialized, click on Continue. You will be redirected to the dashboard of your newly created project.
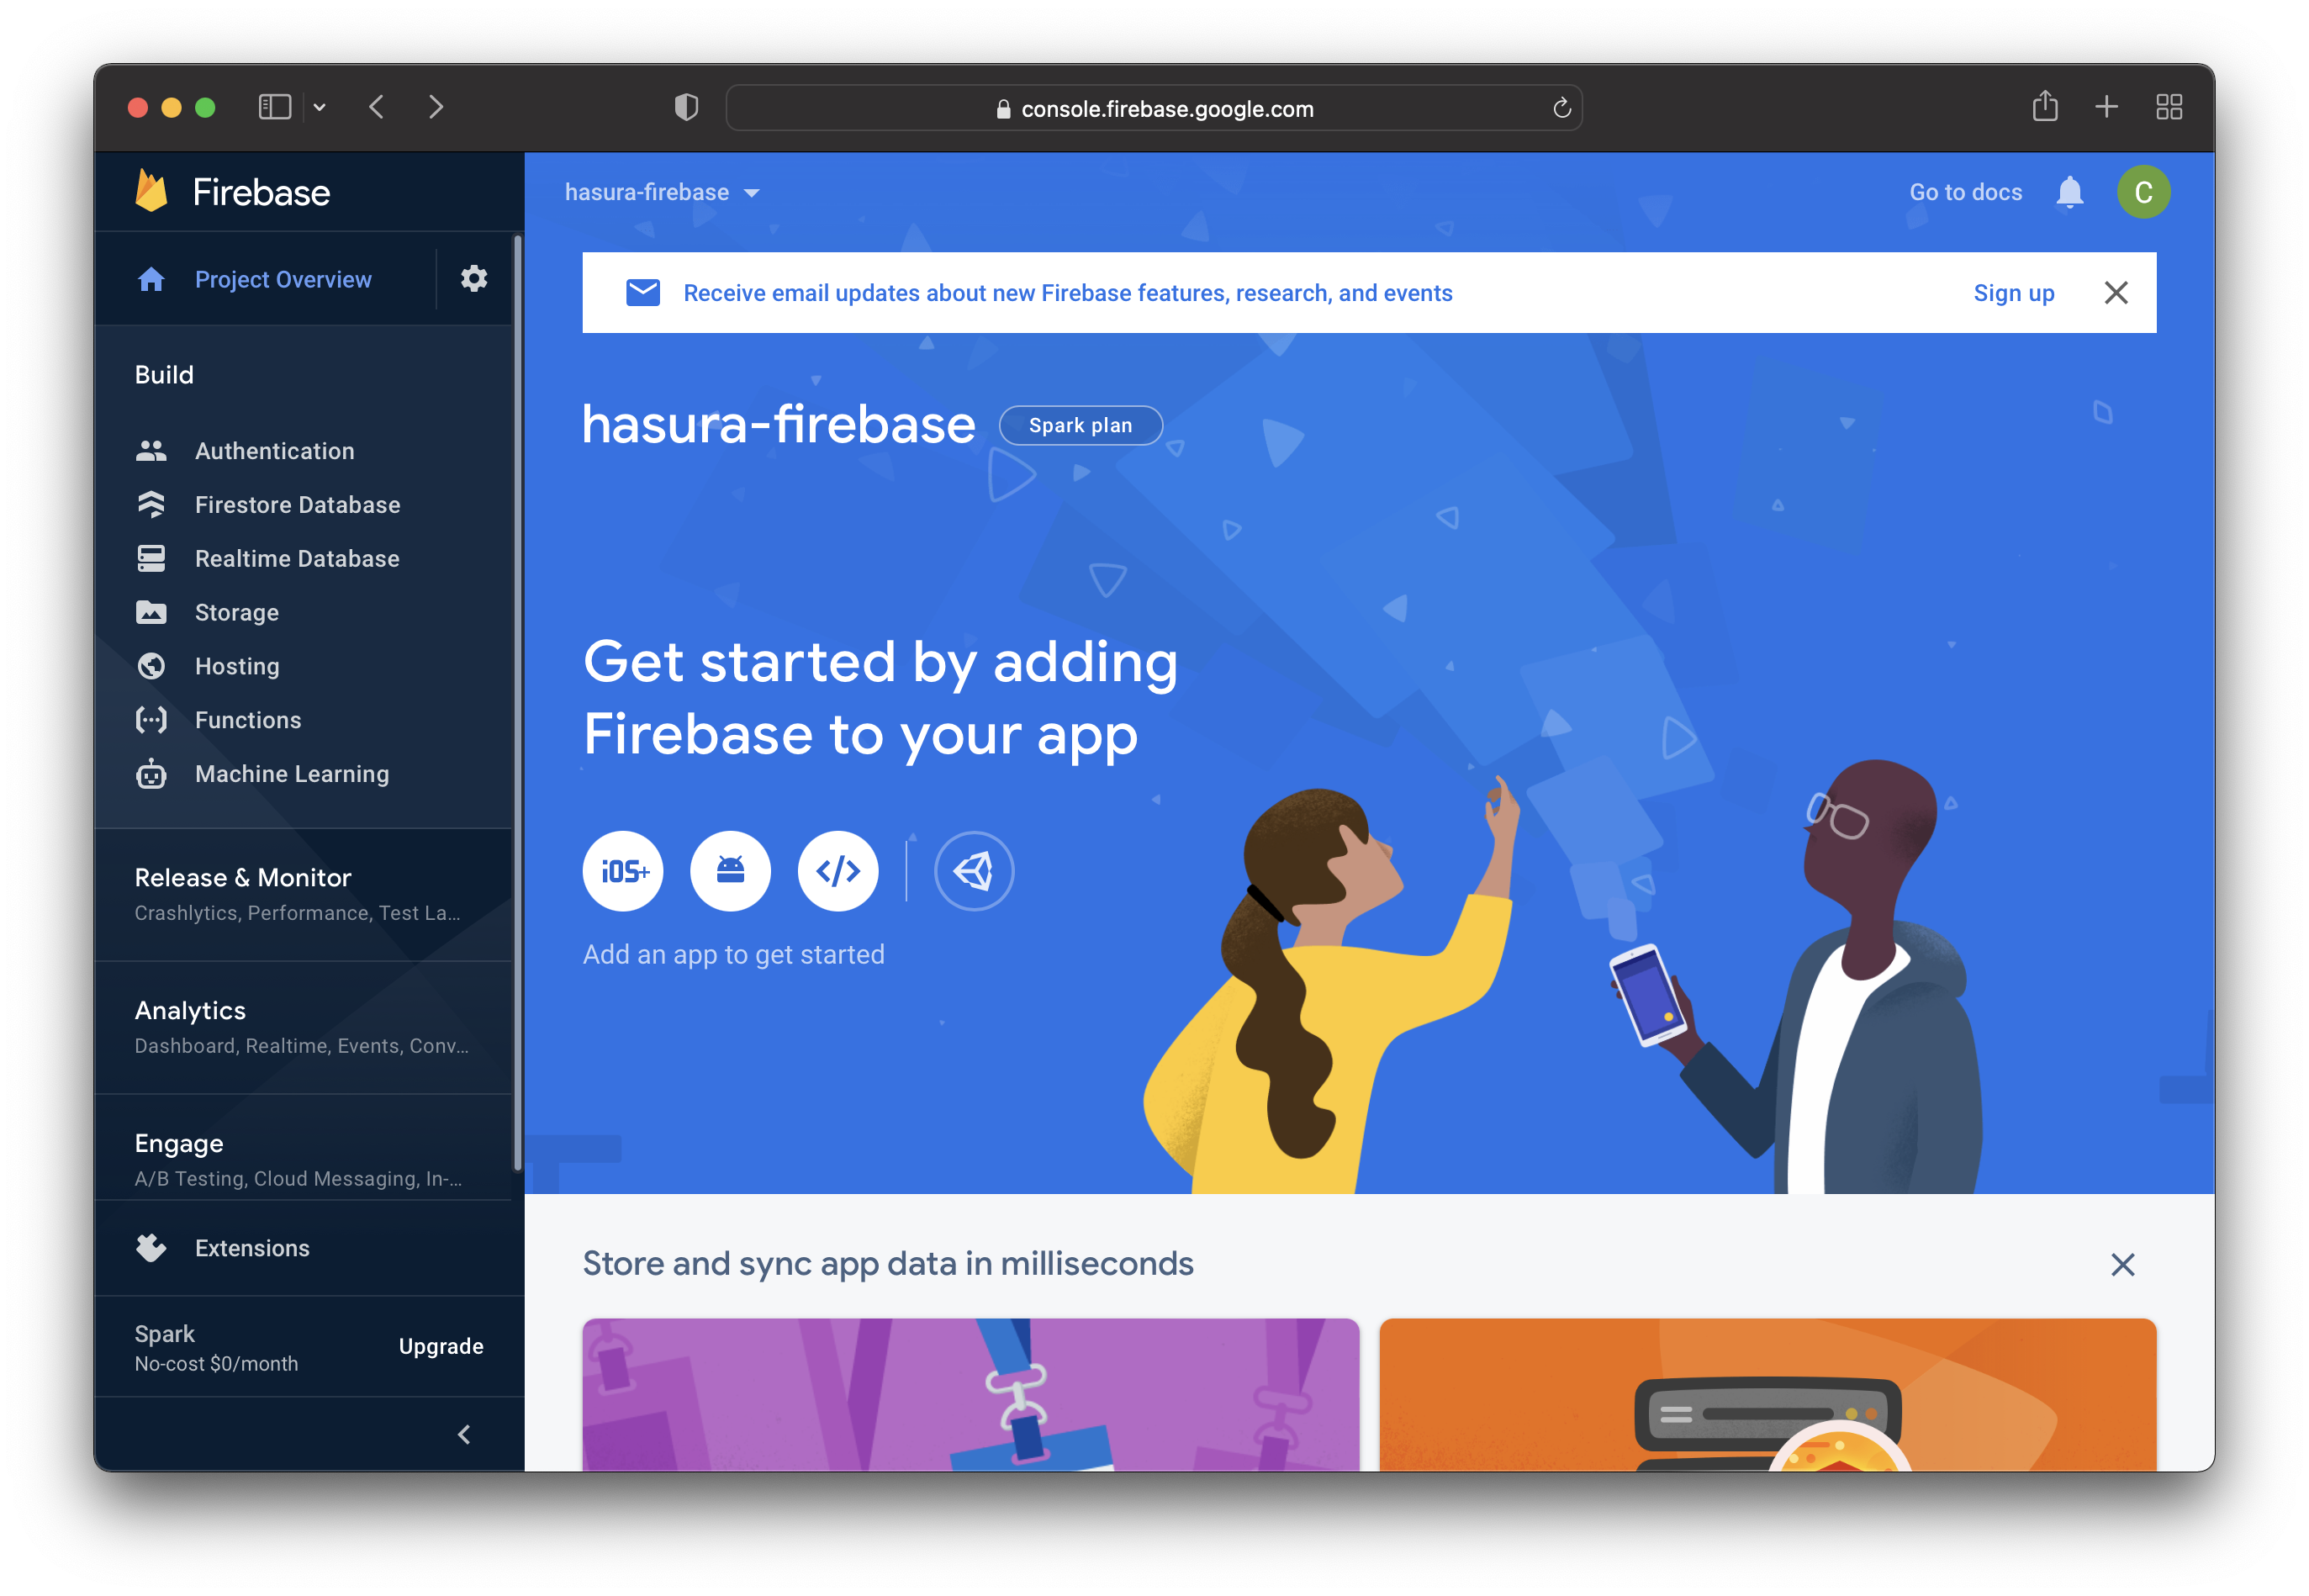
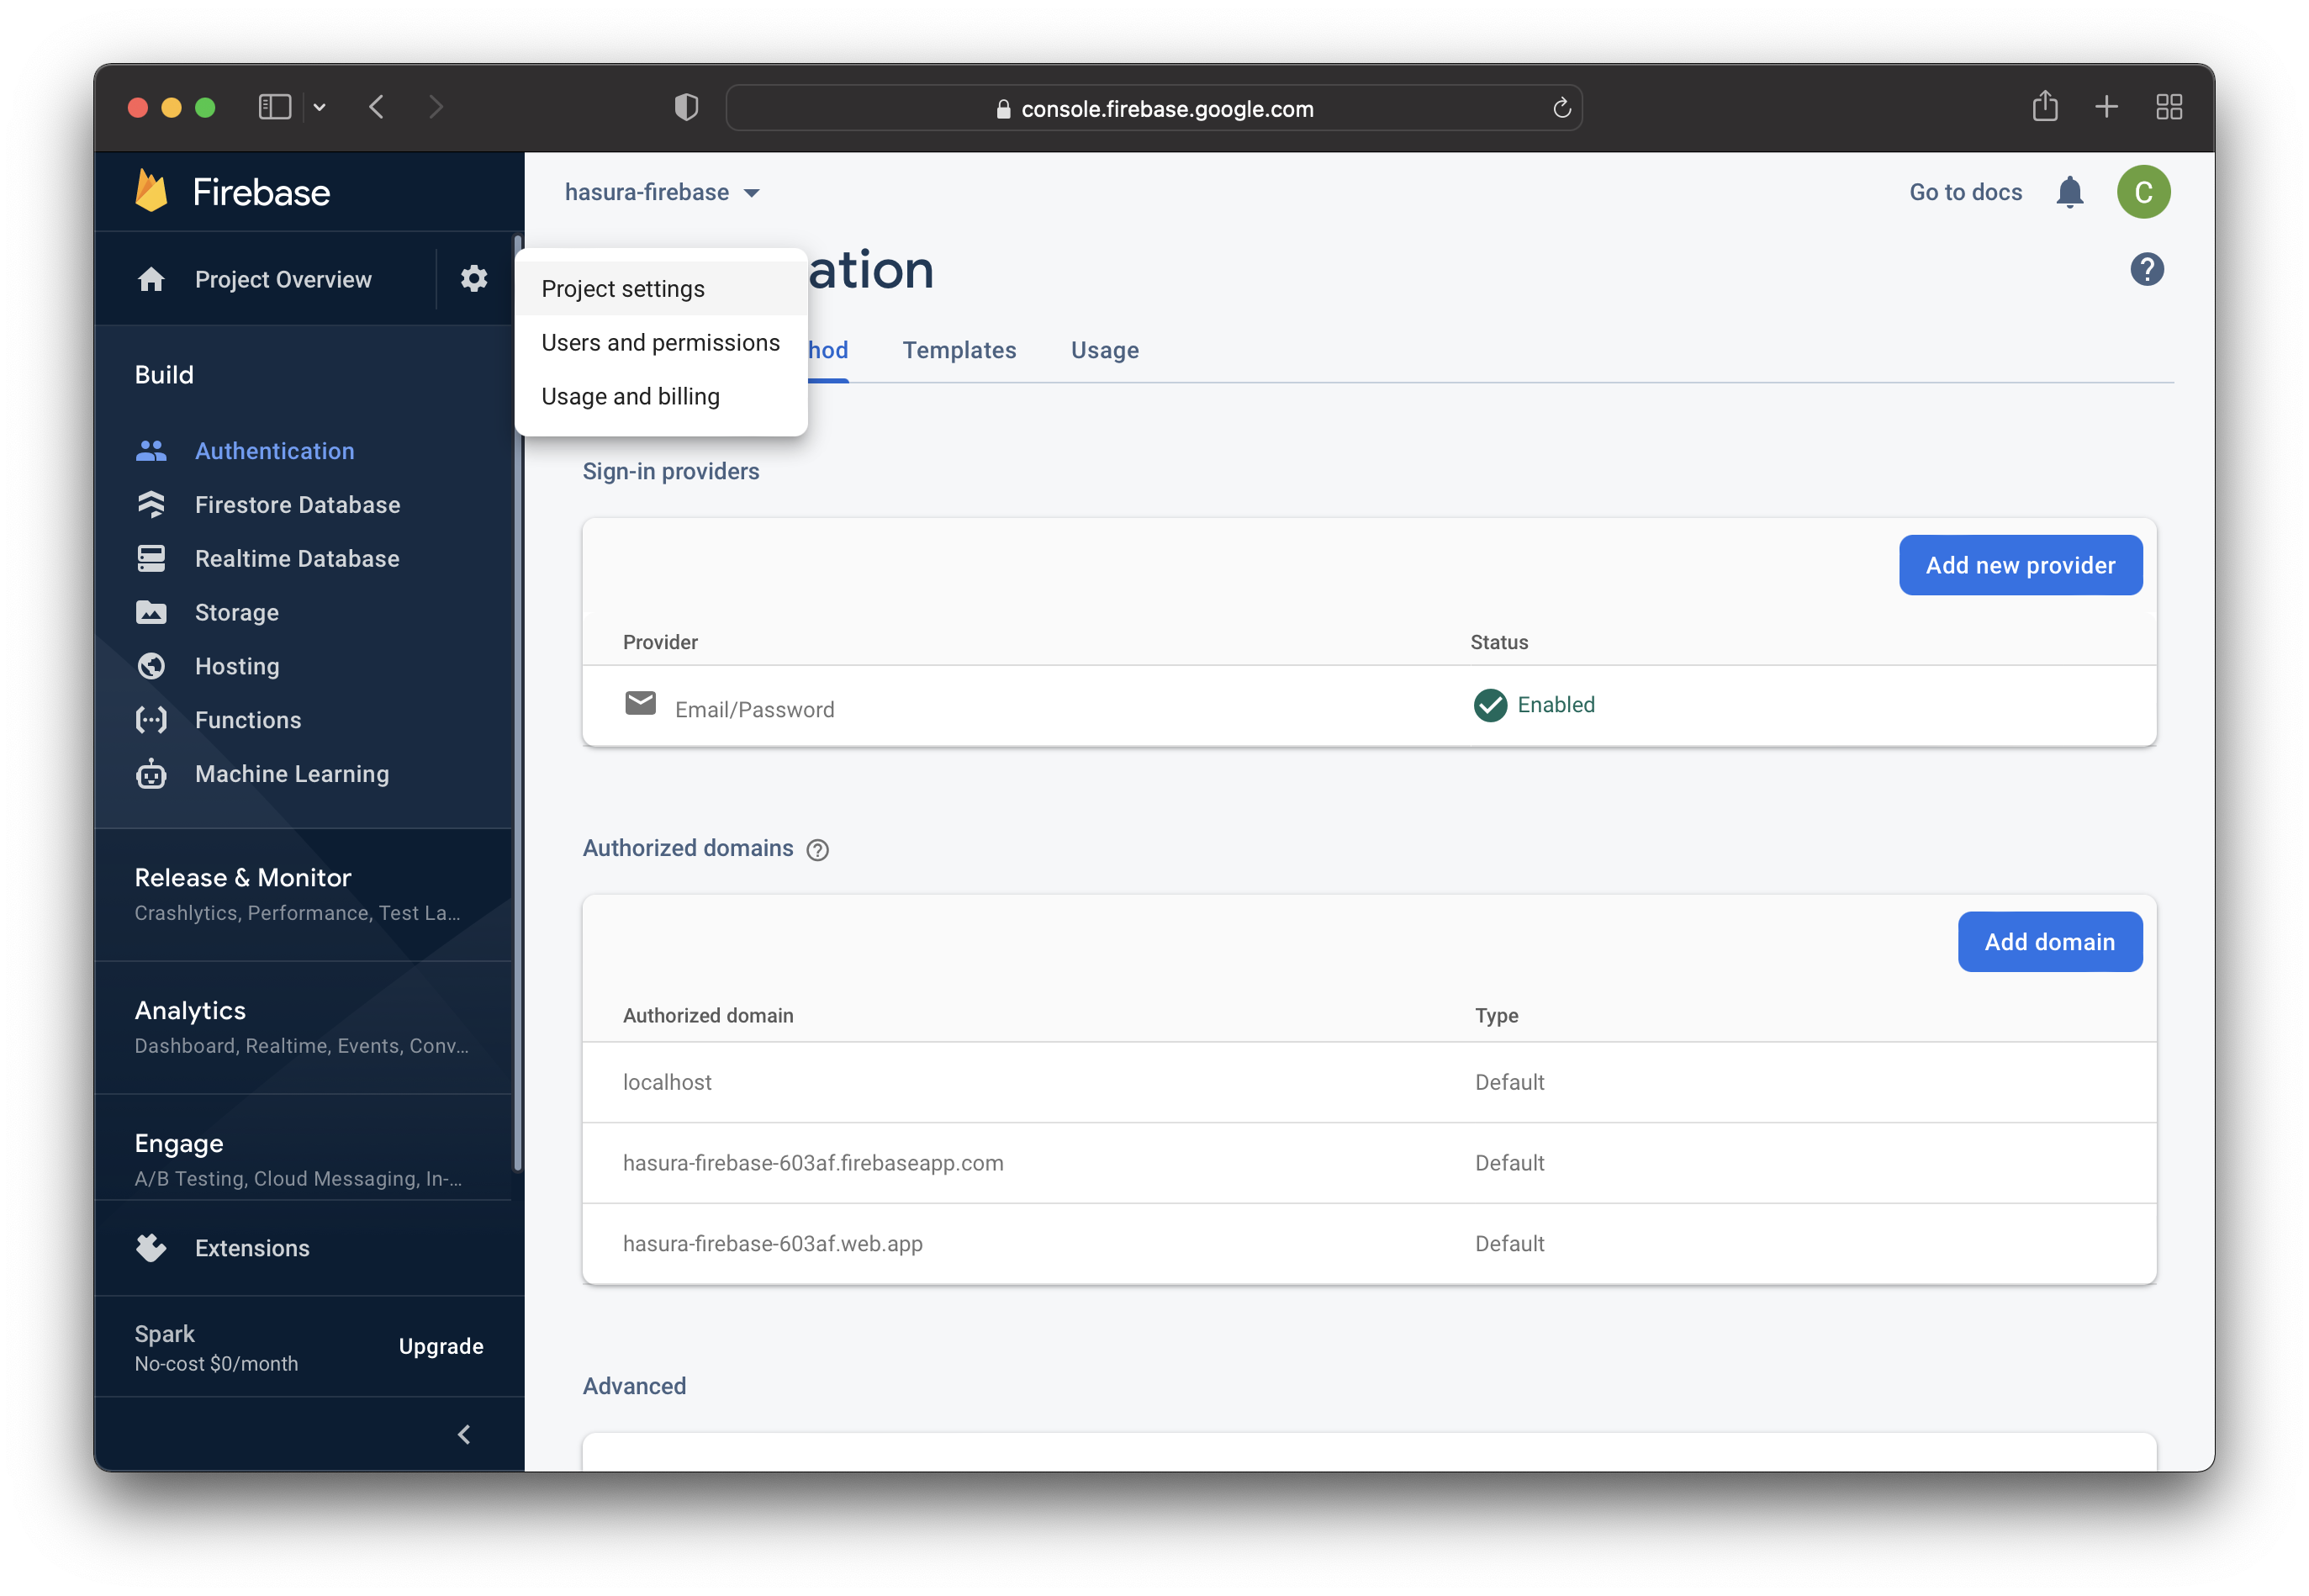
Open the "Authentication" page (see the link on the left side in the above image) and click the Get Started button.
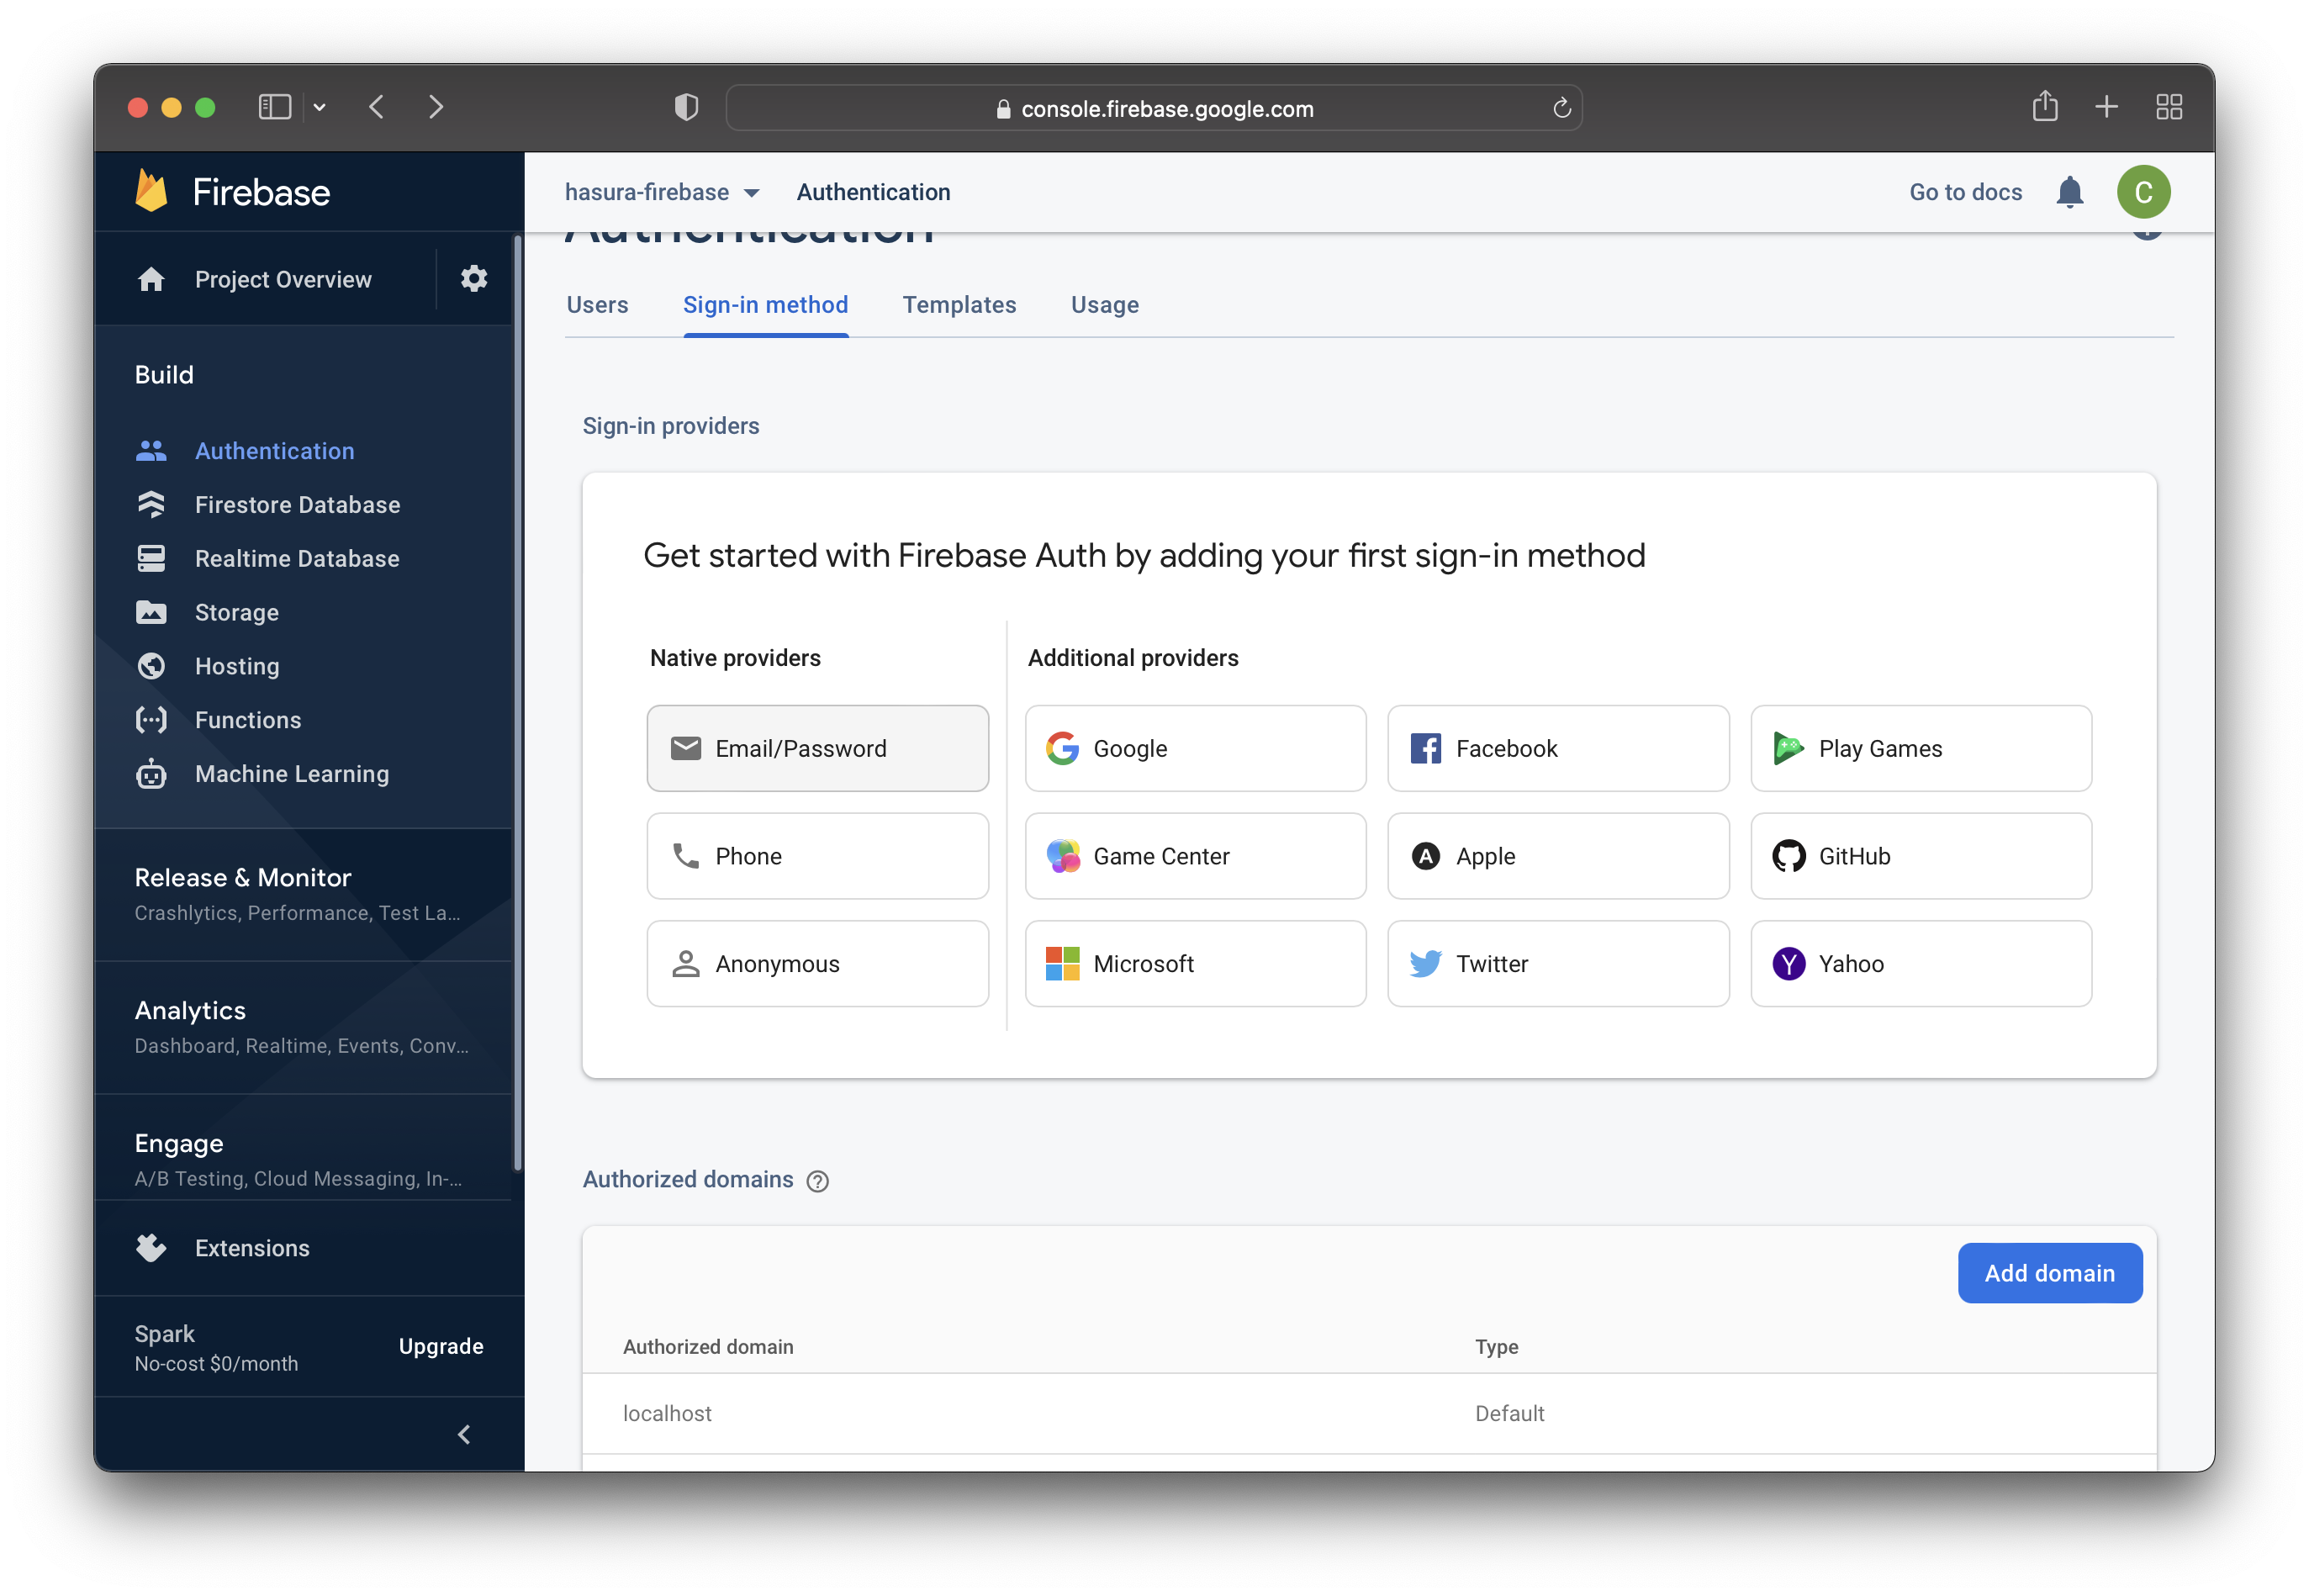
That prompts you to choose your preferred sign-in methods, as shown in the image below. Choose Email/Password for this example.
Firebase allows you to configure the chosen sign-in method on the next page. You can enable people to log in with an email/password and/or passwordless (with an email link).
For this tutorial, only enable the Email/Password option.
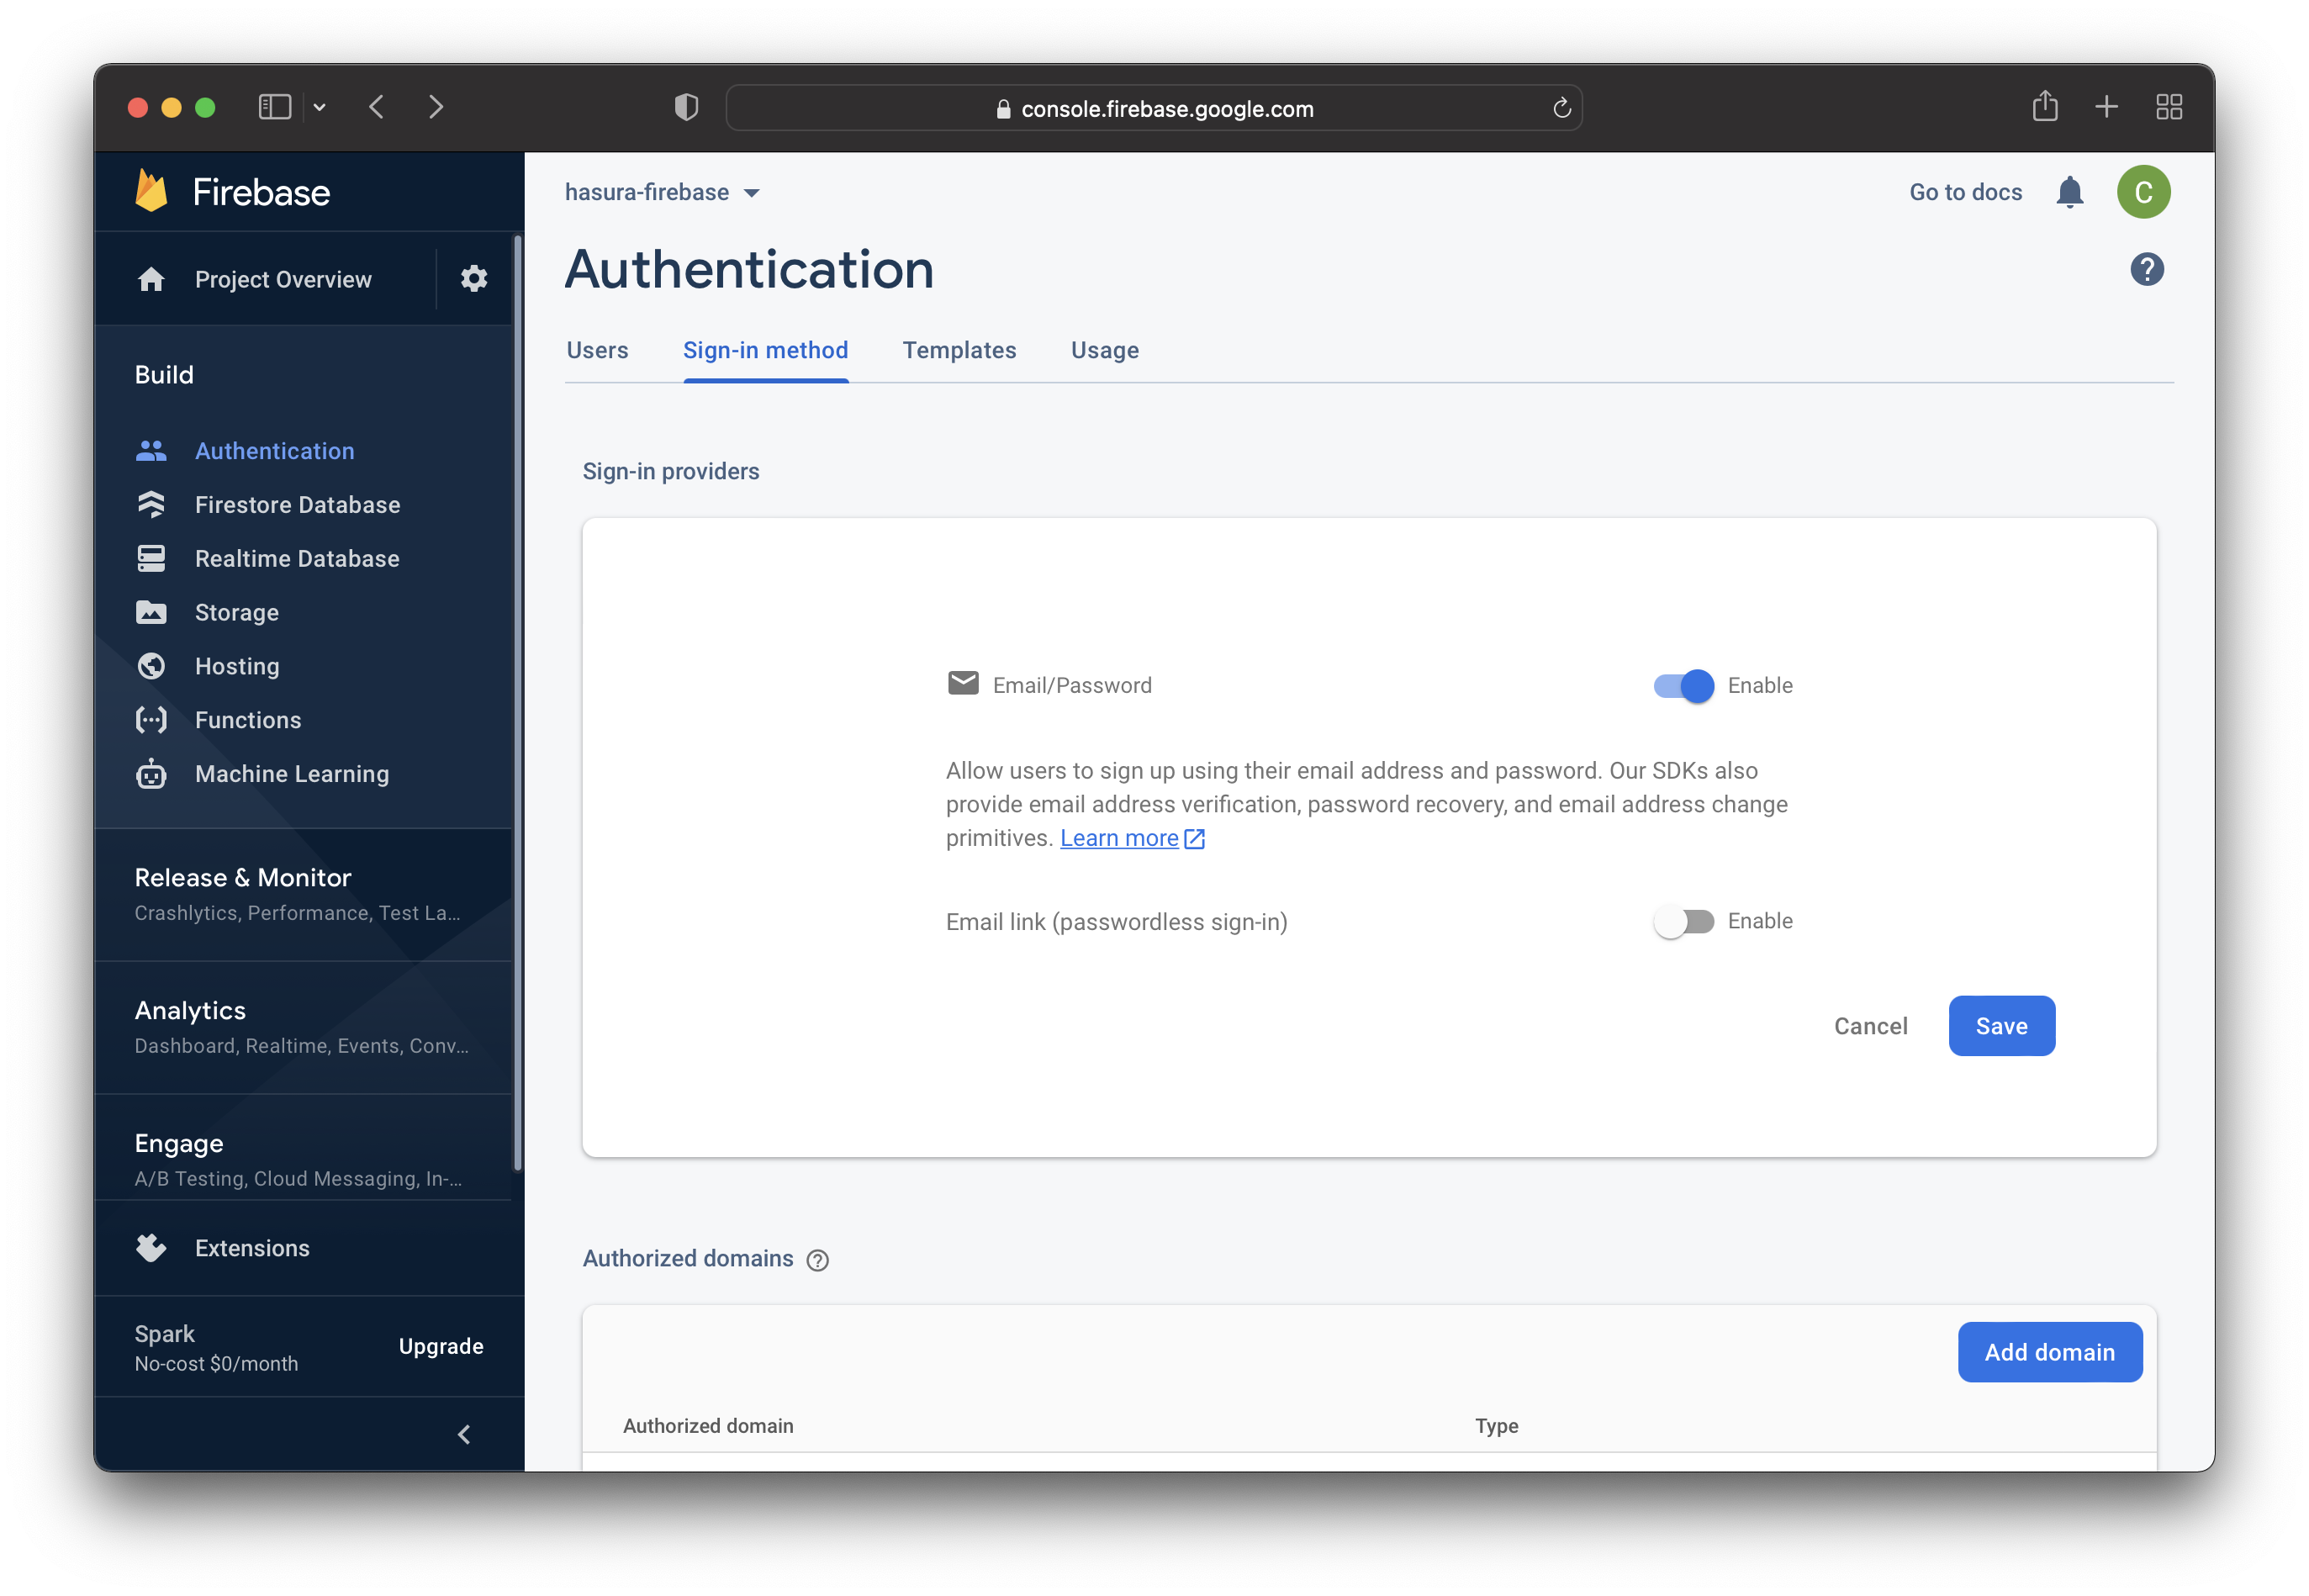
Click on Save to finish the configuration.
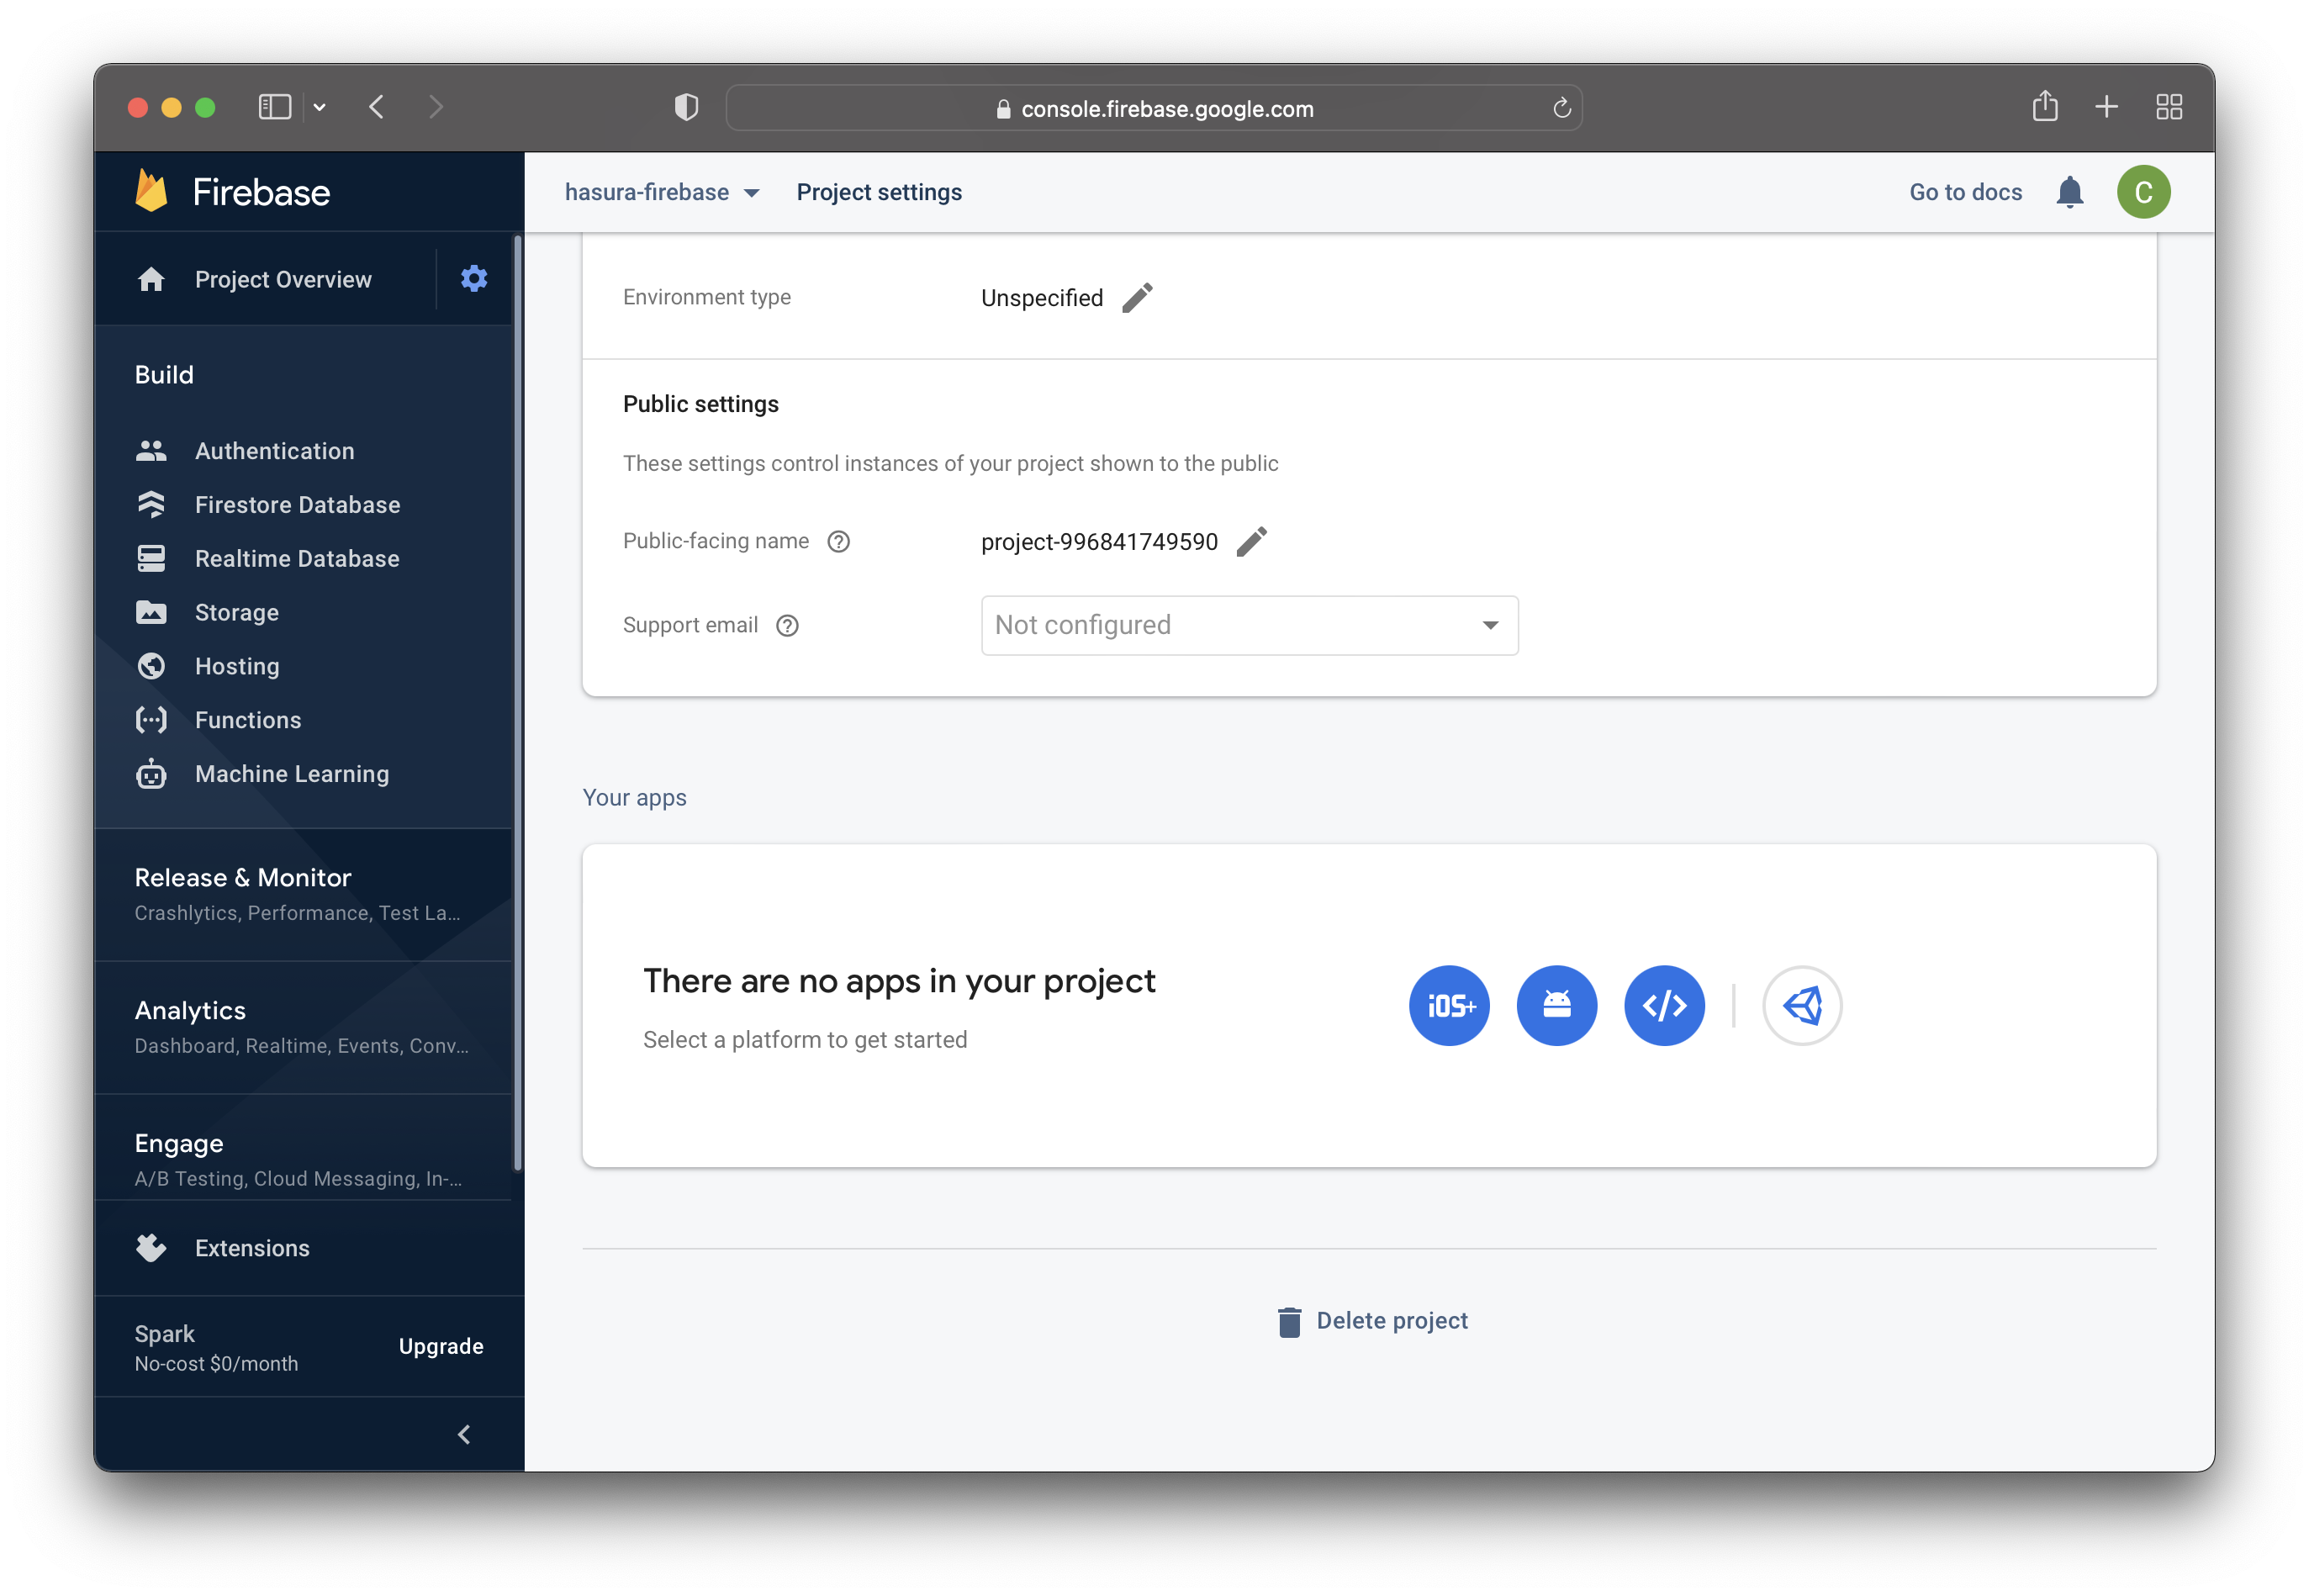
After that, go to the project settings, as shown in the screenshot below.
Once you are on the "Project Settings" page, scroll to the bottom of the page and click on </> to create a web application.
That takes you to another page where you add Firebase to your web app. Choose an app nickname and register the application.
Note: Do not tick the "Firebase Hosting" option yet. You will read about it in the last section of the course.
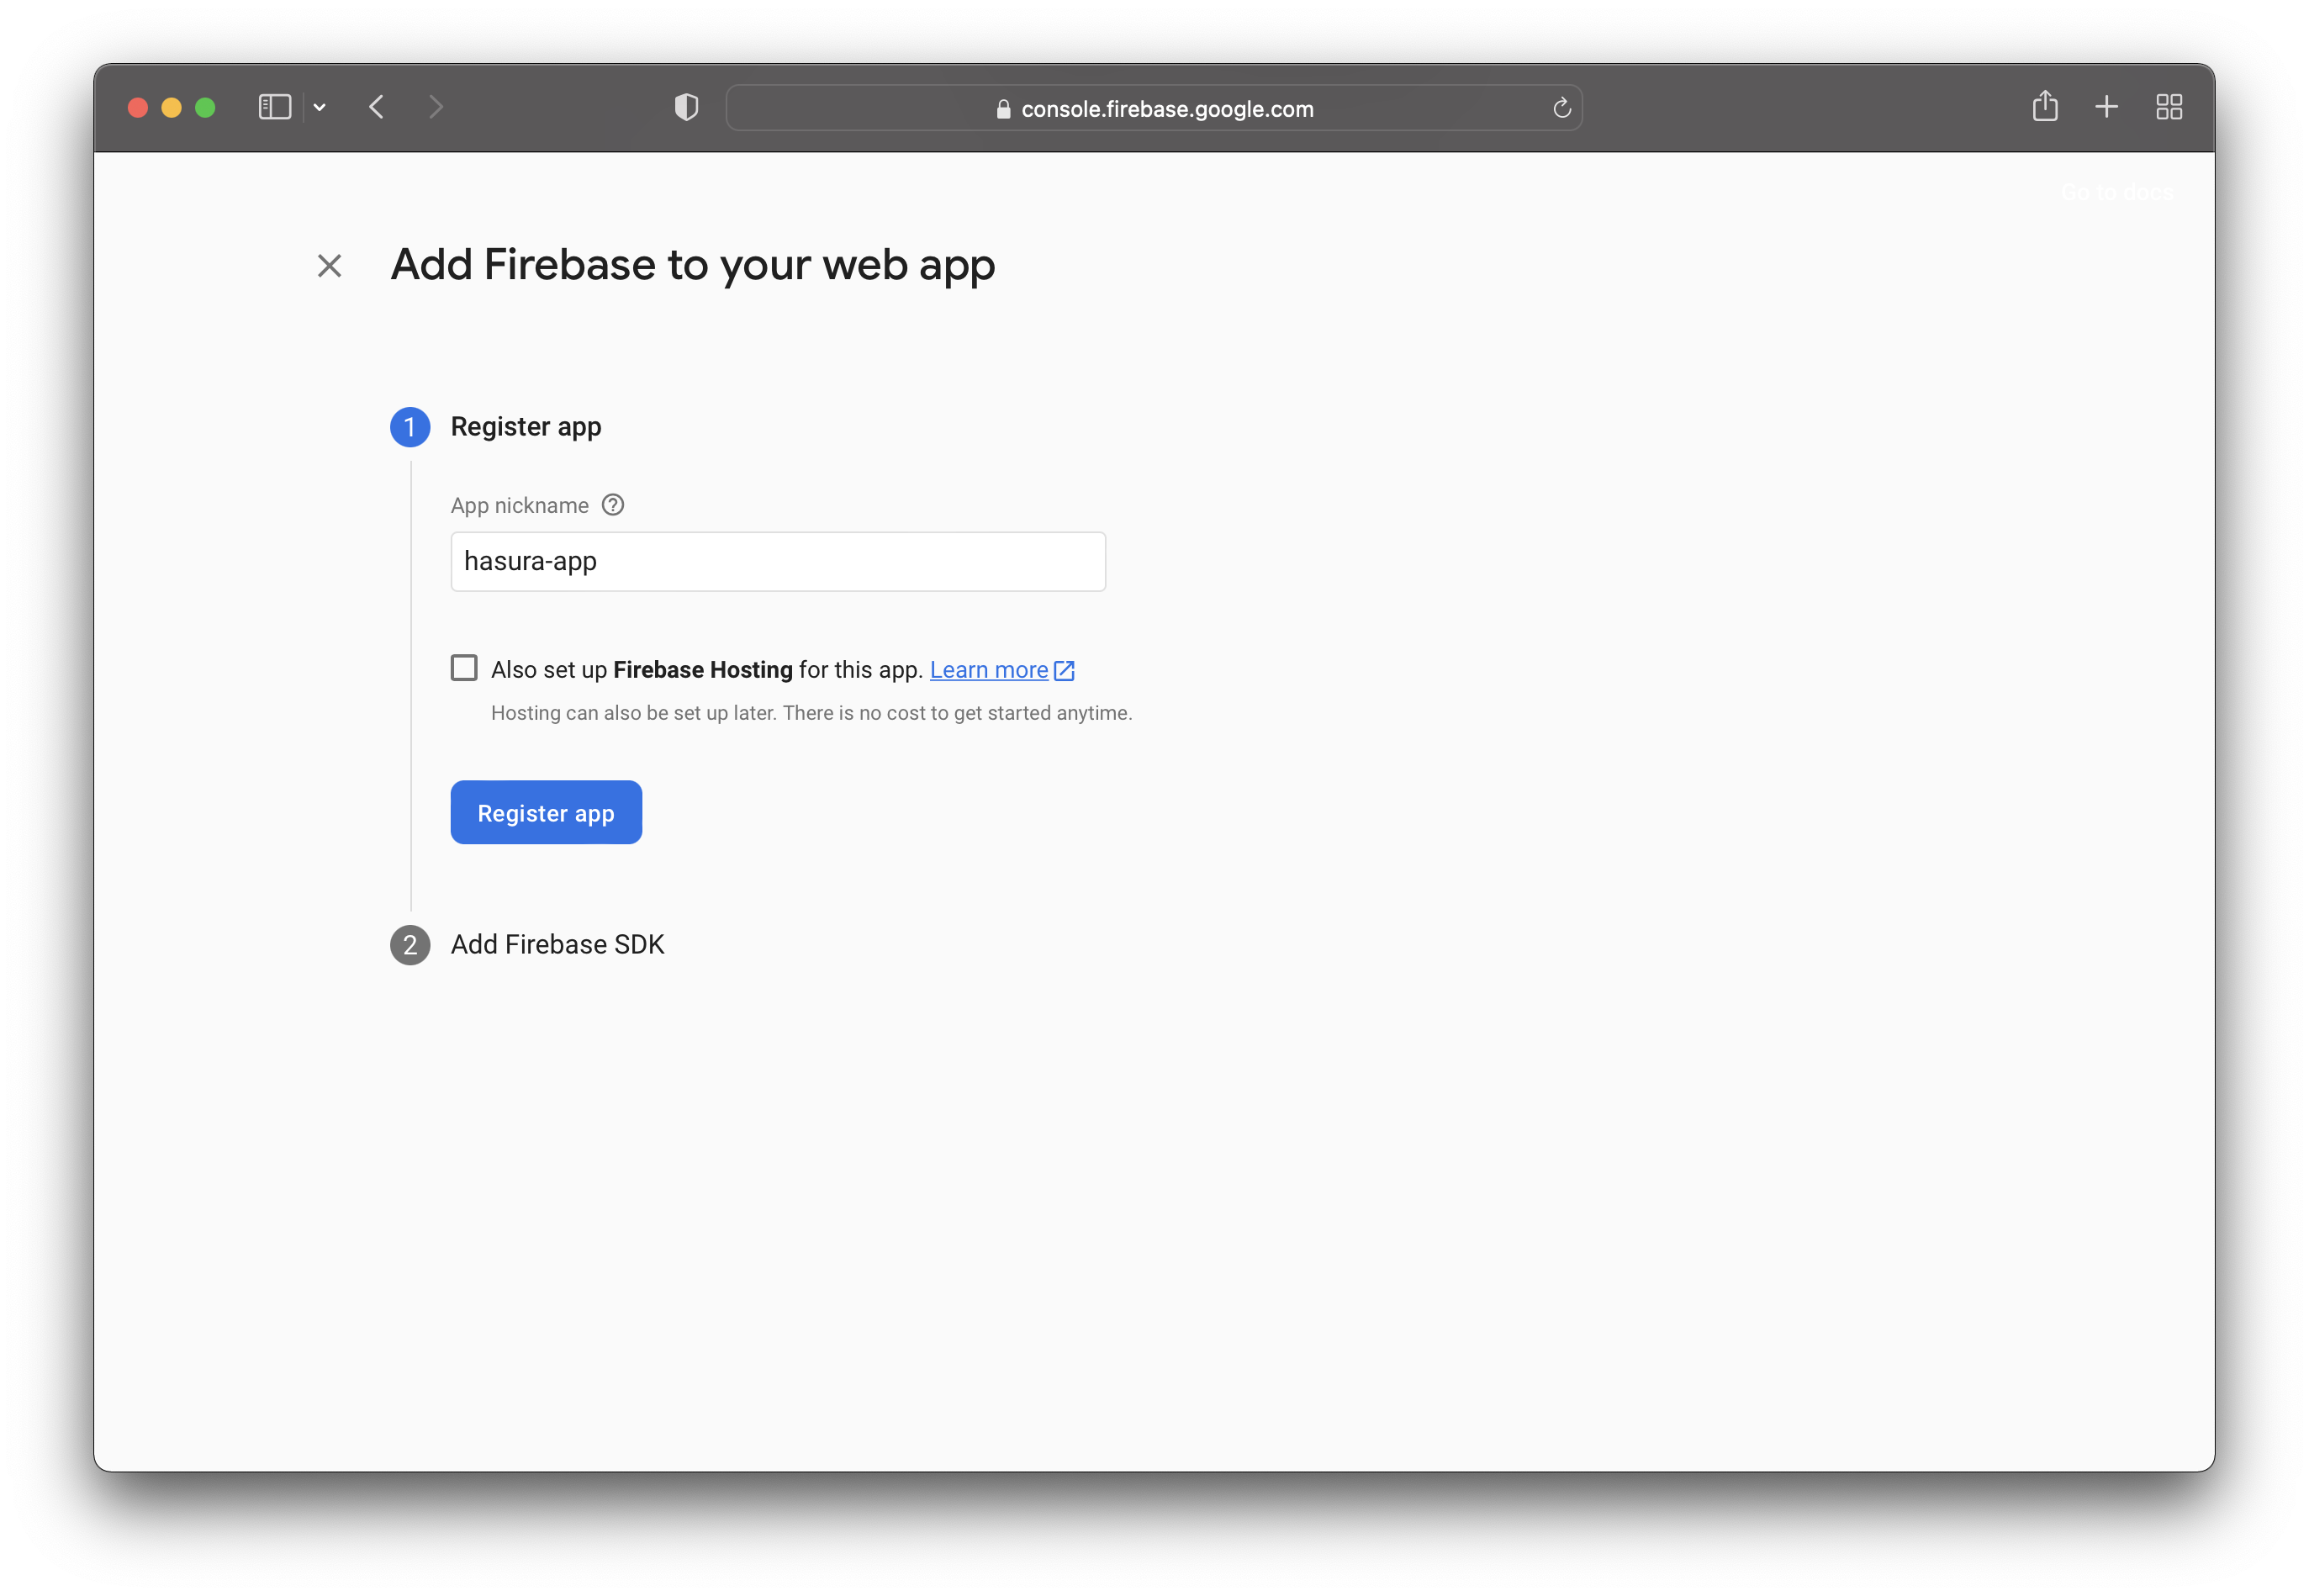
Once you click the "Register app" button, you will receive the Firebase SDK. You will use it in the Frontend implementation. For now, you can skip it.
There is no need to save it because you can always find it in the project settings.
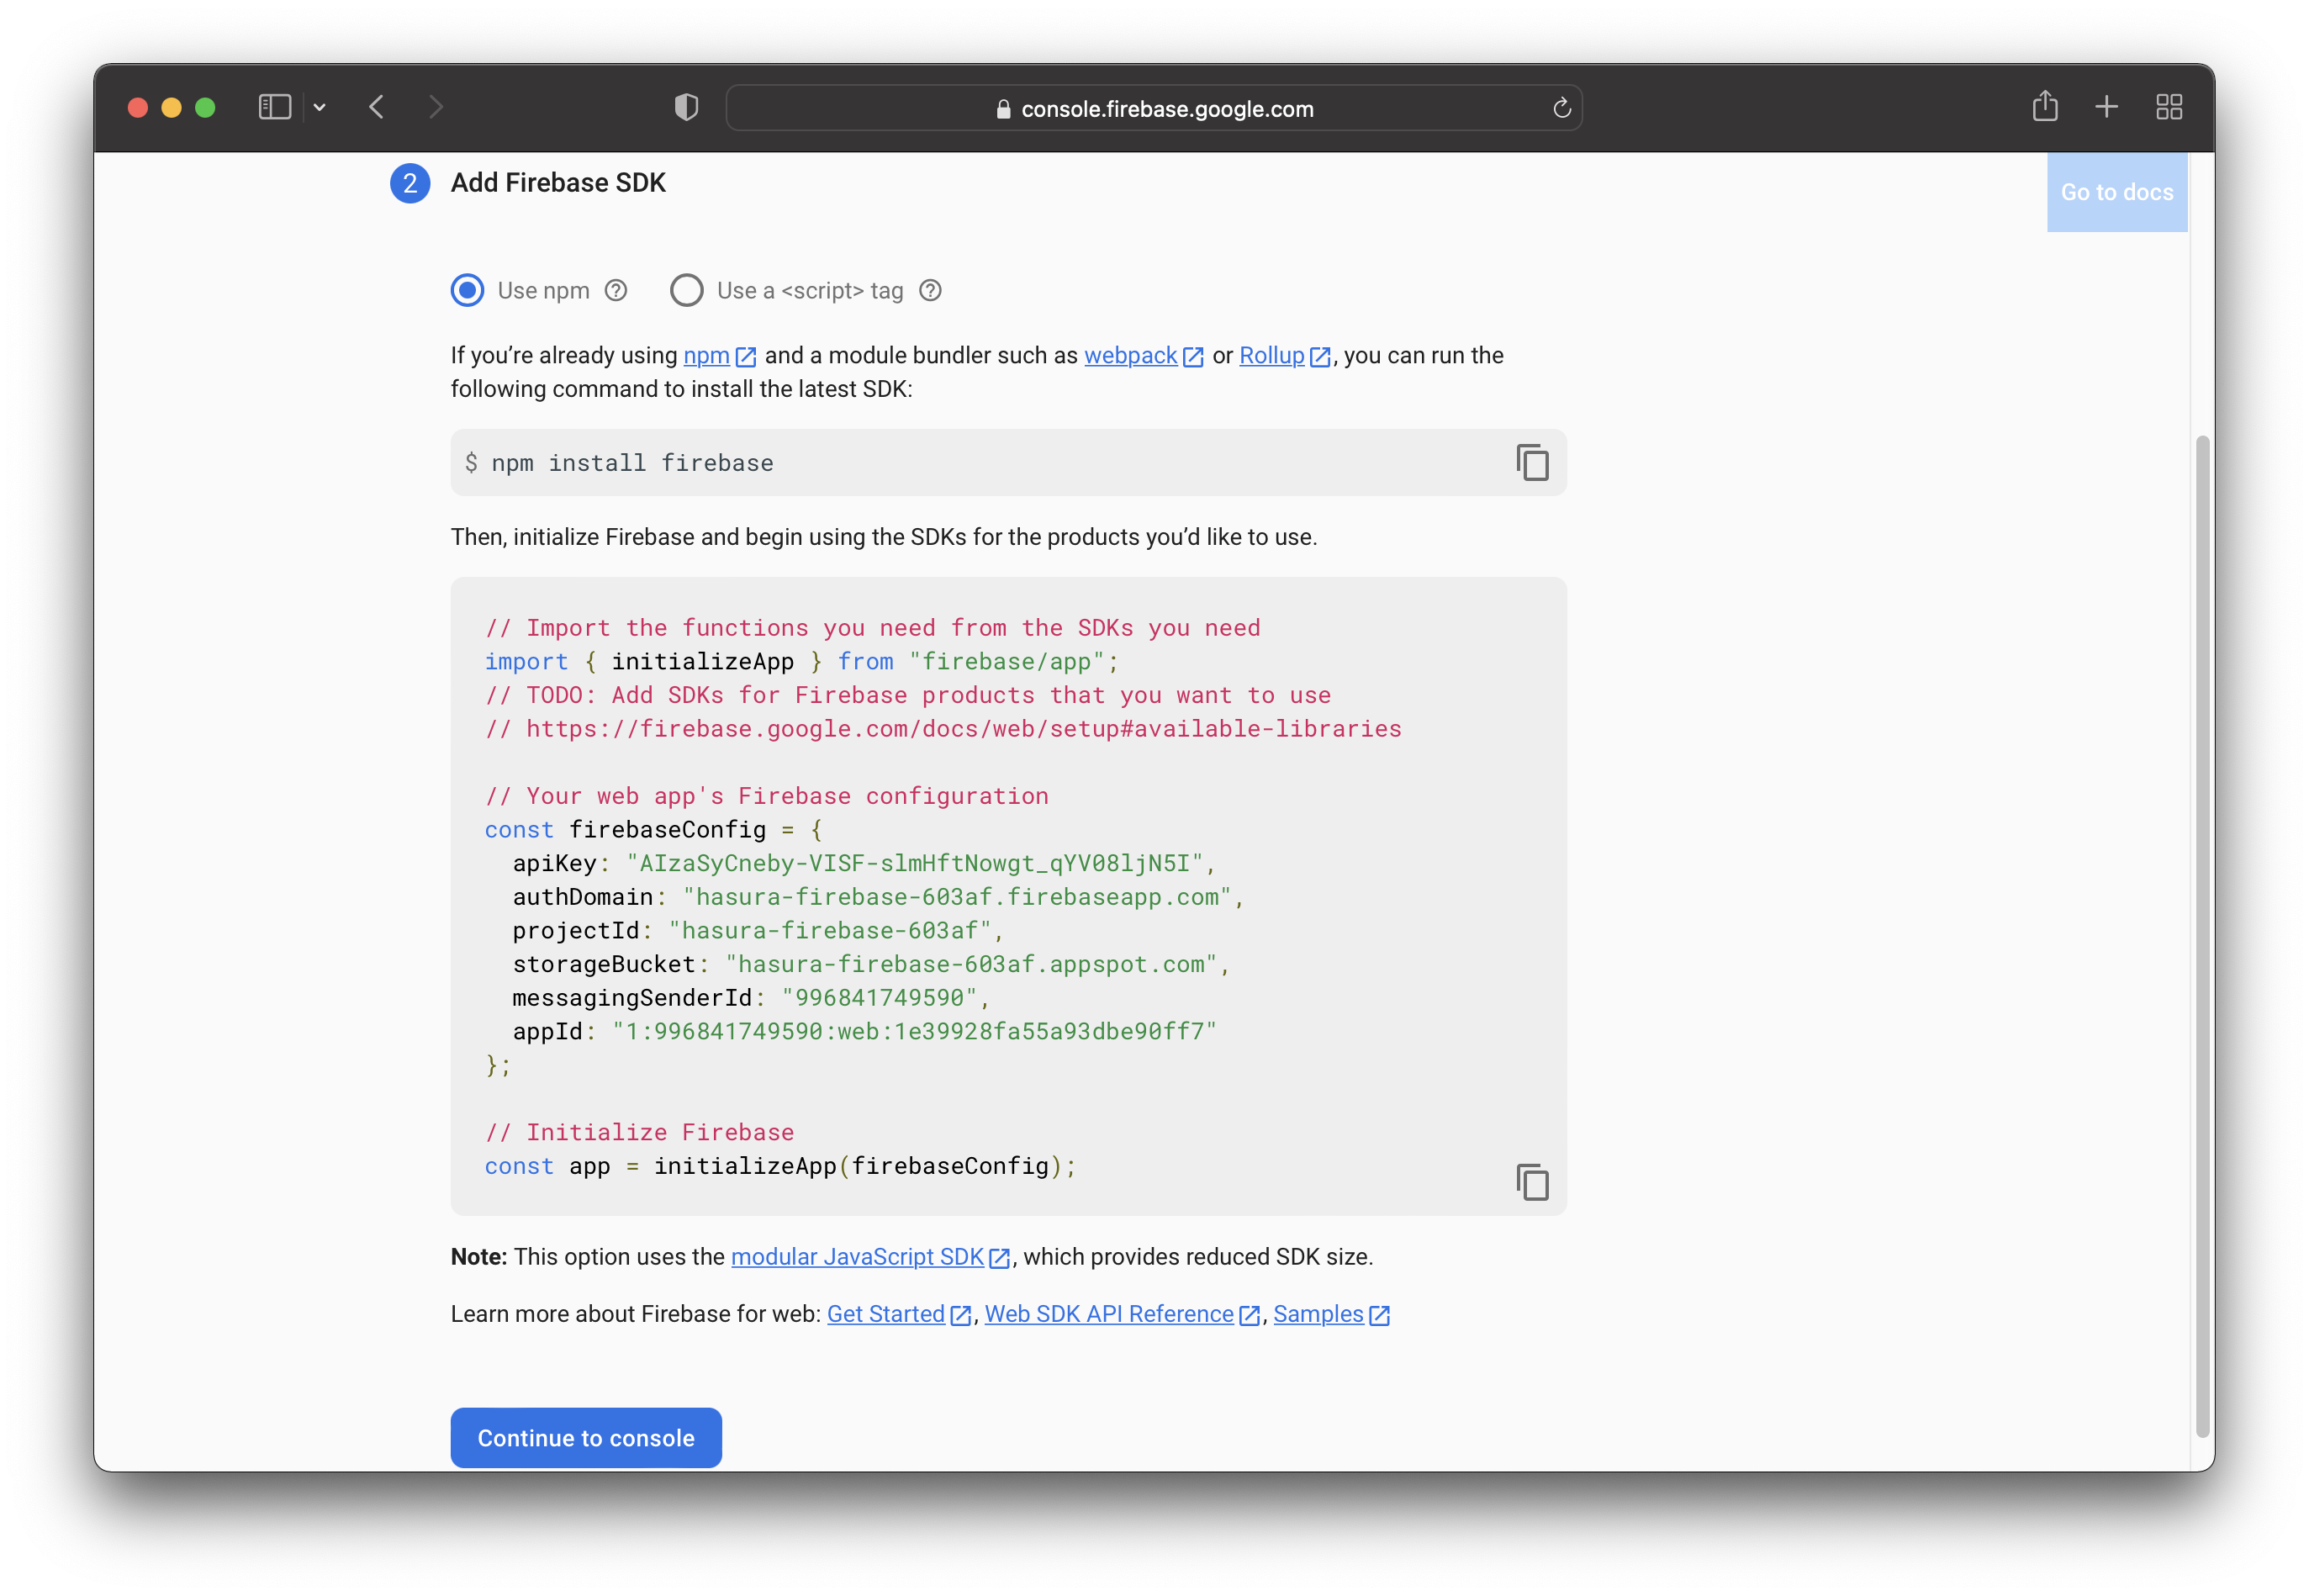
You’ll use the SDK later when you implement the authentication functionality.
Create Hasura App
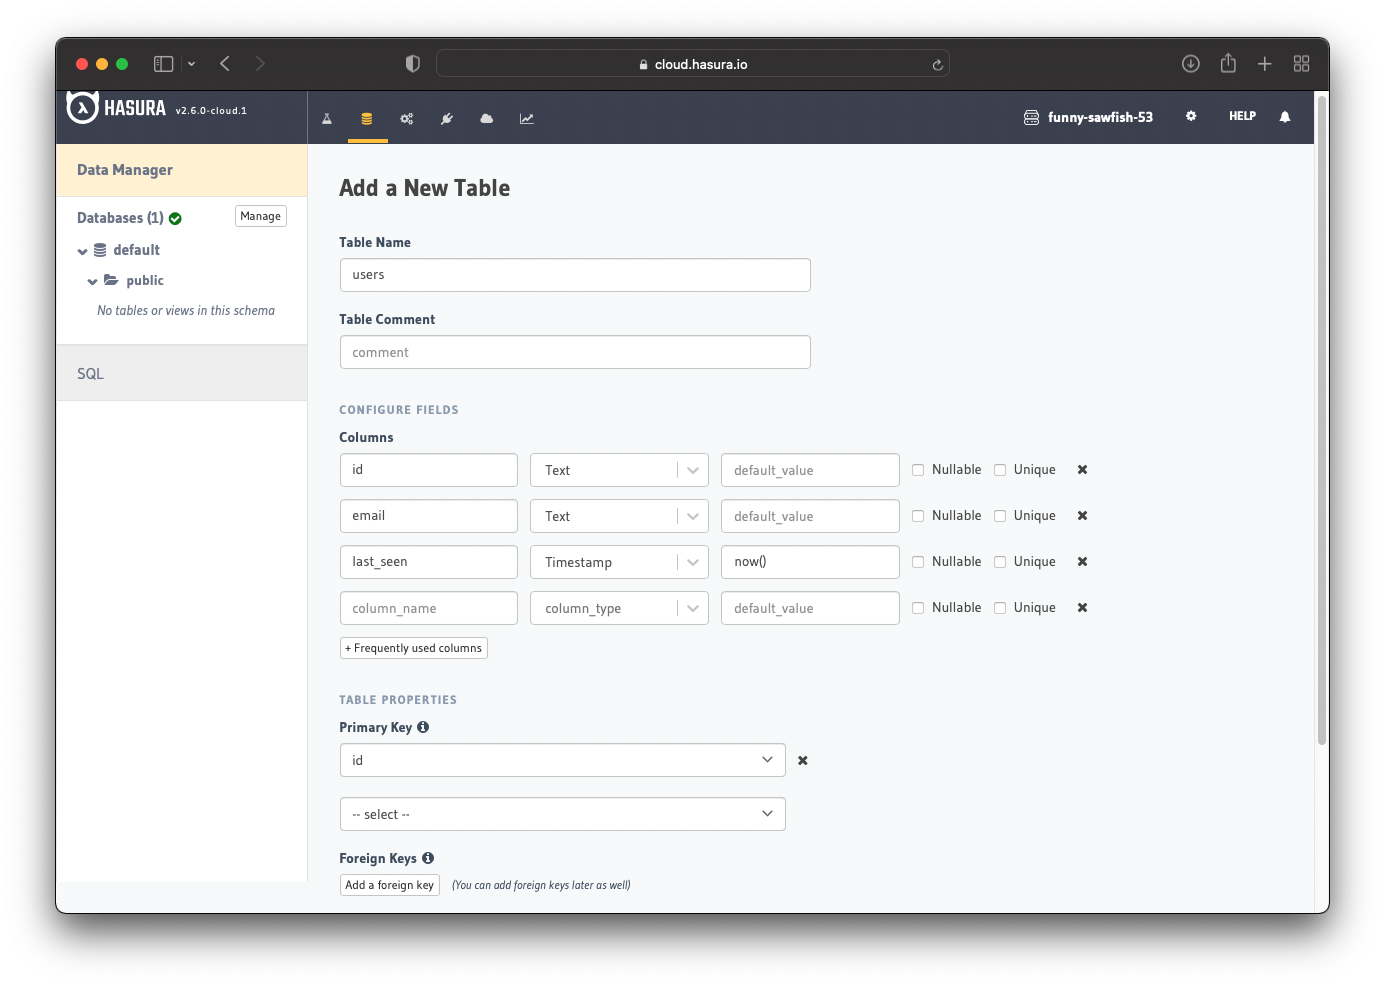
Go to your Hasura app dashboard and create a users table with the following columns:
idof type Text (Primary key)emailof type Textlast_seenof type Timestamp with default valuenow()
See the image below for reference.
The next step is to create a user role for the app. Users should be able to see only their records, but not the other people’s records.
Configure the user role as shown in the image below. For more information, read about configuring permission rules in Hasura.
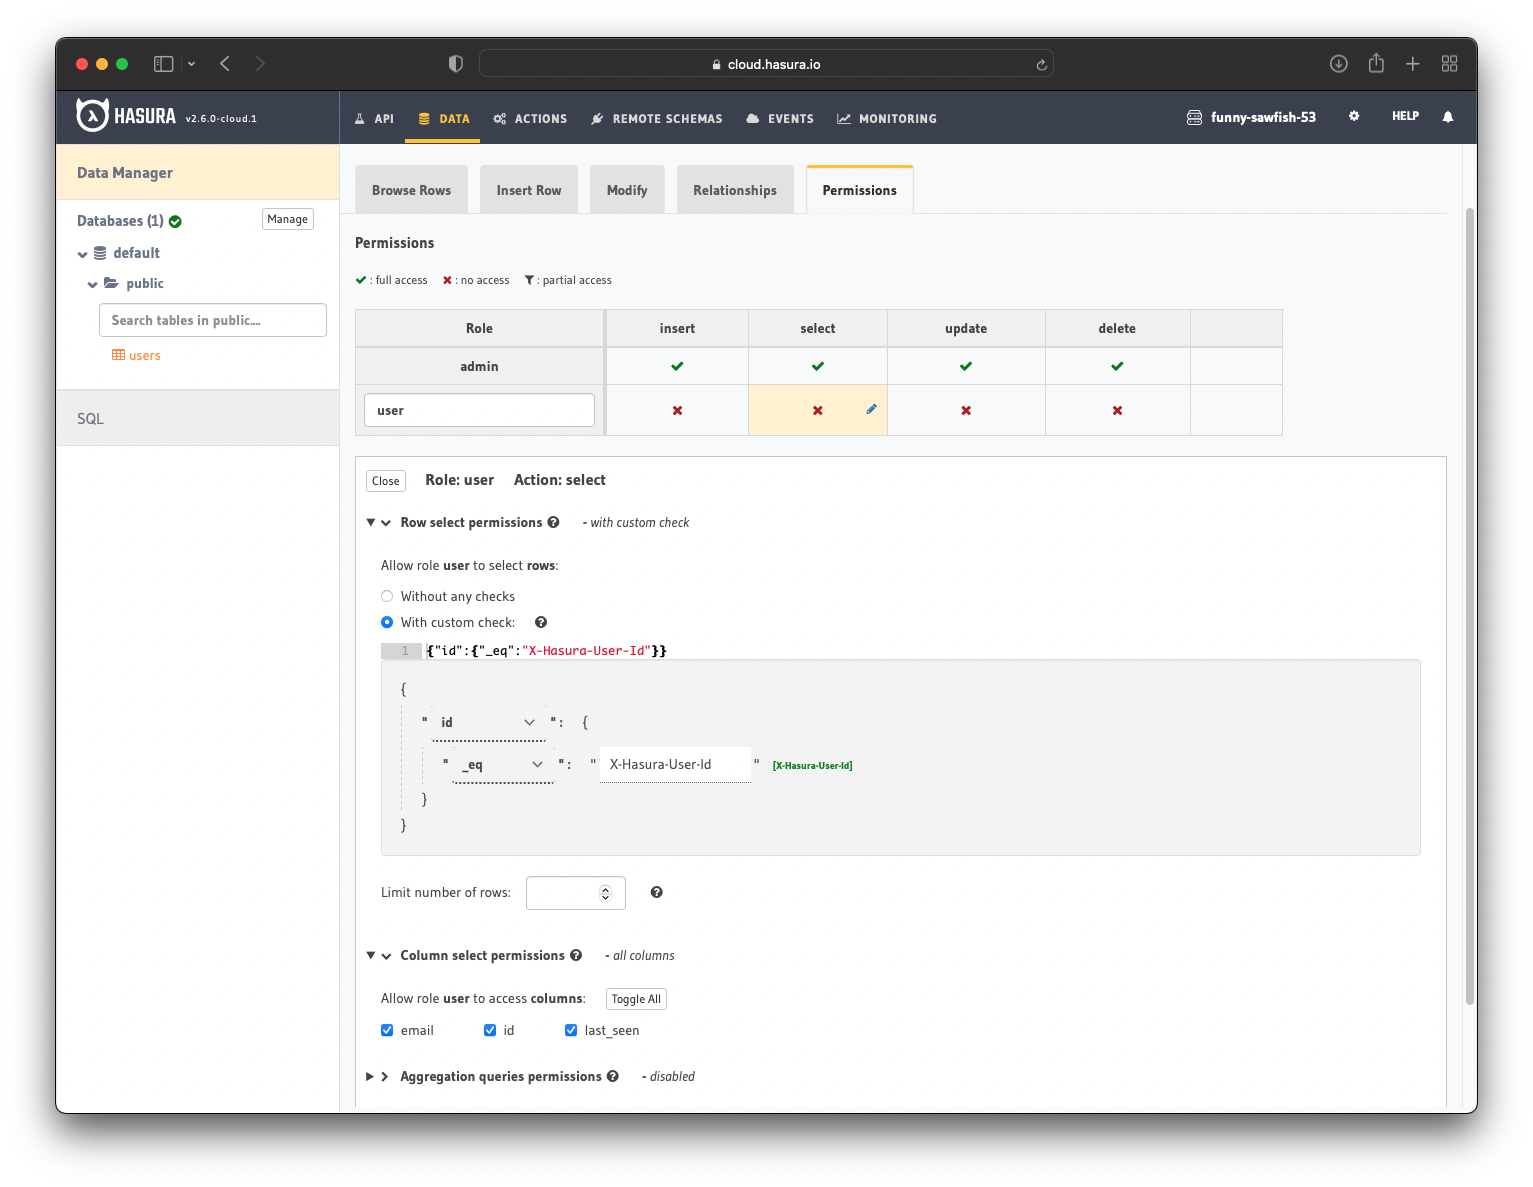
This way, users cannot read other people’s records. They can only access theirs.
JWT Config in Hasura
It's time to generate and use the JWT config in Hasura.
It's essential to secure your endpoint with an
admin secretbefore going further. Check this guide to learn how to do it.
Now you need to generate a JWT Config that will be stored in the HASURA_GRAPHQL_JWT_SECRET environment variable. One way to generate the JWT config is to use the Hasura JWT configurator.
Replace the project id with yours and generate the config.
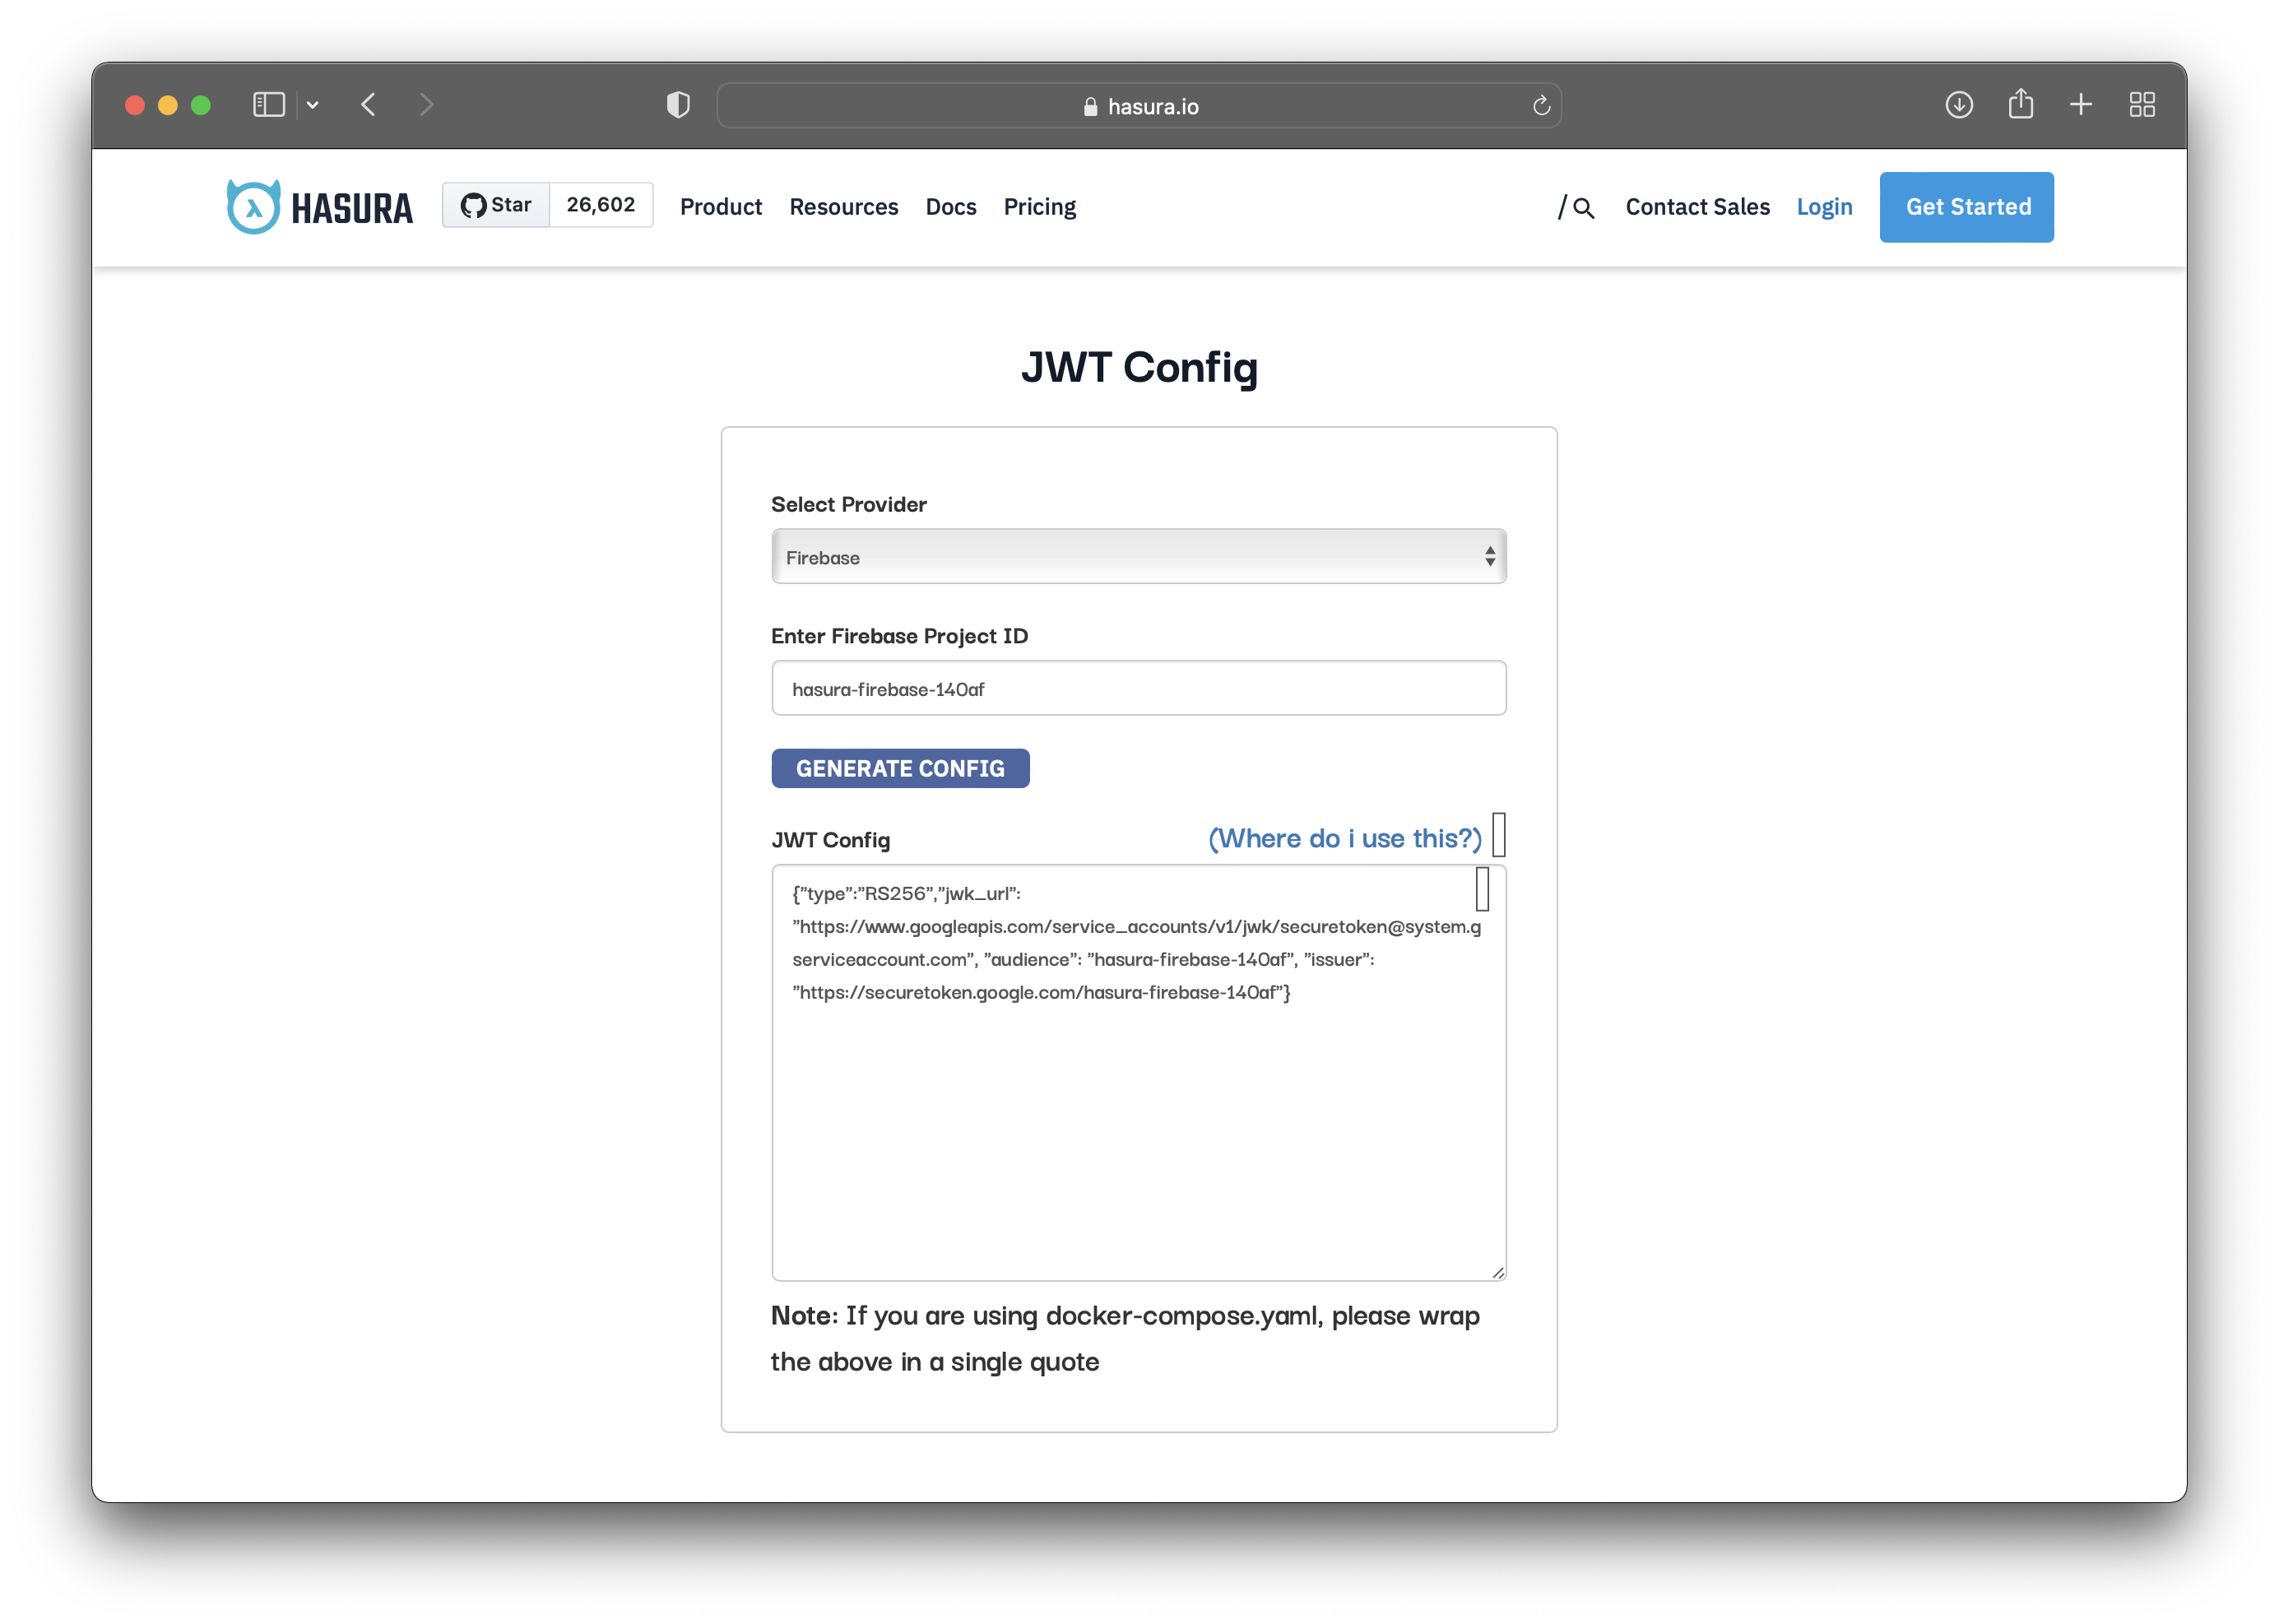
You’ll get a JWT config that will need some modifications. Add the claims_map field into your JWT config:
{{"audience": "hasura-firebase-603af","claims_map": {"x-hasura-allowed-roles": ["user"],"x-hasura-default-role": "user","x-hasura-user-id": {"path": "$.sub"}},"type": "RS256","issuer": "https://securetoken.google.com/hasura-firebase-603af"}}
Note: You would add the custom claims (claims_map) in a Firebase Cloud Function. Since "Cloud Function" is a paid feature, you will use the custom claims in the JWT config.
The next step is to go to the "Env vars" section and click the + New Env Var option. See the image for reference.
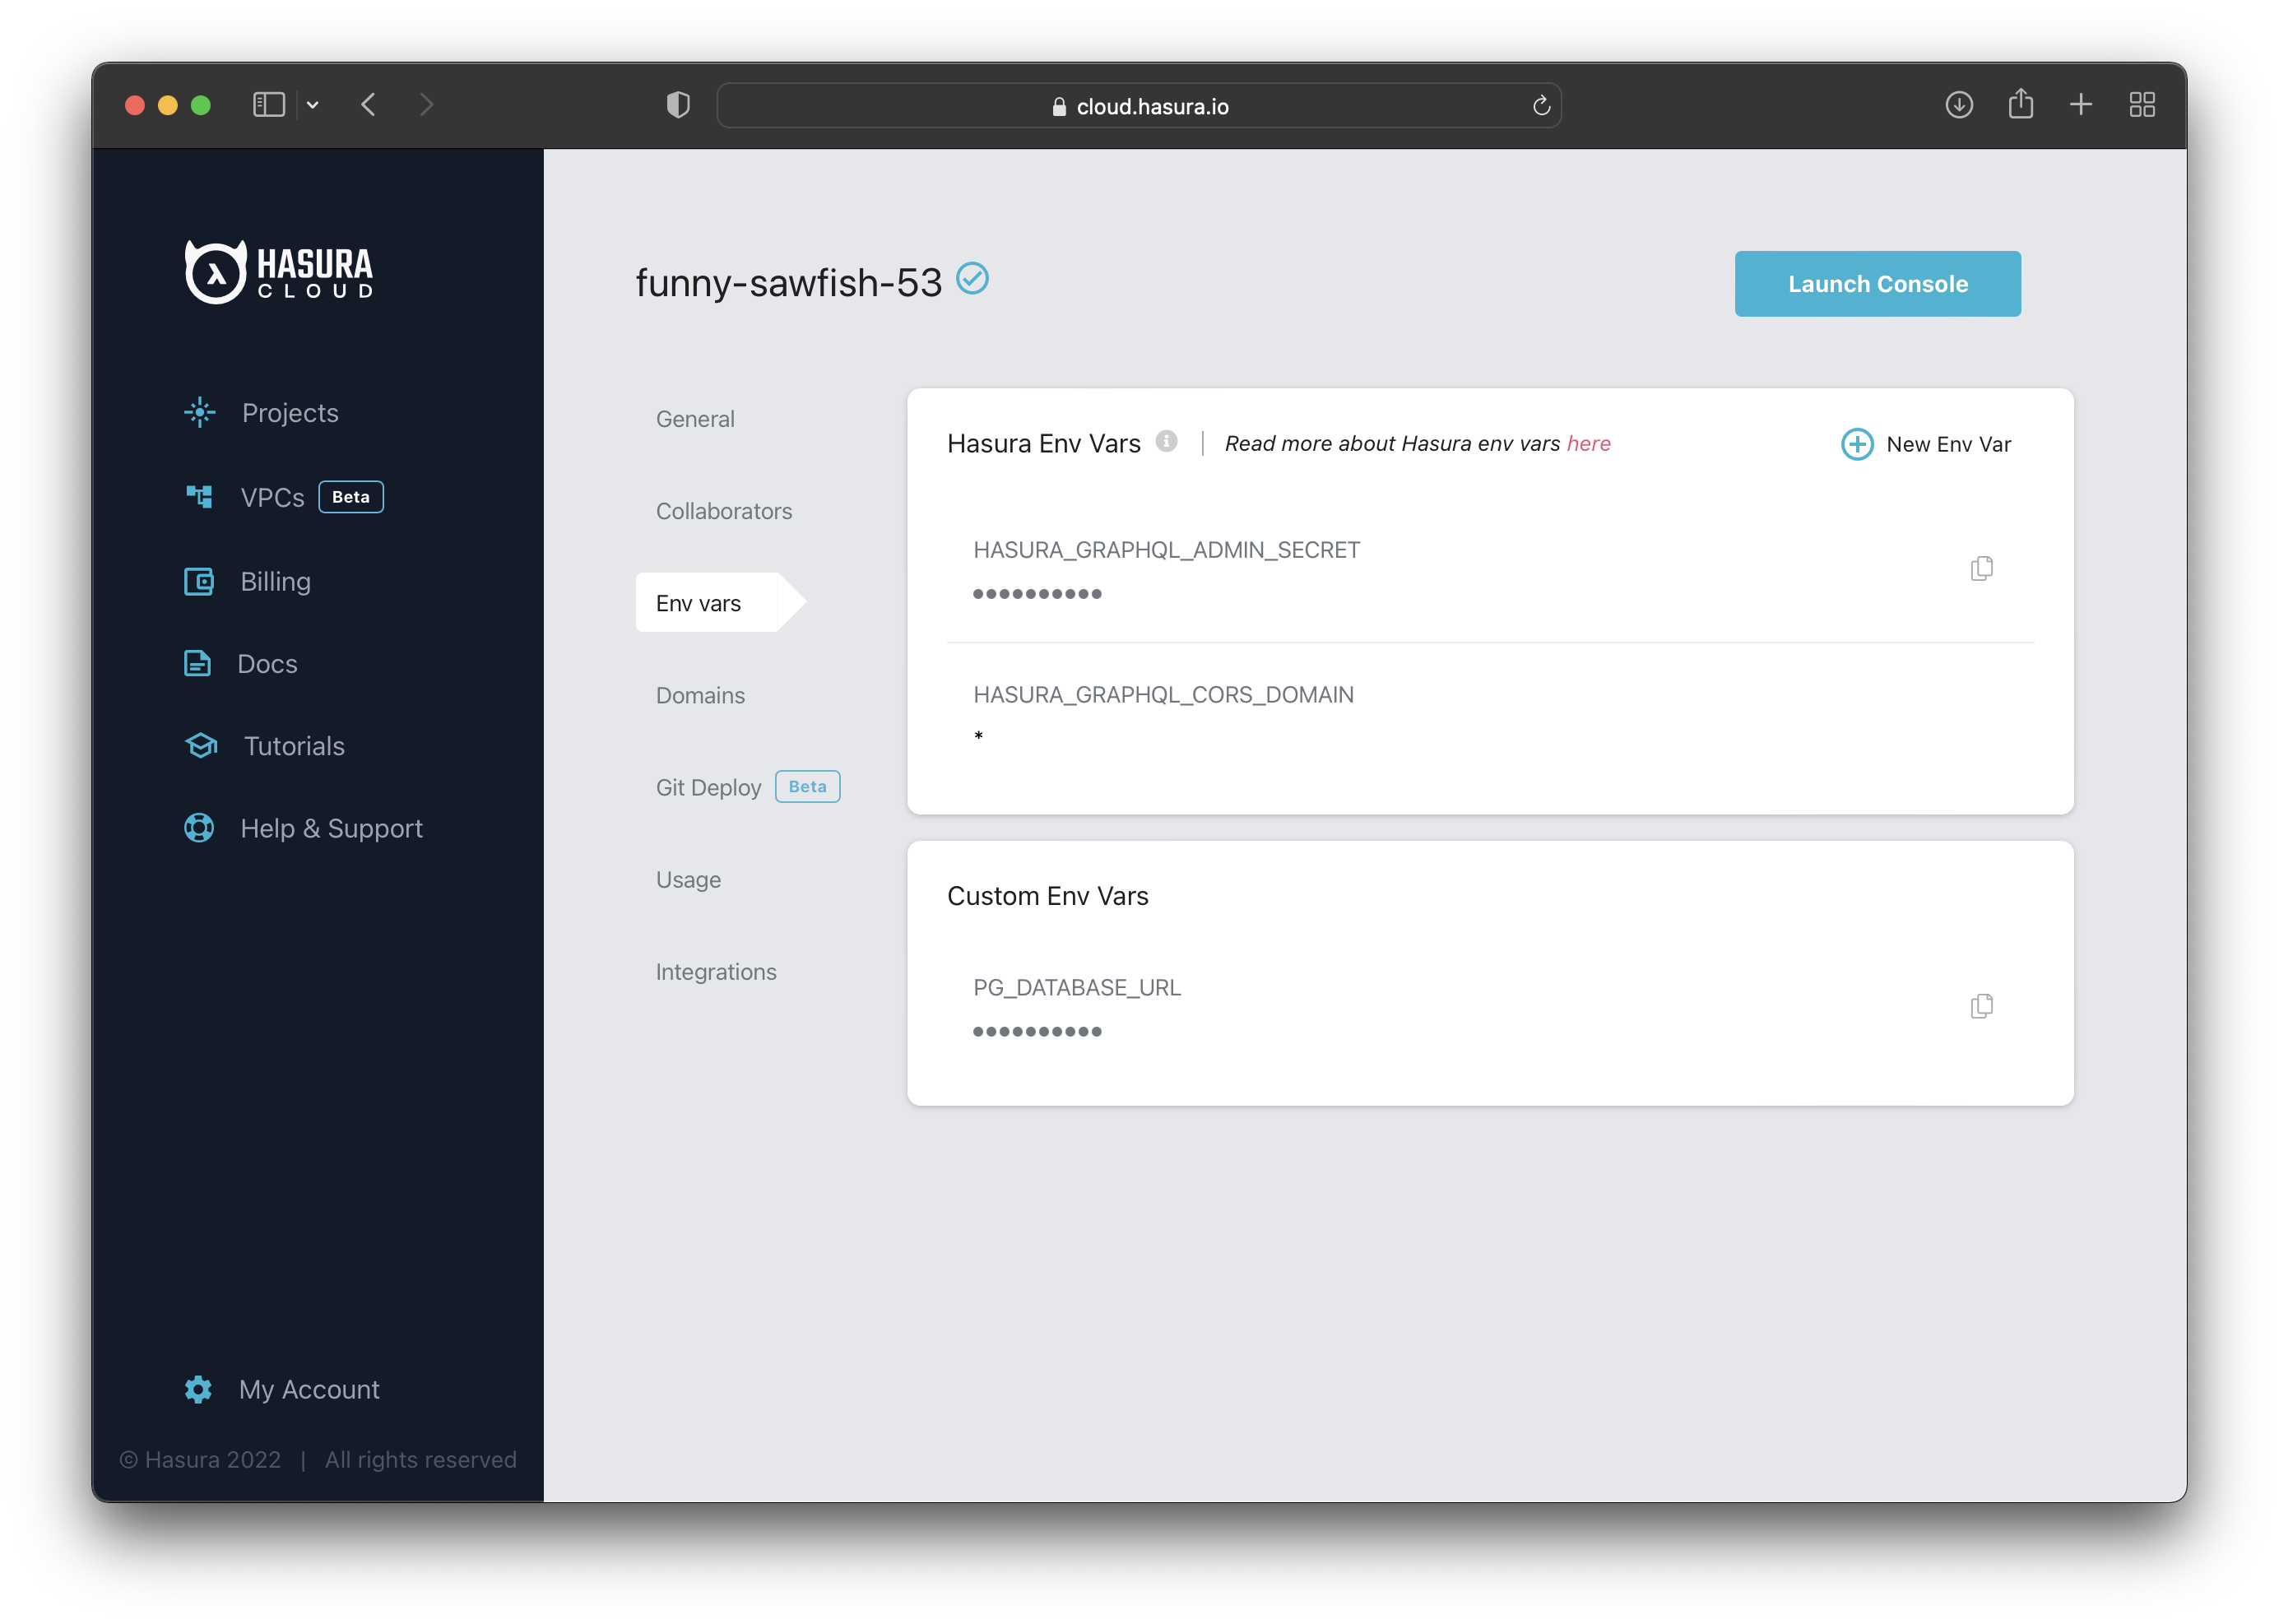
A new section will appear where you can configure the JWT secret.
Select HASURA_GRAPHQL_JWT_SECRET for the "Key" and then paste the JWT config generated previously.
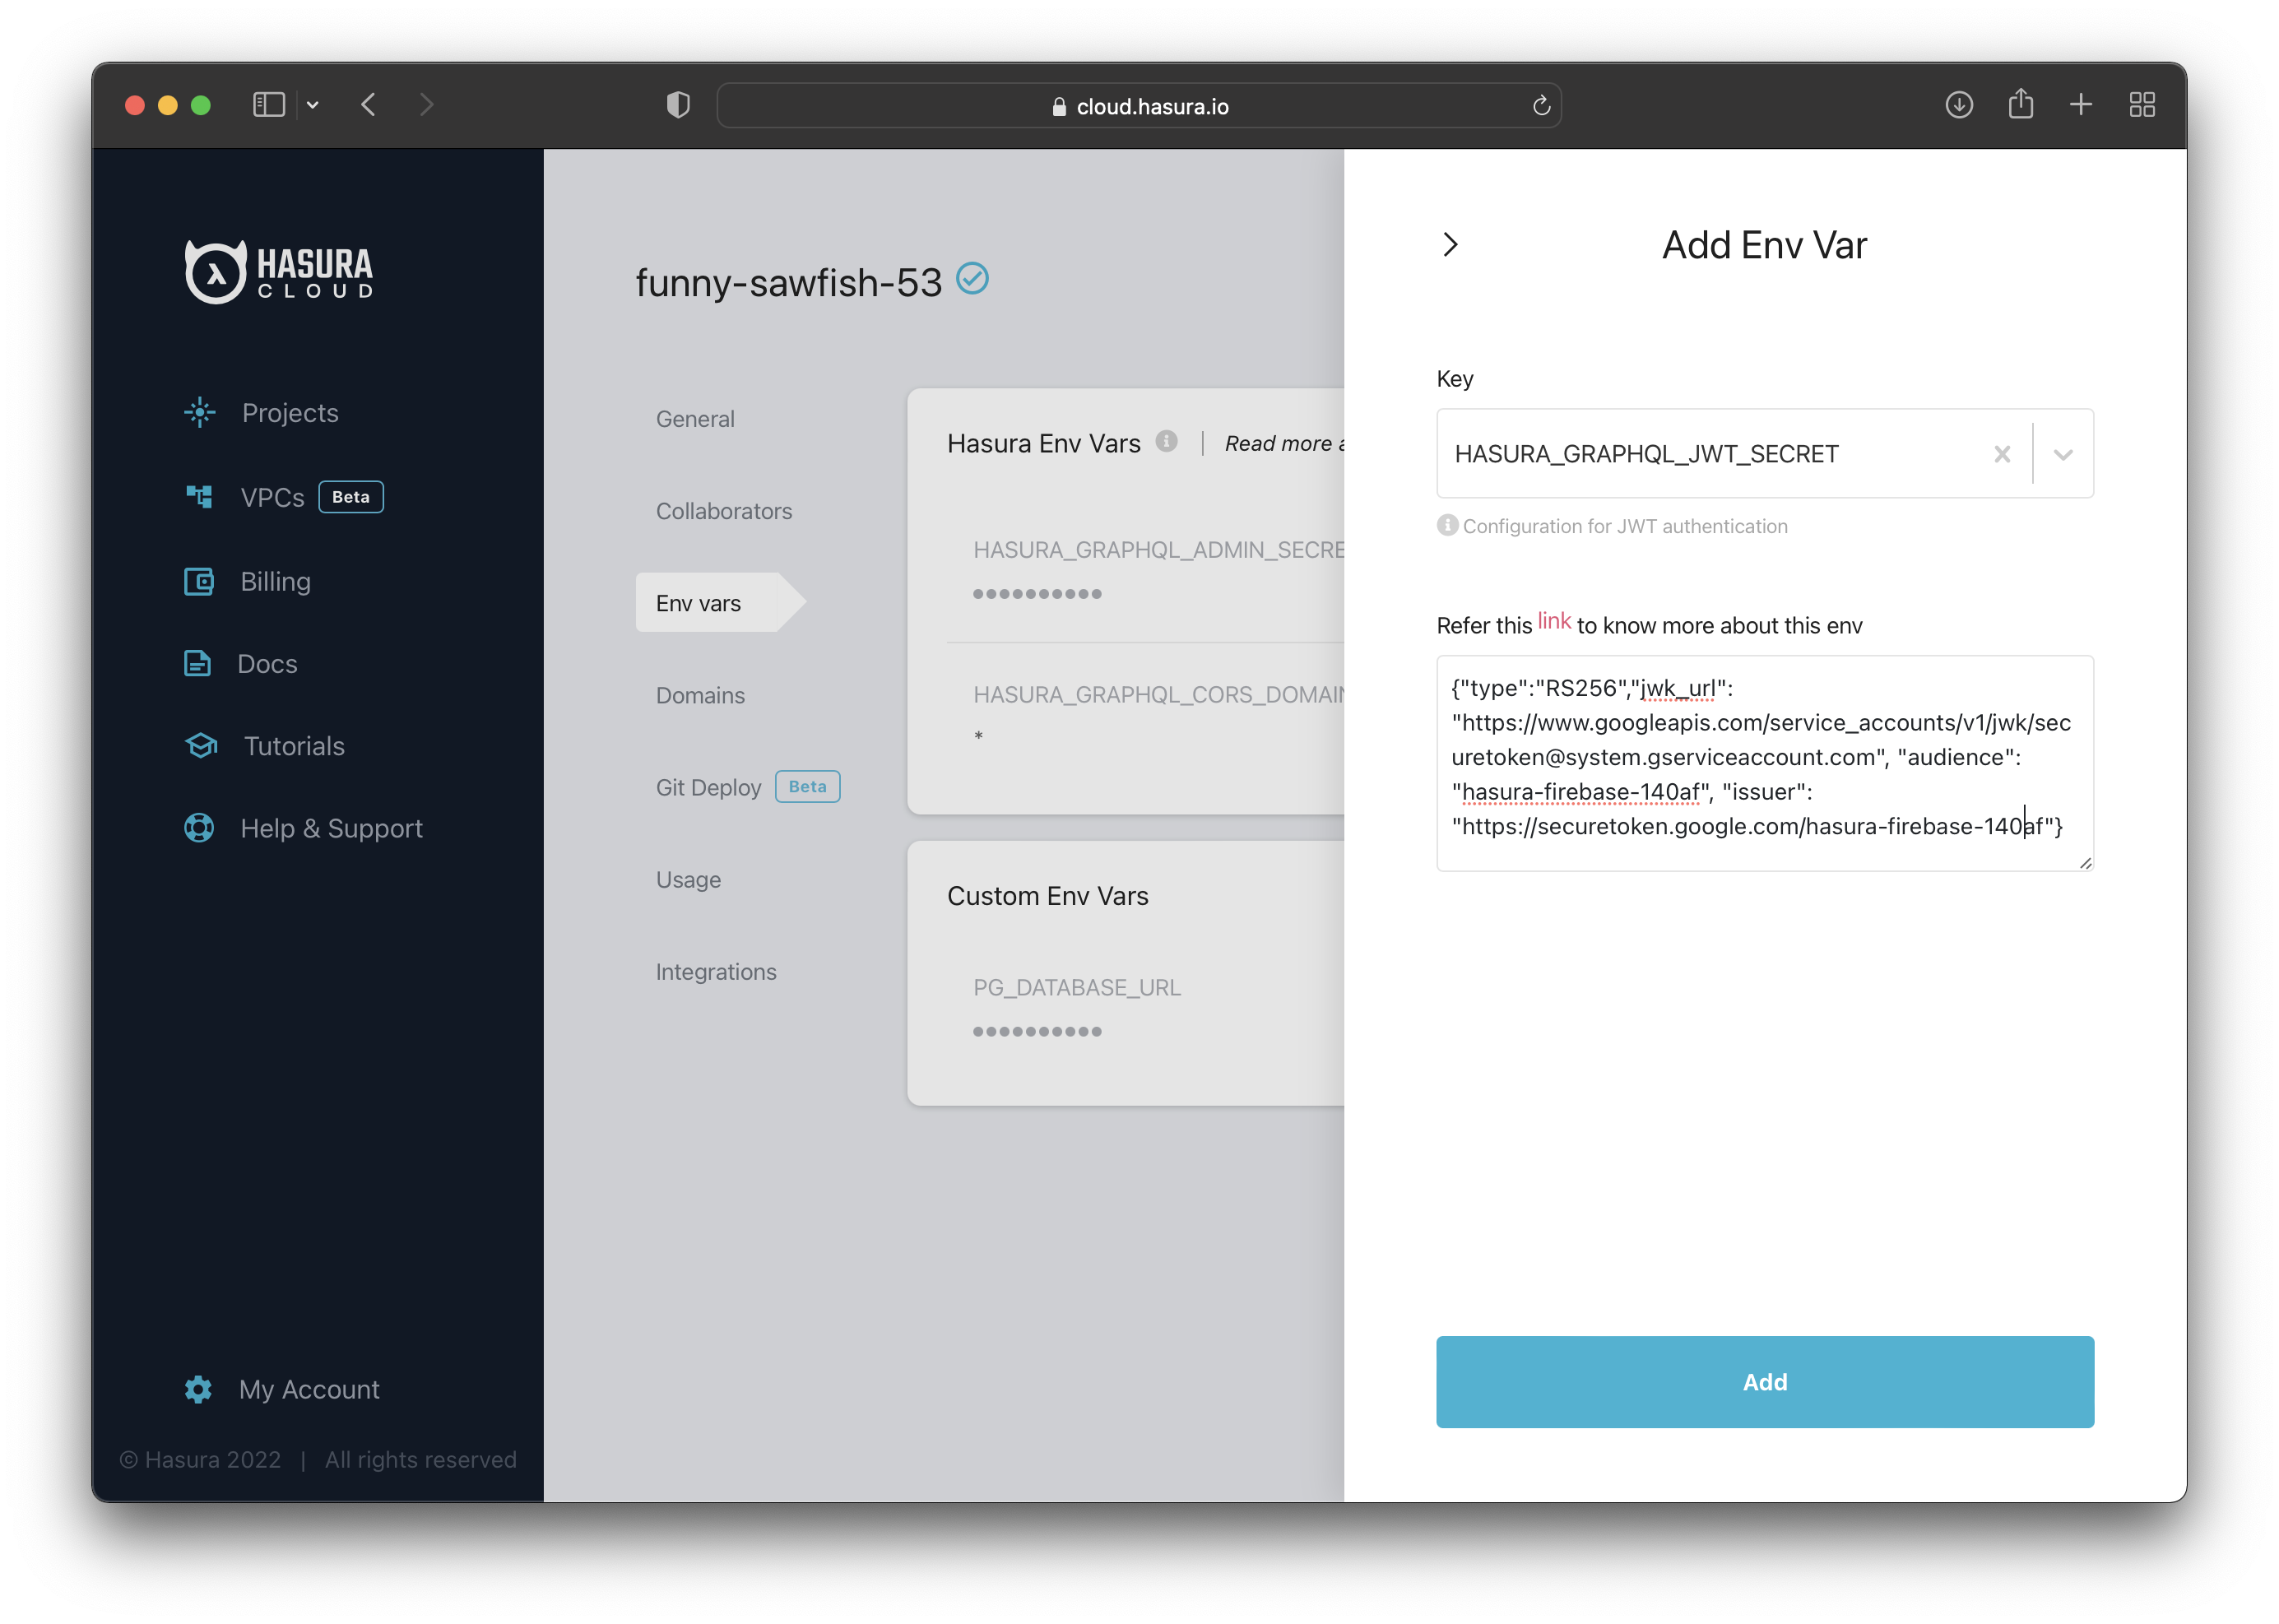
Add the JWT secret, and you are done configuring the Hasura application!
Firebase with Hasura JWT Testing
The following example shows a naive implementation that allows you to retrieve a JWT token. The code below is the HTML code needed to display the registration form and the token.
<html><head><title> Firebase Auth + Hasura JWT example </title></head><body><h1> Firebase Auth + Hasura JWT example </h1><form id="register-form">Email: <input id="reg-email" type="email"/>Password: <input id="reg-password" type="password" /><button type="submit">Register</button></form><button id="get-token"> Get ID token </button><div id="id-token"></div><script src="https://www.gstatic.com/firebasejs/5.5.3/firebase.js"></script><script src="main.js"></script></body></html>
In the file below, you can see the registration logic. First of all, you initialize Firebase with the details from the "Project Settings".
If you scroll up in this course, you should see an image with a firebaseConfig details. Those are the details you need.
After that, you use Firebase to enable users to register. If the registration is successful, the user is also added to Hasura to keep the database in sync.
Provided the registration and the request to Hasura are successful, you can get the token to perform authenticated requests in your Hasura application.
// Initialize Firebasevar config = {apiKey: "",authDomain: "",projectId: "",storageBucket: "",messagingSenderId: "",appId: "",};firebase.initializeApp(config);document.getElementById("register-form").onsubmit = function (event) {event.preventDefault();let email = document.getElementById("reg-email").value;let pass = document.getElementById("reg-password").value;register(email, pass);};document.getElementById("get-token").onclick = function (event) {event.preventDefault();firebase.auth().currentUser.getIdToken(true).then((token) => (document.getElementById("id-token").innerHTML = token));};function register(email, password) {firebase.auth().createUserWithEmailAndPassword(email, password).then((res) => {const admin_secret = "<your-admin-secret>";const url = "<your-hasura-app-url>";const query = `mutation($userId: String!, $userEmail: String) {insert_users(objects: [{id: $userId, email: $userEmail, last_seen: "now()"}], on_conflict: {constraint: users_pkey, update_columns: [last_seen, email]}) {affected_rows}}`;const variables = { userId: res.user.uid, userEmail: res.user.email };fetch(url, {method: "post",headers: {"content-type": "application/json","x-hasura-admin-secret": admin_secret,},body: JSON.stringify({query: query,variables: variables,})})}).catch((error) => {const errorCode = error.code;const errorMessage = error.message;console.log(errorCode, ':', errorMessage);});}
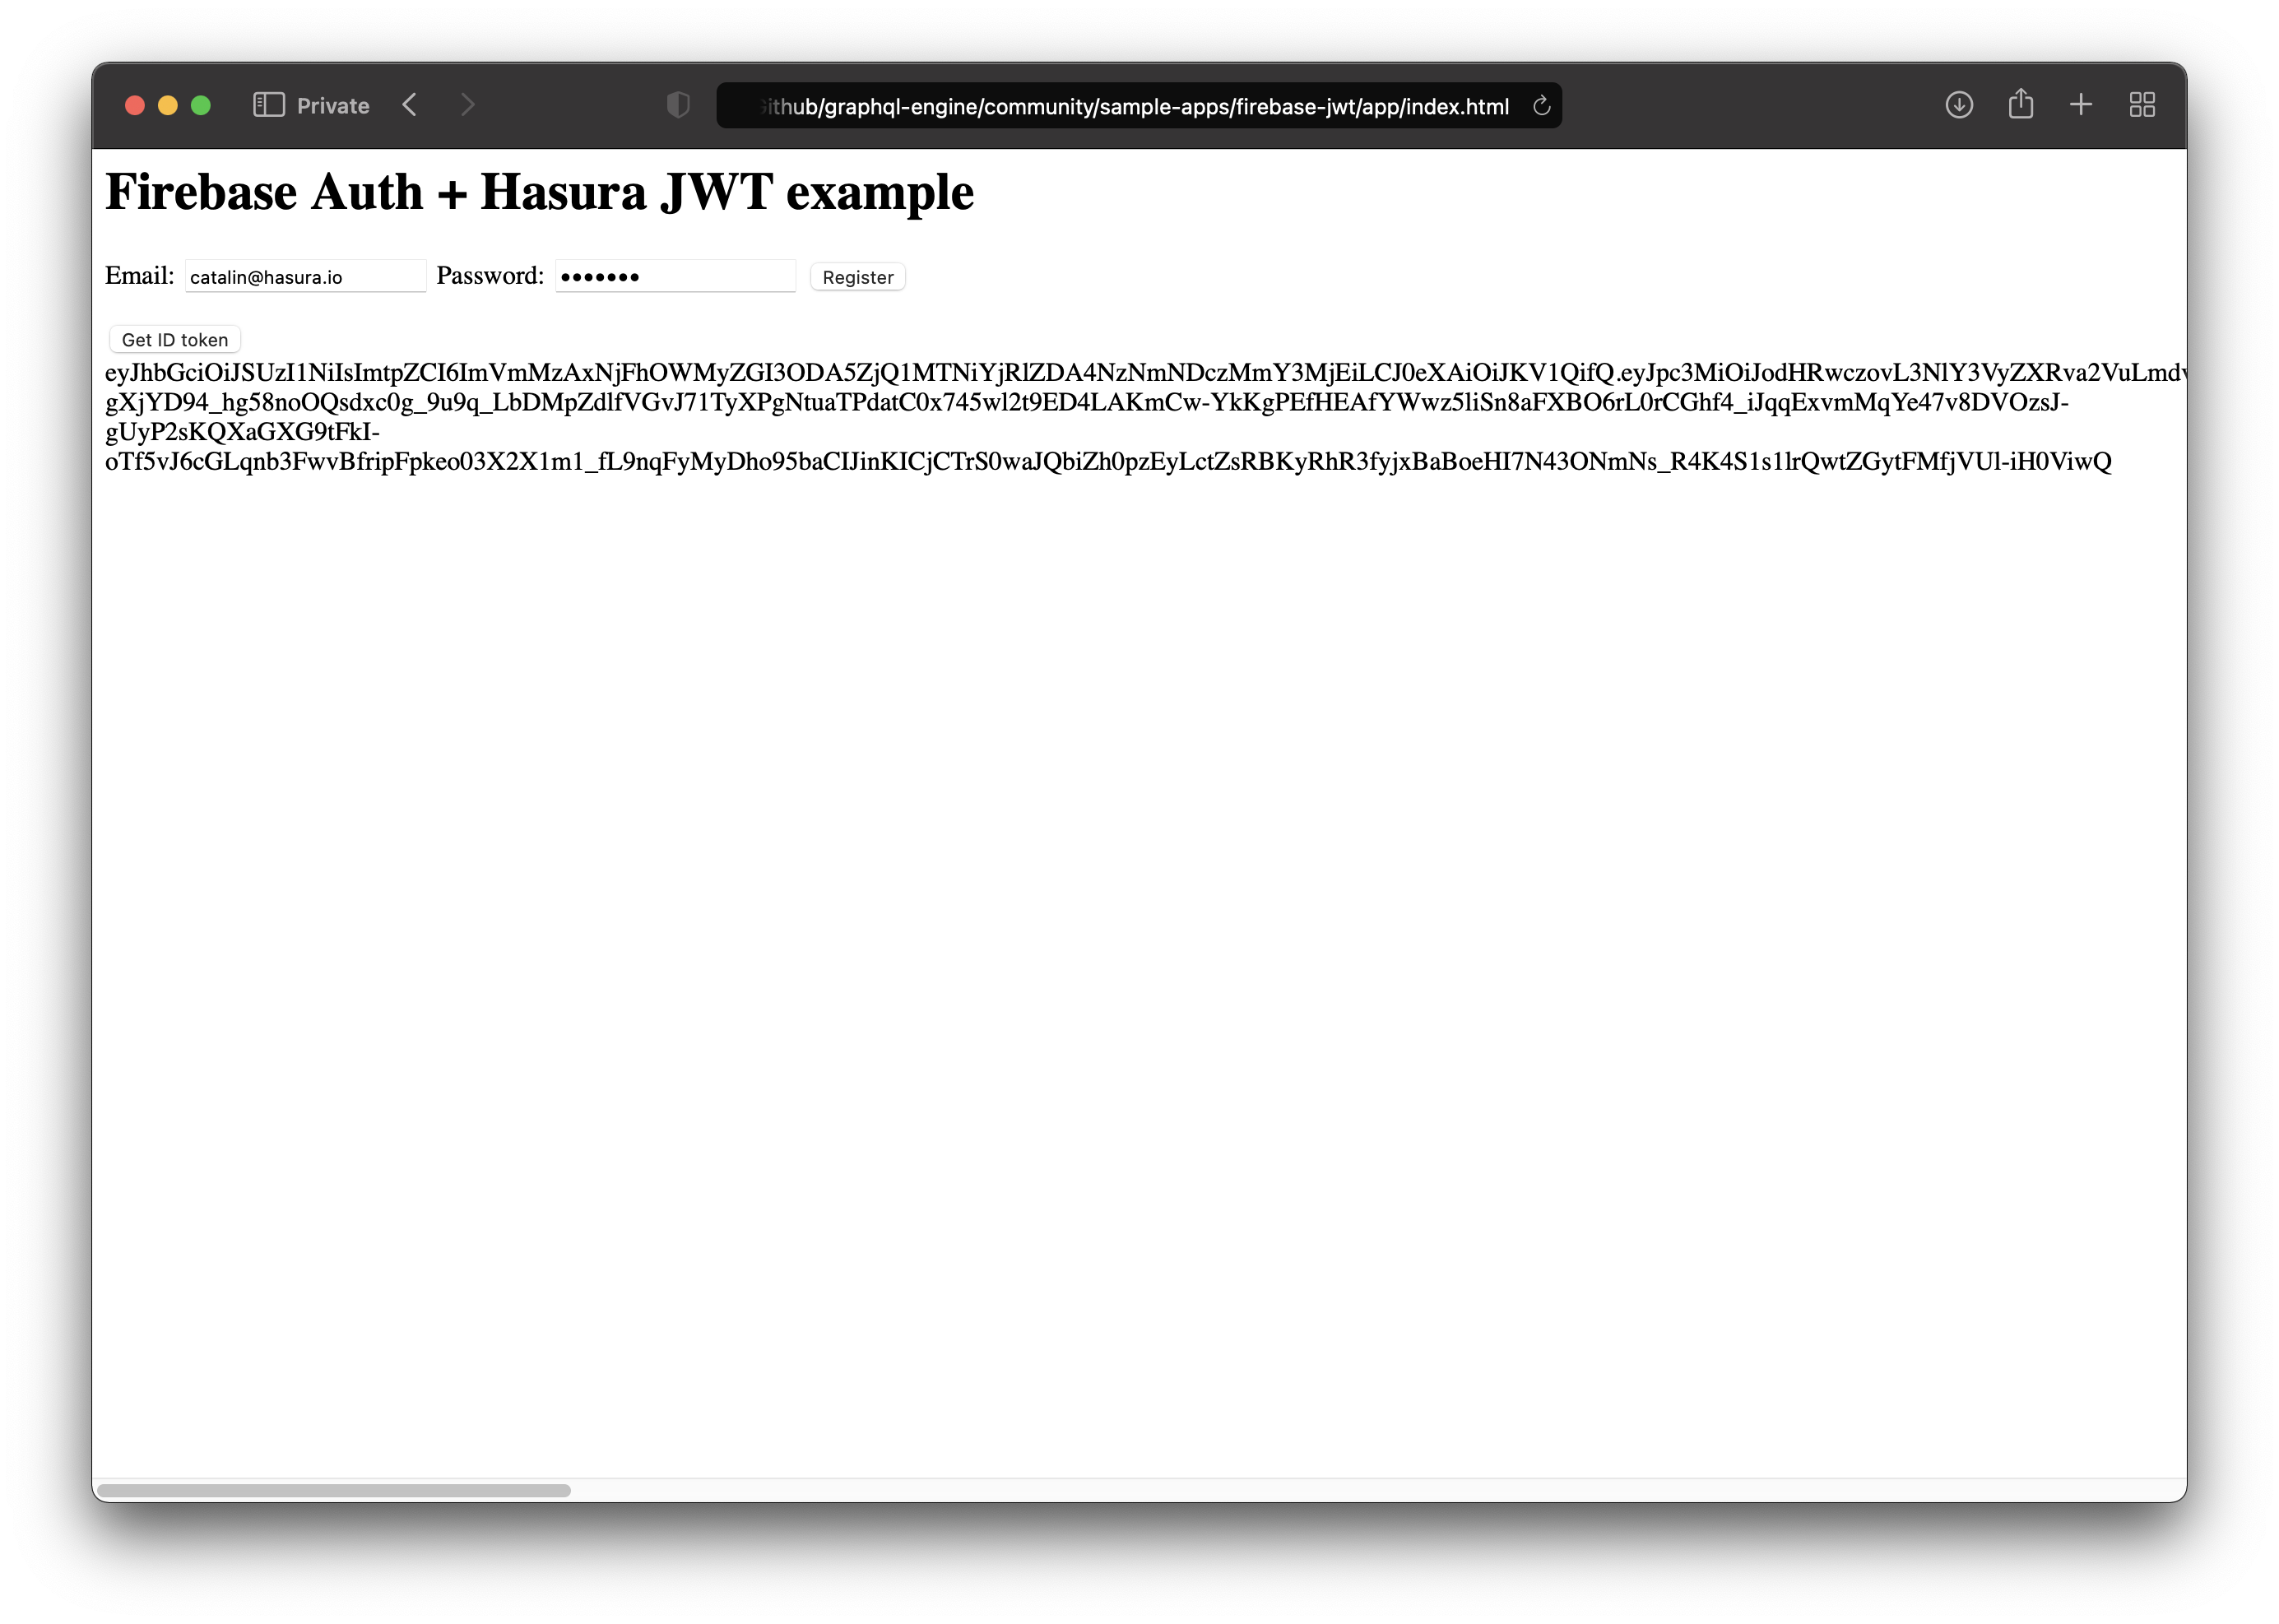
Open the application and register by entering your email and password. After you press the "Register" button, you will be automatically logged in by Firebase.
You can press the "Get ID token" to receive your token.
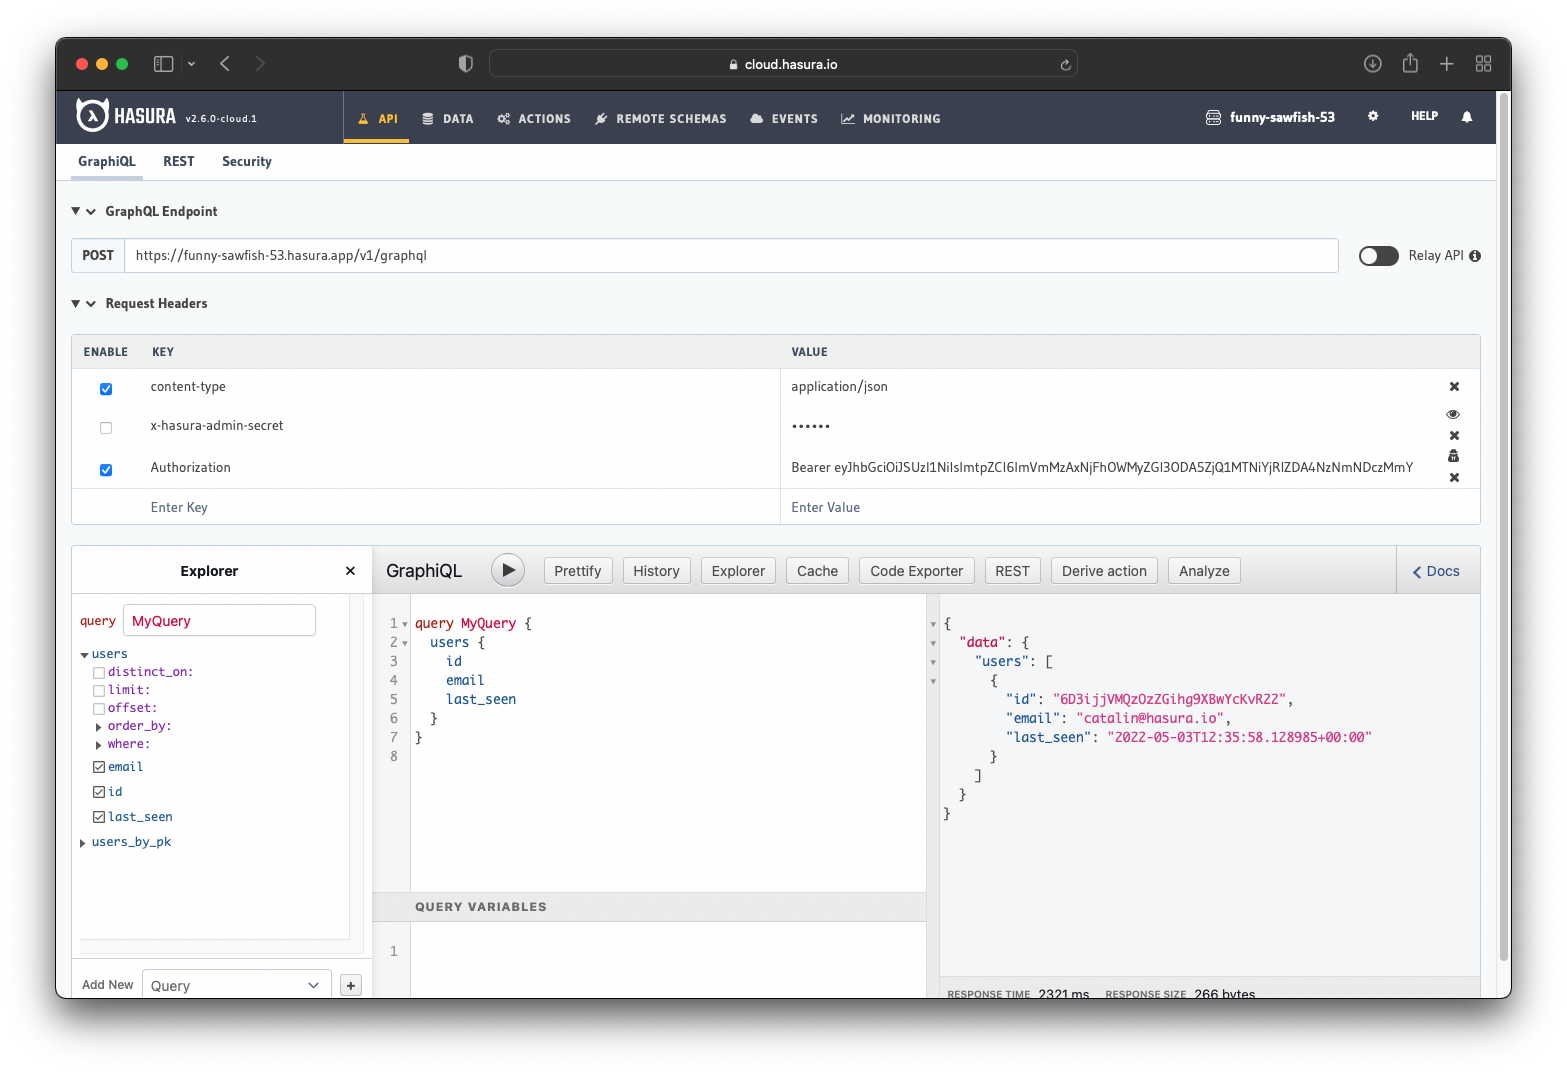
Now you can go to your Hasura Console and use the token. You can see that the token works, and it only shows my details.
The sync between Firebase and Hasura also works since it shows my details.
Note: This is a naive implementation to showcase how to integrate Firebase with Hasura. We want to keep the implementation as simple as possible rather than focusing on a specific framework or library.
Feel free to check the documentation for getting started with Firebase Authentication on Websites.
Optional: Firebase Hosting
This is an optional step. It shows how to deploy the above application on Firebase, but you can skip it.
Firebase enables you to deploy your application online. As an example, you can deploy the above application.
You should have the following project structure:
📂 firebase-hasura📂 app└ index.html└ main.js
Before deploying to Firebase, you need to install the Firebase CLI. You can do it as follows:
npm install -g firebase-tools
Once the installation finishes, log into your Firebase account:
firebase login
Now that you are logged in, navigate inside the "firebase-hasura" folder and run:
firebase init
That will prompt you to answer a series of questions. Choose the following:
- Please select an option: Use an existing project
- Select a default Firebase project for this directory: Choose your project
- What do you want to use as your public directory?: app
- Configure as a single-page app (rewrite all urls to /index.html)?: No
- Set up automatic builds and deploys with GitHub?: No
- File app/index.html already exists. Overwrite?: No
After answering the questions, the app will be deployed within minutes. You will get the public app URL in your terminal.
 Build apps and APIs 10x faster
- Built-in authorization and caching
- 8x more performant than hand-rolled APIs