Edit on GitHub
SuperTokens
What is SuperTokens
SuperTokens is an Open-Source Auth provider that enables you to implement authentication and session management into your applications.
It comes in two flavors:
- self-hosted - unlimited users and free forever
- managed version by SuperTokens - free up to 5K monthly active users
Note: The tutorial uses the managed version of SuperTokens. Also, the auth API is built using NodeJS.
Set up SuperTokens
Using SuperTokens for authentication means that you need to build an auth API that uses the SuperTokens Backend SDK. The app communicates with SuperTokens through the custom auth API.
SuperTokens provides Backend SDKs for:
- Node.js
- Go
- Python
It also has Frontend SDKs for:
- Vanilla JS
- React
- React-Native
Create a SuperTokens Managed Service
If you run a self-hosted (with or without Docker) SuperTokens instance, you can skip this section.
You need to create a SuperTokens account, which gives you a connectionURI and an API key. When you call the
SuperTokens init function in your auth API, you will use them.
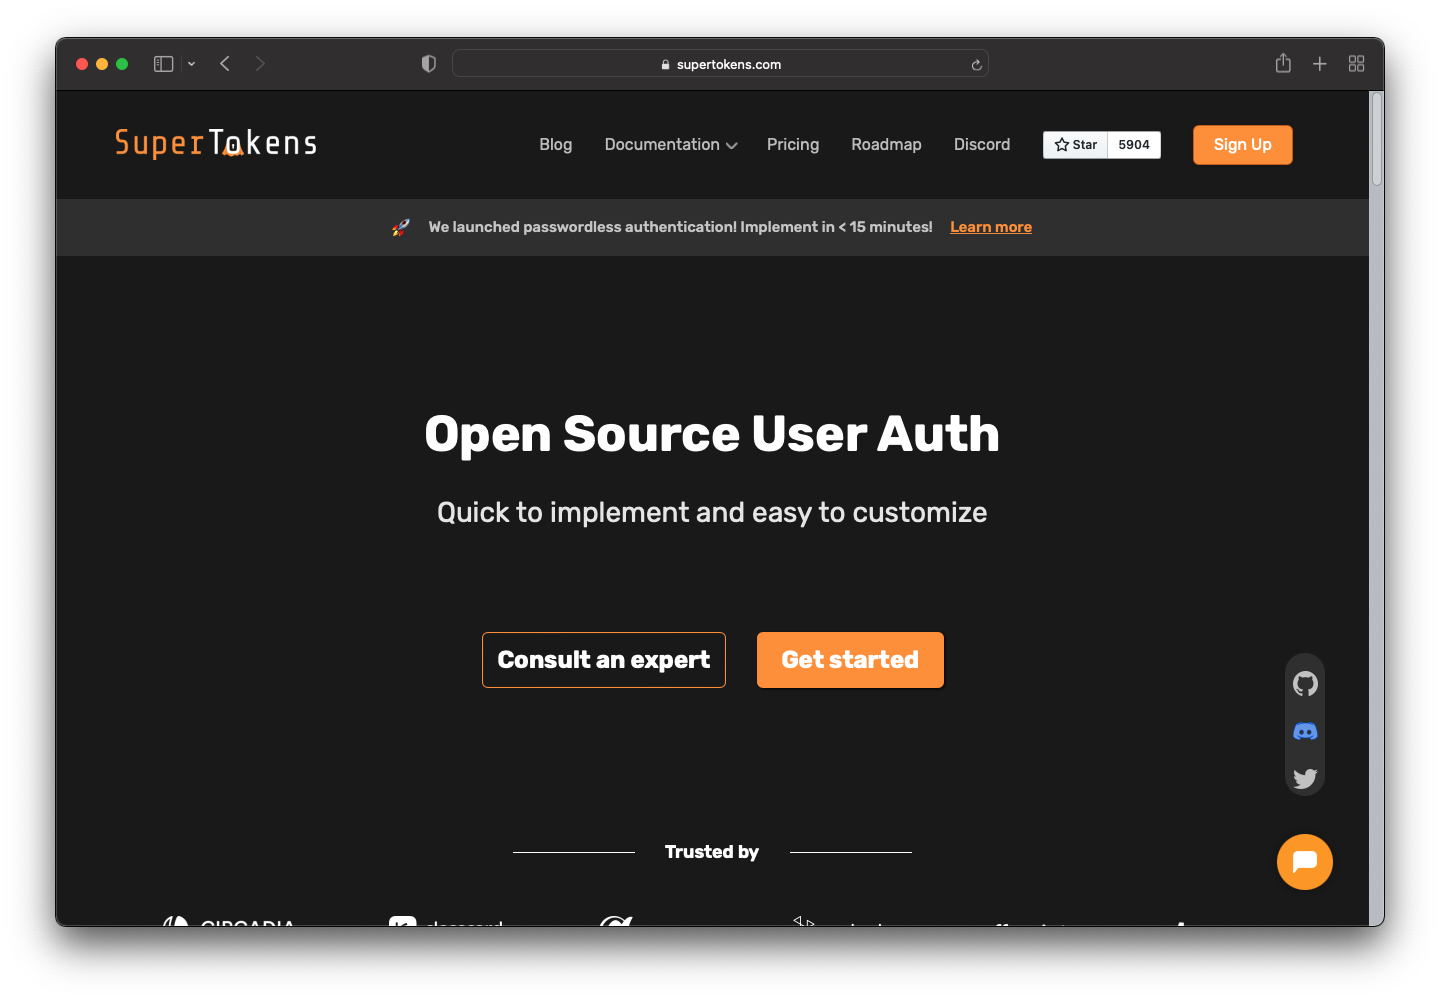
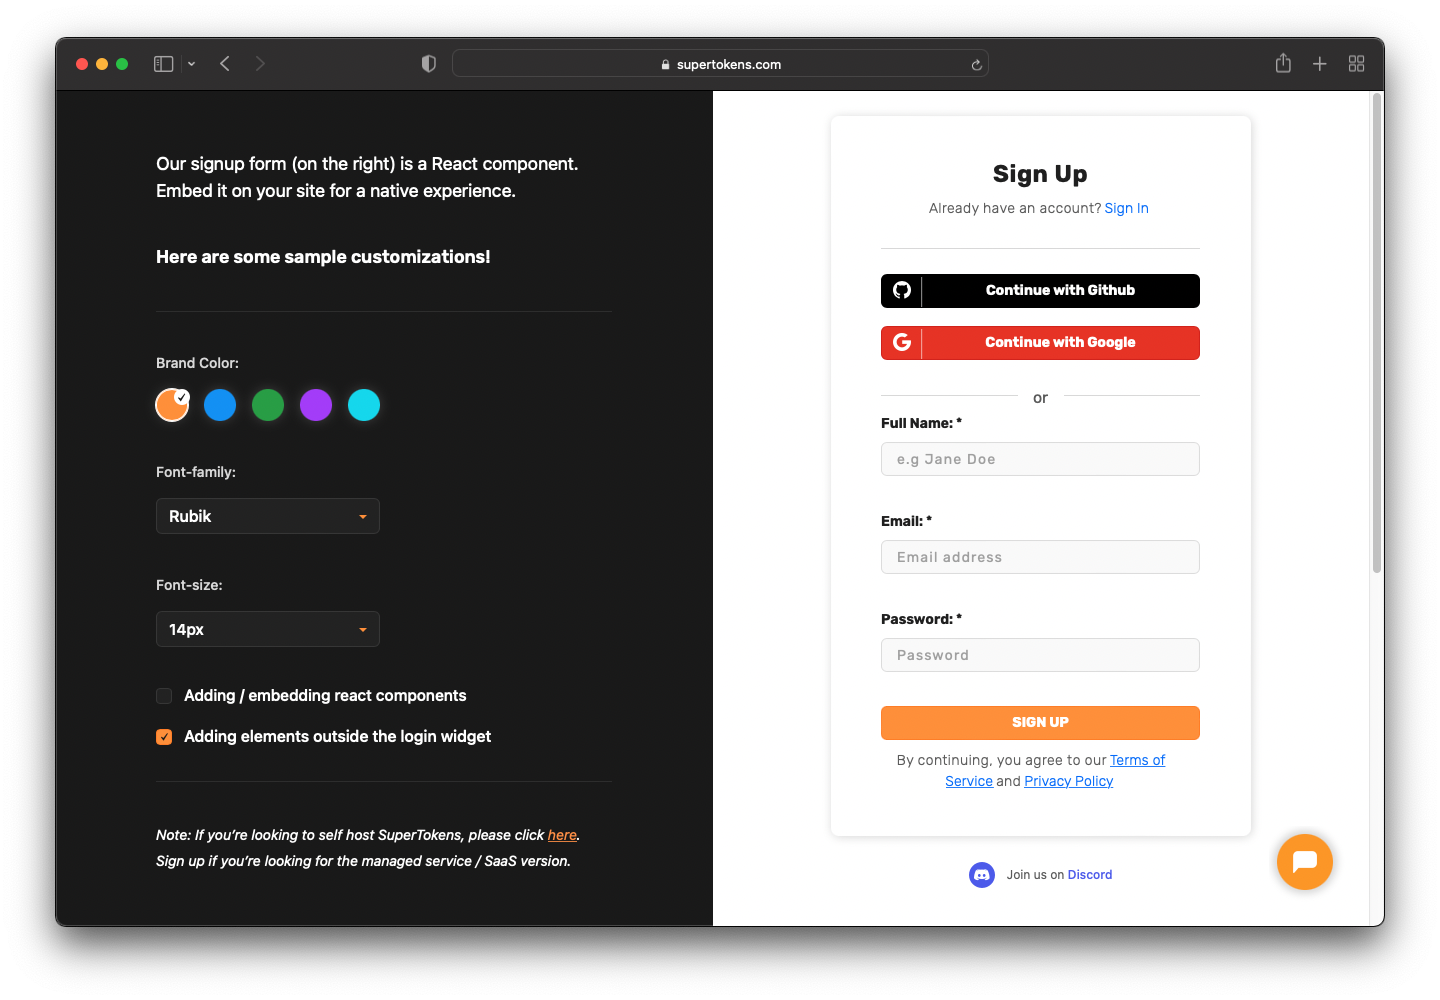
Navigate to supertokens.com and click on the "Sign Up" button to start the registration process.
You can sign up in three ways:
- with GitHub
- with Google
- manually
Additionally, you can customize the signup form on the left-hand side. You can change colors, fonts, and so on.
This tutorial uses the default values. Now register using your preferred method.
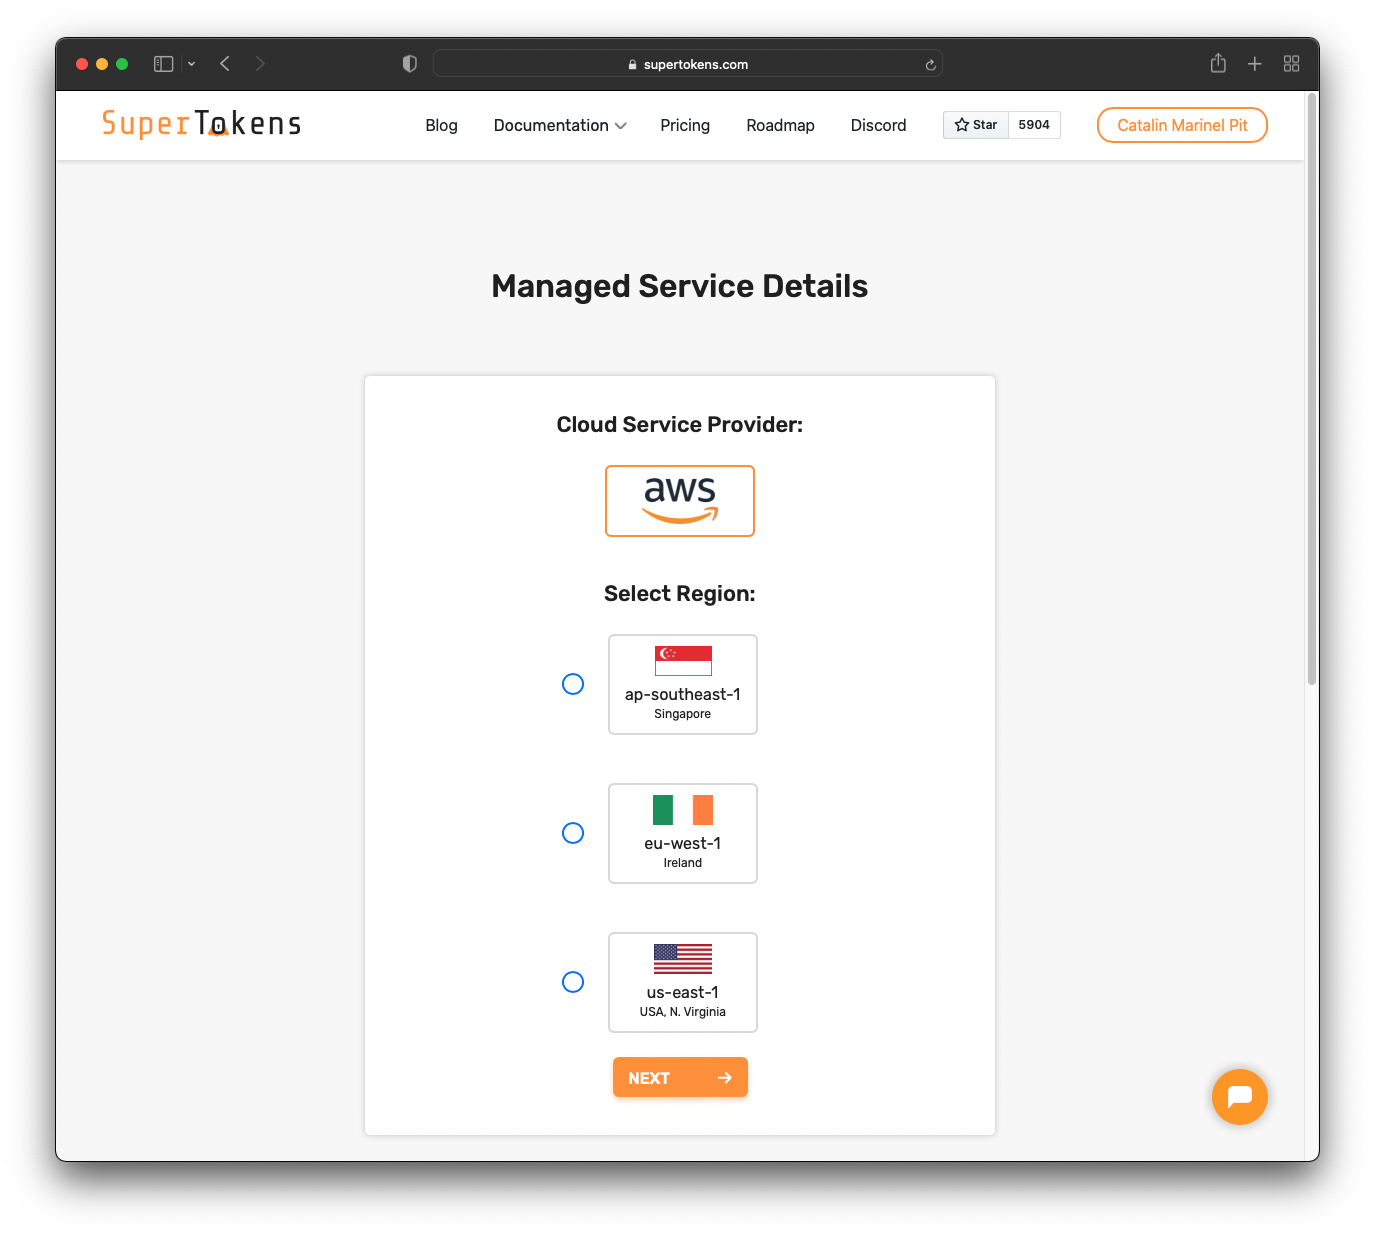
The next step is to configure your SuperTokens account by choosing a region.
Choose the appropriate region for your case and press "Next".
That takes you to the "Dashboard" page, where you can see your connectionURI and API key.
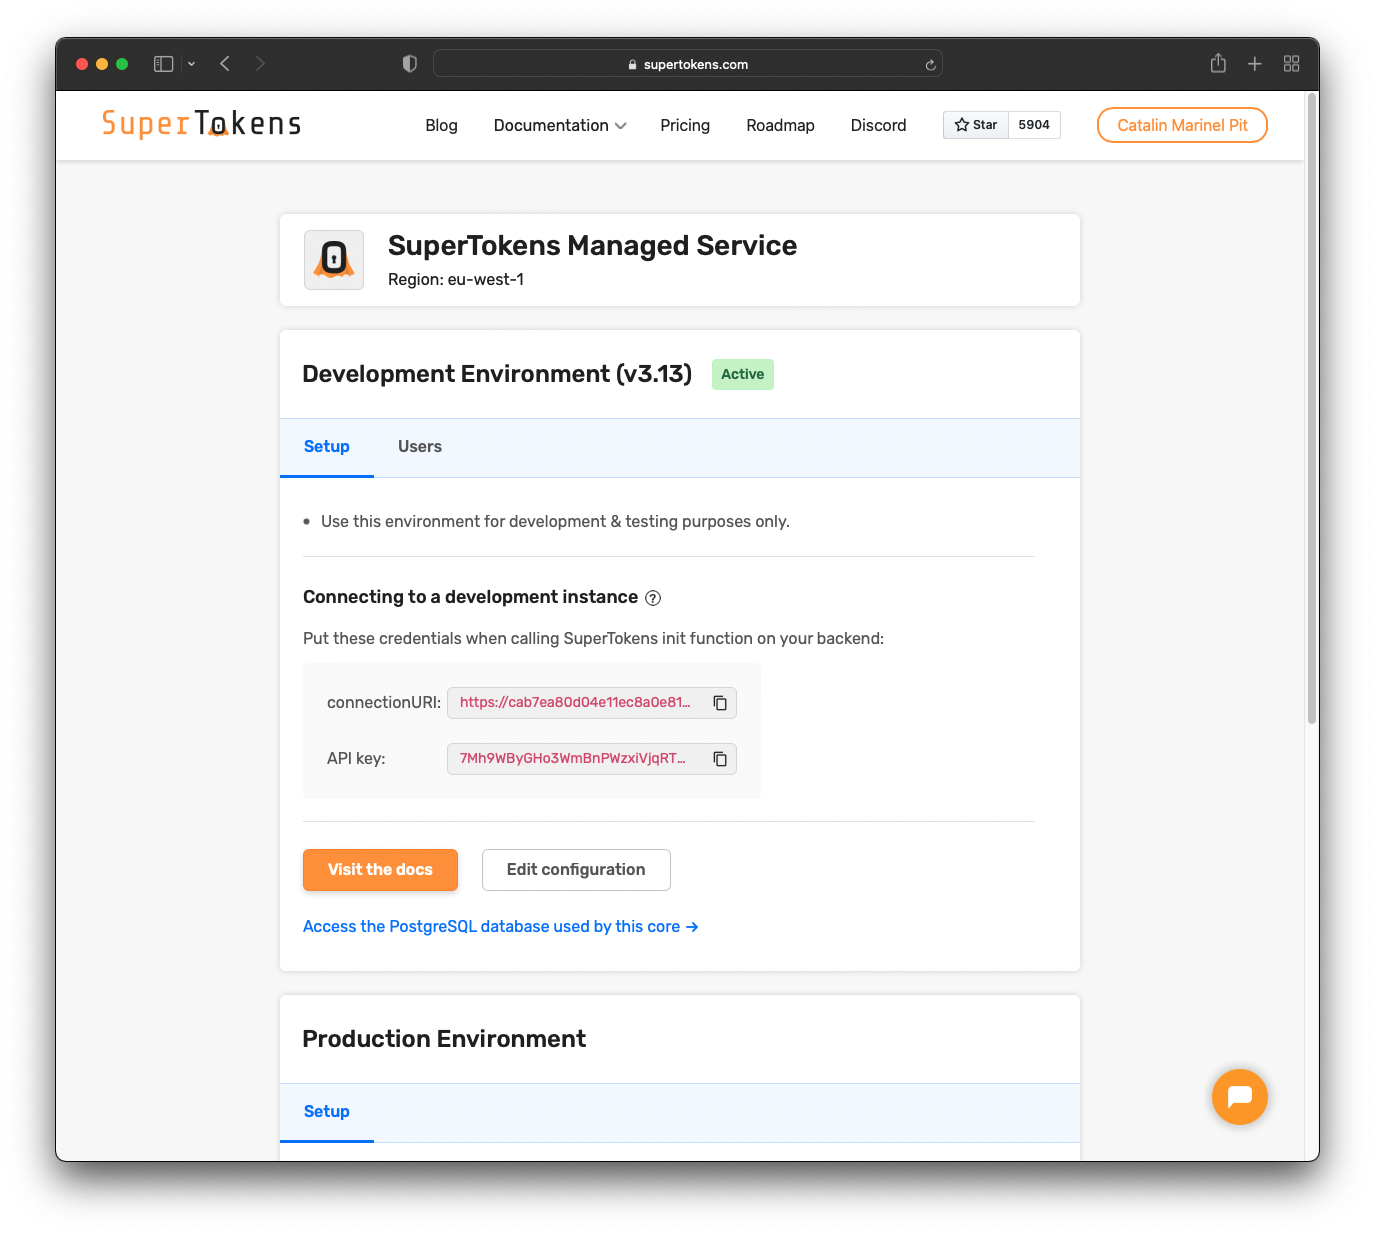
You will need those later. Also, you will connect your Hasura app to the PostgreSQL database from SuperTokens.
You can retrieve the database connection details by clicking where it says
Access the PostgreSQL database used by this core. You should see something similar:
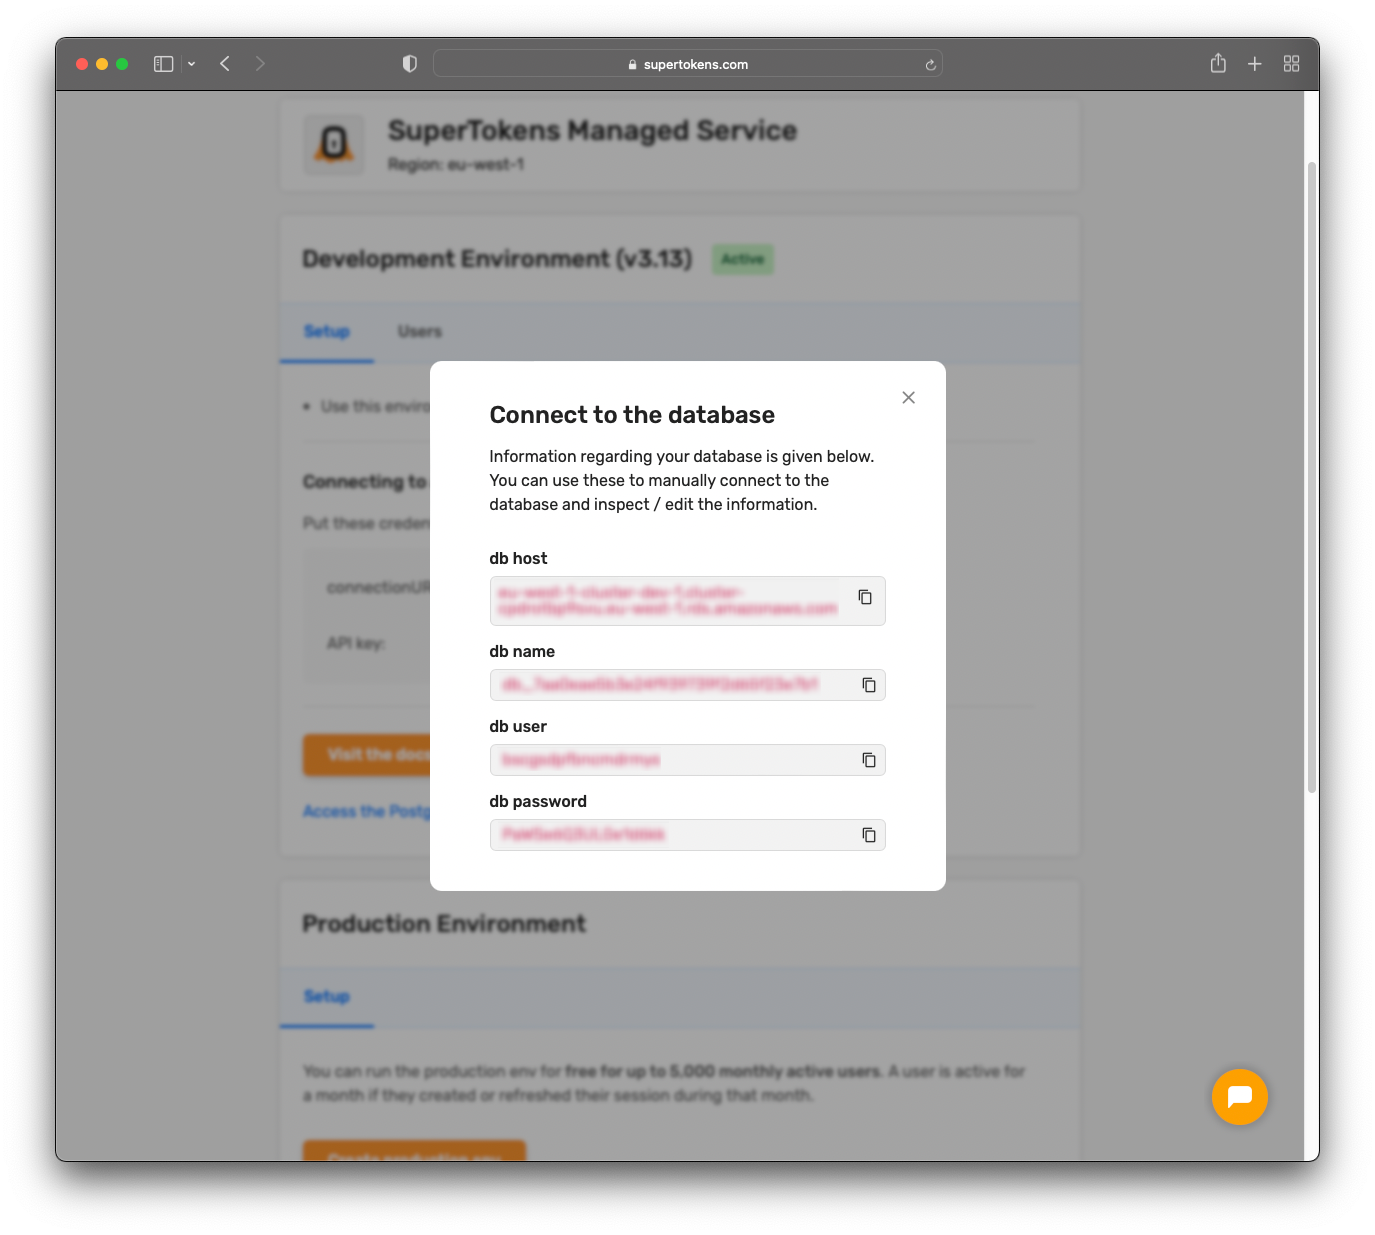
You will need these details in the next step.
Create Hasura App
Navigate to your Hasura Cloud dashboard and create a new project.
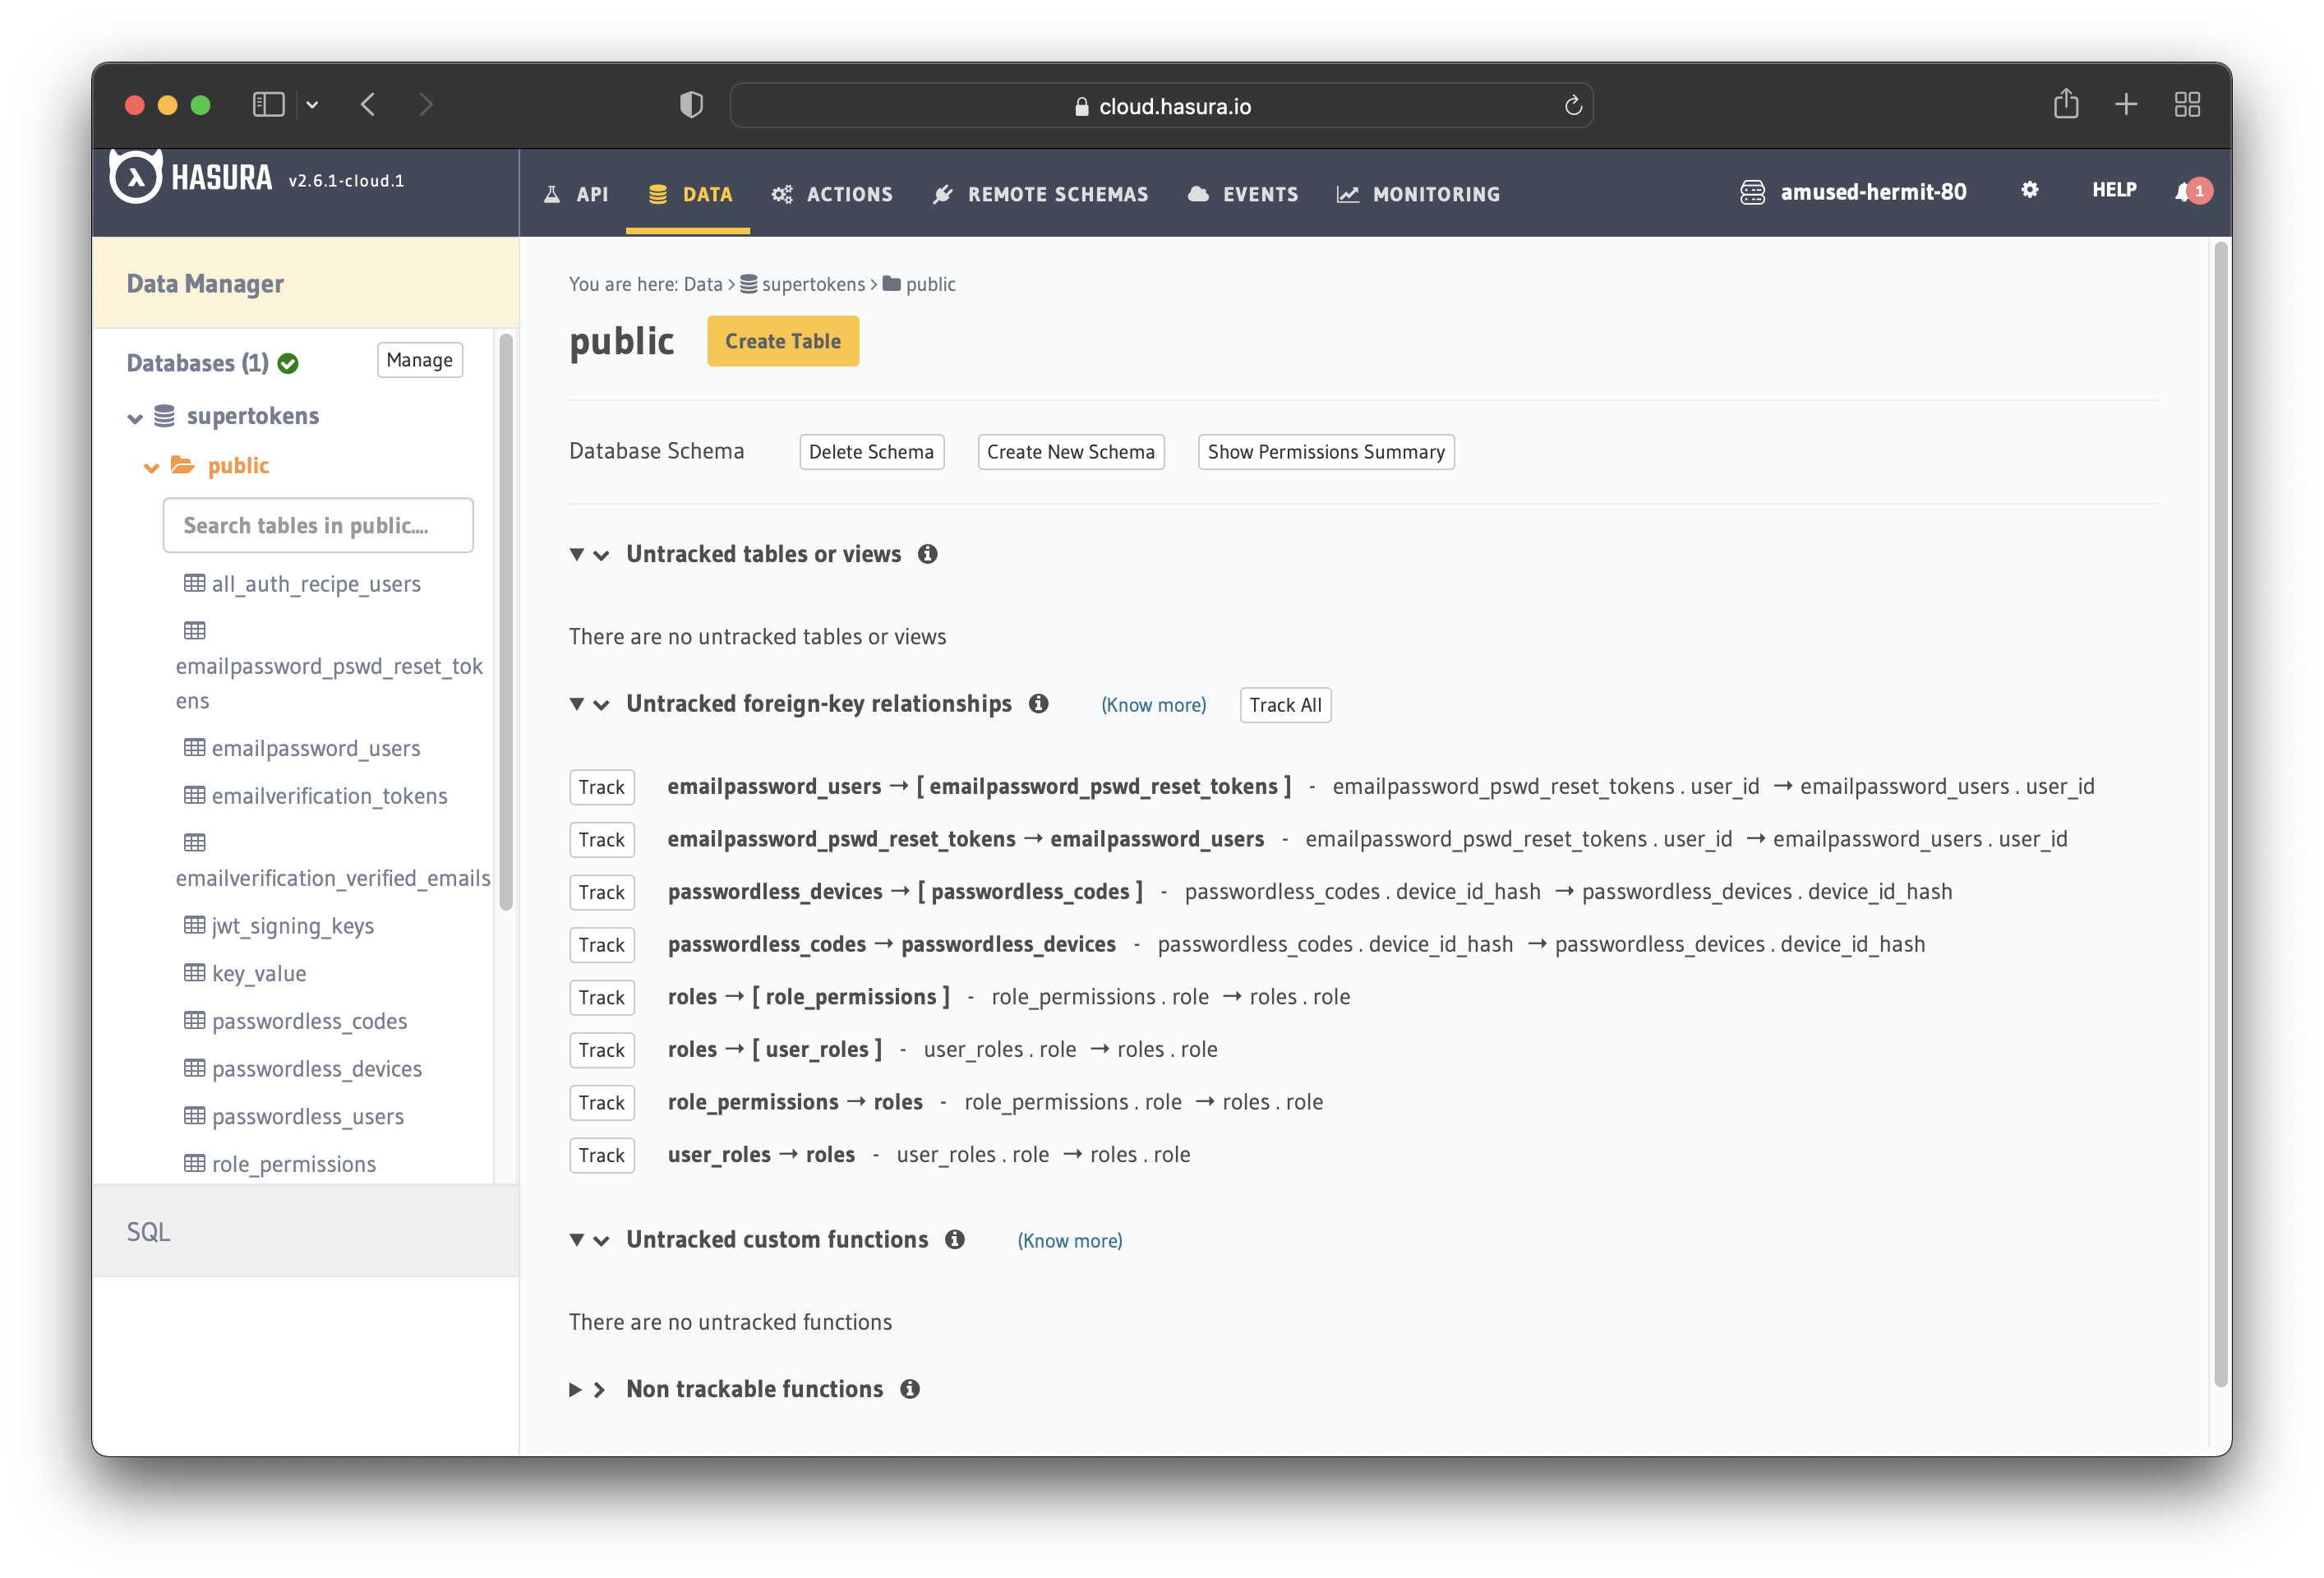
Launch the console once the project is created, go to the "DATA" tab, and connect to an existing database.
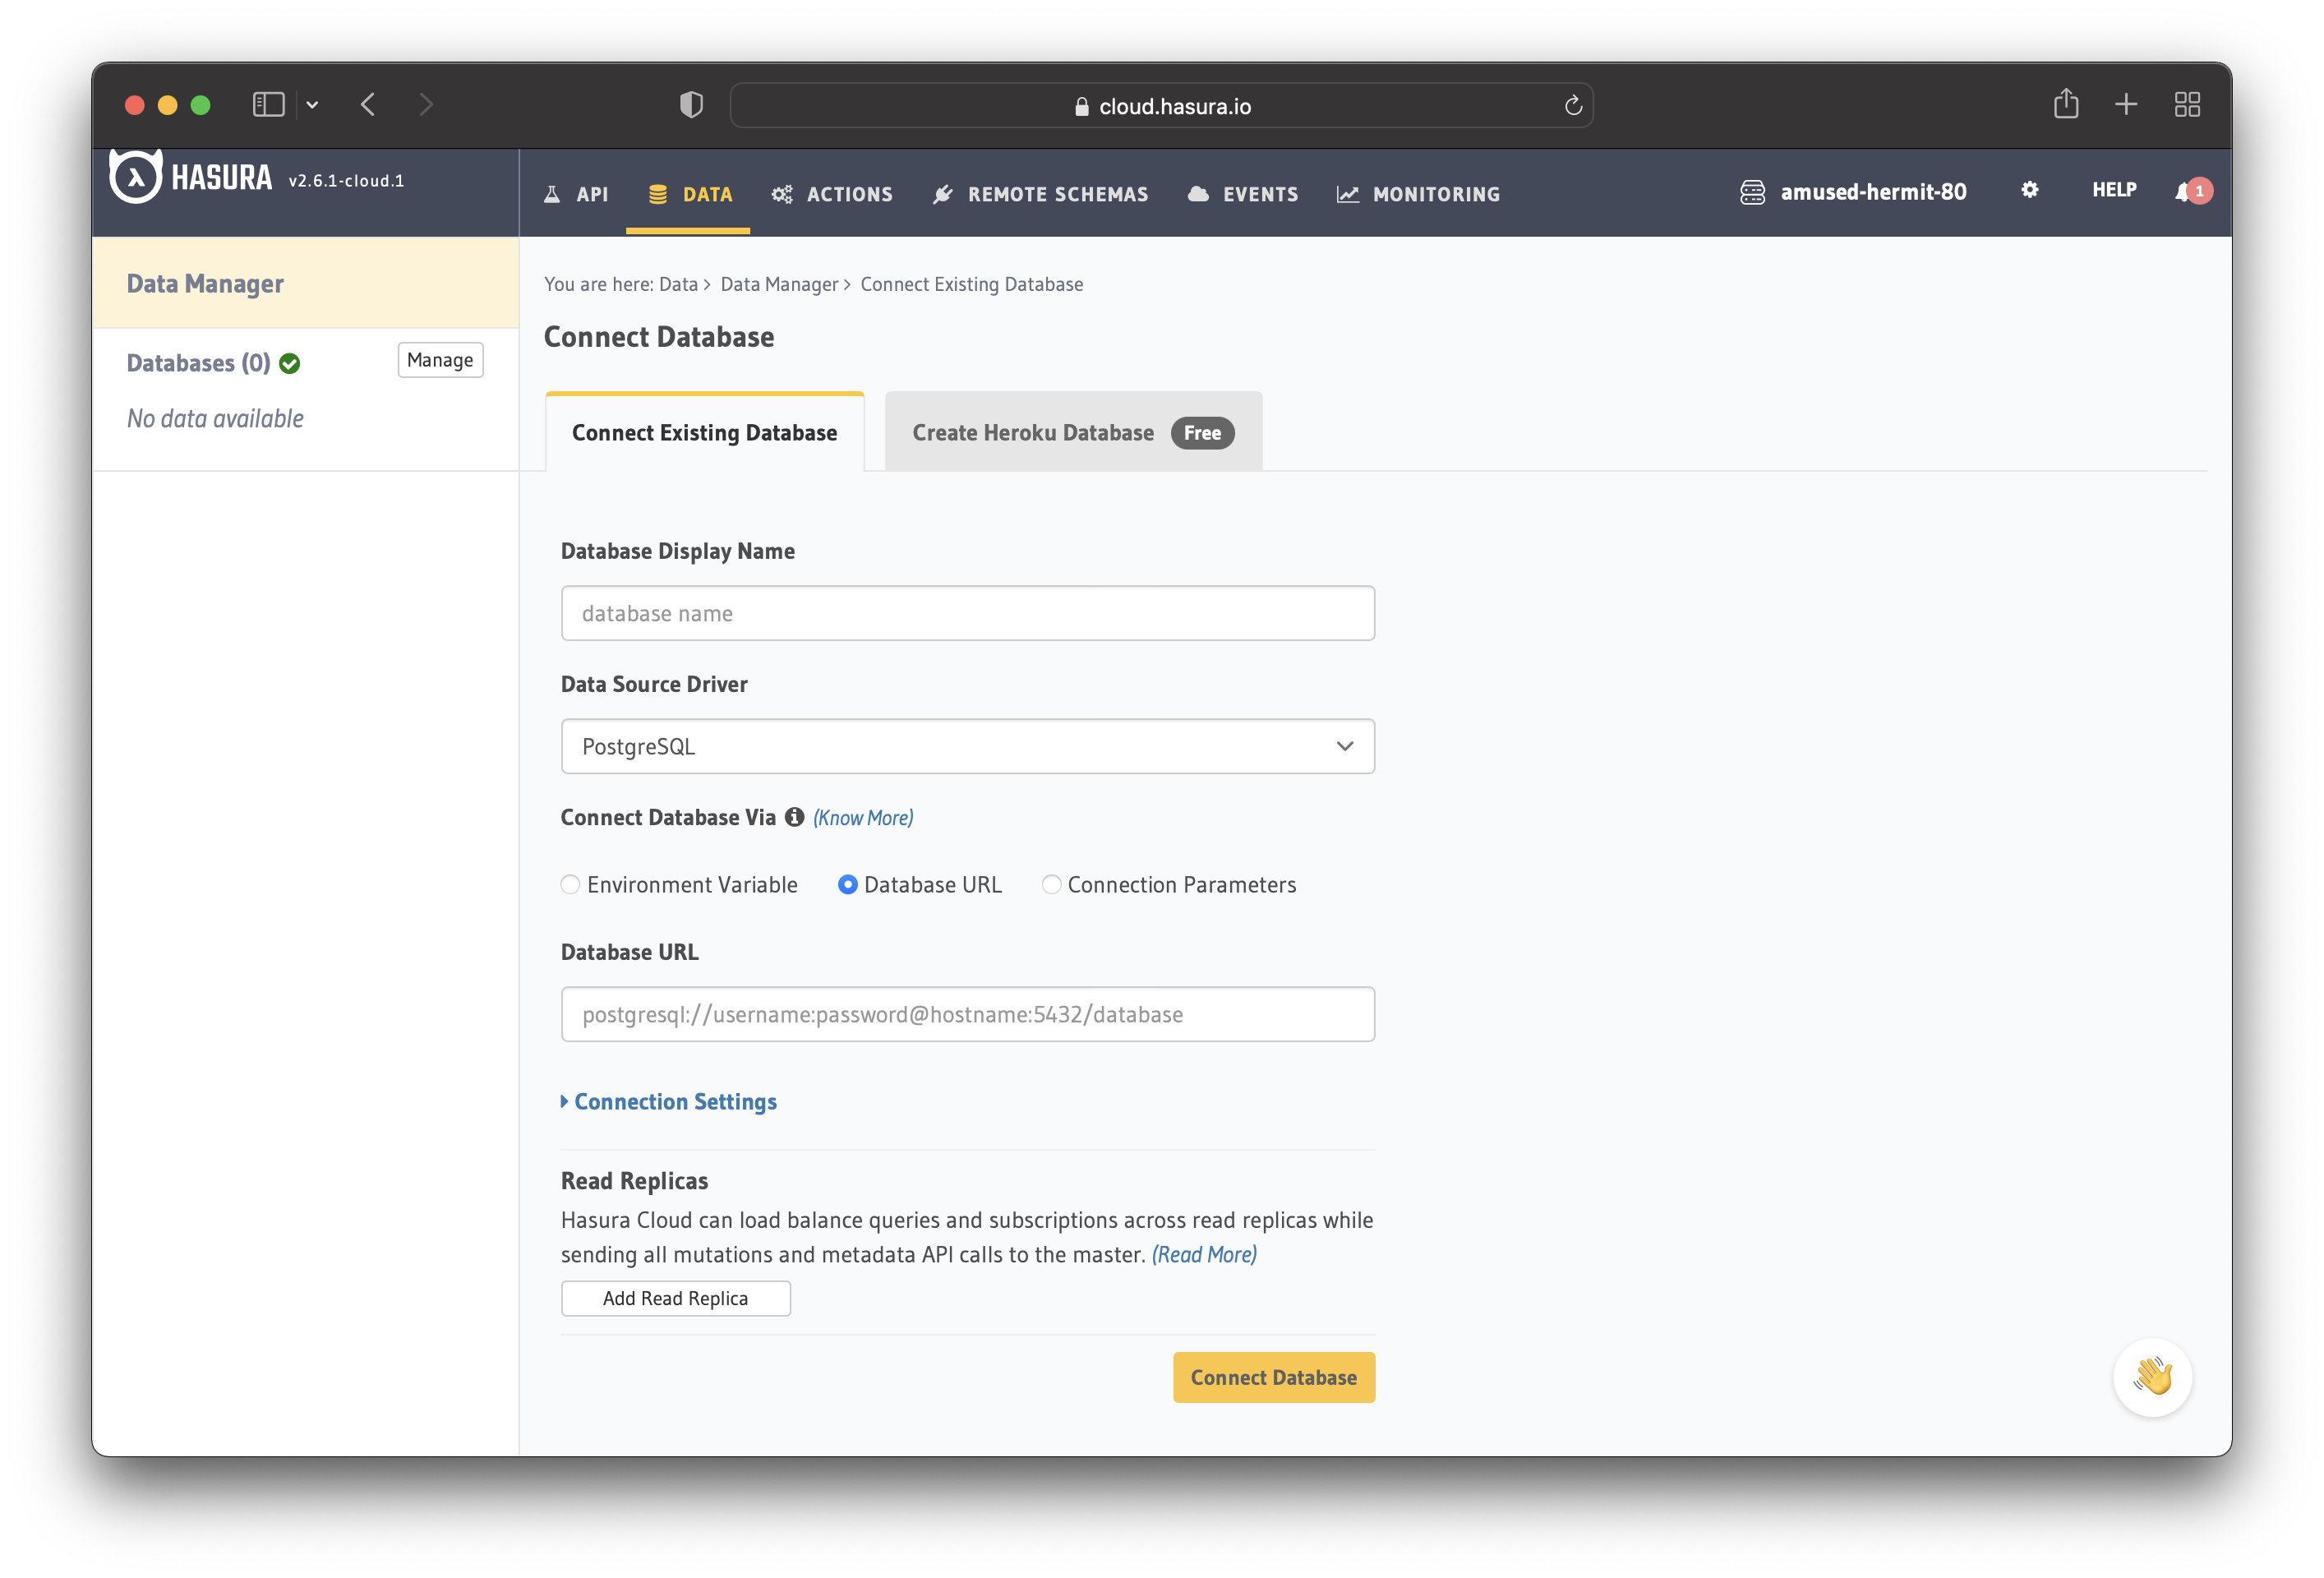
Under Connect Database Via, choose the "Connection Parameters" option to add the connection details manually. Now you need the database details from the previous section.
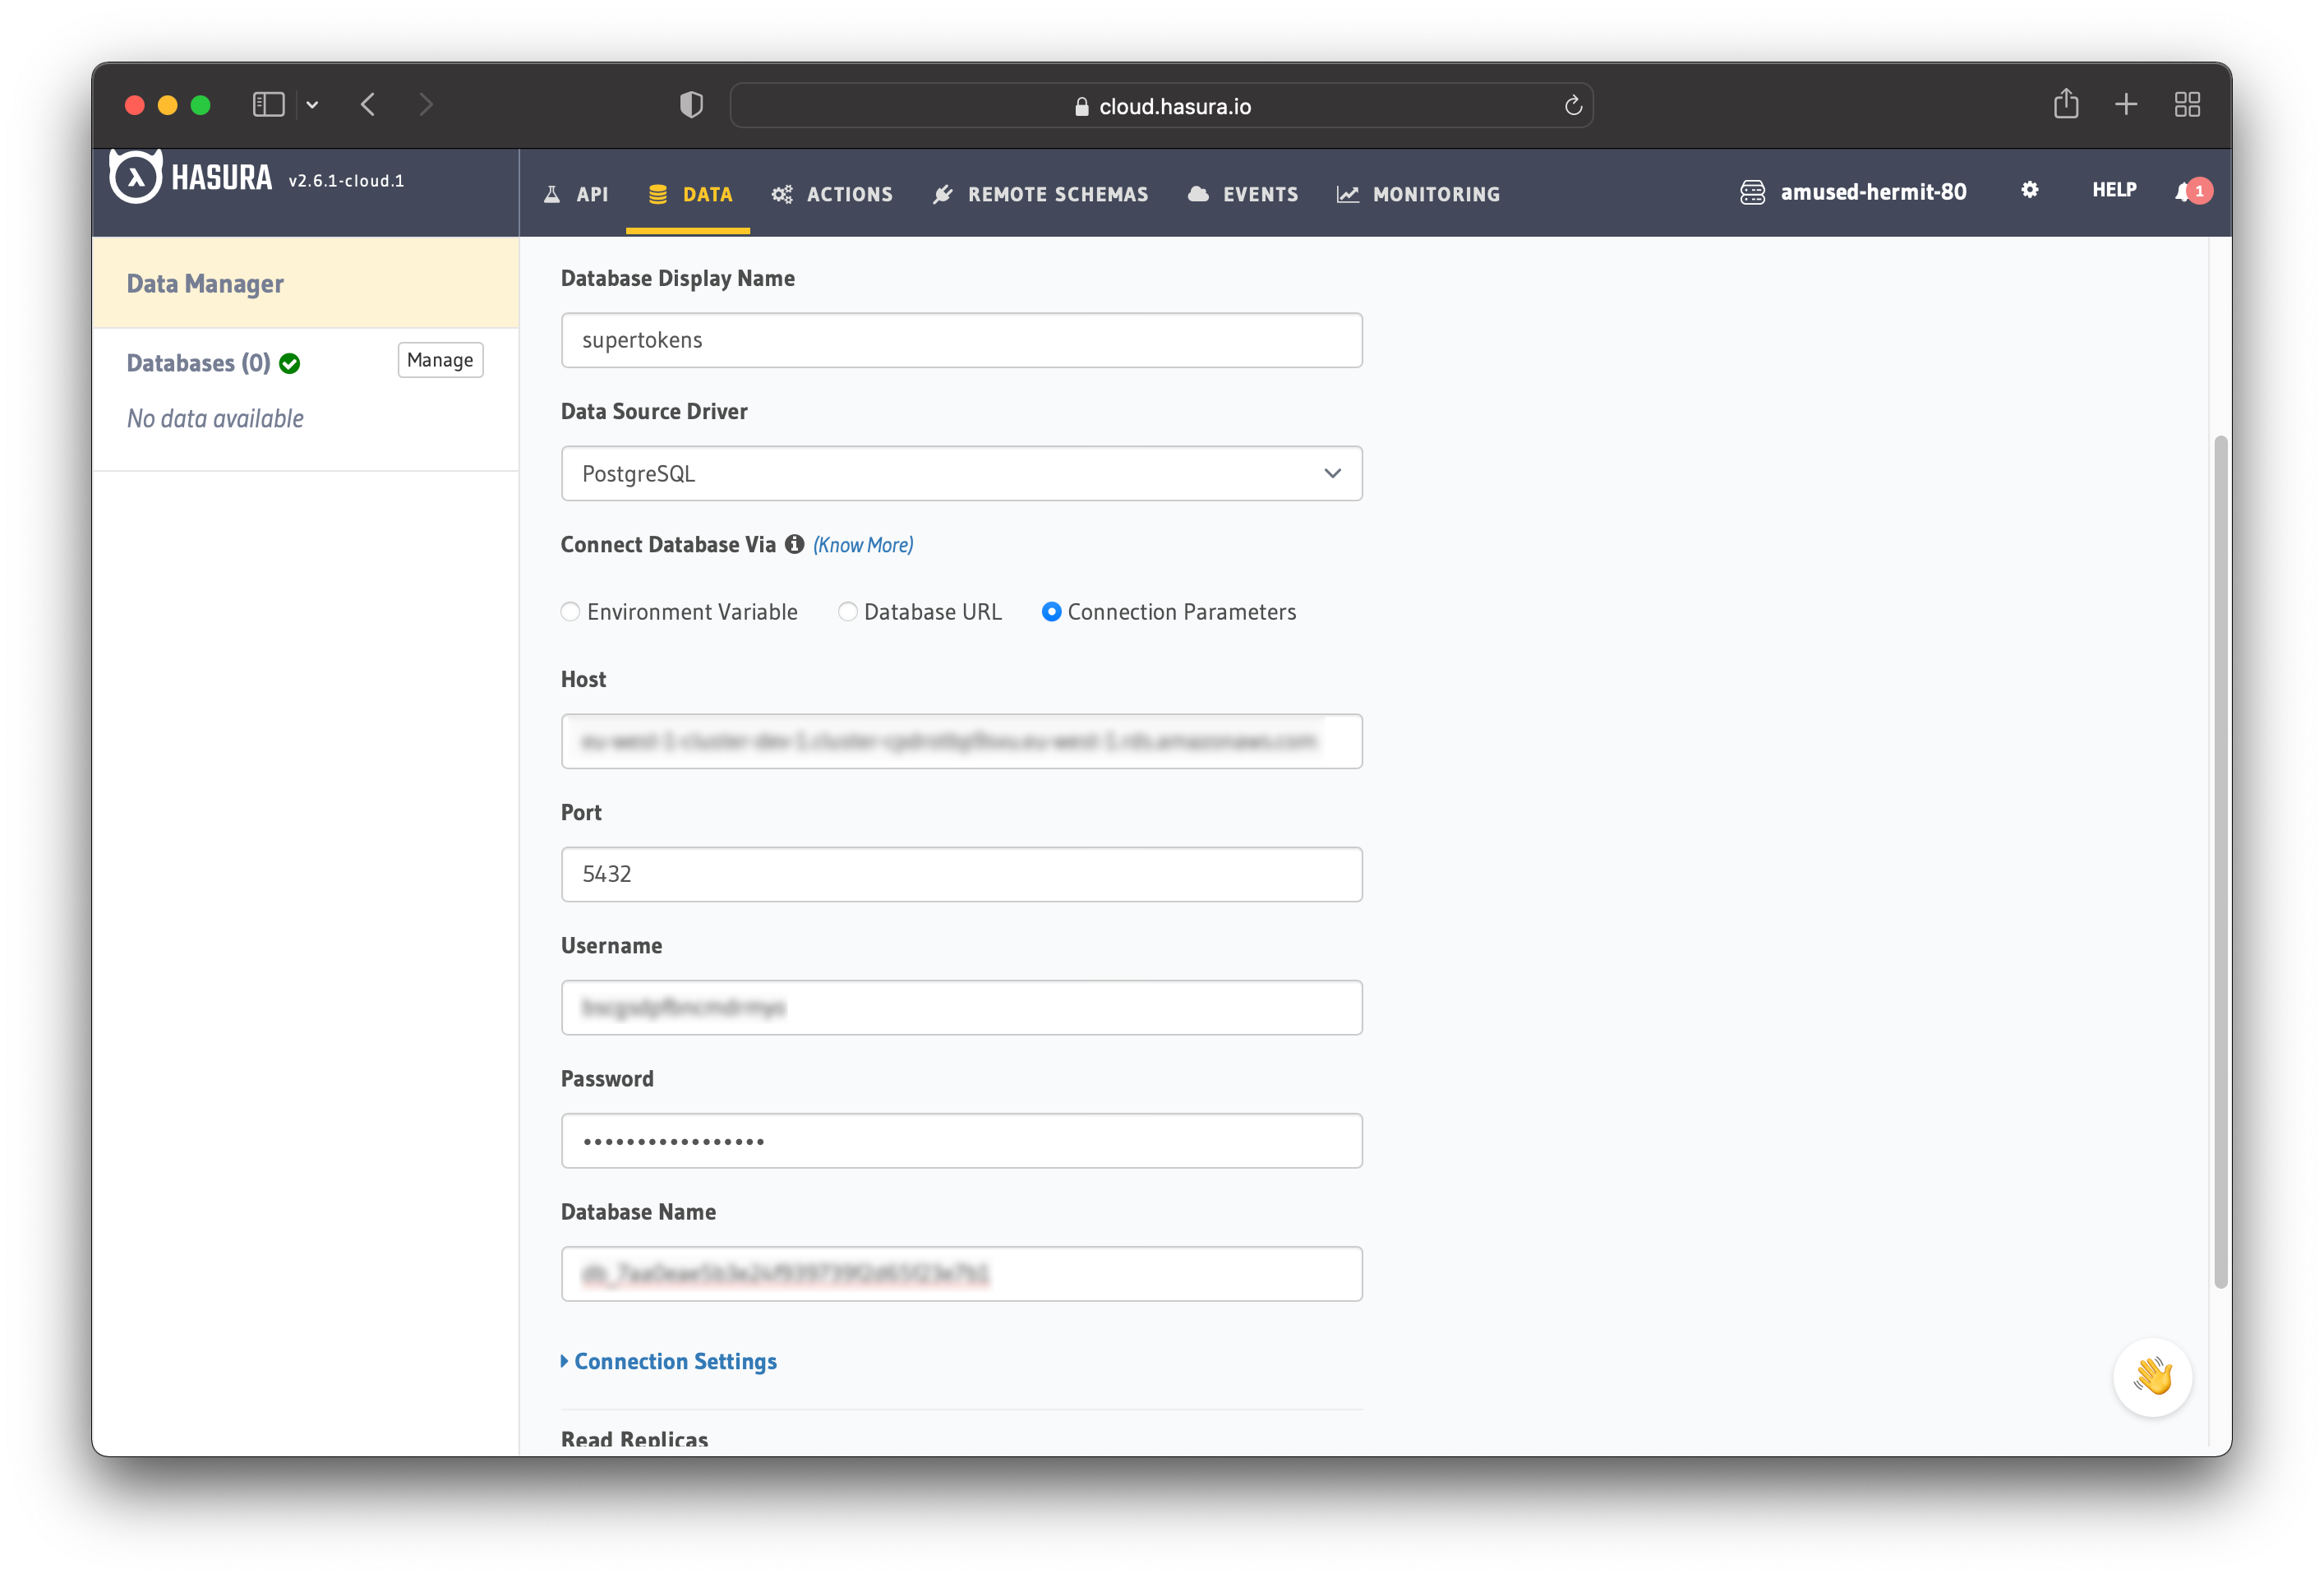
After entering the database details, click "Connect Database" to connect your Hasura app to the SuperTokens database.
You will be redirected to a page that shows all the untracked tables or views. Click "Track All" to track them.
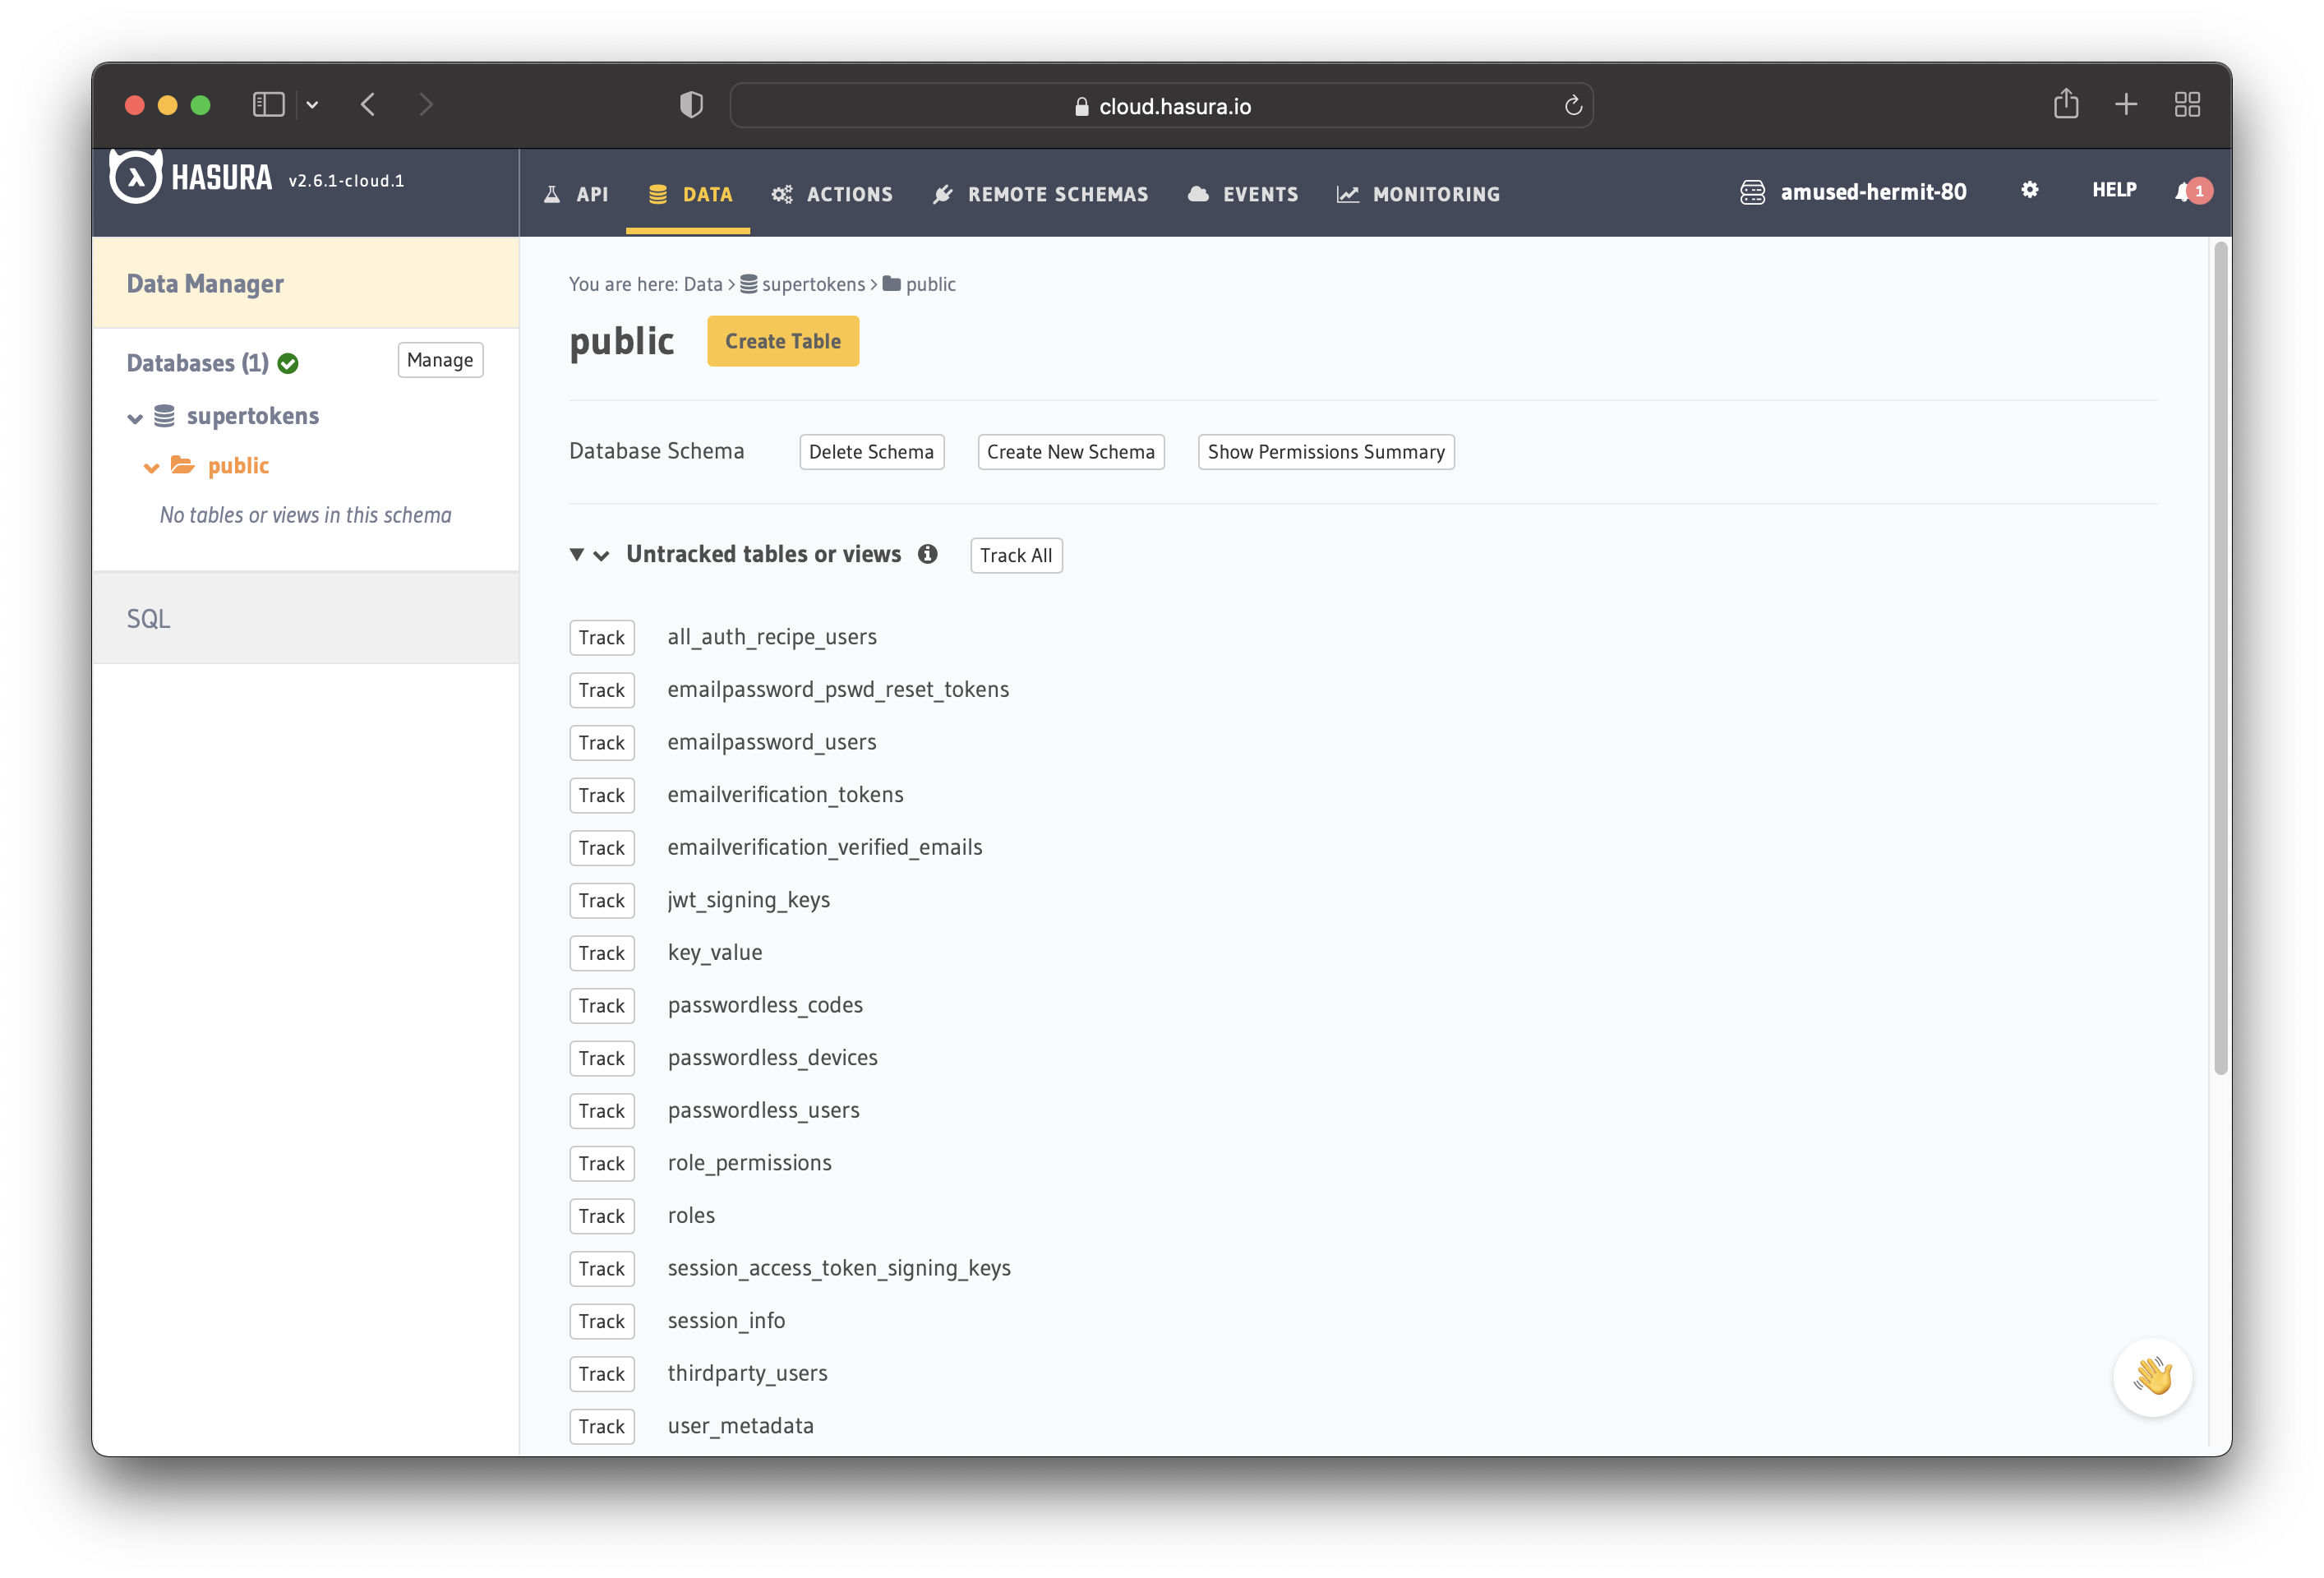
Do the same for the "foreign-key relationships".
The next step is to create a user role for the app. Users should be able to see only their records, but not the other
people’s records.
Configure the user role as shown in the image below. For more information, read about
configuring permission rules in Hasura.
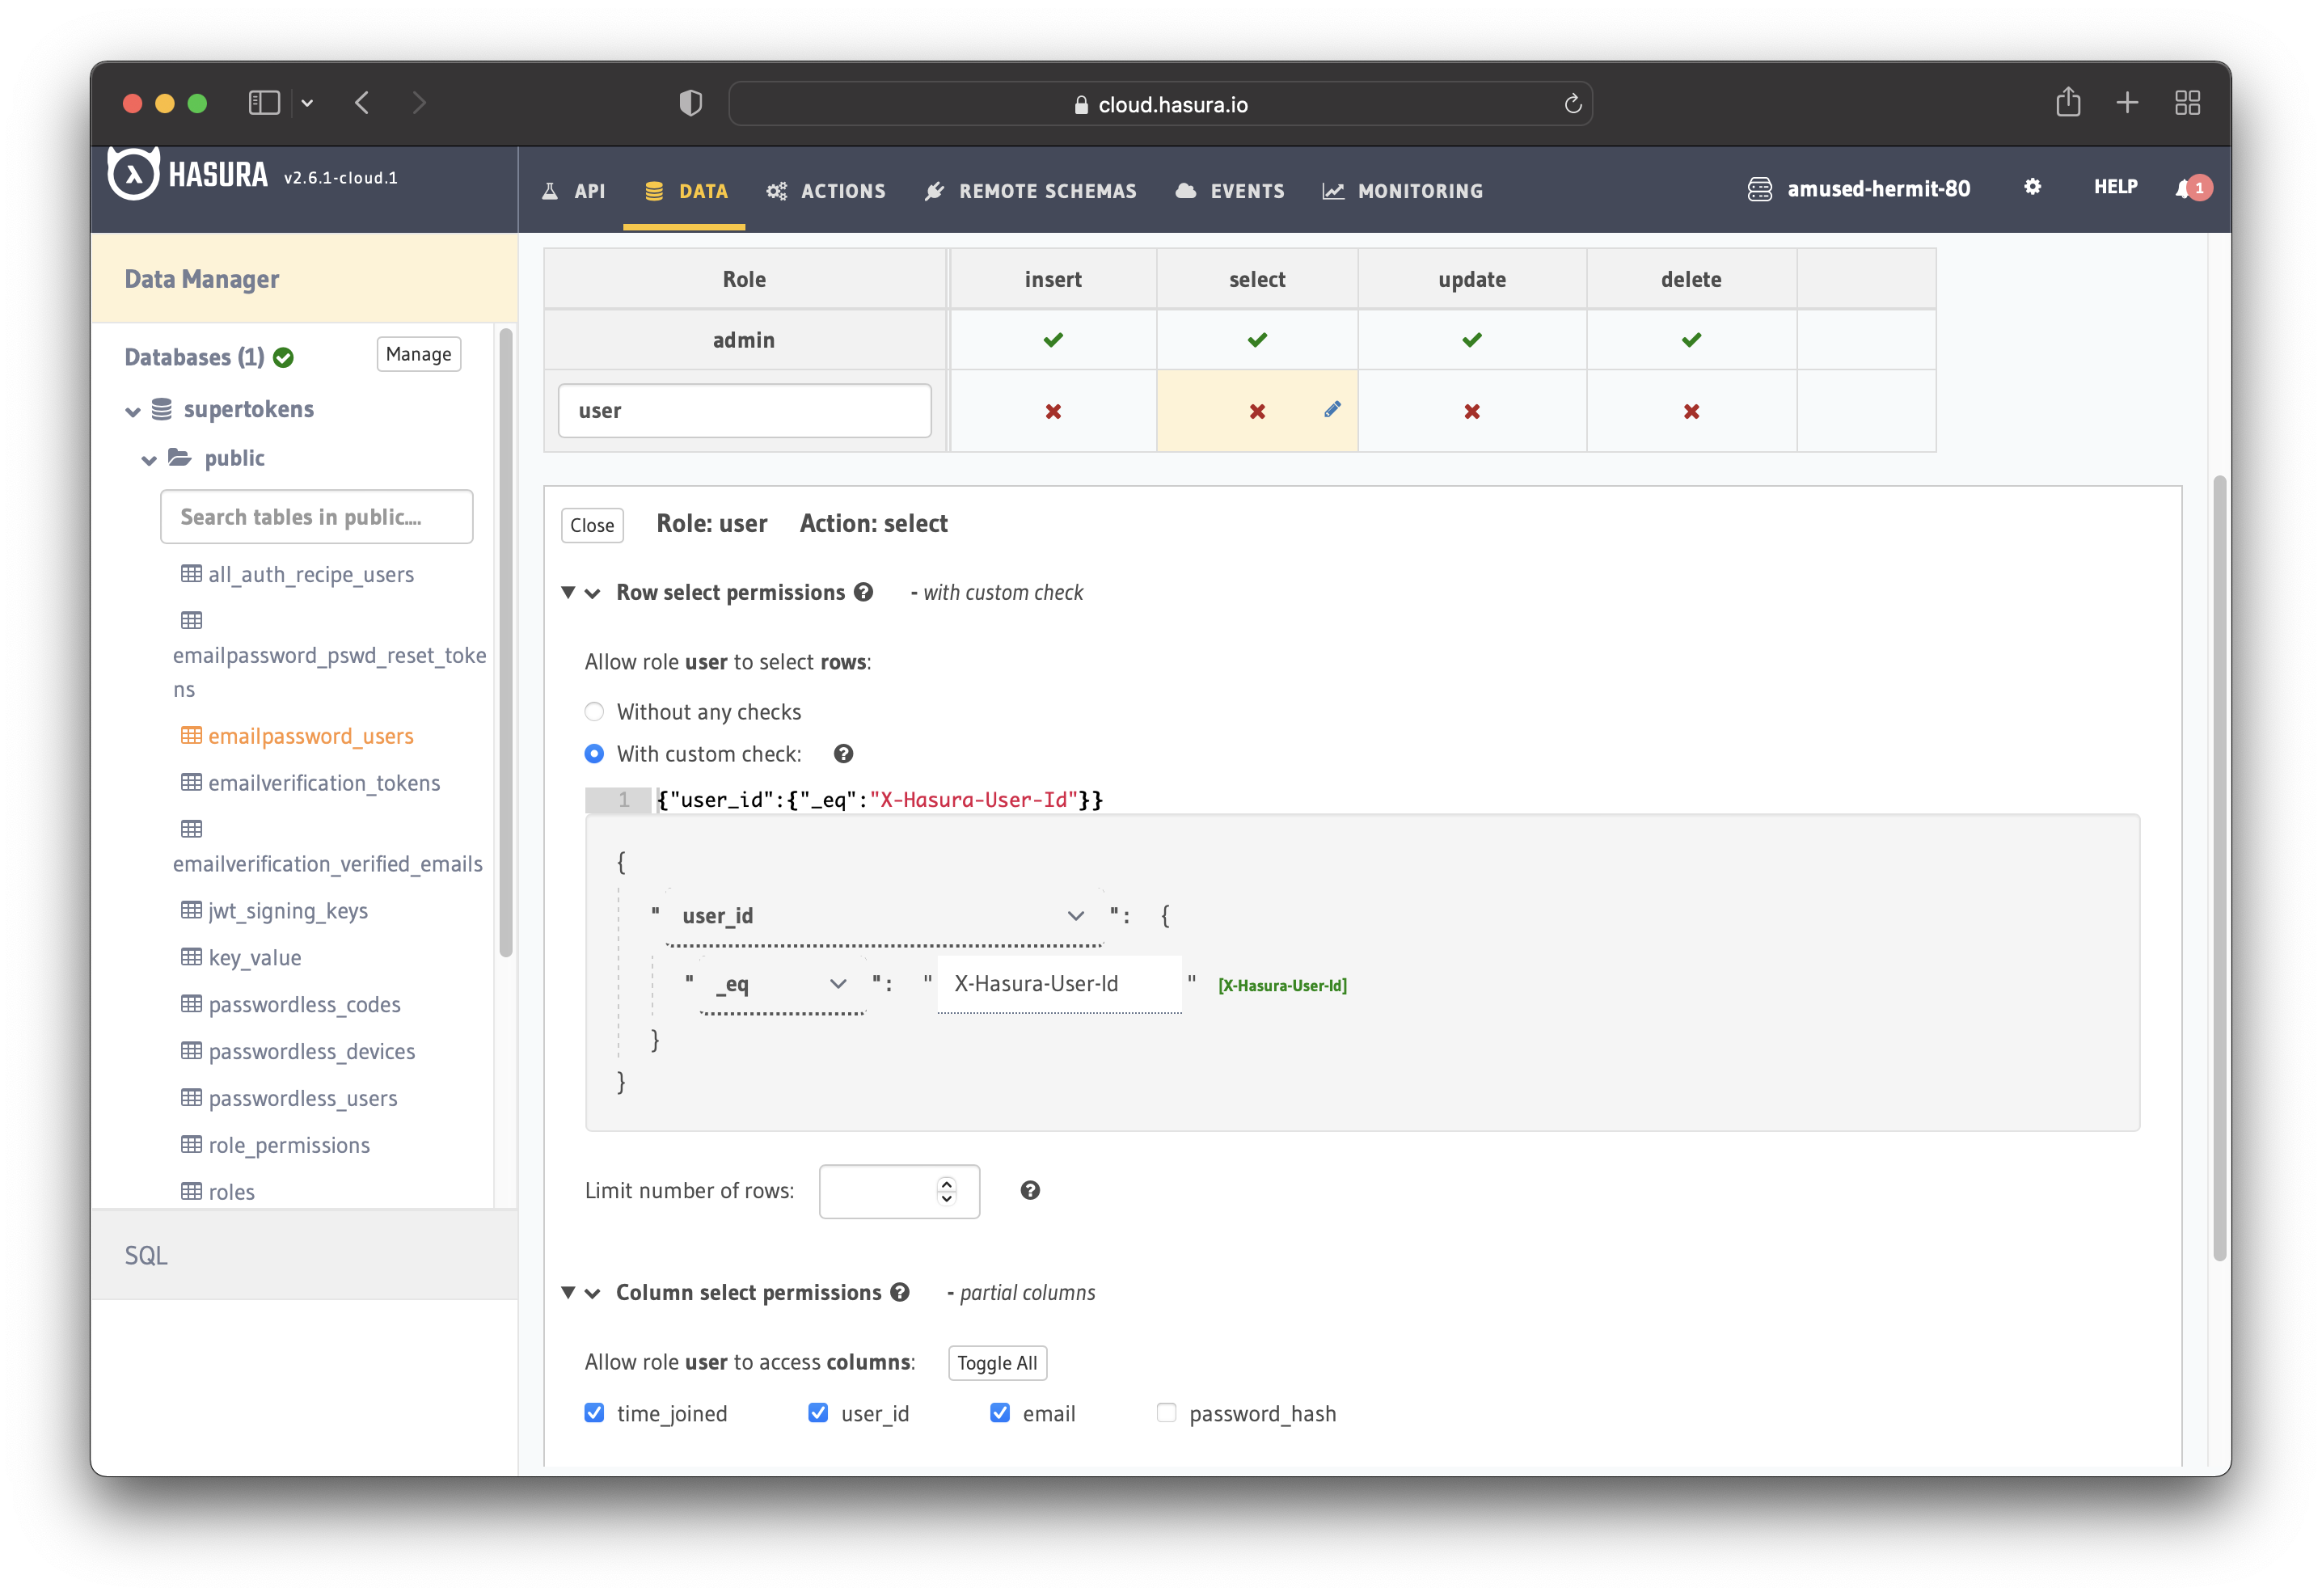
This way, users cannot read other people’s records. They can only access theirs.
Note: The SuperTokens database is only for demo purposes. In a production environment, you should have a separate database.
The next step is implementing the Backend Auth API to interact with SuperTokens.
Backend Auth API Implementation
Create a new folder for the project and open it as follows:
mkdir auth-apicd auth-api
Now initialize your Node project and install the required dependencies:
npm init -ynpm i -s supertokens-node express
Once the installation finishes, create a new file api.js:
touch api.js
You will write the API in this file. Open the file and add the following code (explained below):
const express = require("express");const supertokens = require("supertokens-node");const Session = require("supertokens-node/recipe/session");const EmailPassword = require("supertokens-node/recipe/emailpassword");const { middleware } = require("supertokens-node/framework/express");const { verifySession } = require("supertokens-node/recipe/session/framework/express");supertokens.init({framework: "express",supertokens: {connectionURI: "<your-connection-uri>",apiKey: "<your-api-key>",},appInfo: {appName: "Hasura",apiDomain: "http://localhost:3333",websiteDomain: "http://localhost:3333",apiBasePath: "/api",websiteBasePath: "/auth",},recipeList: [EmailPassword.init(),Session.init({jwt: {enable: true,issuer: "<your-ngrock-url>",},override: {functions: function (originalImplementation) {return {...originalImplementation,createNewSession: async function (input) {input.accessTokenPayload = {...input.accessTokenPayload,"https://hasura.io/jwt/claims": {"x-hasura-user-id": input.userId,"x-hasura-default-role": "user","x-hasura-allowed-roles": ["user"],},};return originalImplementation.createNewSession(input);},};},},}),],});const app = express();app.get("/getJWT", verifySession(), async (req, res) => {let session = req.session;let jwt = session.getAccessTokenPayload()["jwt"];res.json({ token: jwt });});app.use(middleware());app.listen(3333, () => console.log("Server started!"));
For this auth API, you need the:
- Express Framework
- SuperTokens Node.js SDK
Even though the implementation is done with Node.js, the concepts also apply to the other Backend SDKs.
It's a basic API that allows people to:
- register
- login
- receive a JWT token
When you build with SuperTokens, you need to call the .init function and pass some parameters. The parameters allow
overriding the default settings.
The first parameter is the supertokens object.
supertokens: {connectionURI: "<your-connection-uri>",apiKey: "<your-api-key>",},
You need to provide the connectionURI and apiKey from your SuperTokens Managed Service dashboard.
Then you have the appInfo object.
appInfo: {appName: "Hasura",apiDomain: "http://localhost:3333",websiteDomain: "http://localhost:3333",apiBasePath: "/api",websiteBasePath: "/auth",},
appInfo specifies where your API and the frontend client are located. Since there is no frontend implementation, you
can use the same URL.
If you had a frontend client, you would replace the websiteDomain with the URL of that client.
Lastly, there is the recipeList parameter. A recipe represents the type of authentication you need.
In this case, people can authenticate using an email address and a password.
recipeList: [EmailPassword.init(),Session.init({jwt: {enable: true,issuer: "<your-ngrock-url>",},override: {functions: function (originalImplementation) {return {...originalImplementation,createNewSession: async function (input) {input.accessTokenPayload = {...input.accessTokenPayload,"https://hasura.io/jwt/claims": {"x-hasura-user-id": input.userId,"x-hasura-default-role": "user","x-hasura-allowed-roles": ["user"],},};return originalImplementation.createNewSession(input);},};},},}),],
In the above recipeList, you:
- initialize the email/password authentication
- enable the JWT feature and specify a custom issuer (you’ll see in the next section how to set the issuer)
- add custom claims to the JWT
That's all the code you need for a basic auth API that can interact with SuperTokens!
Note: If you had a frontend client, you would have to write additional code. You would have to add the following piece of code.
app.use(cors({origin: "<your-client-url>",allowedHeaders: ["content-type", ...supertokens.getAllCORSHeaders()],credentials: true,}));
The value for origin would be your frontend client URL.
Expose the Auth API Publicly
Until now, your API is available only locally - on your machine. That means you cannot use it with Hasura Cloud.
There are two ways to make the API accessible to Hasura Cloud:
- deploy your API
- make your API publicly with ngrok
This tutorial shows how to make your API available publicly. Check the ngrok documentation to learn how to get started.
After setting up "ngrok", go to the "auth-api" folder and run your API locally with the command:
node api.js
Your API is available at http://localhost:3333.
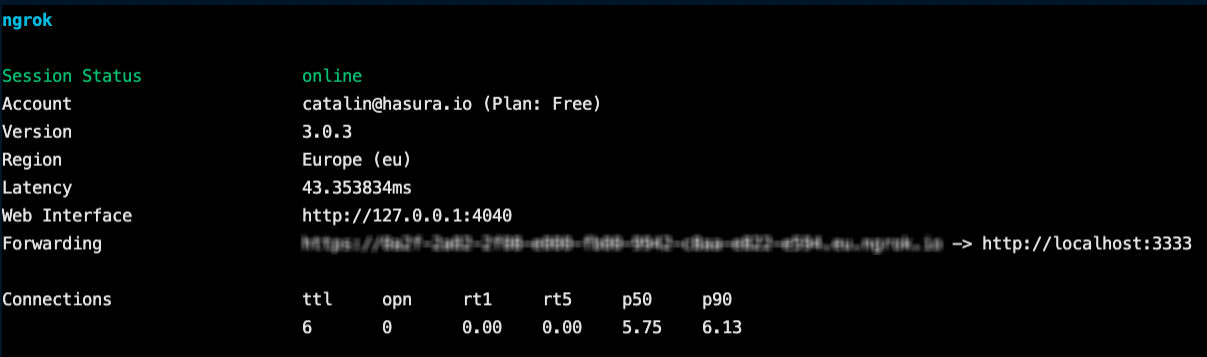
In another terminal window, in the same folder, run:
ngrok http 3333
After running the command, you should get a public URL. See the image below for reference.
Copy the URL and go back to api.js and replace the issuer:
jwt: {enable: true,issuer: "<your-ngrock-url>/api",},
Re-start your server, but leave "ngrok" running. The last step is to add the JWT secret in Hasura.
Integrate SuperTokens with Hasura
The JWKS endpoint is available at http://localhost:3333/api/jwt/jwks.json, but Hasura Cloud cannot access the local
API.
Since you run "ngrok", your JWKS endpoint is available at <your-ngrok-url>/api/jwt/jwks.json.
You will set the URL as an environment variable in your Hasura Project. To do so, go to the Hasura Dashboard and then click the "Gear ⚙️" icon.
After that, go to the Env vars section and click the + New Env Var option.
Select HASURA_GRAPHQL_JWT_SECRET for the "Key" and then add:
{"jwk_url": "<your-ngrok-url>/api/jwt/jwks.json"}
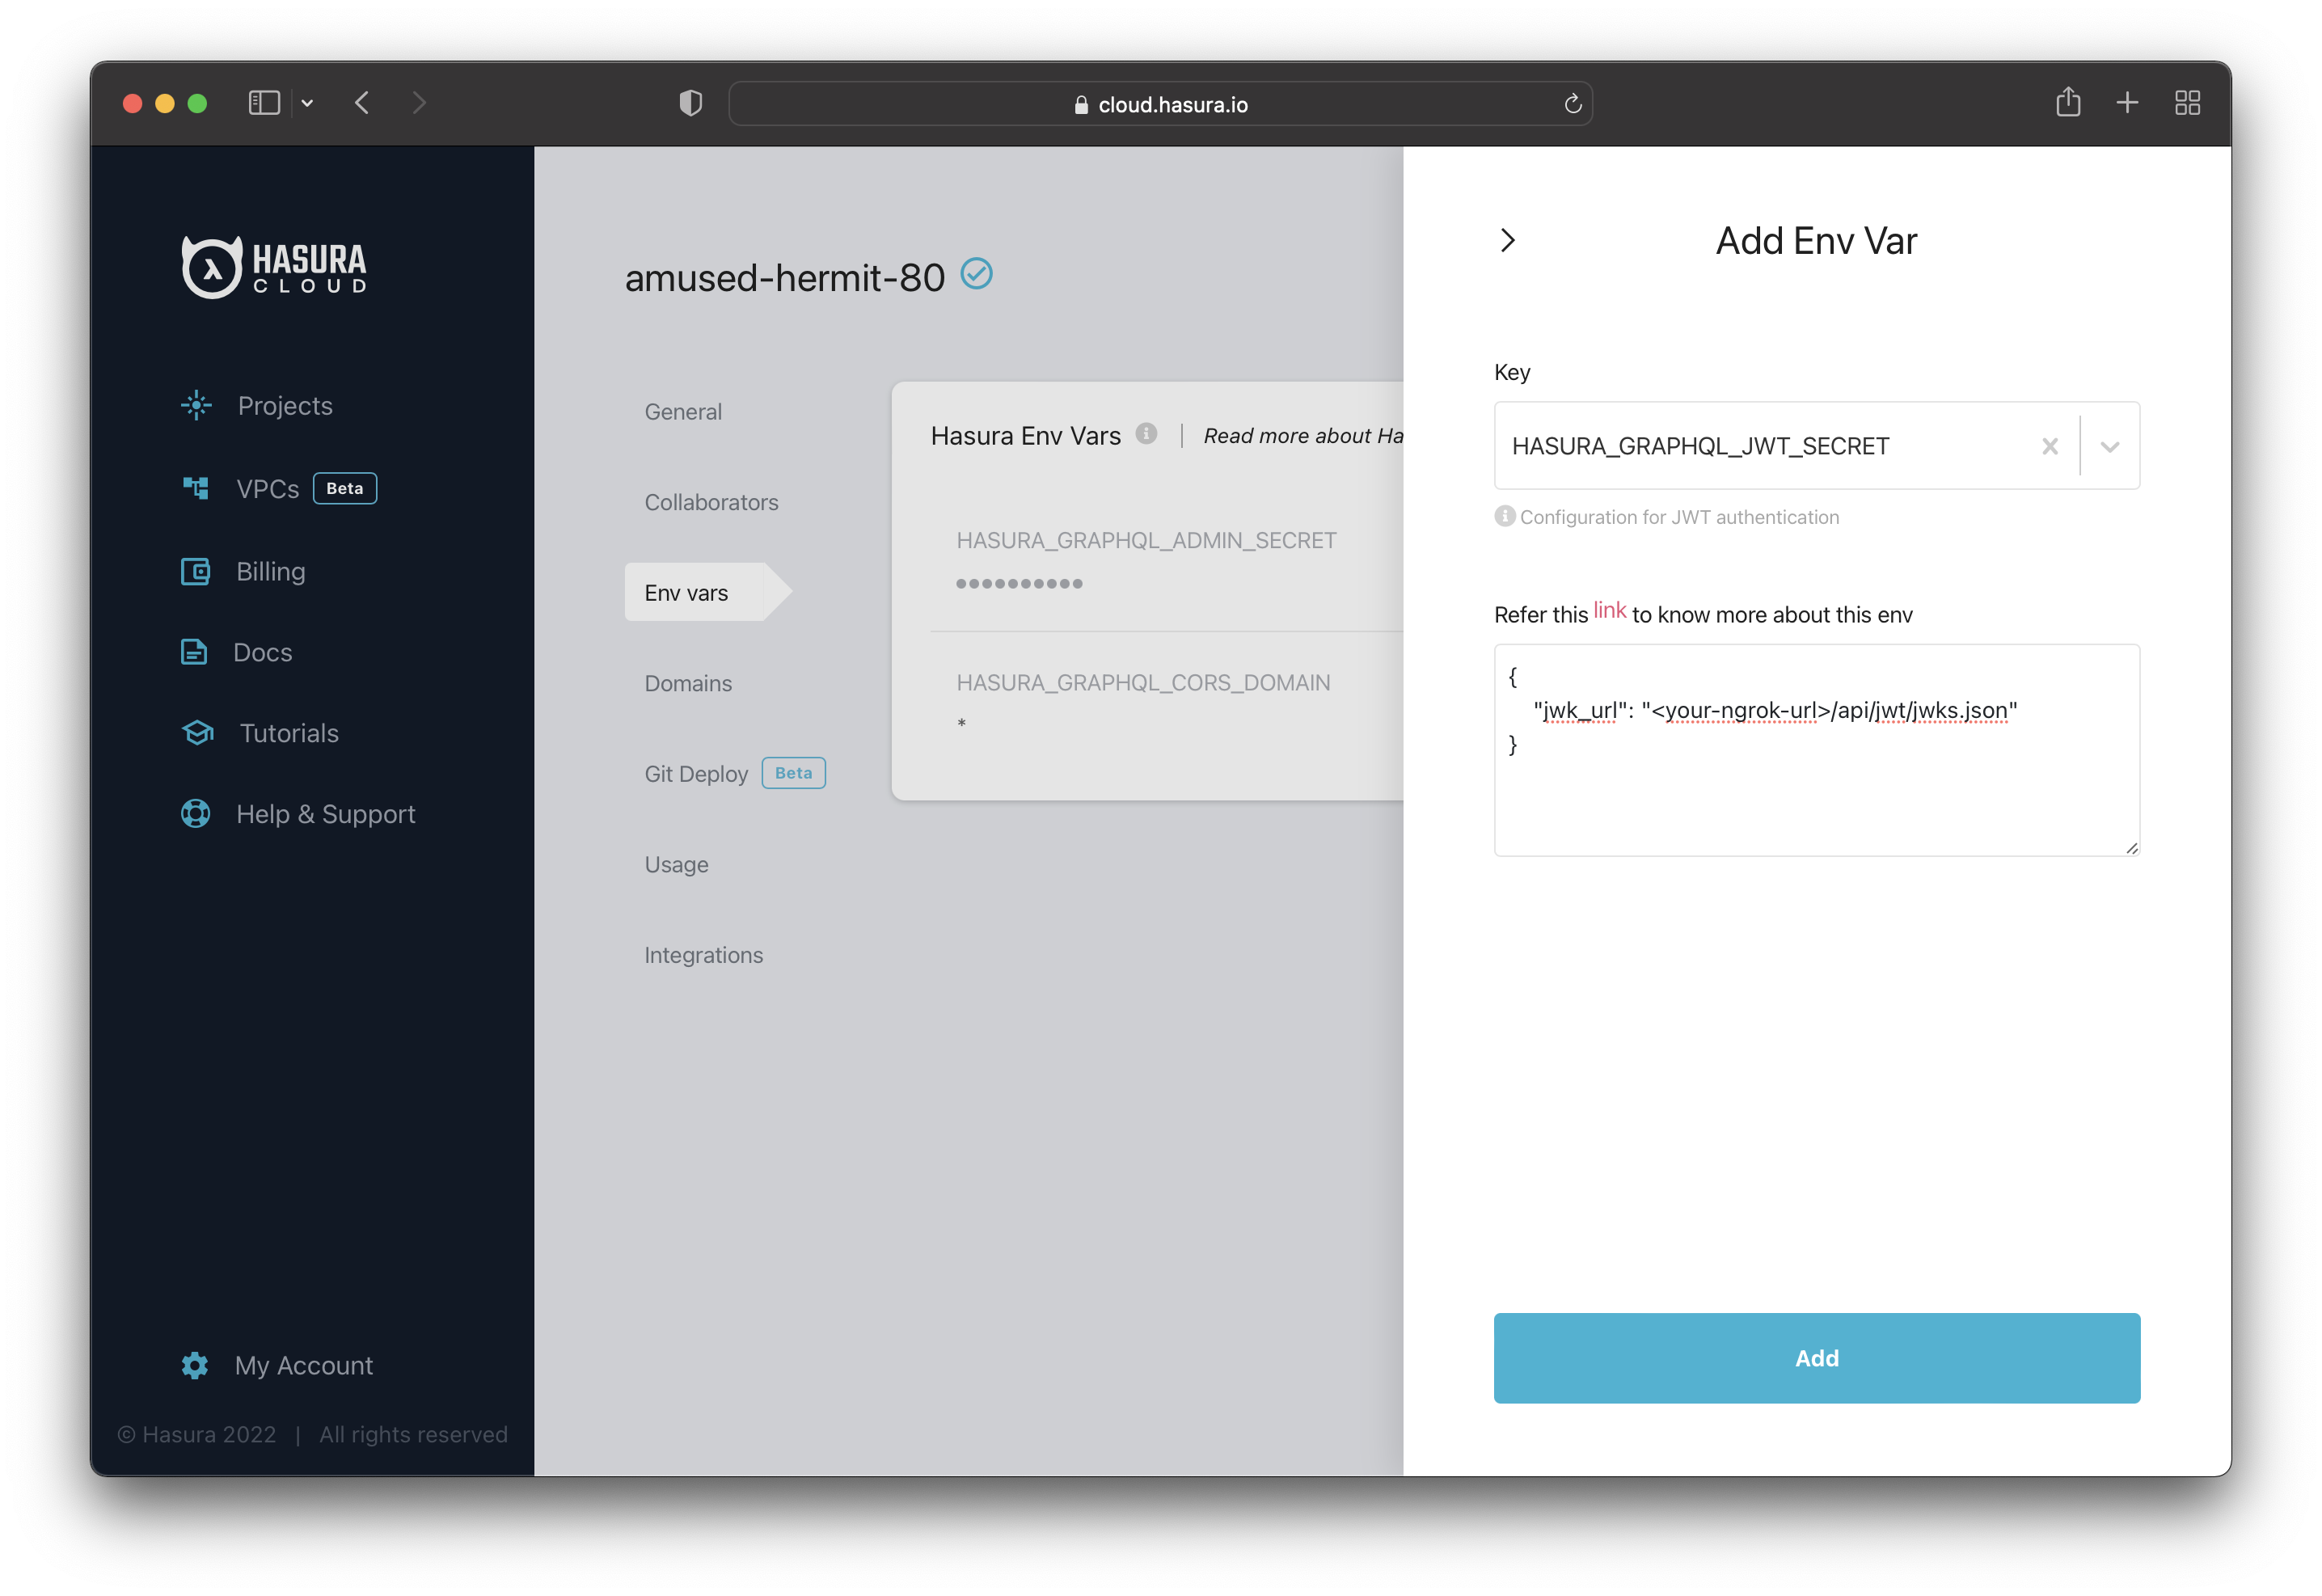
Click on Add, and the environment variable will be applied to your project.
Test the SuperTokens + Hasura Integration
It's time to test the integration. Before testing, make sure the API and ngrok are running.
The first step is to register a new user. Run the following curl command in your terminal:
// Registercurl --location --request POST 'https://a182-2a02-2f08-e000-fb00-9d0-feeb-e5cd-5e50.eu.ngrok.io/api/signup' \--header 'rid: emailpassword' \--header 'Content-Type: application/json' \--data-raw '{"formFields": [{"id": "email",},{"id": "password","value": "testPass123"}]}'
Provided that the request is successful, you should get a similar response:
{"status":"OK","user":{"email":"[email protected]","id":"0a9baee6-cd1e-4ccc-92ef-9fa8e2edd75c","timeJoined":1652686138026}}%
Now you have a user whose email is [email protected]. Since you connected Hasura to the SuperTokens
database, the user is available in Hasura too.
The next step is to log in. You can do so with the following command:
// Log incurl --cookie-jar my_cookies.txt --location --request POST 'https://a182-2a02-2f08-e000-fb00-9d0-feeb-e5cd-5e50.eu.ngrok.io/api/signin' \--header 'rid: emailpassword' \--header 'Content-Type: application/json' \--data-raw '{"formFields": [{"id": "email",},{"id": "password","value": "testPass123"}]}'
Observe the "cookie" part from the curl command --cookie-jar my_cookies.txt. When you sign in, you get two tokens:
- a refresh token
- an access token
The --cookie-jar my_cookies.txt part takes the tokens returned by the "signin" endpoint and saves them in a file.
You will need the access token to get the JWT token. Also, you will get a similar response:
{"status":"OK","user":{"email":"[email protected]","id":"0a9baee6-cd1e-4ccc-92ef-9fa8e2edd75c","timeJoined":1652686138026}}%
When you request the JWT token, you need to pass the tokens. That's what the --cookie my_cookies.txt part from the
command does.
You can retrieve the JWT token as follows:
// Get JWT Tokencurl --cookie my_cookies.txt --location --request GET 'https://a182-2a02-2f08-e000-fb00-9d0-feeb-e5cd-5e50.eu.ngrok.io/getjwt'
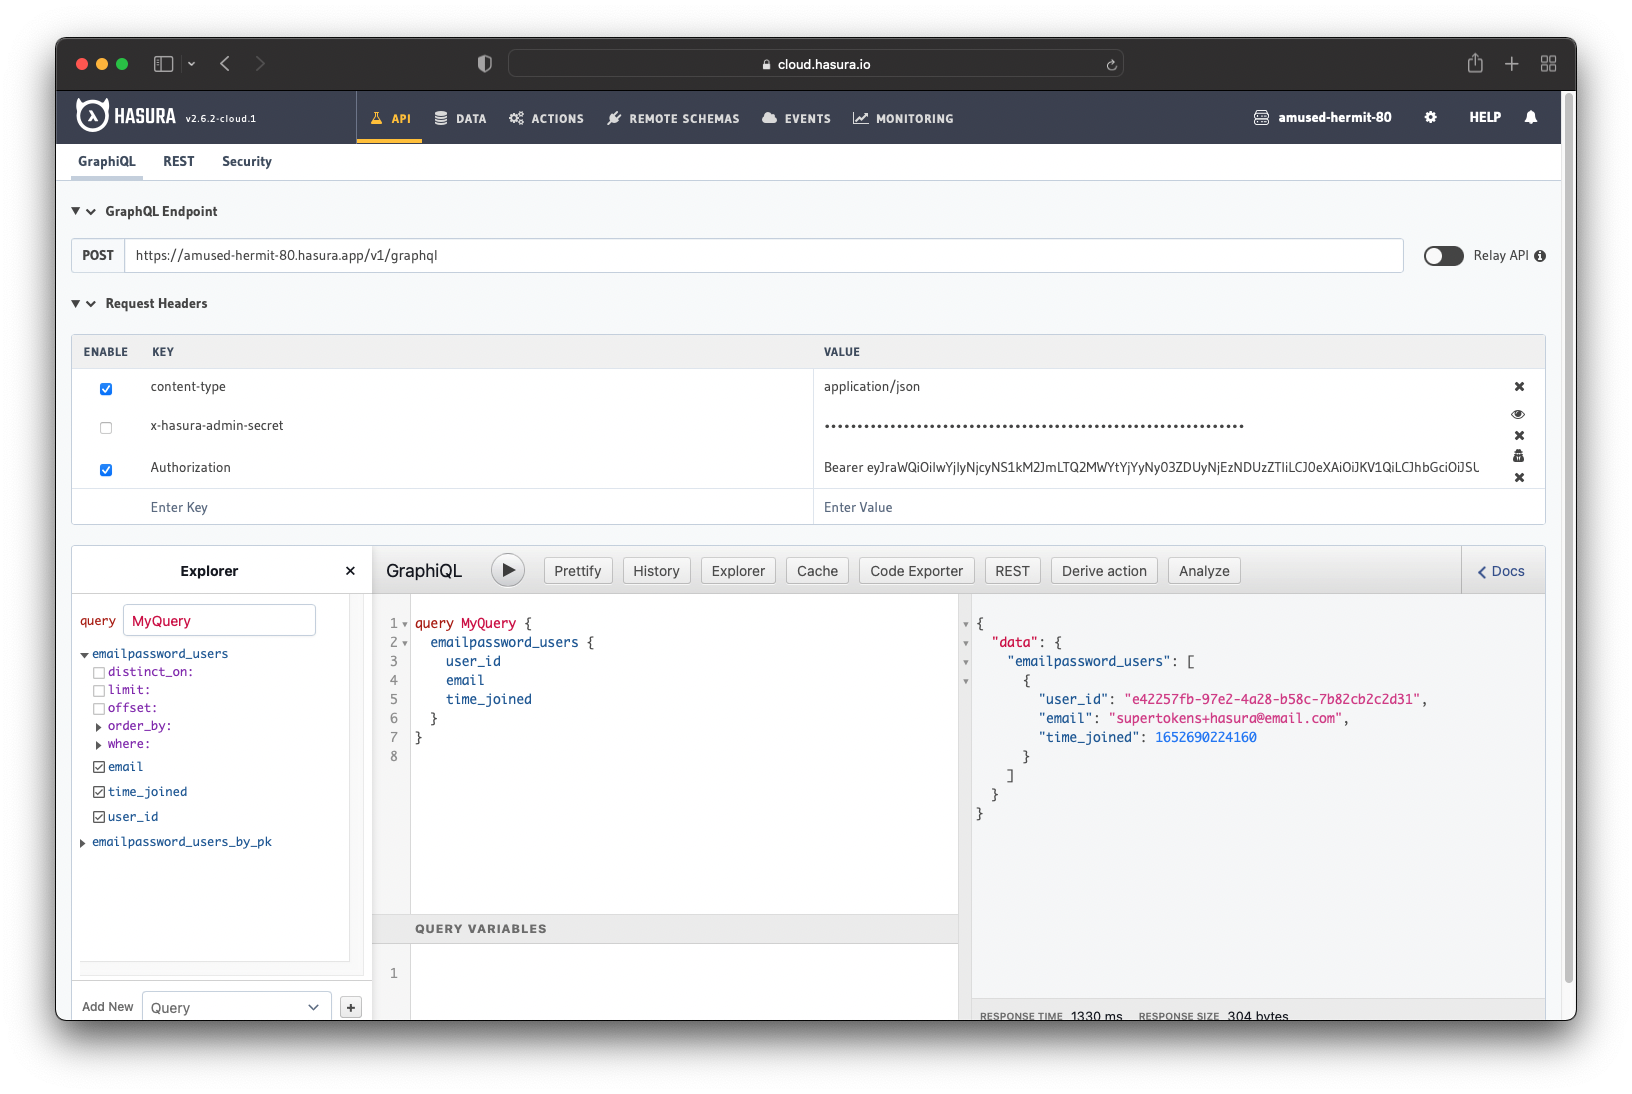
You can then use the token to make authenticated requests. The image below shows that the database returns only this user's details rather than all users.
From here, you can extend the Backend auth API to fit your requirements and build a Frontend client.
Useful links:
 Build apps and APIs 10x faster
- Built-in authorization and caching
- 8x more performant than hand-rolled APIs