Edit on GitHub
NextAuth.js
What is NextAuth.js
NextAuth.js is a complete open-source authentication solution for Next.js applications. Using the next-auth-hasura-adapter library we can connect NextAuth.js and Hasura.
How to Integrate NextAuth.js with Hasura
Add Admin Secret to Hasura
To use authentication with Hasura first we need to set an admin secret via the HASURA_GRAPHQL_ADMIN_SECRET environment variable. Use a secure random string.
Configure Hasura JWT Mode
Set the HASURA_GRAPHQL_JWT_SECRET environment variable by generating a secure random string. I used https://generate-secret.now.sh/32.
HASURA_GRAPHQL_JWT_SECRET: '{ "type": "HS256", "key": "<Your secure random string>" }'
Create User Table
In the Hasura Console we use the raw SQL feature on the data page to create and track the tables NextAuth.js needs:
CREATE EXTENSION IF NOT EXISTS pgcrypto;SET check_function_bodies = false;CREATE TABLE public.accounts (id uuid DEFAULT public.gen_random_uuid() NOT NULL,type text NOT NULL,provider text NOT NULL,"providerAccountId" text NOT NULL,refresh_token text,access_token text,expires_at bigint,token_type text,scope text,id_token text,session_state text,oauth_token_secret text,oauth_token text,"userId" uuid NOT NULL,refresh_token_expires_in integer);CREATE TABLE public.sessions (id uuid DEFAULT public.gen_random_uuid() NOT NULL,"sessionToken" text NOT NULL,"userId" uuid NOT NULL,expires timestamp with time zone);CREATE TABLE public.users (id uuid DEFAULT public.gen_random_uuid() NOT NULL,name text,email text,"emailVerified" timestamp with time zone,image text);CREATE TABLE public.verification_tokens (token text NOT NULL,identifier text NOT NULL,expires timestamp with time zone);ALTER TABLE ONLY public.accountsADD CONSTRAINT accounts_pkey PRIMARY KEY (id);ALTER TABLE ONLY public.sessionsADD CONSTRAINT sessions_pkey PRIMARY KEY (id);ALTER TABLE ONLY public.usersADD CONSTRAINT users_email_key UNIQUE (email);ALTER TABLE ONLY public.usersADD CONSTRAINT users_pkey PRIMARY KEY (id);ALTER TABLE ONLY public.verification_tokensADD CONSTRAINT verification_tokens_pkey PRIMARY KEY (token);ALTER TABLE ONLY public.accountsADD CONSTRAINT "accounts_userId_fkey" FOREIGN KEY ("userId") REFERENCES public.users(id) ON UPDATE RESTRICT ON DELETE CASCADE;ALTER TABLE ONLY public.sessionsADD CONSTRAINT "sessions_userId_fkey" FOREIGN KEY ("userId") REFERENCES public.users(id) ON UPDATE RESTRICT ON DELETE CASCADE;
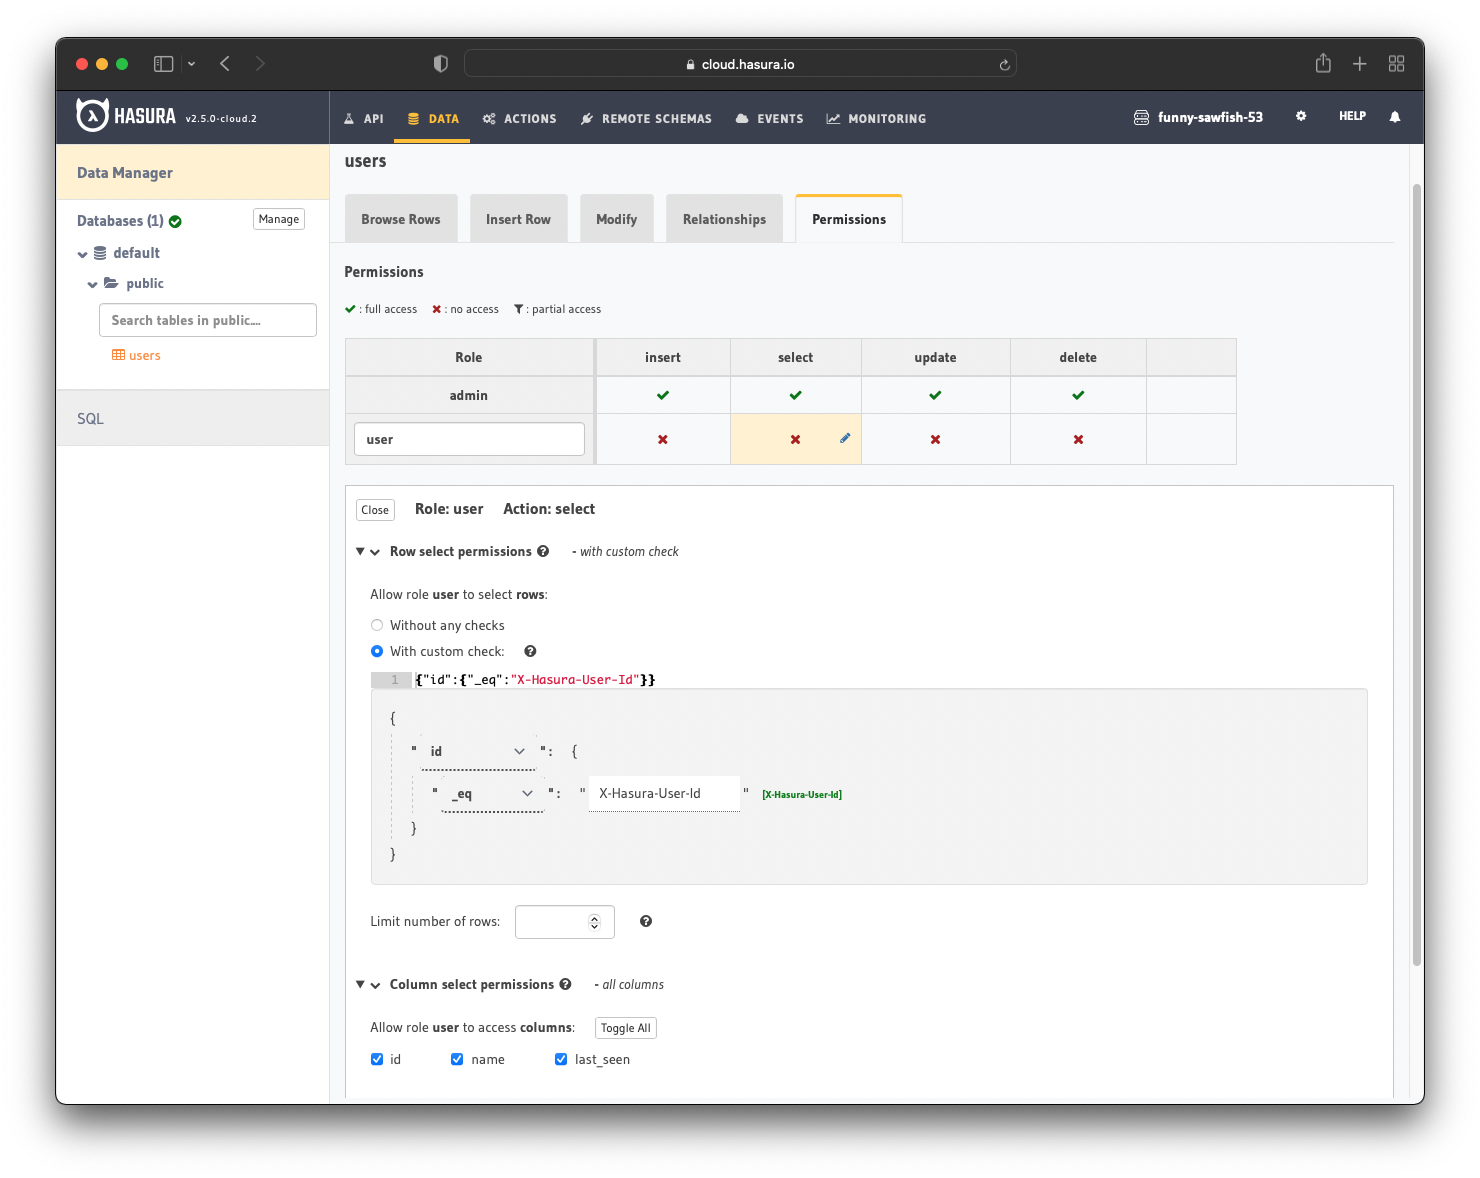
After creation, we need to add permissions for the user role on the users table. Users should be able to see only their record.
Configure the user role to deny all permissions except selecting where id _eq X-Hasura-User-Id. For more information, read about configuring permission rules in Hasura.
Create Next.js App
Setup Boilerplate
Download the official NextAuth.js example app:
git clone https://github.com/nextauthjs/next-auth-example.gitcd next-auth-example
Install development dependencies
npm i -D @types/jsonwebtoken
and regular dependencies
npm i next-auth-hasura-adapter graphql graphql-request jsonwebtoken
We need to include the id property to the session user type. In next-auth.d.ts add
// https://github.com/nextauthjs/next-auth/discussions/536#discussioncomment-1932922import type { DefaultUser } from "next-auth";declare module "next-auth" {interface Session {user?: DefaultUser & {id: string;};}}
Setup Github OAuth
For this tutorial, we will use Github login. Register a new OAuth application, the Authorization callback URL will be http://localhost:3000/api/auth/callback/github. We got that URL from the NextAuth.js docs.
Record the Client ID and secret.
Create .env file
Create .env.local
NEXTAUTH_URL=http://localhost:3000NEXTAUTH_SECRET=<Your randomly generated secret string>GITHUB_ID=<Github OAuth Client ID>GITHUB_SECRET=<Github OAuth Secret>HASURA_PROJECT_ENDPOINT=<Hasura GraphQL endpoint>HASURA_ADMIN_SECRET=<Chosen Hasura Admin secret>
Setup NextAuth.js Config
Replace pages/api/auth/[...nextauth].ts with our example:
import NextAuth, { NextAuthOptions } from "next-auth"import GithubProvider from "next-auth/providers/github";import { JWT } from "next-auth/jwt";import { HasuraAdapter } from "next-auth-hasura-adapter";import * as jsonwebtoken from "jsonwebtoken";// For more information on each option (and a full list of options) go to// https://next-auth.js.org/configuration/optionsexport const authOptions: NextAuthOptions = {// https://next-auth.js.org/configuration/providers/oauthproviders: [GithubProvider({clientId: process.env.GITHUB_ID,clientSecret: process.env.GITHUB_SECRET,}),],adapter: HasuraAdapter({endpoint: process.env.HASURA_PROJECT_ENDPOINT!,adminSecret: process.env.HASURA_ADMIN_SECRET!,}),theme: {colorScheme: "auto",},// Use JWT strategy so we can forward them to Hasurasession: { strategy: "jwt" },// Encode and decode your JWT with the HS256 algorithmjwt: {encode: ({ secret, token }) => {const encodedToken = jsonwebtoken.sign(token!, secret, {algorithm: "HS256",});return encodedToken;},decode: async ({ secret, token }) => {const decodedToken = jsonwebtoken.verify(token!, secret, {algorithms: ["HS256"],});return decodedToken as JWT;},},callbacks: {// Add the required Hasura claims// https://hasura.io/docs/latest/graphql/core/auth/authentication/jwt/#the-specasync jwt({ token }) {return {...token,"https://hasura.io/jwt/claims": {"x-hasura-allowed-roles": ["user"],"x-hasura-default-role": "user","x-hasura-role": "user","x-hasura-user-id": token.sub,},};},// Add user ID to the sessionsession: async ({ session, token }) => {if (session?.user) {session.user.id = token.sub!;}return session;},},};export default NextAuth(authOptions);
Now when we log in our user will be saved to our database via Hasura, the JWT will be HS256 signed and populated with the needed custom claims, and our session has our user ID.
Query Hasura with user JWT
We will query Hasura with our user's JWT to fetch info about the user. Based on the permission rules we set up earlier a user can only see their record.
Replace pages/api/examples/protected.ts with our example:
// This is an example of to protect an API routeimport { getSession } from "next-auth/react";import type { NextApiRequest, NextApiResponse } from "next";import { getToken } from "next-auth/jwt";import { request, gql } from "graphql-request";export default async (req: NextApiRequest, res: NextApiResponse) => {const session = await getSession({ req });if (session) {const secret = process.env.NEXTAUTH_SECRET;const token = await getToken({req,secret,// Raw gives the un-decoded JWTraw: true,});const query = gql`query GetUserName($id: uuid!) {users_by_pk(id: $id) {name}}`;const { users_by_pk: user } = await request(process.env.HASURA_PROJECT_ENDPOINT!,query,{ id: session.user?.id },{ authorization: `Bearer ${token}` });res.send({content: `This is protected content. Your name is ${user.name}`,});} else {res.send({error:"You must be signed in to view the protected content on this page.",});}};
Testing It Out
Run the Next.js app with npm run dev. When you log in via Github and navigate to http://localhost:3000/protected and you should see your Github name!
 Build apps and APIs 10x faster
- Built-in authorization and caching
- 8x more performant than hand-rolled APIs